How to Replace your A/C Compressor DIY
 05-09-2011, 09:23 AM
#1
Audiworld Junior Member
Thread Starter

Join Date: Jul 2010
Location: snellville, GA
Posts: 15
Likes: 0
Received 0 Likes
on
0 Posts
Hi Guys, i haven't really posted here so i decided to post a DIY for my fellow AFC'ers. enjoy.
I’m in no way responsible if you fail to do this or for any injuries it may cause you. DO NOT attempt if you don’t feel comfortable as I’M IN NO WAY LIABLE for what could happen to you performing this how to on your own. Do this at your own risk.
The first thing you need to do before you attempt to remove your compressor is to vacuum all the Freon and make sure your system is empty. You need a special machine for this, DO NOT RELEASE IN THE AIR SINCE THIS GAS IS POISONOUS AND CAN HARM YOUR HEALTH OR EVEN KILL YOU IF YOU BREATH TOO MUCH OF IT. If you already had someone empty your system you got nothing to worry about.
Things you need for this specific how to are:
10mm socket
13mm socket
13mm elbow socket (the ones that twist while reaching an uncomfortable area)
17mm socket
T30 Bit
T40 Bit
1 Ľ wrench
A grinder ( I’ll explain)
Lots of man power and patience.
This How to was done on my 96 A4 2.8 though it’s a similar process to all 2.8 I believe, but don’t quote me on that. My compressor part number is a Denso compressor 4B0 260 205BX. You can find it online for like $350.00 new. You need to replace dryer if you are replacing compressor. I saw it at $40.00 in partsgeek.com.
Get your car on a stand and remove the bumper (there’s a how to some where online)
Here’s how your car would look like if you remove your bumper:
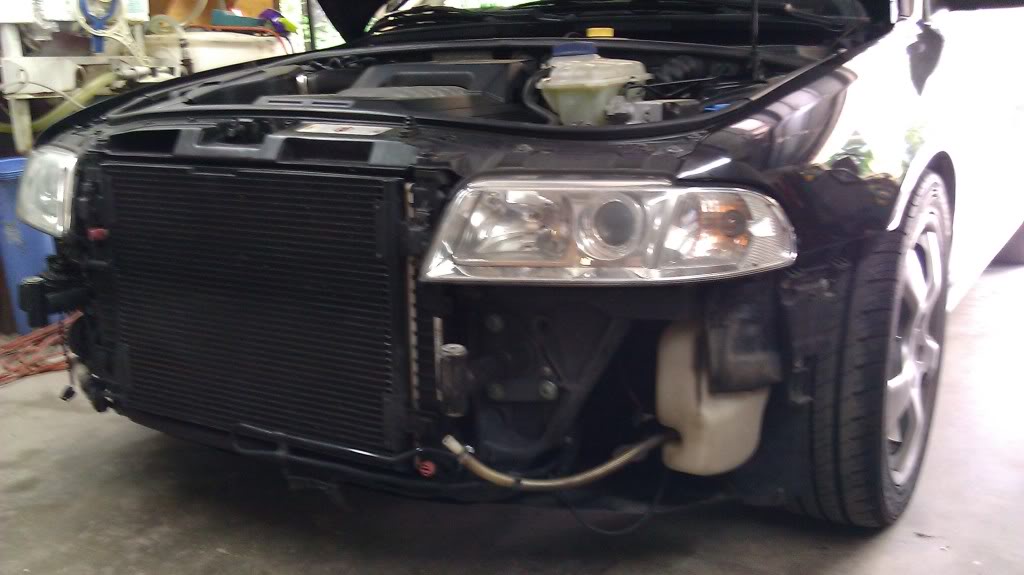
From the information I was able to gather there are two ways to perform this, either through the fron removing everything you see or from the bottom removing your oil filter. I chose removing my oil filter since I didn’t want to do a coolant flush.
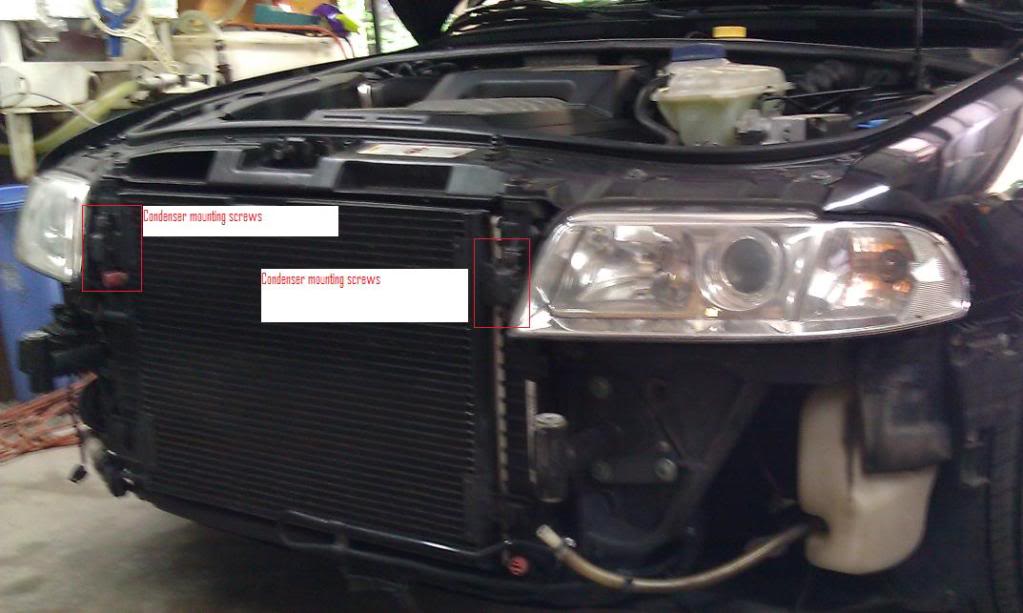
You’ll need to get the condenser out of the way by unbolting these screws and move them to the side.
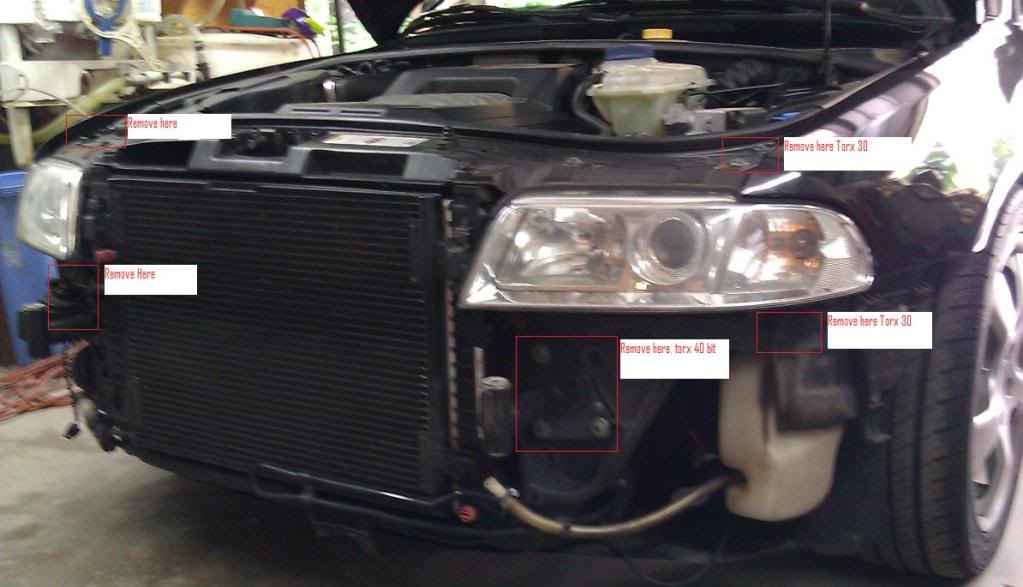
Move the front of the car more to the front. (I forget how this is called). By removing the following screws.
In order to move the front forward without falling on top of you, place the two long bumper bolts here.
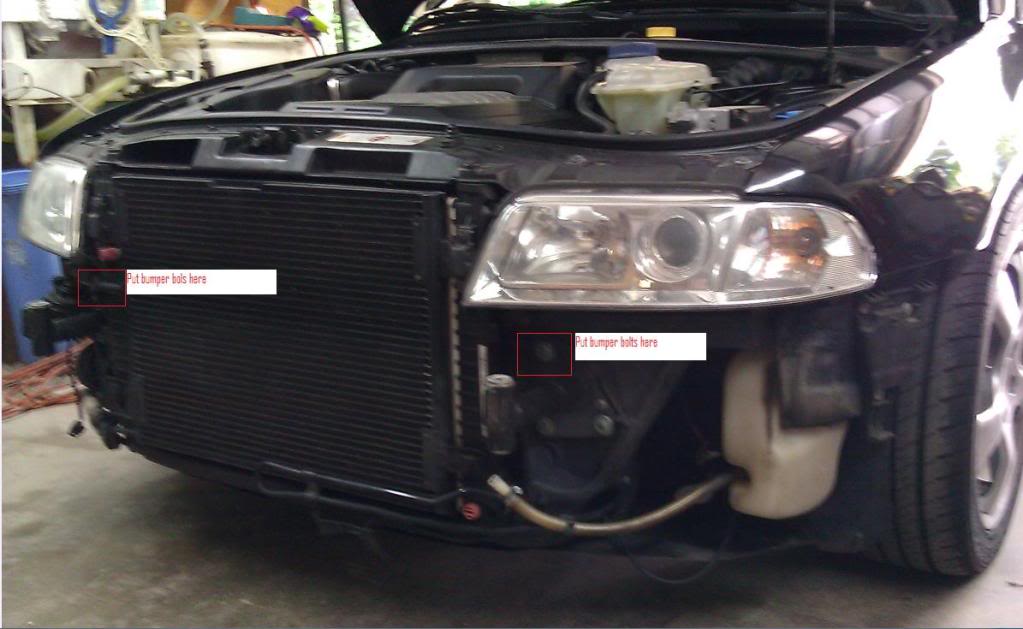
Once everything is in place you should move the front forward just slightly which is all you need. The bumper bolts will provide you the support you need to keep the front end in place, don’t force it too much since there’s always the possibility for the coolant lines to fall, and I’m sure we don’t want to do that.
Drain all your oil in an oil pan and remove your filter, it’s just like an oil change.
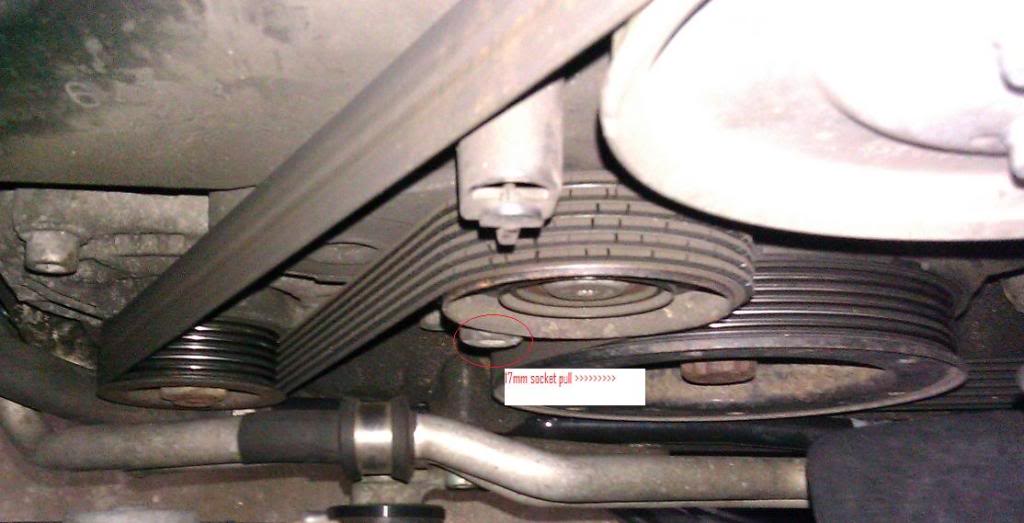
Reach from the top, while oil is draining, and remove the serpentine belt by pulling the tensioner to the right using a 17mm socket.
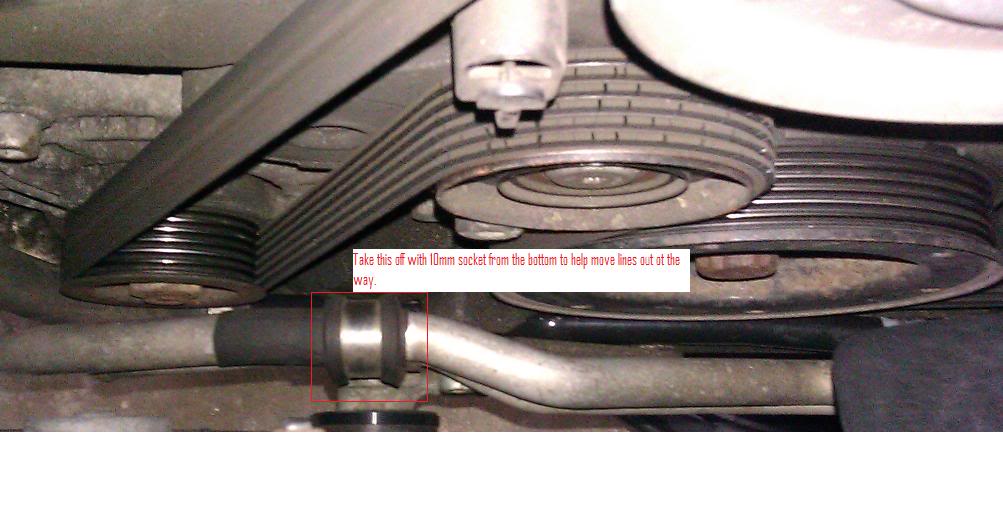
Go under the car and clean all the areas needed and make room as you need.
And remove this piece:
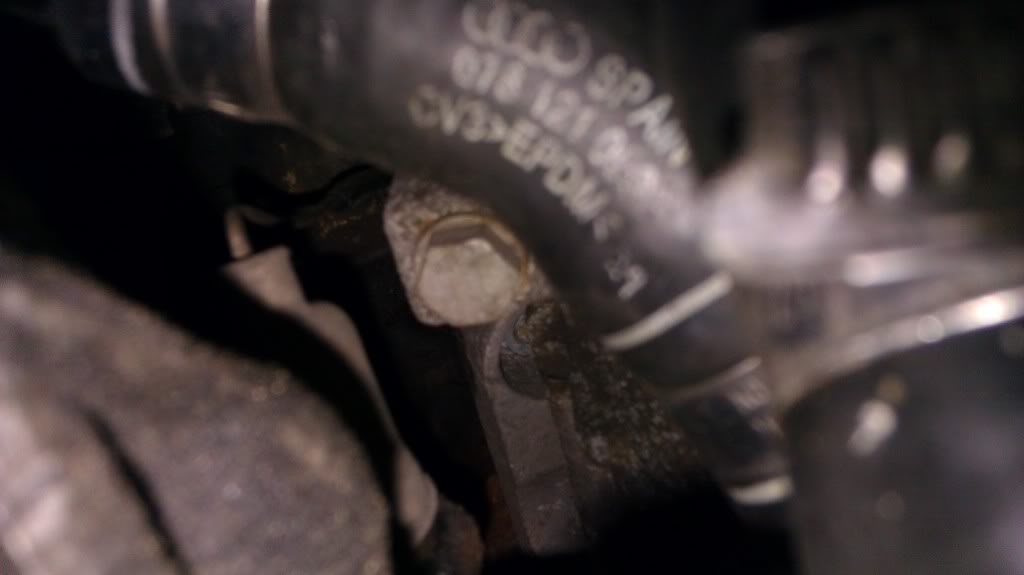
There are 3 screws holding the compressor, aside from the A/C lines. For this you’ll need the 13mm sockets. Two in front and one in the back.

One behind the oil cooler: you’ll need the 13mm elbow socket to get to it.
One on the back of the compressor

To remove the lines you need the t30 bit. The lines just pop off by pushing them up. Once all is taken off maneuver your way out, this is when you need some muscle resistance not strength… lol. The compressor does come out just be patient, its like a small puzzle. You just need to get the lines out of the way
This is what it looks like when compressor is off.
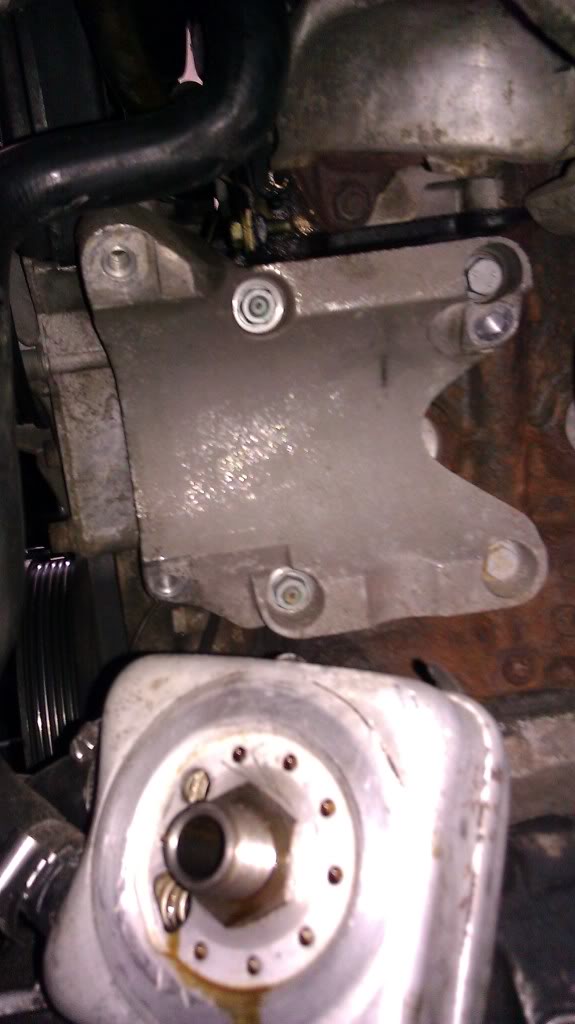
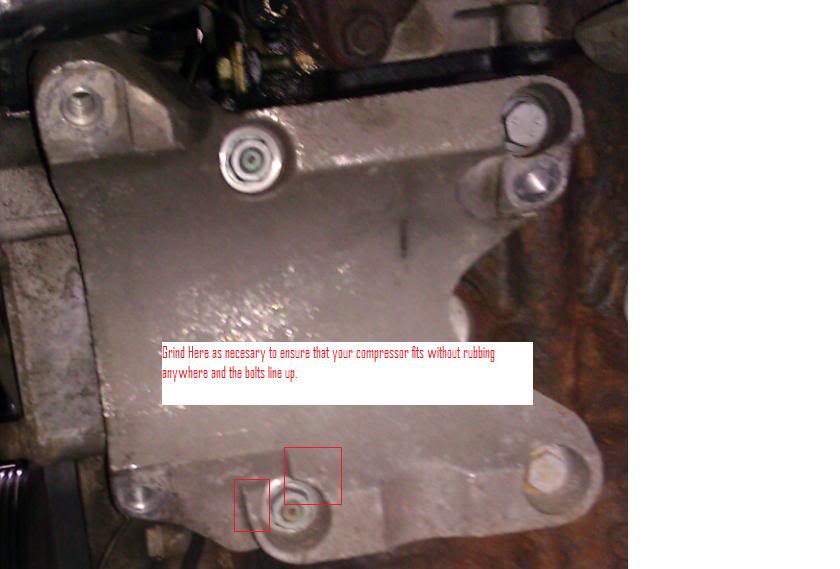
Remove the bracket with a 13mm socket and test fit your new compressor outside. You might need to grind this part to make sure everything lines up correctly; otherwise you’ll spend over 6 hours trying to fit a screw because nothing lines up. Believe me you’ll hate it; you’ll save a ton of time if you do this. Camera died by the time I figured this out so no picture of grounded part, sorry.
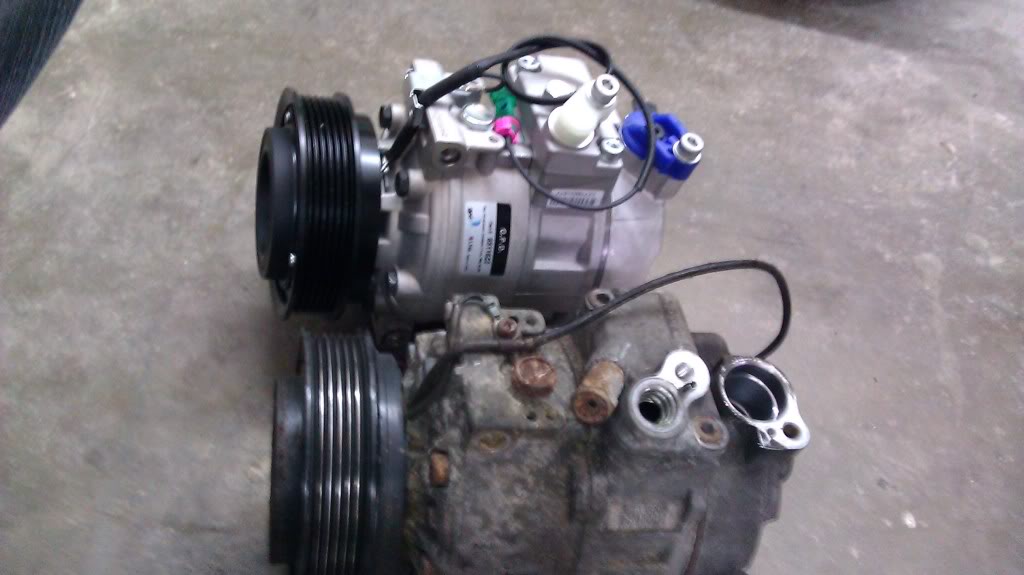
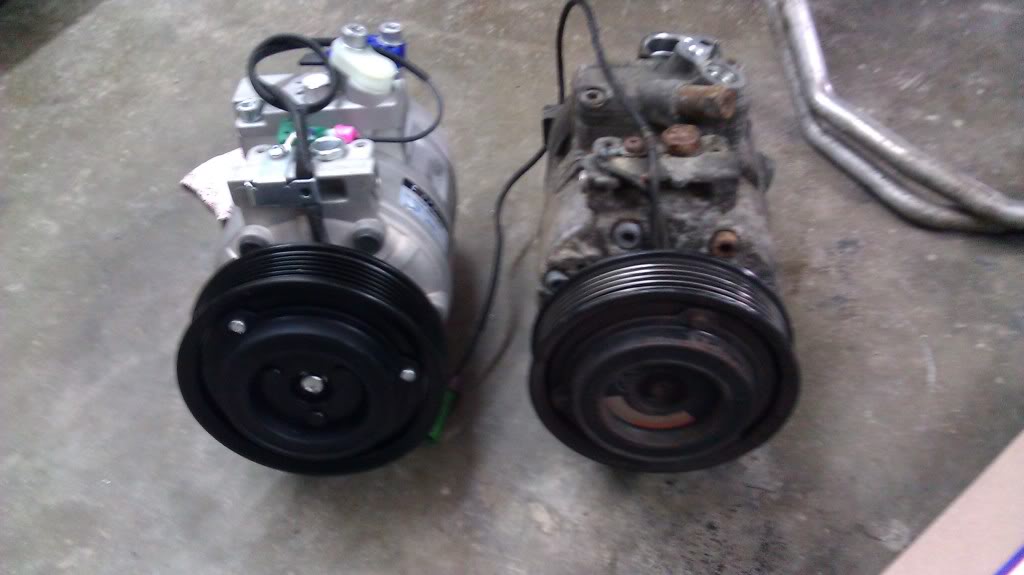
New compressor versus Old.
Then put bracket back in and bolt the compressor up and connect the AC lines and the line holding things.
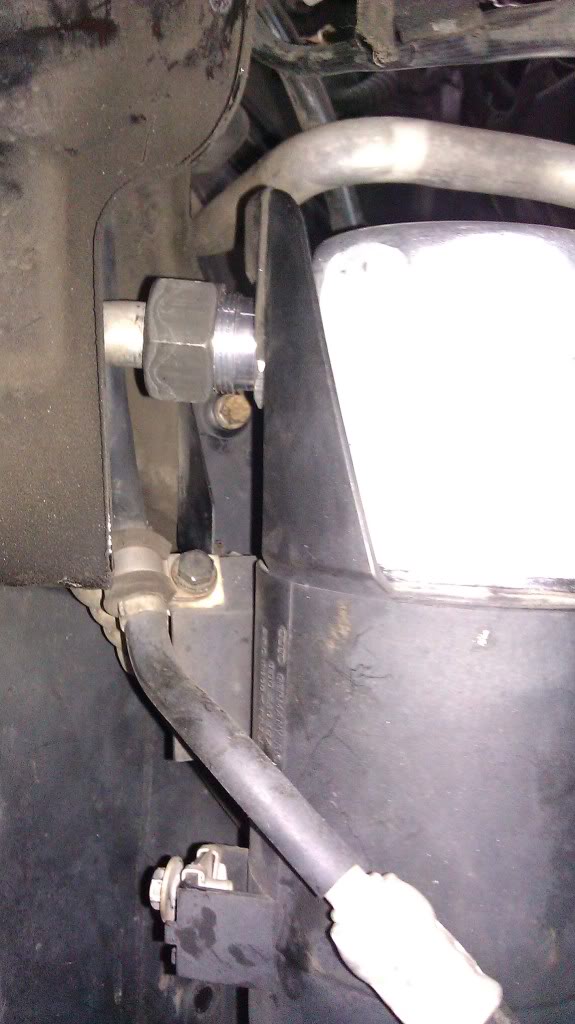
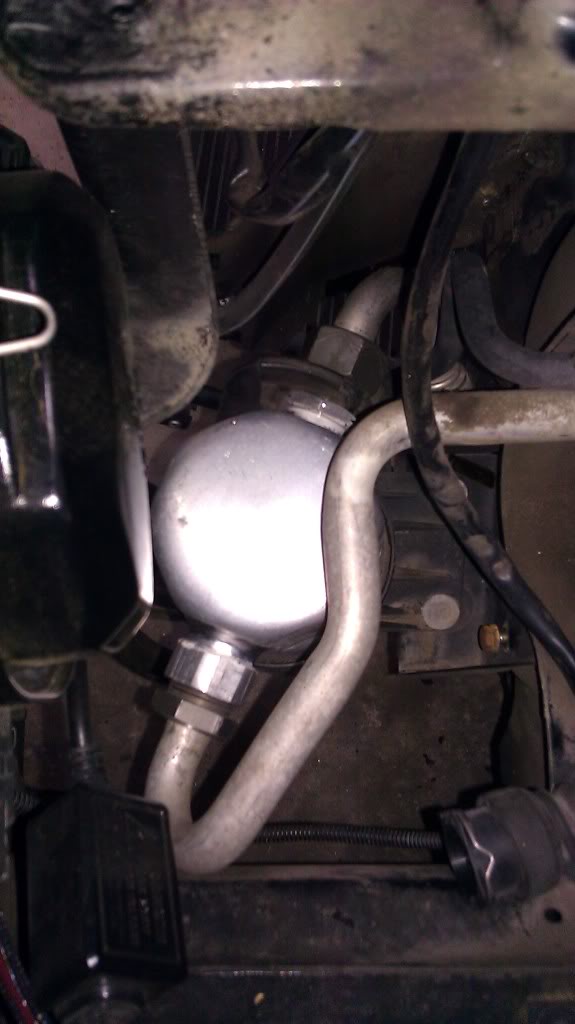
Now to the dryer:
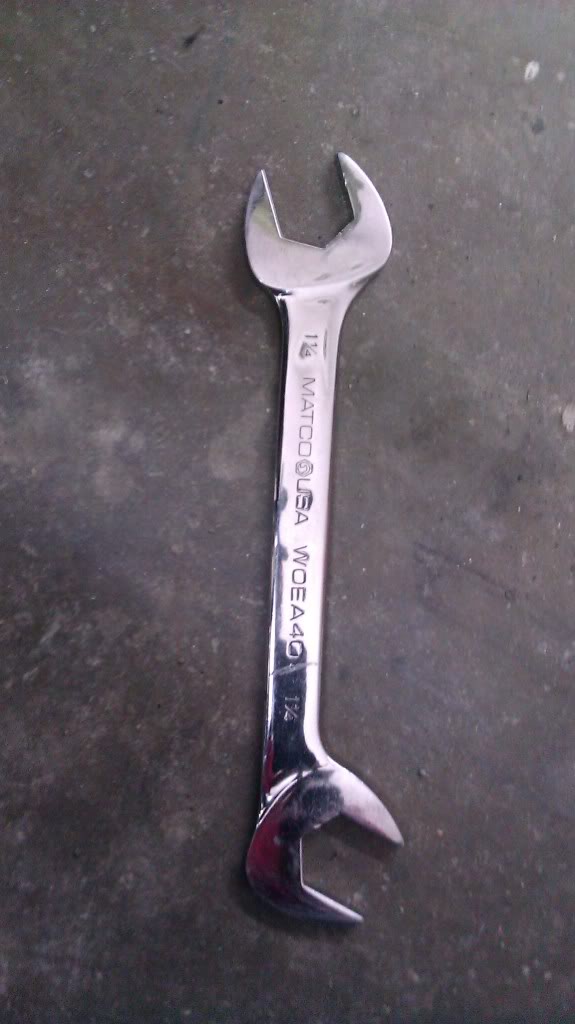
Remove dryer using this tool. 1 Ľ wrench. .

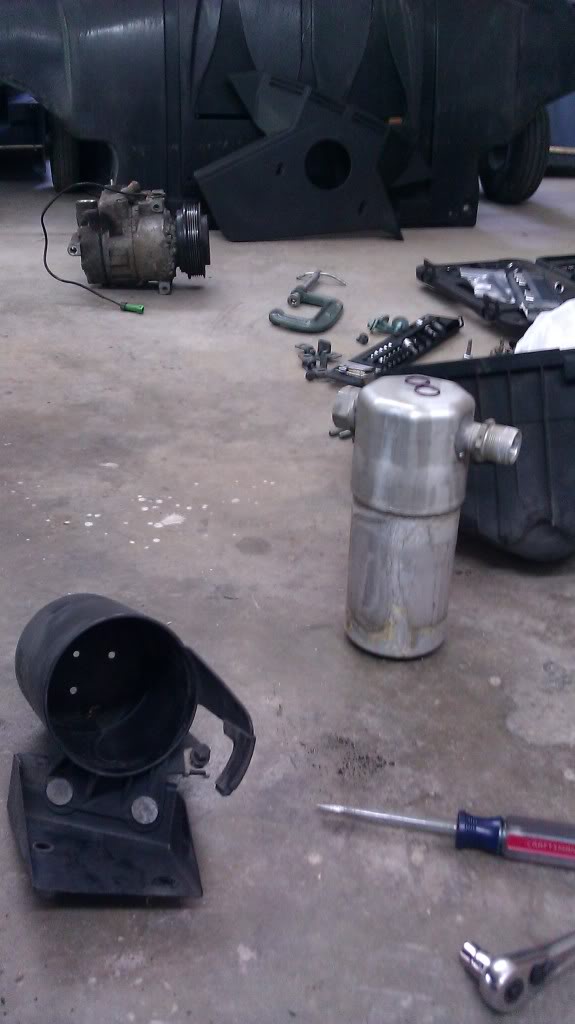
It will be a little hard to take the dryer out but that’s because of the rubber thing around it. Here’s the new dryer dressed up…

Put pocket back in and connect all the lines, don’t forget to use new O rings. To avoid any leaks in the system.
It was helpful to get the air filter box out of the way.
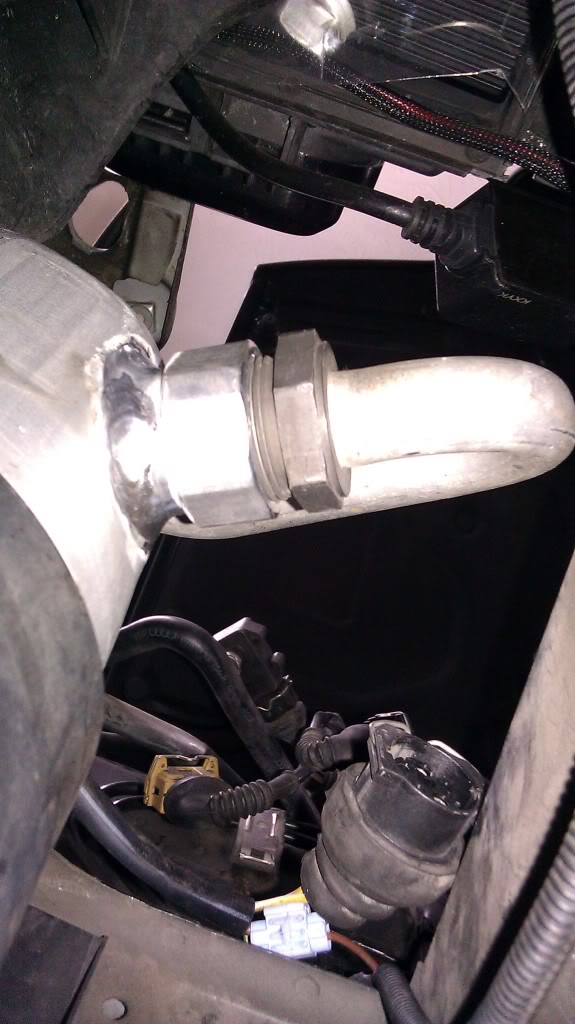
I didn’t get to take a picture of the orifice tube but you need to replace this piece as well with is behind the firewall, on the left side of the battery, NOT on the line where the low pressure sensor is. It’s not too hard to take it out.
After this you’re all done. I hope you know how to put it all back together…..lol
Just follow the instructions backwards without removing the dryer and compressor to put it all back together.
You need to vacuum your entire system and fill it with PAG oil and Freon. You’ll need a special machine since you can only fill through the high pressure fitting on the condenser. If you put a can in there it will blow up, from what I was told….
I hope this is helpful for anyone replacing their compressor. i tried searching for a how to and didnt find one anywhere.
How to Replace your AC Compressor
By Jose’s B5I’m in no way responsible if you fail to do this or for any injuries it may cause you. DO NOT attempt if you don’t feel comfortable as I’M IN NO WAY LIABLE for what could happen to you performing this how to on your own. Do this at your own risk.
The first thing you need to do before you attempt to remove your compressor is to vacuum all the Freon and make sure your system is empty. You need a special machine for this, DO NOT RELEASE IN THE AIR SINCE THIS GAS IS POISONOUS AND CAN HARM YOUR HEALTH OR EVEN KILL YOU IF YOU BREATH TOO MUCH OF IT. If you already had someone empty your system you got nothing to worry about.
Things you need for this specific how to are:
10mm socket
13mm socket
13mm elbow socket (the ones that twist while reaching an uncomfortable area)
17mm socket
T30 Bit
T40 Bit
1 Ľ wrench
A grinder ( I’ll explain)
Lots of man power and patience.
This How to was done on my 96 A4 2.8 though it’s a similar process to all 2.8 I believe, but don’t quote me on that. My compressor part number is a Denso compressor 4B0 260 205BX. You can find it online for like $350.00 new. You need to replace dryer if you are replacing compressor. I saw it at $40.00 in partsgeek.com.
Get your car on a stand and remove the bumper (there’s a how to some where online)
Here’s how your car would look like if you remove your bumper:
From the information I was able to gather there are two ways to perform this, either through the fron removing everything you see or from the bottom removing your oil filter. I chose removing my oil filter since I didn’t want to do a coolant flush.
You’ll need to get the condenser out of the way by unbolting these screws and move them to the side.
Move the front of the car more to the front. (I forget how this is called). By removing the following screws.
In order to move the front forward without falling on top of you, place the two long bumper bolts here.
Once everything is in place you should move the front forward just slightly which is all you need. The bumper bolts will provide you the support you need to keep the front end in place, don’t force it too much since there’s always the possibility for the coolant lines to fall, and I’m sure we don’t want to do that.
Drain all your oil in an oil pan and remove your filter, it’s just like an oil change.
Reach from the top, while oil is draining, and remove the serpentine belt by pulling the tensioner to the right using a 17mm socket.
Go under the car and clean all the areas needed and make room as you need.
And remove this piece:
There are 3 screws holding the compressor, aside from the A/C lines. For this you’ll need the 13mm sockets. Two in front and one in the back.
One behind the oil cooler: you’ll need the 13mm elbow socket to get to it.
One on the back of the compressor
To remove the lines you need the t30 bit. The lines just pop off by pushing them up. Once all is taken off maneuver your way out, this is when you need some muscle resistance not strength… lol. The compressor does come out just be patient, its like a small puzzle. You just need to get the lines out of the way
This is what it looks like when compressor is off.
Remove the bracket with a 13mm socket and test fit your new compressor outside. You might need to grind this part to make sure everything lines up correctly; otherwise you’ll spend over 6 hours trying to fit a screw because nothing lines up. Believe me you’ll hate it; you’ll save a ton of time if you do this. Camera died by the time I figured this out so no picture of grounded part, sorry.
New compressor versus Old.
Then put bracket back in and bolt the compressor up and connect the AC lines and the line holding things.
Now to the dryer:
Remove dryer using this tool. 1 Ľ wrench. .
It will be a little hard to take the dryer out but that’s because of the rubber thing around it. Here’s the new dryer dressed up…
Put pocket back in and connect all the lines, don’t forget to use new O rings. To avoid any leaks in the system.
It was helpful to get the air filter box out of the way.
I didn’t get to take a picture of the orifice tube but you need to replace this piece as well with is behind the firewall, on the left side of the battery, NOT on the line where the low pressure sensor is. It’s not too hard to take it out.
After this you’re all done. I hope you know how to put it all back together…..lol
Just follow the instructions backwards without removing the dryer and compressor to put it all back together.
You need to vacuum your entire system and fill it with PAG oil and Freon. You’ll need a special machine since you can only fill through the high pressure fitting on the condenser. If you put a can in there it will blow up, from what I was told….
I hope this is helpful for anyone replacing their compressor. i tried searching for a how to and didnt find one anywhere.
 06-03-2011, 10:43 AM
#2
AudiWorld Senior Member

Thank-you sir! I don't use my A/C but one day I would like to do a total system delete. I appreciate you putting this together.
08-01-2011, 11:17 AM
#3
AudiWorld Member

Join Date: Dec 2002
Posts: 143
Likes: 0
Received 0 Likes
on
0 Posts
If you can locate the low pressure cut out switch you can remove it and replace it with an adapter so that you can fill the system from the low-pressure side. The only other thing you will need to do is to jumper the low pressure switch so that the compressor will kick on.
 01-14-2020, 12:52 AM
#5
AudiWorld Newcomer

Join Date: Jan 2020
Posts: 1
Likes: 0
Received 0 Likes
on
0 Posts
Hey guys,
just made an account to post a possible alternate method of removing the AC compressor.
So I had a a4 b6 come into work for an ac compressor, and being a mainly jap tech found this thread which massive thumbs up, gave me an idea of what I was working with, but being in a busy workshop didn't quite have time to pull the front bar and everything off. I found by removing the oil filter, the mount, and the coolant lines I could easily get the compressor out and in. Only downsides were obviously having to replace and bleed coolant, and it was quite fiddly. Especially those darn metal coolant pipes.
So I removed the splash tray, then took off the oil filter, removed the little bend of rubber hose for coolant, the coolant lines running to the oil filter mount, took off the 13mm so the metal pipe could flex, and then could get straight to the compressor bolts and AC lines. With a little bit of wriggling got the compressor straight out and back in. Getting the little bend of hose back in was kind of a pain because of the factory spring clips, but I'm sure someone with more euro experience wouldn't have much trouble. Then it was just a matter of putting the hoses back and doing up the 13mm.
Was quite messy, even with a drainer underneath I still copped a fair bit of oil, AC dye, and coolant, but was fairly straightforward in terms of removing/refitting parts. Might help someone because I couldn't find any forum posts about this method.
Once again super informative and helpful post though, I wouldn't have been able to even start without finding this!
cheers
01-26-2020, 06:07 AM
#6
AudiWorld Newcomer

Join Date: Jan 2020
Posts: 3
Likes: 0
Received 0 Likes
on
0 Posts
Hi, I am from Argentina. I own a Q7 with a 4.2 fsi engine. The AC compressor has no belt. The technicians at the workshop are trying to remove the compressor because it has a worn seal and the freon gas leaks immeadiatly. Can you describe the procedure for dissmounting the AC compressor? I hace neumatic suspension too.
thanks un avance!!
Patrick
thanks un avance!!
Patrick

Thread
Thread Starter
Forum
Replies
Last Post
1999Audi
A4 (B5 Platform) Discussion
14
02-13-2011 06:21 AM
aerohr
Audi 5000 / 200 / V8 Discussion
3
07-20-2006 04:27 PM