
 08-15-2016, 10:52 AM
Last edit by: IB Advertising
See related guides and technical advice from our community experts:
- Audi A6 C5 How to Remove Headlight Assembly<br>Step by step instructions for do-it-yourself repairs.

HEADLIGHT ASSEMBLY REMOVAL
07-26-2009, 11:45 AM
#1
AudiWorld Member
Thread Starter

Join Date: Jul 2009
Posts: 2
Likes: 0
Received 0 Likes
on
0 Posts
I know this has probally been posted a million times but heres another...can any post pictures of exactly where the third screw is located on a 2002 a6 3.0 im having a hell of time trying to remove the headlight assembly on the passenger side because i cant find all the screws
 07-26-2009, 03:50 PM
#2
AudiWorld Member
Join Date: Feb 2009
Location: Southwestern - Ca
Posts: 497
Likes: 0
Received 0 Likes
on
0 Posts
Damn, I just found a picture too.. Its like a whole in the front assembly over the light. I its a 10mm, use an extension. I'll try to find that picture and post it
07-26-2009, 05:27 PM
#3
AudiWorld Expert
Here are a couple of reference pictures for you:
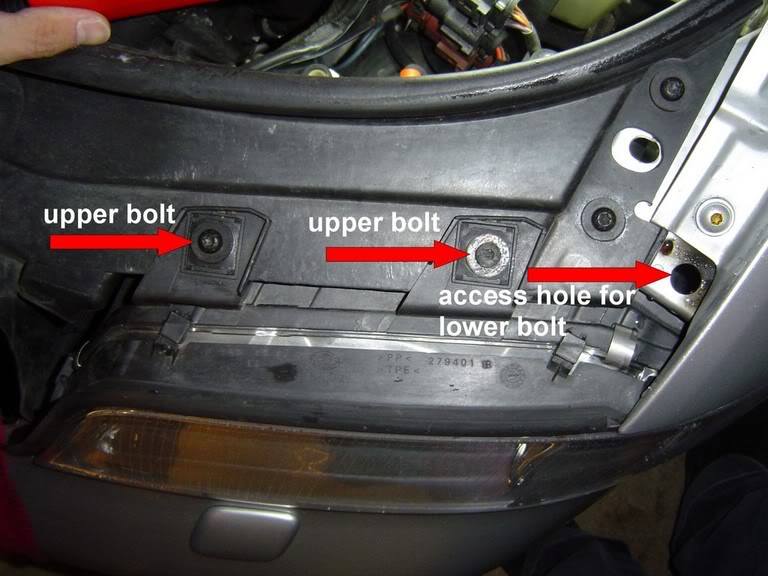
or better viewed here with the headlight removed...
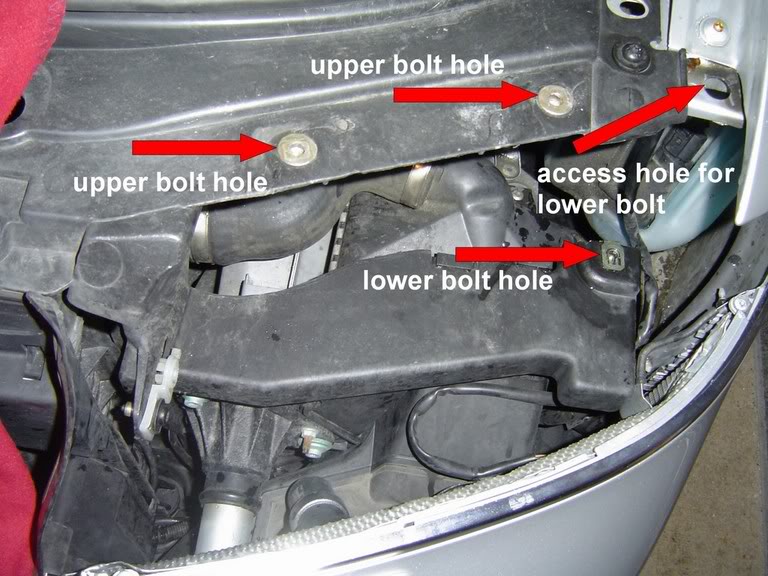
Note: This was for my 2001 2.7T, but I think your 2002 3.0 would be the same here. I did not remove the front bumper to get the headlight out, a friend of mine used a slim extension to reach the bolt. Some guys claim that it is easier accessed with the fender liner removed. I have not tried that, but it sounds reasonable. I bought the Calvan brand long torx drivers to reach now...those work great. Just search amazon.com for "calvan long torx"
or better viewed here with the headlight removed...
Note: This was for my 2001 2.7T, but I think your 2002 3.0 would be the same here. I did not remove the front bumper to get the headlight out, a friend of mine used a slim extension to reach the bolt. Some guys claim that it is easier accessed with the fender liner removed. I have not tried that, but it sounds reasonable. I bought the Calvan brand long torx drivers to reach now...those work great. Just search amazon.com for "calvan long torx"
07-27-2009, 11:45 AM
#5
AudiWorld Member
Thread Starter
Join Date: Jul 2009
Posts: 2
Likes: 0
Received 0 Likes
on
0 Posts
Here are a couple of reference pictures for you:

or better viewed here with the headlight removed...

Note: This was for my 2001 2.7T, but I think your 2002 3.0 would be the same here. I did not remove the front bumper to get the headlight out, a friend of mine used a slim extension to reach the bolt. Some guys claim that it is easier accessed with the fender liner removed. I have not tried that, but it sounds reasonable. I bought the Calvan brand long torx drivers to reach now...those work great. Just search amazon.com for "calvan long torx"
or better viewed here with the headlight removed...
Note: This was for my 2001 2.7T, but I think your 2002 3.0 would be the same here. I did not remove the front bumper to get the headlight out, a friend of mine used a slim extension to reach the bolt. Some guys claim that it is easier accessed with the fender liner removed. I have not tried that, but it sounds reasonable. I bought the Calvan brand long torx drivers to reach now...those work great. Just search amazon.com for "calvan long torx"
07-27-2009, 11:53 AM
#6
AudiWorld Expert
Only three bolts IIRC. The otehr place that secures the headlamp is the white plastic thing you can see in the lower left of the 2nd picture from my previous post. Usually you can just pry the peg out of the hole of the white plastic. You do not have to remove the bolt.
However, once the torx bolts are removed, it takes some jostling back and forth to angle the light out properly because the ballast (mounted on the bottom) sticks out too far below. I ahve never tried to take pictures of the remoavl, beacuse both hands are pretty busy maneuvering the headlamp out to stop and take pictures.
However, once the torx bolts are removed, it takes some jostling back and forth to angle the light out properly because the ballast (mounted on the bottom) sticks out too far below. I ahve never tried to take pictures of the remoavl, beacuse both hands are pretty busy maneuvering the headlamp out to stop and take pictures.
07-27-2009, 11:56 AM
#7
AudiWorld Expert
Before I had the long torx driver, we used a telescoping magnetic wand. The flat tip would securely hold the torx bolt (which we had to "affix" to the magnet uder the hole...in typical Audi fashion, the hole is too small for the rox bolt to fit into). We then just lowered the bolt into the hole and turned gently to start the thread. Once the bolt started tot hread, we could just pull up the magentic wand, and use the torx extension to complete the rest of the tightening.
Yes, it was a major PITA. That is why I opted to spend the $$ ont he long torx drivers instead, so the next time I need to do this, it will be easier.
Yes, it was a major PITA. That is why I opted to spend the $$ ont he long torx drivers instead, so the next time I need to do this, it will be easier.
Trending Topics
 08-08-2012, 02:36 PM
#9

OK, so, I guess the user up top who posted the steps which included the bumper cover removal, must work for Audi.
I couldn't quite make complete sense (initially) of the substitute instructions so I called Audi and spoke to one of the service writers.
I completely verified (according to Audi) the bumper does have to come off and a single light bulb repair would cost $400.00. So he was quick to add that 'naturally' we suggest going ahead to replace all of the bulbs at one time..
Cha-ching, the $400.00 bill just became $600.00.
No-f-ing way I said, that just can't be...
So I came back here and studied closely the steps here and compared them to my 2003 A6 Avant 3.0 Quattro (driver side).
Looked like a pretty close match so I go started.
I was successful but there are a few catches so I'd like to add a few comments please.
First, I just used standard tools.
In fact, I didn't have the right size torx, so I used a 4mm allen bit in a 1/4" drive socket head. with a 1/4 drive extension and ratchet, getting the third bolt out was a snap.
I had a bit of luck though because I had been reading the instructions for the A4 and they repeatedly mentioned only loosing the lower bolts (not removing them). So, all I did at first was loosen the lower bolt. Of course the assembly did not come out, but it was loose. This allowed me to discover that I could in fact reach my hand down and around the back and put my hand on the bolt. It was then I discovered I would have to remove the bolt entirely (because it is too long). But the lucky part was that since I could reach it, I could easily remove it from the back without any long grabber or magnetized tools.
So, once I had all three bolts out, I could wobble the assy pretty well, but it still would not let go of the "white plastic thing" mentioned above. The post which inserted into it from the headlight assy was too long. So, I just pulled extra hard and it came out.
However, the assy still would not come completely out. Well, maybe it would have if I finagled with it longer, but when it did not come all the way out easily, I looked at the back.
I could easily see the clips on he back of the light bulb cover.
I loosed both of the clips but the outboard one had to be completely removed in order to get the bulb back cover off the assy.
Once I had the back cover off, getting to the burned out low beam was easy enough.
However, a could of un-mentioned notes on the installation of the bulb which are not mentioned here.
BOTH the bulb and the retaining ring have alignment notches on them. It was too difficult to align without some investigation as to where the alignment notches actually needed to be.
When I had that figured out, I had to slid the retaining ring up and over my index finger and then hold the back of the bulb while I got its notches lined up and inserted. Then, I slid the retainer ring off my finger and over the back of the bulb and aligned it and twisted it back into place.
I plugged the cable back on the back of the bulb and quickly tested it and shazam it was working.
So I replaced the back cover on the assy, reinstalled the clips and locked them and I was ready to get it bolted back down.
The only thing I was concerned about was the lower bolt but that turned out to not be a problem at all.
Since the assy was already out of its normal position, I could easily get my hand behind it and insert the bolt into the hole, making sure not to let it drop all the way through.
Then I slowly wiggled the assy back into place while my hand was still holding the bolt. When I had the whole thing close, I stuck my long extension down through the access hole and used my fingers to get the bit into the torx head. Then I finished pushing it back into place and tightened it up. I thought my hand might then be stuck in place, but it came right out, no worries. Plus, I am not a small guy. 6'3 200 pound and my arms are thick, so most anybody ought to be able to manage the same thing.
So, there you have it for the 2003 A6 Avant 3.0 Drivers side.
Looks like there might be a couple of added complications on the passenger side, but still, it does not look like the bumper has to come off. lol.
$600.00 my ***...
$89.00 for the bulb at Autozone and a few minutes and it was done with some basic 1/4" drive tools.
I hope this helps somebody.
I assume the 2004 A6 is probably pretty close to the 2003.