Need to drain gas tank
 03-20-2015, 07:09 AM
#21
AudiWorld Super User

I once had to replace the fuel pump on a Toyota pickup. Siphoned a good portion of the fuel out just to make it a litle more managable but couldn't get it all out. Had to unstrap the tank and balance it on my chest as i lowered it to the floor noticed out of the corner of my eye the gleam of the pilot light of the furnace which was in the garage. Talk about seeing my life flash before my eyes ..... to use bad terminology. Whew! I quickly finished the job but without the pilot light on after a few prayers.
A friend of mine had her whole Honda Civic and their detached garage go up in flames when her father was replacing a fuel pump and the trouble light fell and broke igniting the spilled fuel. Luckily no one was hurt.
Couple of guys from my home town were driving an old pickup on a hot summer day. The old truck tended to get vapor lock and their fix was to reach outside the window and remove the gas cap(the caps use to be right behind the door on the pillar). A stray spark ignited the fumes and killed them both.
I know the last one is a little morbid ... BUT YOU CAN'T BE TOO CAREFUL!
OTOH, it could well be that vapor lock wasn't the real problem, but a non-vented gas cap that allowed vacuum to build up in the tank and slowing/stopping fuel flow to the fuel pump. Try that on your lawnmower�put a piece of plastic wrap under the tank cap�as the tank empties the engine will stop while there is still fuel in the tank because the gravity fuel feed is overcome by the vacuum in the gas tank.
 03-20-2015, 07:14 AM
#22
AudiWorld Super User
Isn't there an access panel in the trunk, too - at the top of the tank? If you siphon from there, spillage would be minor, even with a brimmed tank.
If you have a compressor or decent air pump available - "air out" the tank after draining and before going to work. Most of those fumes won't go anywhere without som circulation and slight pressure help. This will also reduce headaches while working and the smell lingering in the car, as you push the majority of the vapor out in one go.
If you really got the tank empty, consider cleaning out gunk and sediment at the bottom. Your new pump and fuel filter will love you for it.
03-20-2015, 07:18 AM
#23
AudiWorld Super User
Just to keep this information in front, here's what I did in January 2014. This is a copy of a post on another fuel pump replacement thread in AudiWorld.
......
Yes, the fuel pump was the problem! I've replaced it and the car started nearly instantly. It took just a couple seconds to pressurize the system with fuel when the new pump started.
Here are some details and observations for those of you who need to replace a fuel pump under the rear seat of a 2002 A6 or allroad.
First, read Robert Gedeon's 2006 Tech article entitled "Remove and Replace Factory Fuel Pump": AudiWorld Tech Articles. Bookmark its location so you can refer to it over and over again. Robert has done an exemplary job of documenting the fuel pump replacement procedure.
I will list in no particular order a number of things which caused me headaches and things which were easier than expected. Hopefully this adds to your understanding of the difficulty of the work involved.
----
I had to empty the fuel tank of nearly 17 gallons of fuel before I could remove the fuel pump. Since the fuel tank on the C5 allroad consists of several chambers and has different levels, emptying the fuel became the longest part of the job. The filler neck on my car had a screen inserted near the bottom of the neck. This prevented a siphon hose from entering the tank. And even if such a hose would be able to enter the tank, that hose would only reach the upper part of the tank, not the lower two chambers (one of which houses the fuel pump).
I had considered removing the fuel pump's retaining ring and letting the fuel spill out and around the tank onto the floor of my garage. But this seemed dangerous, messy, and smelly. So I used the multi-step procedure recommend by Audi to empty a full tank.
First I had to get a "transfer" pump. I had considered just using a length of PVC hose to "manually" siphon the fuel by sucking on the hose. But if you've ever tried this with gasoline, you already know it is a foolish procedure. Even the gasoline vapors which you inhale will be with you for days. And any fuel you pull into your mouth will be with you forever.
So I bought a really cheap transfer pump from Harbor Freight ($8). This was a piece of crap and I recommend that you use something...anything... better. Although I did use the Harbor Freight pump to complete the job, it literally fell apart at the very last moment, spilling a few ounces of fuel. And even during the hand pumping procedure, several ounces of fuel leaked around the pump's shaft. Get something else, please, when you do the work.
Anyway...back to removing the fuel from the tank...
First... Do use some sort of transfer pump to remove as much fuel via the filler neck as you can. I was able to get about a quart out via the filler neck before I was just pulling air. If you do not get this fuel out first, you risk having spillage when removing the fuel level sensor in the next step.
In the allroad, there are three fuel level sensors. One of them is accessed via a port in the trunk below the carpeting just behind the rear seat back. The carpeting is glued to a flip up stiffener board. To lift the carpet, remove the two tie-down buckles behind the rear seat backs (two phillips screws each), lean the two seat backs forward to free up the trapped carpet edge and flip the carpet/stiffener board back toward the rear of the car. You do not need to lift the carpeted spare tire cover.
The fuel level sensor is below a cover plate nearly identical to the one Robert Gedeon shows in his DIY. Before removing the plate note the orientation of the raised portion so you can reinstall it properly. Under the plate is the access point for the fuel sensor. The sensor is sealed to the fuel tank with a large retaining "cap/ring" and a rubber gasket sealing it to the fuel tank. (This is somewhat like a Mason jar used for canning fruit.) Unscrewing the 3.5" or so diameter cap/retaining ring is best accomplished with a special tool which grabs two or more ridges on the outer edge of the ring. I bought such a tool on Amazon for about $28 ("Lisle 63000 Fuel Tank Lock Ring Tool). This tool worked, but the spacing between the two jaws could not be reduced enough without reversing one of the jaws making the tool non-symmetrical. Still, it worked.
Once the retaining cap was off, the fuel level sensor could be very gingerly removed, giving me full access to the upper tank chamber and, via surreptitious routes, to the lower chambers. Nevertheless, siphoning the fuel was still a PITA. The fuel tank's lower chambers are accessible via the right and left sides of the upper chamber. I was able to wiggle a length of 7/16" clear PVC hose into the tank's left side chamber with some trial and error...it took several attempts, but the hose finally found its way to the left side chamber below the rear seat. The 7/16" PVC hose was fitted to the Harbor Freight's original hose, making the transfer pump's input hose about 12' long (instead of the 4' length provided). The pump was located outside the vehicle in this manner.
Finding the right location to "push" the PVC hose into the fuel tank is extremely difficult because you are working somewhat blind and the hose has a natural curl to it. Using a stiffer hose would likely be easier to an extent, but then it wouldn't snake its way into the lower chamber as easily. Every time I thought the hose was in place, I used the transfer pump only to discover it was sucking air. Moving the hose in and about the tank did not reveal where it was, so this whole procedure was trial and error. When I finally snaked the hose into the left chamber and started pumping, I was able to extract about 9.5 gallons into a portable gasoline can I had (the gas can held five gallons - I nearly filled it twice). I then put the fuel into my other car which had a nearly empty tank (this was planned).
So now the left chamber was empty. But the fuel pump is in the right chamber and I wasn't sure if the fuel from that chamber would naturally level itself by flowing slowly into the left chamber. So I needed to also empty the right chamber to be safe.
Snaking the hose into the lower left fuel chamber was difficult. Snaking the hose into the lower right fuel chamber (where the fuel pump resides) was nearly impossible. It took at least 15 attempts, but I finally pushed and twisted the hose in just the right way and - success - the hose found its way along a convoluted path and into the lower right chamber.
I removed nearly 7 gallons of fuel from the right chamber. And kudos to my spouse (my helper in all of this) for mentioning one important thing: "Save the last couple gallons in the transfer fuel tank to put back into the Audi when the job is finished." Thank you, Sheila!
All in all, I pumped the piece o' crap Harbor Freight transfer pump over 500 times to extract the approximate 17 gallons of fuel. My arms were very sore.
At this point I reinstalled the fuel level sensor in the trunk (I reused the original rubber sealing gasket below the cover). I will acknowledge the fact that doing this work in a sedan would have itself been so confining that anyone with claustrophobia would go crazy. Reinstalling the fuel level sensor must be done with great care. You must not bend the float arm. I suggest you look around for a DIY on doing this so no damage is done as you push and twist the sensor end. Note the embossed "arrows" which need to be aligned. One arrow (actually only half an arrow) is on the nylon sensor cover, and the other arrow (also a half arrow) is on the fuel tank top as it angles downward to the attachment location for the fuel sensor. There may be a bit of blue paint helping to identify the arrow embossed into the fuel tank.
From here on, I followed Robert Gedeon's DIY with the following differences:
I used a new VDO pump ($256 delivered) exactly like the original one in the vehicle. As such I did not need to do any electrical splicing. (I have found that Airtex has a perfect match to the OE VDO pump for a great price (~$160 to $180, sold via AutoZone, CarQuest, Advanced Auto Parts, PartsGeek, Amazon, etc)...see the Airtex Fuel Pump Module Assembly p/n E8384M.)
The return fuel line inside the new VDO pump was included below the pump cover. This exactly matched the original pump setup. This meant I did not need to remove and replace the Oetiker hose clamp (11.9 mm) which Robert had to do. (Here's Robert's photo showing the internal return line (large circle) connection point. Robert needed to remove this connection because his pump did not include the hose attached there. I reproduced the image without his permission so I hope the link remains.)
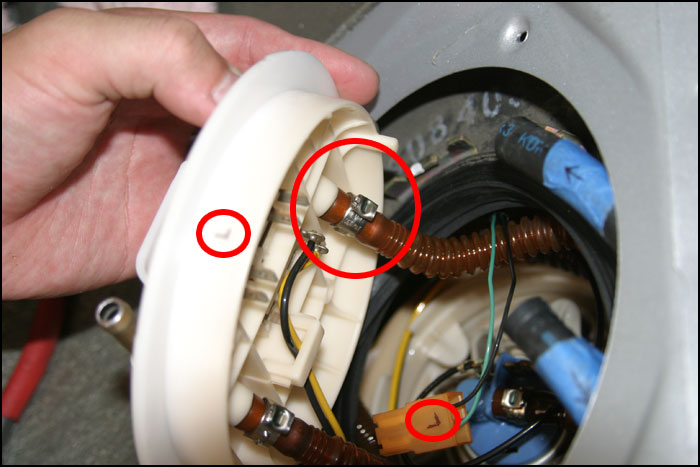
Instead, I removed the snapped-on coupler from the other end of that hose where it attached to a distribution manifold attached to the side of the fuel pump basket (I think it's called a distribution manifold...I'll confirm and edit later to clarify this step and include a drawing from Bentley. I followed Bentley's description to remove the manifold by pushing it to the left side of the vehicle and pulling up. Surprisingly it was easy to do even though I was working blindly with my hand in the fuel tank, eliminating any chance of seeing what I was doing!)
Make note of the orientation of the fuel pump as it sits in the basket...the outgoing hose at the top of the pump points to the front of the vehicle. Look at Roberts Gedeon's photos to confirm this.
Rotating the pump itself to unhook it from the basket using Robert Gedeon's recommended method of two crossed screw drivers was a breeze. Thank, you Robert! Installing the new pump into the basket was accomplished with just a twist by my fingers. This was so easy that it concerned me...it was too easy. After the pump snapped into place I wiggled and lifted...the pump was where it should be and it was firmly in place.
The two electrical connectors under the fuel pump cover can be mistakenly installed the wrong way. BE VERY CAREFUL HERE. I actually had to use one of the photos from Robert Gedeon to confirm the proper position of the connectors. It wasn't whether the brown or black connectors were reversed, it was the orientation of the connectors in each of their respective snapped in position. I noted that the green insulated wire was on the outside in both cases. Here's Robert's photo (reproduced without his permission so I hope the link remains).
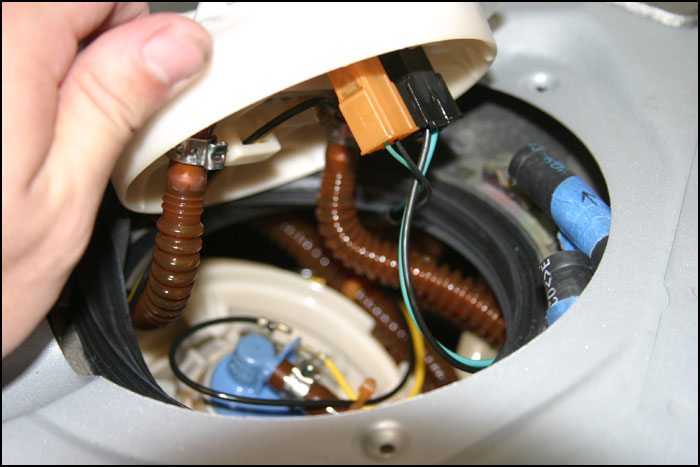
Locating the various hoses and wires did take some time as I positioned the fuel pump cover. My only advice here is to take your time and consider how everything will be positioned as the parts are installed.
I did replace the large rubber gasket seal for the fuel pump cover. The original was black in color, whereas the replacement was orange. The part number was 1J0-919-133-B. This part is common to all manner of VW vehicle's so I bought it from the local VW dealer for $10.
The two Oetiker clamps I used to re-attach the feed and return fuel lines to the outside connection of the fuel pump were 14.8 mm in size (Oetiker style PG-167 item #16700014 ; Ref #014.8-706R). The dealer charged me $2 each for these two clamps (a bit too high in my opinion). The tool I used to crimp the ears on the clamps was an inexpensive tile nipper I already owned (from Home Depot - sorry, can't recall the price, but definitely cheaper than an Oetiker crimping tool) and it worked perfect because the nipping teeth edges are not particularly sharp.
I used lots of paper towels to clean up fuel spills immediately. Gasoline immediately attacks the sound deadening material adhered to the metal supporting the rear seat.
When I initially lifted the rear seat from its normal secured position, my yanking broke three of the four "grommet" clips snapped into the metal of the seat support. I replaced these after completing the pump install. The grommet part number is 4B0-886-373-01C at $2.70 each. I also lubricated the four rear seat metal loops/hooks which snap into the grommets. I used my favorite grease for such things...Krytox.
When re-installing the rear seat, I spent a very long time dressing the wires for the seat heaters. I did not want the wires to be pinched or trapped and broken when the seat was finally in place and someone sat down. I suggest you note that the wires probably indented the foam support a bit where they had been located and position the wires in the same location again. As you rotate the seat into its horizontal position take particular care at the outer edges to assure the wires are not snagged by the metal seat support. I spent many minutes making sure I did not initiate a future electrical short here.
If I think of anything else, I'll update this post later.
Good luck to all of you who attempt a new fuel pump install. I rate it as a 7 on the difficulty scale from 1 - 10 just because of the fuel mess. And I hope you are as lucky as I was to have this happen when the allroad was at home when the pump failed... and better yet I hope you can do the work outside when the weather is more amenable than the 38 degrees Fahrenheit in which I was working.
......
Yes, the fuel pump was the problem! I've replaced it and the car started nearly instantly. It took just a couple seconds to pressurize the system with fuel when the new pump started.
Here are some details and observations for those of you who need to replace a fuel pump under the rear seat of a 2002 A6 or allroad.
First, read Robert Gedeon's 2006 Tech article entitled "Remove and Replace Factory Fuel Pump": AudiWorld Tech Articles. Bookmark its location so you can refer to it over and over again. Robert has done an exemplary job of documenting the fuel pump replacement procedure.
I will list in no particular order a number of things which caused me headaches and things which were easier than expected. Hopefully this adds to your understanding of the difficulty of the work involved.
----
I had to empty the fuel tank of nearly 17 gallons of fuel before I could remove the fuel pump. Since the fuel tank on the C5 allroad consists of several chambers and has different levels, emptying the fuel became the longest part of the job. The filler neck on my car had a screen inserted near the bottom of the neck. This prevented a siphon hose from entering the tank. And even if such a hose would be able to enter the tank, that hose would only reach the upper part of the tank, not the lower two chambers (one of which houses the fuel pump).
I had considered removing the fuel pump's retaining ring and letting the fuel spill out and around the tank onto the floor of my garage. But this seemed dangerous, messy, and smelly. So I used the multi-step procedure recommend by Audi to empty a full tank.
First I had to get a "transfer" pump. I had considered just using a length of PVC hose to "manually" siphon the fuel by sucking on the hose. But if you've ever tried this with gasoline, you already know it is a foolish procedure. Even the gasoline vapors which you inhale will be with you for days. And any fuel you pull into your mouth will be with you forever.
So I bought a really cheap transfer pump from Harbor Freight ($8). This was a piece of crap and I recommend that you use something...anything... better. Although I did use the Harbor Freight pump to complete the job, it literally fell apart at the very last moment, spilling a few ounces of fuel. And even during the hand pumping procedure, several ounces of fuel leaked around the pump's shaft. Get something else, please, when you do the work.
Anyway...back to removing the fuel from the tank...
First... Do use some sort of transfer pump to remove as much fuel via the filler neck as you can. I was able to get about a quart out via the filler neck before I was just pulling air. If you do not get this fuel out first, you risk having spillage when removing the fuel level sensor in the next step.
In the allroad, there are three fuel level sensors. One of them is accessed via a port in the trunk below the carpeting just behind the rear seat back. The carpeting is glued to a flip up stiffener board. To lift the carpet, remove the two tie-down buckles behind the rear seat backs (two phillips screws each), lean the two seat backs forward to free up the trapped carpet edge and flip the carpet/stiffener board back toward the rear of the car. You do not need to lift the carpeted spare tire cover.
The fuel level sensor is below a cover plate nearly identical to the one Robert Gedeon shows in his DIY. Before removing the plate note the orientation of the raised portion so you can reinstall it properly. Under the plate is the access point for the fuel sensor. The sensor is sealed to the fuel tank with a large retaining "cap/ring" and a rubber gasket sealing it to the fuel tank. (This is somewhat like a Mason jar used for canning fruit.) Unscrewing the 3.5" or so diameter cap/retaining ring is best accomplished with a special tool which grabs two or more ridges on the outer edge of the ring. I bought such a tool on Amazon for about $28 ("Lisle 63000 Fuel Tank Lock Ring Tool). This tool worked, but the spacing between the two jaws could not be reduced enough without reversing one of the jaws making the tool non-symmetrical. Still, it worked.
Once the retaining cap was off, the fuel level sensor could be very gingerly removed, giving me full access to the upper tank chamber and, via surreptitious routes, to the lower chambers. Nevertheless, siphoning the fuel was still a PITA. The fuel tank's lower chambers are accessible via the right and left sides of the upper chamber. I was able to wiggle a length of 7/16" clear PVC hose into the tank's left side chamber with some trial and error...it took several attempts, but the hose finally found its way to the left side chamber below the rear seat. The 7/16" PVC hose was fitted to the Harbor Freight's original hose, making the transfer pump's input hose about 12' long (instead of the 4' length provided). The pump was located outside the vehicle in this manner.
Finding the right location to "push" the PVC hose into the fuel tank is extremely difficult because you are working somewhat blind and the hose has a natural curl to it. Using a stiffer hose would likely be easier to an extent, but then it wouldn't snake its way into the lower chamber as easily. Every time I thought the hose was in place, I used the transfer pump only to discover it was sucking air. Moving the hose in and about the tank did not reveal where it was, so this whole procedure was trial and error. When I finally snaked the hose into the left chamber and started pumping, I was able to extract about 9.5 gallons into a portable gasoline can I had (the gas can held five gallons - I nearly filled it twice). I then put the fuel into my other car which had a nearly empty tank (this was planned).
So now the left chamber was empty. But the fuel pump is in the right chamber and I wasn't sure if the fuel from that chamber would naturally level itself by flowing slowly into the left chamber. So I needed to also empty the right chamber to be safe.
Snaking the hose into the lower left fuel chamber was difficult. Snaking the hose into the lower right fuel chamber (where the fuel pump resides) was nearly impossible. It took at least 15 attempts, but I finally pushed and twisted the hose in just the right way and - success - the hose found its way along a convoluted path and into the lower right chamber.
I removed nearly 7 gallons of fuel from the right chamber. And kudos to my spouse (my helper in all of this) for mentioning one important thing: "Save the last couple gallons in the transfer fuel tank to put back into the Audi when the job is finished." Thank you, Sheila!
All in all, I pumped the piece o' crap Harbor Freight transfer pump over 500 times to extract the approximate 17 gallons of fuel. My arms were very sore.
At this point I reinstalled the fuel level sensor in the trunk (I reused the original rubber sealing gasket below the cover). I will acknowledge the fact that doing this work in a sedan would have itself been so confining that anyone with claustrophobia would go crazy. Reinstalling the fuel level sensor must be done with great care. You must not bend the float arm. I suggest you look around for a DIY on doing this so no damage is done as you push and twist the sensor end. Note the embossed "arrows" which need to be aligned. One arrow (actually only half an arrow) is on the nylon sensor cover, and the other arrow (also a half arrow) is on the fuel tank top as it angles downward to the attachment location for the fuel sensor. There may be a bit of blue paint helping to identify the arrow embossed into the fuel tank.
From here on, I followed Robert Gedeon's DIY with the following differences:
I used a new VDO pump ($256 delivered) exactly like the original one in the vehicle. As such I did not need to do any electrical splicing. (I have found that Airtex has a perfect match to the OE VDO pump for a great price (~$160 to $180, sold via AutoZone, CarQuest, Advanced Auto Parts, PartsGeek, Amazon, etc)...see the Airtex Fuel Pump Module Assembly p/n E8384M.)
The return fuel line inside the new VDO pump was included below the pump cover. This exactly matched the original pump setup. This meant I did not need to remove and replace the Oetiker hose clamp (11.9 mm) which Robert had to do. (Here's Robert's photo showing the internal return line (large circle) connection point. Robert needed to remove this connection because his pump did not include the hose attached there. I reproduced the image without his permission so I hope the link remains.)
Instead, I removed the snapped-on coupler from the other end of that hose where it attached to a distribution manifold attached to the side of the fuel pump basket (I think it's called a distribution manifold...I'll confirm and edit later to clarify this step and include a drawing from Bentley. I followed Bentley's description to remove the manifold by pushing it to the left side of the vehicle and pulling up. Surprisingly it was easy to do even though I was working blindly with my hand in the fuel tank, eliminating any chance of seeing what I was doing!)
Make note of the orientation of the fuel pump as it sits in the basket...the outgoing hose at the top of the pump points to the front of the vehicle. Look at Roberts Gedeon's photos to confirm this.
Rotating the pump itself to unhook it from the basket using Robert Gedeon's recommended method of two crossed screw drivers was a breeze. Thank, you Robert! Installing the new pump into the basket was accomplished with just a twist by my fingers. This was so easy that it concerned me...it was too easy. After the pump snapped into place I wiggled and lifted...the pump was where it should be and it was firmly in place.
The two electrical connectors under the fuel pump cover can be mistakenly installed the wrong way. BE VERY CAREFUL HERE. I actually had to use one of the photos from Robert Gedeon to confirm the proper position of the connectors. It wasn't whether the brown or black connectors were reversed, it was the orientation of the connectors in each of their respective snapped in position. I noted that the green insulated wire was on the outside in both cases. Here's Robert's photo (reproduced without his permission so I hope the link remains).
Locating the various hoses and wires did take some time as I positioned the fuel pump cover. My only advice here is to take your time and consider how everything will be positioned as the parts are installed.
I did replace the large rubber gasket seal for the fuel pump cover. The original was black in color, whereas the replacement was orange. The part number was 1J0-919-133-B. This part is common to all manner of VW vehicle's so I bought it from the local VW dealer for $10.
The two Oetiker clamps I used to re-attach the feed and return fuel lines to the outside connection of the fuel pump were 14.8 mm in size (Oetiker style PG-167 item #16700014 ; Ref #014.8-706R). The dealer charged me $2 each for these two clamps (a bit too high in my opinion). The tool I used to crimp the ears on the clamps was an inexpensive tile nipper I already owned (from Home Depot - sorry, can't recall the price, but definitely cheaper than an Oetiker crimping tool) and it worked perfect because the nipping teeth edges are not particularly sharp.
I used lots of paper towels to clean up fuel spills immediately. Gasoline immediately attacks the sound deadening material adhered to the metal supporting the rear seat.
When I initially lifted the rear seat from its normal secured position, my yanking broke three of the four "grommet" clips snapped into the metal of the seat support. I replaced these after completing the pump install. The grommet part number is 4B0-886-373-01C at $2.70 each. I also lubricated the four rear seat metal loops/hooks which snap into the grommets. I used my favorite grease for such things...Krytox.
When re-installing the rear seat, I spent a very long time dressing the wires for the seat heaters. I did not want the wires to be pinched or trapped and broken when the seat was finally in place and someone sat down. I suggest you note that the wires probably indented the foam support a bit where they had been located and position the wires in the same location again. As you rotate the seat into its horizontal position take particular care at the outer edges to assure the wires are not snagged by the metal seat support. I spent many minutes making sure I did not initiate a future electrical short here.
If I think of anything else, I'll update this post later.
Good luck to all of you who attempt a new fuel pump install. I rate it as a 7 on the difficulty scale from 1 - 10 just because of the fuel mess. And I hope you are as lucky as I was to have this happen when the allroad was at home when the pump failed... and better yet I hope you can do the work outside when the weather is more amenable than the 38 degrees Fahrenheit in which I was working.
03-23-2015, 05:10 AM
#24
AudiWorld Member

Join Date: Dec 2014
Location: Norway
Posts: 150
Likes: 0
Received 0 Likes
on
0 Posts
If you're unable to drain the tank properly though, you really should displace the air in there with a non-toxic inert gas. If not, at some point the oxygen/fuel vapor mix IS going to get potentially highly explosive.
Please be warned when using nitrogen to displace oxygen in a work subject like this - while inert, it will do its job - displace oxygen. Unless an additive is applied, nitrogen is odorless. colorless, tasteless and non-irritating. This means, while you're hovering above your fuel tank, the gas will give no warning as to your asphyxiation - so adding to any toxic fuel vapors, listen EXTRA carefully to your body. If you pass out from asphyxiation, face down in that nitrogen-filled tank - thats it. Nitrogen is lighter than oxygen, too (albeit barely) - so if you're taking your time and don't have a meter, remember to "top it off", oxygen will return to the tank given time.
03-23-2015, 10:19 AM
#25
AudiWorld Super User
I really wasn't suggesting you pump a little bit of air into the tank, as some critically dangerous stoichiometry exercise. Airing out the tank after draining, is not a problem if you are careful about your surroundings - you're much more likely to to have it blow up in your face if you "just" drain and then go to work. Boom-factor wise, the most dangerous tank to work on is usually an empty or nearly empty one. The point here is to properly air it out when the tank is empty.
If you're unable to drain the tank properly though, you really should displace the air in there with a non-toxic inert gas. If not, at some point the oxygen/fuel vapor mix IS going to get potentially highly explosive.
Please be warned when using nitrogen to displace oxygen in a work subject like this - while inert, it will do its job - displace oxygen. Unless an additive is applied, nitrogen is odorless. colorless, tasteless and non-irritating. This means, while you're hovering above your fuel tank, the gas will give no warning as to your asphyxiation - so adding to any toxic fuel vapors, listen EXTRA carefully to your body. If you pass out from asphyxiation, face down in that nitrogen-filled tank - thats it. Nitrogen is lighter than oxygen, too (albeit barely) - so if you're taking your time and don't have a meter, remember to "top it off", oxygen will return to the tank given time.
03-30-2015, 03:57 AM
#26
AudiWorld Member
Join Date: Dec 2014
Location: Norway
Posts: 150
Likes: 0
Received 0 Likes
on
0 Posts
While inert and not as hazardous, do take similar precautions; listen well if you star getting a headache, nausea etc.
-
Ps. Congratz on 6k post!
 03-30-2015, 06:42 AM
#27
AudiWorld Super User
- and as you say, gloves or pliers. rapid decompression of any gas container, epecially things like co2 (and nitrogen), will make it very cold, very fast. Not sure how much is in those tiny ones though (?)
While inert and not as hazardous, do take similar precautions; listen well if you star getting a headache, nausea etc.
-
Ps. Congratz on 6k post!
While inert and not as hazardous, do take similar precautions; listen well if you star getting a headache, nausea etc.
-
Ps. Congratz on 6k post!
03-30-2015, 10:20 AM
#28
AudiWorld Super User
One thing to add about the rapid decompression of any gas is static discharge during the right conditions, I've been snapped a few times with nitrogen on refrigeration systems not grounding the hose.....those nasty electrons build up quick.
06-25-2021, 10:04 PM
#29
Thanks to everyone who contributed to this thread. Your inputs allowed me to save time during my fuel pump replacement. I tried extracting fuel from the tank through the filling tube in vain just Iike all of you. Then I thought of trying something that sounds silly but which turned out to be positive. I successfully drained almost all the fuel out of my tank without making a mess. Watch the following video from 17:00.
The following 2 users liked this post by kelisko:
georgeb944 (06-26-2021),
nickypp (01-24-2022)
