Jack Stands

 12-06-2012, 11:22 AM
#2
AudiWorld Senior Member
Join Date: Jun 2009
Location: Atlantic City Metro Area
Posts: 792
Likes: 0
Received 2 Likes
on
2 Posts
have that vid on my favorite list
seen it a few times
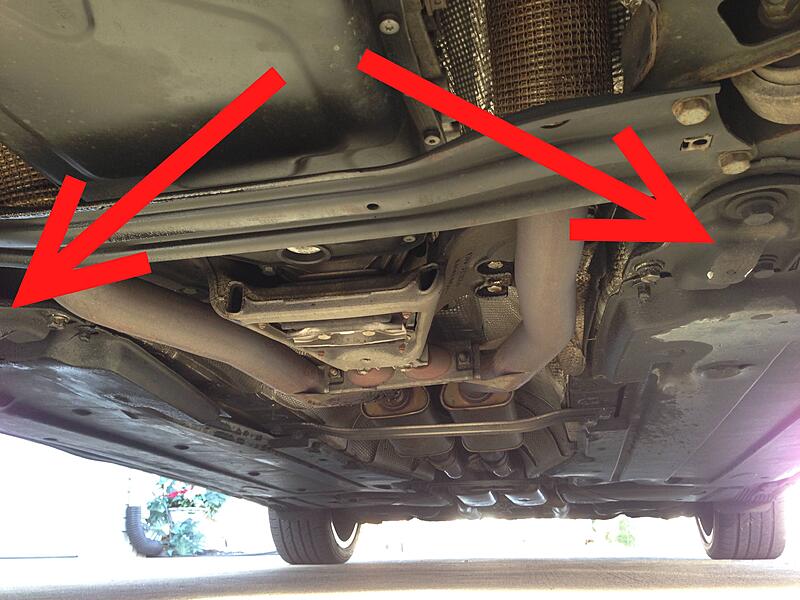
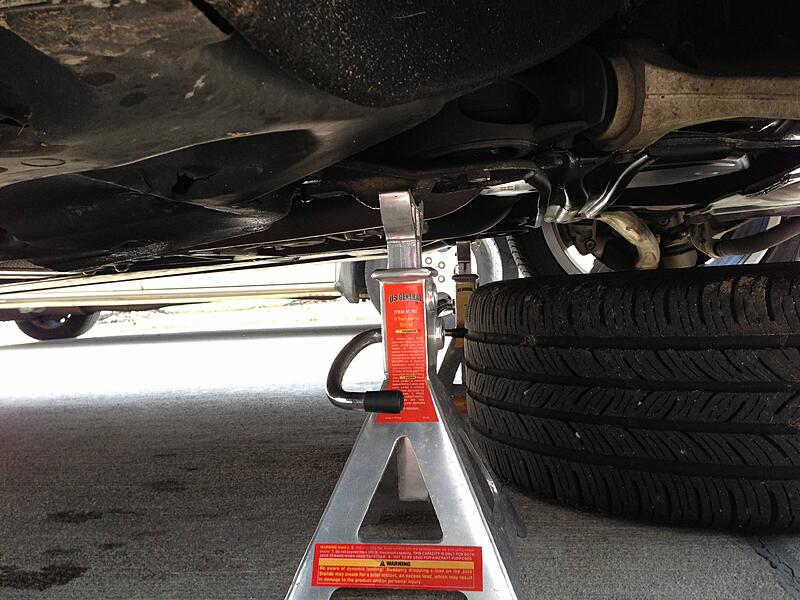
cant say for sure but seems like they are placed here
i placed my jack stands there when i did my stabilizer/sway bar end links
seen it a few times
cant say for sure but seems like they are placed here
i placed my jack stands there when i did my stabilizer/sway bar end links


Last edited by MainlandMig; 12-06-2012 at 11:46 AM. Reason: added photos *sorry i did not see the other reply before i made edits to my post
12-06-2012, 02:05 PM
#5
AudiWorld Senior Member
Join Date: Jun 2009
Location: Atlantic City Metro Area
Posts: 792
Likes: 0
Received 2 Likes
on
2 Posts
i never seen a vid for the rears but this vid is helpful ...shows you how it works
<iframe width="420" height="315" src="http://www.youtube.com/embed/nPRNbn9bdJg" frameborder="0" allowfullscreen></iframe>
Last edited by MainlandMig; 12-07-2012 at 06:44 PM.

 12-06-2012, 10:50 PM
#7
AudiWorld Super User

I wouldn't call this guy a true "mechanic" because he didn't use a torque wrench to tighten any of the fasteners on the caliper to their specified tightening torque, which could lead to a brake failure down the road. Anyone who does any maintenance/repairs on a vehicle needs to follow the OEM specs for tightening bolts for each bolted joint.
Trending Topics
12-07-2012, 12:20 AM
#8
AudiWorld Senior Member
Thread Starter
Audi Electronic Parking Brake (EPB)<O
 </O
</O<O
</OConnect Battery charger. ignition ON.<O
</OScan for existing errors<O
</O<O
</O1. Cycle the EPB on & off using the switch. Ensure that it is disengaged before continuing.<O
</O<O
</O2. On the VCDS screen - Select - 53 Parking brake.<O
</O<O
</O3. Basic settings group 007 & click on GO.<O
</O<O
</O4. Listen carefully & you will hear the EPB open wide. When it has finished, Basic Settings at the top of the screen will show<O
</OON, wait for one min<O
</O<O
</O5. After one min. click on Done. go back <O
</O<O
</O6. On the next screen . Close controller. Go back.<O
</O<O
</O7. Turn ignition off.<O
</O<O
</OThe pistons can now be pushed in as on a normal brake calliper.<O
</O<O
</OIt is now safe to remove the calliper and perform the brake service.<O
</O<O
</O<O
</O<O
</OReplace the brake pads and / or perform repairs. After maintenance you will need to electronically close the callipers.<O
</O<O
</O<O
</O<O
</OClosing the parking brake after servicing.<O</O
<O</O
</O<O
</O1. With the brakes fully assembled, pump up the brake pedal.<O
</O<O
</O2. Turn ignition ON <O
</O<O
</O3. On the VCDS screen - Select - 53 Parking brake.<O
</O<O
</O4 Go into Basic Settings Group 006 and click GO<O
</O<O
</OThe EPB module will close up the brake mechanism.<O
</O<O
</OWhen the motors stop, Wait for one min.<O
</O<O
</O5. Done. Go back.<O
</O<O
</O6. Close Controller. Go Back.<O
</O<O
</O7 Test the operation of the parking brake switch<O
</O<O
</O<O
</OIf all is OK and no warning lights. Job completed.<O
</O<O
</OIf there are any warning lights you will have to perform a function test.<O
</O<O
</O
Last edited by royclark; 12-07-2012 at 02:00 AM.
12-07-2012, 12:50 AM
#9
AudiWorld Senior Member
Thread Starter
I wouldn't call this guy a true "mechanic" because he didn't use a torque wrench to tighten any of the fasteners on the caliper to their specified tightening torque, which could lead to a brake failure down the road. Anyone who does any maintenance/repairs on a vehicle needs to follow the OEM specs for tightening bolts for each bolted joint.
Can you verify that they are correct?
<TABLE class="cc abstand-kap einzug-standard"><TBODY><TR><TD class=titel-kap>Servicing rear brakes - all models, including ceramic brakes</TD></TR></TBODY></TABLE><TABLE class="cc einzug-standard abstand-standard absatz-hervor"><TBODY><TR><TD>Rear brakes with automatic adjustment</TD></TR></TBODY></TABLE>
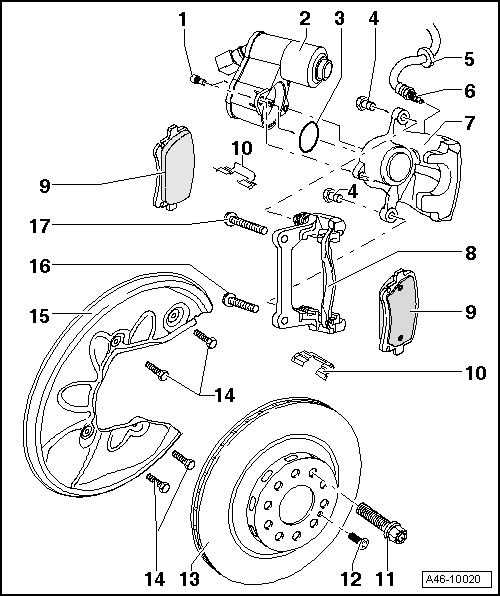
<TABLE class="cc abstand-standard erlaeutrg-explo"><TBODY><TR><TD class=einzug-nummer>1 - </TD><TD>Self-locking bolt (Torx 30), tightening torque 12 Nm</TD></TR></TBODY></TABLE><TABLE class="cc abstand-standard erlaeutrg-explo"><TBODY><TR><TD class=einzug-nummer>2 - </TD><TD>Actuator motor for electronic parking brake and handbrake</TD></TR></TBODY></TABLE><TABLE class="cc einzug-explo abstand-explo "><TBODY><TR><TD class=einzug-liste>q </TD><TD>Removing and installing control unit for electronic parking brake and handbrake → Chapter</TD></TR></TBODY></TABLE><TABLE class="cc einzug-explo abstand-explo "><TBODY><TR><TD class=einzug-liste>q </TD><TD>Removing and installing actuator motor → Chapter</TD></TR></TBODY></TABLE><TABLE class="cc abstand-standard erlaeutrg-explo"><TBODY><TR><TD class=einzug-nummer>3 - </TD><TD>Seal</TD></TR></TBODY></TABLE><TABLE class="cc einzug-explo abstand-explo "><TBODY><TR><TD class=einzug-liste>q </TD><TD>Always renew</TD></TR></TBODY></TABLE><TABLE class="cc abstand-standard erlaeutrg-explo"><TBODY><TR><TD class=einzug-nummer>4 - </TD><TD>Self-locking bolt, 35 Nm</TD></TR></TBODY></TABLE><TABLE class="cc einzug-explo abstand-explo "><TBODY><TR><TD class=einzug-liste>q </TD><TD>Always renew</TD></TR></TBODY></TABLE><TABLE class="cc einzug-explo abstand-explo "><TBODY><TR><TD class=einzug-liste>q </TD><TD>When loosening and tightening, counter-hold on guide pin</TD></TR></TBODY></TABLE><TABLE class="cc abstand-standard erlaeutrg-explo"><TBODY><TR><TD class=einzug-nummer>5 - </TD><TD>Spacer bracket</TD></TR></TBODY></TABLE><TABLE class="cc abstand-standard erlaeutrg-explo"><TBODY><TR><TD class=einzug-nummer>6 - </TD><TD>Brake hose</TD></TR></TBODY></TABLE><TABLE class="cc einzug-explo abstand-explo "><TBODY><TR><TD class=einzug-liste>q </TD><TD>To brake caliper, tightening torque 12 Nm</TD></TR></TBODY></TABLE><TABLE class="cc einzug-explo abstand-explo "><TBODY><TR><TD class=einzug-liste>q </TD><TD>Do not disconnect brake line when changing brake pads</TD></TR></TBODY></TABLE><TABLE class="cc einzug-explo abstand-explo "><TBODY><TR><TD class=einzug-liste>q </TD><TD>Make sure that the locking lugs are fitted properly in the bracket</TD></TR></TBODY></TABLE><TABLE class="cc einzug-explo abstand-explo "><TBODY><TR><TD class=einzug-liste>q </TD><TD>Do not twist hose when installing</TD></TR></TBODY></TABLE><TABLE class="cc abstand-standard erlaeutrg-explo"><TBODY><TR><TD class=einzug-nummer>7 - </TD><TD>Brake caliper housing</TD></TR></TBODY></TABLE><TABLE class="cc einzug-explo abstand-explo "><TBODY><TR><TD class=einzug-liste>q </TD><TD>Do not disconnect brake hose when changing brake pads</TD></TR></TBODY></TABLE><TABLE class="cc einzug-explo abstand-explo "><TBODY><TR><TD class=einzug-liste>q </TD><TD>Servicing brake caliper → Chapter</TD></TR></TBODY></TABLE><TABLE class="cc einzug-explo abstand-explo "><TBODY><TR><TD class=einzug-liste>q </TD><TD>The brake carrier can be mounted together with the brake caliper</TD></TR></TBODY></TABLE><TABLE class="cc abstand-standard erlaeutrg-explo"><TBODY><TR><TD class=einzug-nummer>8 - </TD><TD>Brake carrier with guide pins and protective caps</TD></TR></TBODY></TABLE><TABLE class="cc einzug-explo abstand-explo "><TBODY><TR><TD class=einzug-liste>q </TD><TD>Replacement carriers are supplied assembled and with sufficient grease on guide pins</TD></TR></TBODY></TABLE><TABLE class="cc einzug-explo abstand-explo "><TBODY><TR><TD class=einzug-liste>q </TD><TD>If protective caps or guide pins are damaged, renew using repair kit. Use grease sachet supplied to lubricate guide pins.</TD></TR></TBODY></TABLE><TABLE class="cc einzug-explo abstand-explo "><TBODY><TR><TD class=einzug-liste>q </TD><TD>The brake carrier can be mounted together with the brake caliper</TD></TR></TBODY></TABLE><TABLE class="cc abstand-standard erlaeutrg-explo"><TBODY><TR><TD class=einzug-nummer>9 - </TD><TD>Brake pads</TD></TR></TBODY></TABLE><TABLE class="cc einzug-explo abstand-explo "><TBODY><TR><TD class=einzug-liste>q </TD><TD>Wear limit → Chapter</TD></TR></TBODY></TABLE><TABLE class="cc einzug-explo abstand-explo "><TBODY><TR><TD class=einzug-liste>q </TD><TD>Always renew on both sides of axle</TD></TR></TBODY></TABLE><TABLE class="cc einzug-explo abstand-explo "><TBODY><TR><TD class=einzug-liste>q </TD><TD>Removing and installing → Chapter</TD></TR></TBODY></TABLE><TABLE class="cc einzug-explo abstand-explo "><TBODY><TR><TD class=einzug-liste>q </TD><TD>Checking pad thickness: → Booklet405</TD></TR></TBODY></TABLE><TABLE class="cc einzug-explo abstand-explo "><TBODY><TR><TD class=einzug-liste>q </TD><TD>The brake carrier can be mounted together with the brake caliper</TD></TR></TBODY></TABLE><TABLE class="cc abstand-standard erlaeutrg-explo"><TBODY><TR><TD class=einzug-nummer>10 - </TD><TD>Pad retainer</TD></TR></TBODY></TABLE><TABLE class="cc einzug-explo abstand-explo "><TBODY><TR><TD class=einzug-liste>q </TD><TD>Always renew when changing pads</TD></TR></TBODY></TABLE><TABLE class="cc abstand-standard erlaeutrg-explo"><TBODY><TR><TD class=einzug-nummer>11 - </TD><TD>Wheel bolts</TD></TR></TBODY></TABLE><TABLE class="cc einzug-explo abstand-explo "><TBODY><TR><TD class=einzug-liste>q </TD><TD>Fitting wheels → Wheels and tyres; Rep. Gr.44</TD></TR></TBODY></TABLE><TABLE class="cc abstand-standard erlaeutrg-explo"><TBODY><TR><TD class=einzug-nummer>12 - </TD><TD>Cross-head screw</TD></TR></TBODY></TABLE><TABLE class="cc einzug-explo abstand-explo "><TBODY><TR><TD class=einzug-liste>q </TD><TD>Tightening torque: 5 Nm</TD></TR></TBODY></TABLE><TABLE class="cc abstand-standard erlaeutrg-explo"><TBODY><TR><TD class=einzug-nummer>13 - </TD><TD>Brake disc</TD></TR></TBODY></TABLE><TABLE class="cc einzug-explo abstand-explo "><TBODY><TR><TD class=einzug-liste>q </TD><TD>Wear limit → Chapter</TD></TR></TBODY></TABLE><TABLE class="cc einzug-explo abstand-explo "><TBODY><TR><TD class=einzug-liste>q </TD><TD>Always renew on both sides of axle</TD></TR></TBODY></TABLE><TABLE class="cc einzug-explo abstand-explo "><TBODY><TR><TD class=einzug-liste>q </TD><TD>On vehicles with a 16" brake system, the brake carrier must be removed prior to removing the brake discs</TD></TR></TBODY></TABLE><TABLE class="cc einzug-explo abstand-explo "><TBODY><TR><TD class=einzug-liste>q </TD><TD>Detach brake caliper prior to removing</TD></TR></TBODY></TABLE><TABLE class="cc einzug-explo abstand-explo "><TBODY><TR><TD class=einzug-liste>q </TD><TD>Allocation of brake discs → Chapter</TD></TR></TBODY></TABLE><TABLE class="cc abstand-standard erlaeutrg-explo"><TBODY><TR><TD class=einzug-nummer>14 - </TD><TD>Hexagon bolts, 10 Nm</TD></TR></TBODY></TABLE><TABLE class="cc abstand-standard erlaeutrg-explo"><TBODY><TR><TD class=einzug-nummer>15 - </TD><TD>Splash plate for brakes</TD></TR></TBODY></TABLE><TABLE class="cc abstand-standard erlaeutrg-explo"><TBODY><TR><TD class=einzug-nummer>16 - </TD><TD>Ribbed bolts</TD></TR></TBODY></TABLE><TABLE class="cc einzug-explo abstand-explo "><TBODY><TR><TD class=einzug-liste>q </TD><TD>M 12 x 1.5 x 60</TD></TR></TBODY></TABLE><TABLE class="cc einzug-explo abstand-explo "><TBODY><TR><TD class=einzug-liste>q </TD><TD>Always renew</TD></TR></TBODY></TABLE><TABLE class="cc einzug-explo abstand-explo "><TBODY><TR><TD class=einzug-liste>q </TD><TD>For bottom bolt: set torque wrench -V.A.G 1332- to 115 Nm to tighten the bottom bolt. This tightening torque only applies when using interchangeable head -T40065- on the left side and interchangeable head -T40066- on the right side.</TD></TR></TBODY></TABLE><TABLE class="cc abstand-standard erlaeutrg-explo"><TBODY><TR><TD class=einzug-nummer>17 - </TD><TD>Ribbed bolts</TD></TR></TBODY></TABLE><TABLE class="cc einzug-explo abstand-explo "><TBODY><TR><TD class=einzug-liste>q </TD><TD>M 12 x 1.5 x 60</TD></TR></TBODY></TABLE><TABLE class="cc einzug-explo abstand-explo "><TBODY><TR><TD class=einzug-liste>q </TD><TD>Always renew</TD></TR></TBODY></TABLE><TABLE class="cc einzug-explo abstand-explo "><TBODY><TR><TD class=einzug-liste>q </TD><TD>Tightening torque for top bolt: 140 Nm</TD></TR></TBODY></TABLE>
Also bolts No. 3 - 196Nm
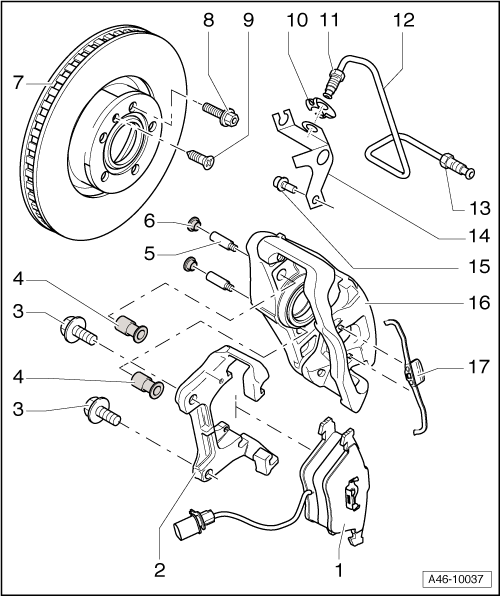
Servicing front brakes
<TABLE cellSpacing=0 cellPadding=0 width="100%"><TBODY><TR><TD class=spalte-text><TABLE class="cc abstand-kap einzug-standard"><TBODY><TR><TD class=titel-kap>Servicing front brakes</TD></TR></TBODY></TABLE>
 Note
Note<TABLE class="cc abstand-liste-erster einzug-standard hinweis-rumpf"><TBODY><TR><TD class=einzug-liste>t </TD><TD>Install all parts supplied in repair kit.</TD></TR></TBODY></TABLE><TABLE class="cc abstand-liste einzug-standard hinweis-rumpf"><TBODY><TR><TD class=einzug-liste>t </TD><TD>After replacing brake pads, depress brake pedal firmly several times with vehicle stationary so that the pads are properly seated in their normal operating position.</TD></TR></TBODY></TABLE><TABLE class="cc abstand-liste einzug-standard hinweis-rumpf"><TBODY><TR><TD class=einzug-liste>t </TD><TD>To draw off brake fluid from brake fluid reservoir use a bleeder bottle which is used only for brake fluid. Brake fluid is poisonous and must on no account be sucked out with the mouth using a hose!</TD></TR></TBODY></TABLE><TABLE class="cc abstand-liste einzug-standard hinweis-rumpf"><TBODY><TR><TD class=einzug-liste>t </TD><TD>Check that the brake caliper moves freely by moving it from side to side.</TD></TR></TBODY></TABLE>
</TD><TD class=spalte-pfeil></TD><TD class=spalte-marg></TD></TR></TBODY></TABLE><TABLE class="cc abstand-standard erlaeutrg-explo"><TBODY><TR><TD class=einzug-nummer>1 - </TD><TD>Brake pads</TD></TR></TBODY></TABLE><TABLE class="cc einzug-explo abstand-explo "><TBODY><TR><TD class=einzug-liste>q </TD><TD>Wear limit → Chapter</TD></TR></TBODY></TABLE>
Note<TABLE class="cc abstand-liste-erster einzug-explo hinweis-rumpf"><TBODY><TR><TD>A wire for the wear indicator is fitted to the inner pad (with spring).</TD></TR></TBODY></TABLE><TABLE class="cc einzug-explo abstand-explo "><TBODY><TR><TD class=einzug-liste>q </TD><TD>Always renew on both sides of axle</TD></TR></TBODY></TABLE><TABLE class="cc einzug-explo abstand-explo "><TBODY><TR><TD class=einzug-liste>q </TD><TD>Before inserting pads, clean guide surfaces and apply a thin coating of polycarbamide grease -G 052 142 A2-.</TD></TR></TBODY></TABLE><TABLE class="cc einzug-explo abstand-explo "><TBODY><TR><TD class=einzug-liste>q </TD><TD>Removing and installing → Chapter</TD></TR></TBODY></TABLE><TABLE class="cc einzug-explo abstand-explo "><TBODY><TR><TD class=einzug-liste>q </TD><TD>Checking pad thickness: → Booklet405</TD></TR></TBODY></TABLE><TABLE class="cc einzug-explo abstand-explo "><TBODY><TR><TD class=einzug-liste>q </TD><TD>Different versions available → ETKA</TD></TR></TBODY></TABLE>
Note<TABLE class="cc abstand-liste-erster einzug-explo hinweis-rumpf"><TBODY><TR><TD>Clean the brake caliper thoroughly (grease-free) before inserting new brake pads. It is particularly important to ensure that contact surfaces for brake pads are clean.</TD></TR></TBODY></TABLE><TABLE class="cc abstand-standard erlaeutrg-explo"><TBODY><TR><TD class=einzug-nummer>2 - </TD><TD>Brake carrier</TD></TR></TBODY></TABLE><TABLE class="cc einzug-explo abstand-explo "><TBODY><TR><TD class=einzug-liste>q </TD><TD>Bolt to wheel bearing housing</TD></TR></TBODY></TABLE><TABLE class="cc abstand-standard erlaeutrg-explo"><TBODY><TR><TD class=einzug-nummer>3 - </TD><TD>Ribbed bolt, 196 Nm</TD></TR></TBODY></TABLE><TABLE class="cc einzug-explo abstand-explo "><TBODY><TR><TD class=einzug-liste>q </TD><TD>Clean ribs if using again</TD></TR></TBODY></TABLE><TABLE class="cc einzug-explo abstand-explo "><TBODY><TR><TD class=einzug-liste>q </TD><TD>M14�1.5x 38</TD></TR></TBODY></TABLE><TABLE class="cc abstand-standard erlaeutrg-explo"><TBODY><TR><TD class=einzug-nummer>4 - </TD><TD>Bearing bush</TD></TR></TBODY></TABLE><TABLE class="cc einzug-explo abstand-explo "><TBODY><TR><TD class=einzug-liste>q </TD><TD>Insert into brake caliper housing</TD></TR></TBODY></TABLE><TABLE class="cc abstand-standard erlaeutrg-explo"><TBODY><TR><TD class=einzug-nummer>5 - </TD><TD>Guide pins, 30 Nm</TD></TR></TBODY></TABLE><TABLE class="cc abstand-standard erlaeutrg-explo"><TBODY><TR><TD class=einzug-nummer>6 - </TD><TD>Protective cap</TD></TR></TBODY></TABLE><TABLE class="cc einzug-explo abstand-explo "><TBODY><TR><TD class=einzug-liste>q </TD><TD>Take off</TD></TR></TBODY></TABLE><TABLE class="cc einzug-explo abstand-explo "><TBODY><TR><TD class=einzug-liste>q </TD><TD>Insert wear indicator wire in protective cap</TD></TR></TBODY></TABLE><TABLE class="cc abstand-standard erlaeutrg-explo"><TBODY><TR><TD class=einzug-nummer>7 - </TD><TD>Brake disc</TD></TR></TBODY></TABLE><TABLE class="cc einzug-explo abstand-explo "><TBODY><TR><TD class=einzug-liste>q </TD><TD>Wear limit → Chapter</TD></TR></TBODY></TABLE><TABLE class="cc einzug-explo abstand-explo "><TBODY><TR><TD class=einzug-liste>q </TD><TD>Always renew on both sides of axle</TD></TR></TBODY></TABLE><TABLE class="cc einzug-explo abstand-explo "><TBODY><TR><TD class=einzug-liste>q </TD><TD>Detach brake caliper prior to removing</TD></TR></TBODY></TABLE><TABLE class="cc einzug-explo abstand-explo "><TBODY><TR><TD class=einzug-liste>q </TD><TD>Lubricate contact surfaces between brake disc and wheel hub with polycarbamide grease -G 052 142 A2-. → Wheels and tyres; Rep. Gr.44</TD></TR></TBODY></TABLE><TABLE class="cc einzug-explo abstand-explo "><TBODY><TR><TD class=einzug-liste>q </TD><TD>Allocation → Chapter</TD></TR></TBODY></TABLE><TABLE class="cc einzug-explo abstand-explo "><TBODY><TR><TD class=einzug-liste>q </TD><TD>Thickness → Chapter</TD></TR></TBODY></TABLE><TABLE class="cc abstand-standard erlaeutrg-explo"><TBODY><TR><TD class=einzug-nummer>8 - </TD><TD>Wheel bolts</TD></TR></TBODY></TABLE><TABLE class="cc einzug-explo abstand-explo "><TBODY><TR><TD class=einzug-liste>q </TD><TD>Fitting wheels → Wheels and tyres; Rep. Gr.44</TD></TR></TBODY></TABLE><TABLE class="cc abstand-standard erlaeutrg-explo"><TBODY><TR><TD class=einzug-nummer>9 - </TD><TD>Bolt</TD></TR></TBODY></TABLE><TABLE class="cc einzug-explo abstand-explo "><TBODY><TR><TD class=einzug-liste>q </TD><TD>Tightening torque: 5 Nm</TD></TR></TBODY></TABLE><TABLE class="cc abstand-standard erlaeutrg-explo"><TBODY><TR><TD class=einzug-nummer>10 - </TD><TD>Spring clip</TD></TR></TBODY></TABLE><TABLE class="cc abstand-standard erlaeutrg-explo"><TBODY><TR><TD class=einzug-nummer>11 - </TD><TD>Brake line connection to brake hose, 12 Nm</TD></TR></TBODY></TABLE><TABLE class="cc abstand-standard erlaeutrg-explo"><TBODY><TR><TD class=einzug-nummer>12 - </TD><TD>Brake line</TD></TR></TBODY></TABLE><TABLE class="cc einzug-explo abstand-explo "><TBODY><TR><TD class=einzug-liste>q </TD><TD>Screw into brake caliper housing</TD></TR></TBODY></TABLE><TABLE class="cc einzug-explo abstand-explo "><TBODY><TR><TD class=einzug-liste>q </TD><TD>Screw into brake hose, counter hold on brake hose hexagon.</TD></TR></TBODY></TABLE><TABLE class="cc einzug-explo abstand-explo "><TBODY><TR><TD class=einzug-liste>q </TD><TD>Do not twist hose when fitting</TD></TR></TBODY></TABLE><TABLE class="cc einzug-explo abstand-explo "><TBODY><TR><TD class=einzug-liste>q </TD><TD>Ensure that lugs are properly seated in grooves in bracket.</TD></TR></TBODY></TABLE><TABLE class="cc abstand-standard erlaeutrg-explo"><TBODY><TR><TD class=einzug-nummer>13 - </TD><TD>Brake line connection to brake caliper, 17 Nm</TD></TR></TBODY></TABLE><TABLE class="cc abstand-standard erlaeutrg-explo"><TBODY><TR><TD class=einzug-nummer>14 - </TD><TD>Bracket</TD></TR></TBODY></TABLE><TABLE class="cc einzug-explo abstand-explo "><TBODY><TR><TD class=einzug-liste>q </TD><TD>Bolt to brake caliper housing</TD></TR></TBODY></TABLE><TABLE class="cc einzug-explo abstand-explo "><TBODY><TR><TD class=einzug-liste>q </TD><TD>Attach brake line</TD></TR></TBODY></TABLE><TABLE class="cc abstand-standard erlaeutrg-explo"><TBODY><TR><TD class=einzug-nummer>15 - </TD><TD>Bolt</TD></TR></TBODY></TABLE><TABLE class="cc einzug-explo abstand-explo "><TBODY><TR><TD class=einzug-liste>q </TD><TD>Tightening torque: 25 Nm</TD></TR></TBODY></TABLE><TABLE class="cc abstand-standard erlaeutrg-explo"><TBODY><TR><TD class=einzug-nummer>16 - </TD><TD>Brake caliper housing</TD></TR></TBODY></TABLE><TABLE class="cc einzug-explo abstand-explo "><TBODY><TR><TD class=einzug-liste>q </TD><TD>If assembly work is required, do not leave caliper hanging from brake hose but secure it to bodywork with binding wire</TD></TR></TBODY></TABLE><TABLE class="cc einzug-explo abstand-explo "><TBODY><TR><TD class=einzug-liste>q </TD><TD>With the exception of �Renewing brake pads� → Chapter and �Servicing front brake caliper�, no repairs may be performed on the brake caliper.</TD></TR></TBODY></TABLE><TABLE class="cc einzug-explo abstand-explo "><TBODY><TR><TD class=einzug-liste>q </TD><TD>Do not twist hose when fitting </TD></TR></TBODY></TABLE><TABLE class="cc abstand-standard erlaeutrg-explo"><TBODY><TR><TD class=einzug-nummer>17 - </TD><TD>Retaining spring</TD></TR></TBODY></TABLE><TABLE class="cc einzug-explo abstand-explo "><TBODY><TR><TD class=einzug-liste>q </TD><TD>Note correct installation position.</TD></TR></TBODY></TABLE>
Note<TABLE class="cc abstand-liste-erster einzug-explo hinweis-rumpf"><TBODY><TR><TD>The retaining spring must be pushed under the brake carrier after engaging onto both studs. If incorrectly installed, the wear of the outer pad cannot be adjusted, and the pedal travel will be increased as a result.</TD></TR></TBODY></TABLE>
Last edited by royclark; 12-07-2012 at 02:06 AM.
12-07-2012, 11:31 AM
#10
AudiWorld Super User
I wouldn't call this guy a true "mechanic" because he didn't use a torque wrench to tighten any of the fasteners on the caliper to their specified tightening torque, which could lead to a brake failure down the road. Anyone who does any maintenance/repairs on a vehicle needs to follow the OEM specs for tightening bolts for each bolted joint.
Dont fool yourself, specs are there for a guideline not "omg every tech uses a torque wrench for every little bolt on the whole car." There there so dumbasses dont break bolts off or leave wheel lugs loose. Im sure you use a torque wrench on your battery terminals too right lol....
Last edited by Prospeeder; 12-07-2012 at 11:36 AM.