Park Assist
 03-23-2012, 08:45 PM
#1
Audiworld Junior Member
Thread Starter

Join Date: Mar 2008
Location: Chicago, IL
Posts: 52
Likes: 0
Received 0 Likes
on
0 Posts
Well looks like one of my rear parking sensors took a crap. It was working fine all day, then after work I got the solid tone after engaging reverse. Seems to be my left inner sensor is bad.
My question is, has anyone replaced one? Also if so, is it a PIA to do or simple since I've never taken off my rear bumper.
My question is, has anyone replaced one? Also if so, is it a PIA to do or simple since I've never taken off my rear bumper.
 03-24-2012, 08:54 PM
#2
AudiWorld Senior Member
Well looks like one of my rear parking sensors took a crap. It was working fine all day, then after work I got the solid tone after engaging reverse. Seems to be my left inner sensor is bad.
My question is, has anyone replaced one? Also if so, is it a PIA to do or simple since I've never taken off my rear bumper.
My question is, has anyone replaced one? Also if so, is it a PIA to do or simple since I've never taken off my rear bumper.
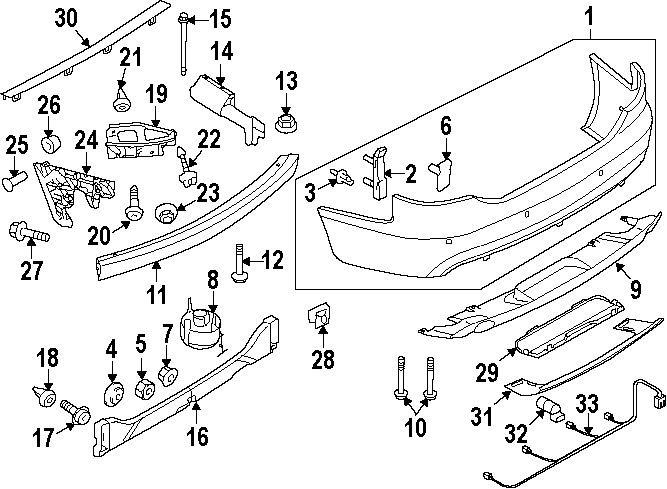
1. Bumper cover<O
 </O
</O2. Stud plate<O
</O3. Stud plate rivet<O
</O4. Stud plate grommet<O
</O5. Stud plate nut<O
</O6. Retainer plate<O
</O7. Retainer plate nut<O
</O8. Centre support<O
</O9. Lower panel<O
</O10. Lower panel bolt<O
</O11. Impact bar<O
</O12. Impact bar bolt<O
</O13. Impact bar nut<O
</O14. Energy absorber<O
</O15. Energy absorber bolt<O
</O16. Strap<O
</O17. Strap screw<O
</O18. Strap nut<O
</O19. Adjust bracket<O
</O20. Adjust bracket bolt<O
</O21. Adjust bracket nut<O
</O22. Adjust bracket screw<O
</O23. Adjust bracket fastener<O
</O24. Guide<O
</O25. Guide screw<O
</O26. Guide nut<O
</O27. Guide bolt<O
</O28. Guide-u-nut<O
</O29. Under tray<O
</O30. ?<O
></O>31. ?<O
></O>32. Reverse sensor<O
</O33. Wire harness
 <O</O
<O</O<O
</O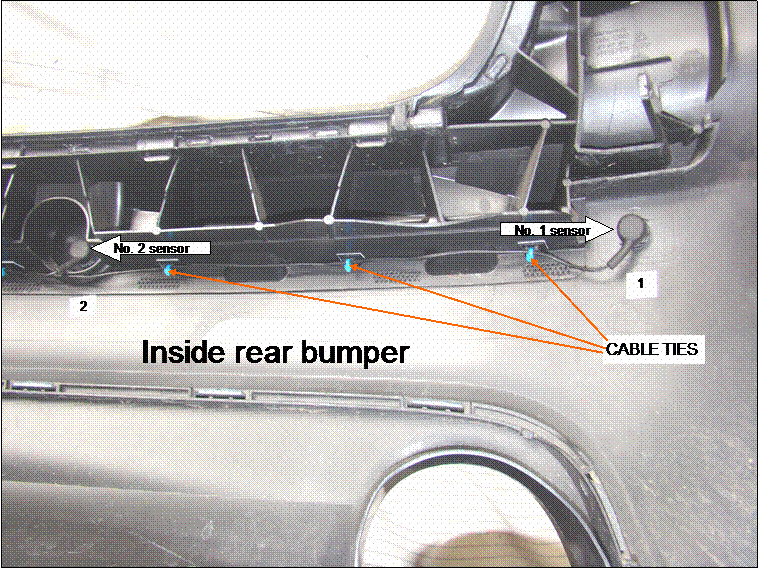
Remove rear bumper, unplug bad sensor, replace sensor, reconnect wire, replace bumper.
A little more info.
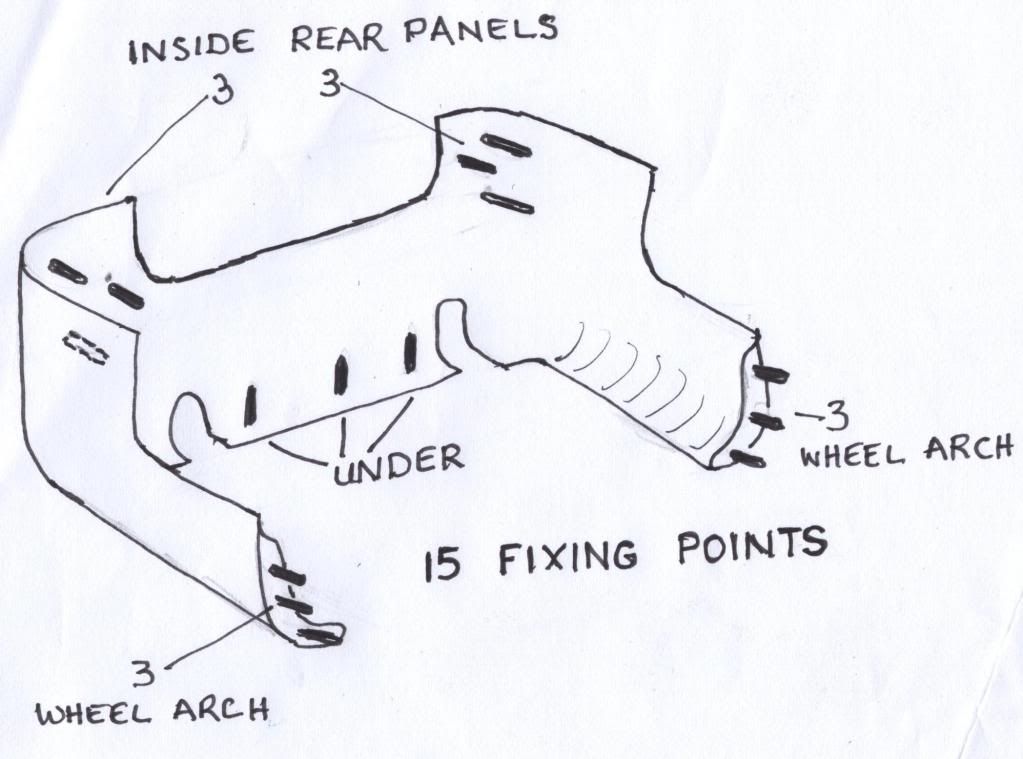
<TABLE class="cc einzug-standard abstand-standard absatz-hervor"><TBODY><TR><TD>Attachment points</TD></TR></TBODY></TABLE>
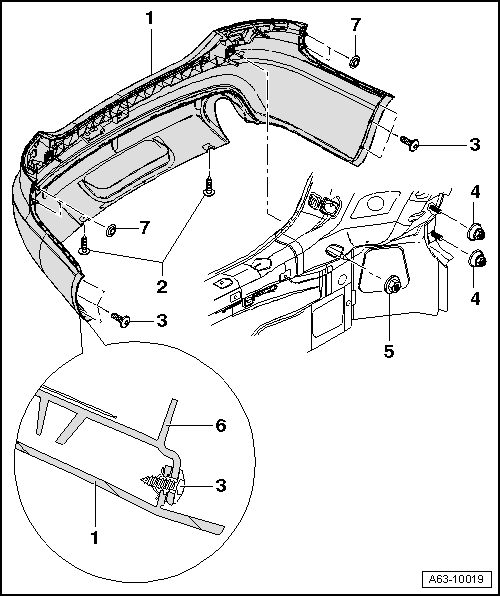
<TABLE class="cc abstand-standard erlaeutrg-explo"><TBODY><TR><TD class=einzug-nummer>1 - </TD><TD>Cover</TD></TR></TBODY></TABLE>
<TABLE class="cc einzug-explo abstand-explo "><TBODY><TR><TD class=einzug-liste>� </TD><TD>To remove, unscrew all nuts and bolts and detach cover towards rear.</TD></TR></TBODY></TABLE>
<TABLE class="cc abstand-standard erlaeutrg-explo"><TBODY><TR><TD class=einzug-nummer>2 - </TD><TD>Self-tapping screw</TD></TR></TBODY></TABLE>
<TABLE class="cc einzug-explo abstand-explo "><TBODY><TR><TD class=einzug-liste>q </TD><TD>1 Nm</TD></TR></TBODY></TABLE>
<TABLE class="cc abstand-standard erlaeutrg-explo"><TBODY><TR><TD class=einzug-nummer>3 - </TD><TD>Self-tapping screw</TD></TR></TBODY></TABLE>
<TABLE class="cc einzug-explo abstand-explo "><TBODY><TR><TD class=einzug-liste>q </TD><TD>1 Nm</TD></TR></TBODY></TABLE>
<TABLE class="cc abstand-standard erlaeutrg-explo"><TBODY><TR><TD class=einzug-nummer>4 - </TD><TD>Cap nut</TD></TR></TBODY></TABLE>
<TABLE class="cc einzug-explo abstand-explo "><TBODY><TR><TD class=einzug-liste>q </TD><TD>4 Nm</TD></TR></TBODY></TABLE>
<TABLE class="cc abstand-standard erlaeutrg-explo"><TBODY><TR><TD class=einzug-nummer>5 - </TD><TD>Nut with washer</TD></TR></TBODY></TABLE>
<TABLE class="cc einzug-explo abstand-explo "><TBODY><TR><TD class=einzug-liste>q </TD><TD>4 Nm</TD></TR></TBODY></TABLE>
<TABLE class="cc abstand-standard erlaeutrg-explo"><TBODY><TR><TD class=einzug-nummer>6 - </TD><TD>Guide</TD></TR></TBODY></TABLE>
<TABLE class="cc abstand-standard erlaeutrg-explo"><TBODY><TR><TD class=einzug-nummer>7 - </TD><TD>Grommet</TD></TR></TBODY></TABLE>
<TABLE class="cc einzug-explo abstand-explo "><TBODY><TR><TD class=einzug-liste>� </TD><TD>Grommets must be pushed onto studs before installing cover.</TD></TR></TBODY></TABLE>
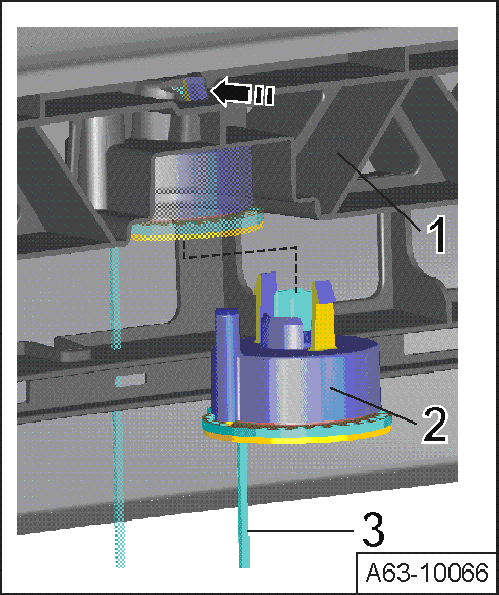
<TABLE cellSpacing=0 cellPadding=0 width="100%"><TBODY><TR><TD class=spalte-text><TABLE class="cc bild-titel einzug-standard abstand-standard"><TBODY><TR><TD>Installing support piece</TD></TR></TBODY></TABLE>Note
<TABLE class="cc abstand-liste-erster einzug-standard hinweis-rumpf"><TBODY><TR><TD>The support piece only has to be installed if you are fitting a new bumper cover.</TD></TR></TBODY></TABLE><TABLE class="cc einzug-standard abstand-standard "><TBODY><TR><TD class=einzug-liste>� </TD><TD>To remove, press catch -arrow- to side and detach support piece downwards out of cover -1-.</TD></TR></TBODY></TABLE><TABLE class="cc einzug-standard abstand-standard "><TBODY><TR><TD class=einzug-liste>� </TD><TD>Fit support piece -2- in cover as shown and make sure it engages.</TD></TR></TBODY></TABLE><TABLE class="cc einzug-standard abstand-standard "><TBODY><TR><TD class=einzug-liste>� </TD><TD>Do not remove retaining tab until you have completed installation of cover.</TD></TR></TBODY></TABLE>
</TD></TR></TBODY></TABLE>
<TABLE cellSpacing=0 cellPadding=0 width="100%"><TBODY><TR><TD class=spalte-text><TABLE class="cc bild-titel einzug-standard abstand-standard"><TBODY><TR><TD>Releasing support piece</TD></TR></TBODY></TABLE><TABLE class="cc achtung-rahmen abstand-standard einzug-standard"><TBODY><TR><TD class=achtung-inhalt>WARNING
<TABLE class="cc einzug-standard abstand-liste-erster achtung-rumpf"><TBODY><TR><TD>Never release support piece following removal, as this could cause injury.</TD></TR></TBODY></TABLE>
</TD></TR></TBODY></TABLE><TABLE class="cc einzug-standard abstand-standard "><TBODY><TR><TD>When re-installing the "old" bumper cover, the "old" support piece can remain installed.</TD></TR></TBODY></TABLE><TABLE class="cc einzug-standard abstand-standard "><TBODY><TR><TD class=einzug-liste>� </TD><TD>If bumper cover is replaced, new support piece must be clipped into bumper cover from underneath.</TD></TR></TBODY></TABLE><TABLE class="cc einzug-standard abstand-standard "><TBODY><TR><TD class=einzug-liste>� </TD><TD>Once you have completed installation of the bumper cover, release support piece by pulling retaining tab -arrow-.</TD></TR></TBODY></TABLE>Note
<TABLE class="cc abstand-liste-erster einzug-standard hinweis-rumpf"><TBODY><TR><TD>Pulling the release tab releases the support piece, so that it then supports the bumper cover against the cross member.</TD></TR></TBODY></TABLE>
</TD></TR></TBODY></TABLE>

And some more
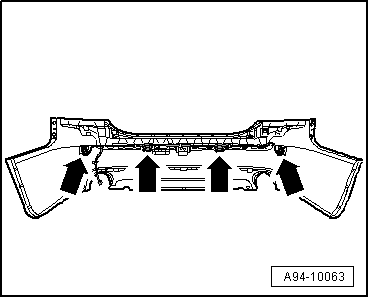
<TABLE cellSpacing=0 cellPadding=0 width="100%"><TBODY><TR><TD class=spalte-text><TABLE class="cc abstand-kap einzug-standard"><TBODY><TR><TD class=titel-kap>Removing and installing rear parking aid senders</TD></TR></TBODY></TABLE><TABLE class="cc einzug-standard abstand-standard "><TBODY><TR><TD>Fitting location: In bumper -arrows-</TD></TR></TBODY></TABLE></TD></TR></TBODY></TABLE>
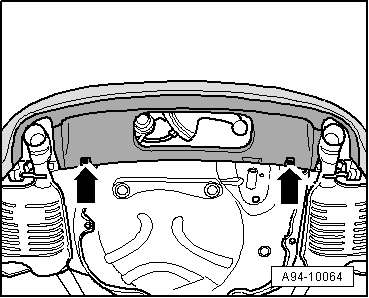
<TABLE class="cc einzug-standard abstand-standard absatz-hervor"><TBODY><TR><TD>Removing</TD></TR></TBODY></TABLE><TABLE class="cc einzug-standard abstand-standard absatz-hervor"><TBODY><TR><TD>Senders (inside) on vehicles with towing bracket:</TD></TR></TBODY></TABLE><TABLE class="cc einzug-standard abstand-standard "><TBODY><TR><TD class=einzug-liste>� </TD><TD>Remove rear bumper cover</TD></TR></TBODY></TABLE><TABLE class="cc einzug-standard abstand-standard absatz-hervor"><TBODY><TR><TD>Senders (inside) on vehicles without towing bracket:</TD></TR></TBODY></TABLE><TABLE class="cc einzug-standard abstand-standard "><TBODY><TR><TD class=einzug-liste>� </TD><TD>Unscrew bolts -arrows-.</TD></TR></TBODY></TABLE><TABLE class="cc einzug-standard abstand-standard "><TBODY><TR><TD class=einzug-liste>� </TD><TD>Reach behind the bumper cover.</TD></TR></TBODY></TABLE>
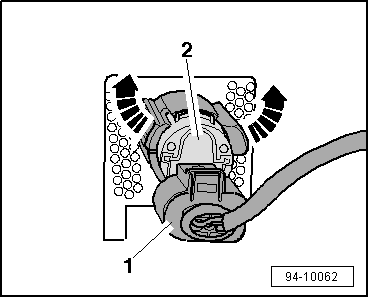
<TABLE class="cc einzug-standard abstand-standard absatz-hervor"><TBODY><TR><TD>All models:</TD></TR></TBODY></TABLE><TABLE class="cc einzug-standard abstand-standard "><TBODY><TR><TD class=einzug-liste>� </TD><TD>Unplug electrical connector -1- at sender.</TD></TR></TBODY></TABLE><TABLE class="cc einzug-standard abstand-standard "><TBODY><TR><TD class=einzug-liste>� </TD><TD>Push both retainer tabs aside -arrows- and push out sender -2- inwards.</TD></TR></TBODY></TABLE><TABLE class="cc einzug-standard abstand-standard absatz-hervor"><TBODY><TR><TD>Installing</TD></TR></TBODY></TABLE><TABLE class="cc einzug-standard abstand-standard "><TBODY><TR><TD>Installation is carried out in the reverse order; note the following:</TD></TR></TBODY></TABLE><TABLE class="cc einzug-standard abstand-standard "><TBODY><TR><TD class=einzug-liste>� </TD><TD>Install rear bumper cover</TD></TR></TBODY></TABLE><TABLE class="cc einzug-standard abstand-standard absatz-hervor"><TBODY><TR><TD>Tightening torque</TD></TR></TBODY></TABLE>
<TABLE class="abstand-tabelle layoutnormal frameall" border=1 cellSpacing=0 cellPadding=0 align=bleedleft><TBODY><TR class=th vAlign=top><TD class=cellborderrightbottom-th vAlign=top align=left>Component</TD><TD class=cellborderbottom-th vAlign=top align=middle>Nm</TD></TR><TR class=td vAlign=top><TD class=cellborderright vAlign=top align=left>Bumper cover to bracket</TD><TD class=cellborderright vAlign=top align=middle>1.5</TD></TR></TBODY></TABLE>
Last edited by royclark; 03-25-2012 at 09:05 PM.
11-15-2014, 03:16 AM
#6
AudiWorld Newcomer

Join Date: Sep 2009
Posts: 1
Likes: 0
Received 0 Likes
on
0 Posts
Hi, I need to know if the rear sensors are equal to the front sensors, because I have 4 rear sensors new and I need to use them on front bumper. Somebody knows how to wire this, because I have not the harness of the front bumper, but I have the rear harness . And it have 12 wires compared with the front harness that is only 6 wires. Thanks

Thread
Thread Starter
Forum
Replies
Last Post
SFexBOY
A4 (B5 Platform) Discussion
12
06-18-2007 10:52 PM
BIGDROCH
TT (Mk1) Discussion
0
07-23-2003 02:29 PM
kweefe
S4 / RS4 (B5 Platform) Discussion
1
10-13-2001 12:32 PM