Installed Rearview Camera Retrofit from Carsgadget.com (Pics)
 12-19-2015, 02:42 PM
#21
AudiWorld Super User

Thanks Bob and ZThang as your tips made my install much easier today. I could of been done in 4 hours and that includes the pre-check before running the wires which for me was the hardest part as tucking the wire under the trim is a pain. My issue was the power wire for the camera was short by about 4 feet and I saw it was shorter then the video wire, but was hoping the video cable was just extra long. Guess what that's not the case, so I had to add a butt splice which I really didn't want to do but I wasn't going to start over routing the wire again. Anyone else doing this install it's just something else to check.
Overall I am happy with how everything turned out.
Overall I am happy with how everything turned out.
1. Did you use the camera system from Carsgadget.com? MMI or AMI (non-MMI) system?
2. If so, the kit I received had a power/video combo wire (the power and video cables are combined in one wire). My combo wire reached from the camera, up along the hatch to the hinge area, back down the side to the floor of the cargo area, and to the front with about 2 feet excess up at the glove box. I installed the AMI system.
3. The separate rear camera power cord was about 4 feet too long and I cut it off.
It's great that you had success!
Last edited by Bob Petruska; 12-19-2015 at 07:44 PM.
 12-19-2015, 04:23 PM
#22
AudiWorld Junior Member

Join Date: Jul 2011
Location: Northern NY
Posts: 17
Likes: 0
Received 0 Likes
on
0 Posts
I used the separate rear camera cable and it was 4 feet to short that was my mistake. Now I have a spare I guess with the video cable in case I ever have a power issue in the future. Yes I purchased from carsgadget.
12-19-2015, 07:57 PM
#23
AudiWorld Super User
For others attempting this install you only run the single power/video combination cable from the rear camera to the front interface box. The extra power cable that attaches to the rear camera is many feet long and only needs to be less than 12 inches and that is attached to the red wire that comes out of the power/video cable. Also the camera ground wire doesn't need to be grounded. The camera is grounded by the grounded shield conductor within the power/video combo cable that is grounded in the interface box.
12-29-2015, 10:55 PM
#24

Awhile back I helped my dad purchase a dealer demo Q5 3.0T and it came equipped with pretty well every feature (i.e. mmi, nav, pano, etc�). However, the one thing missing was a RVC (rear view camera), which wasn�t that big a deal for my dad, but apparently was a show stopper for my mom. Therefore, I decided to address the situation and placed the order with Carsgadget.com Audi rear view camera interface kit and contacted Eugene.
2 days later I had the full kit and was ready for the install. The difference between my install and others is that mine was an MMI equipped unit.

Everything came well packed and complete, as you can see by the pic.
So I got my tools ready, as per what others have already stated on this thread. You don�t need much, but make sure you have the correct socket to remove the body panel screws.

The first step is to remove the lower hatch cover. There are only 4 screws to remove and you just need to use some gentle force on the top end (window) and lower portion to pry off the plastic�don�t be afraid to break things�since I don�t really think it�s possible, as long as you�ve removed the screws.
Once removed it�ll look like this and you can start removing the existing handle. You�ll need to remove the license plate, but other than that after you�ve used your socket wrench just disconnect and pry the existing handle out.
Part 2 - remove the upper plastic hatch piece on the passenger side. There are no screws, but what a PITA to remove. I thought I was going to break things at this point and this was the biggest frustration during the install for me. However, there are 2 metal body panel clips which are REALLY wedged in there. You just have to use leverage and force these up and the whole side will come up.
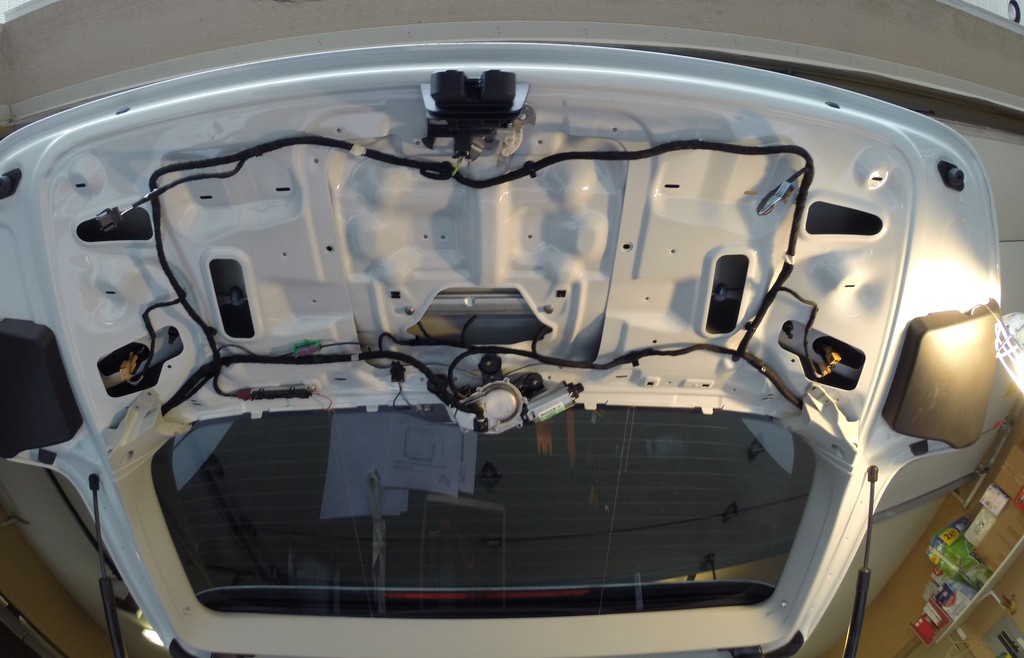
Part 3 � start the install. I placed the new camera/handle in place and ran the wire along the existing wires up the passenger side hinge, which is covered by a plastic hinge and is easy to remove. I used zip ties for most of this.
Part 4 � after passing the video wire over the hinge I dropped this down to the side access panel along the big yellow wire. Then used a hanger to pull the cable from the access panel to the edge of the plastic right behind the rear passenger seat.
Part 5 � at this point the install was pretty easy. I pulled all the wire through and simply laid it where I would be using the tools provided to push the wire under the plastic. This whole process tool less than 15-20 mins and a cake-walk. Just stay close the edge, keep things taut and create gaps using the great tools provided.
Part 6 � getting to the fuse panel and glove box. There are 10 screws you will need to remove to drop the glove box (7 inside, 2 underneath outside, 1 on the fuse panel). Once it�s dropped you will notice how much room there is back there.
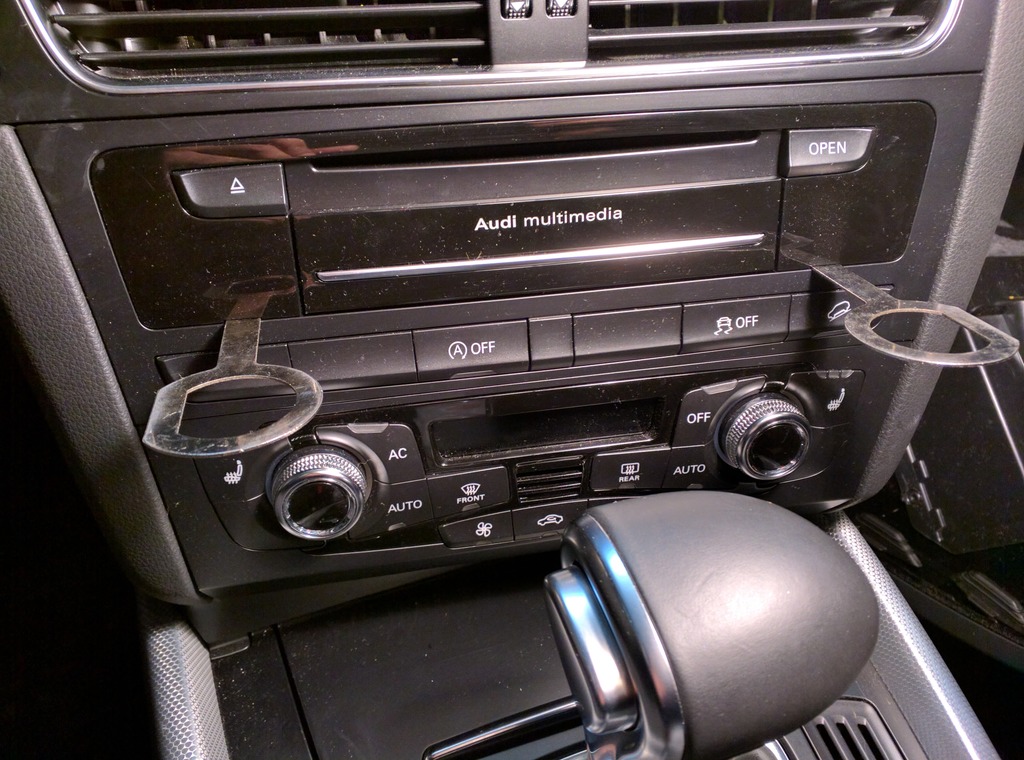
Part 7 � pulled the MMI unit. The keys provided were AWESOME, I�ve used a number of these in the past, but this was the first time EVER that the key worked the very first time. Once the MMI was pulled it was a simple disconnect of the middle cable to the provided RVC unit and basically connecting everything up again. There is enough room in the area behind the MMI that I simply ended up leaving the RVC h/w behind the unit and would be easy to access in the future.

Part 8 � cabling up. At this point, simply connect the video cable to the RVC h/w and then connect the powering. I used the guidance provided and simply tapped into the power on the lower 5amp power using a scotch wire connector.

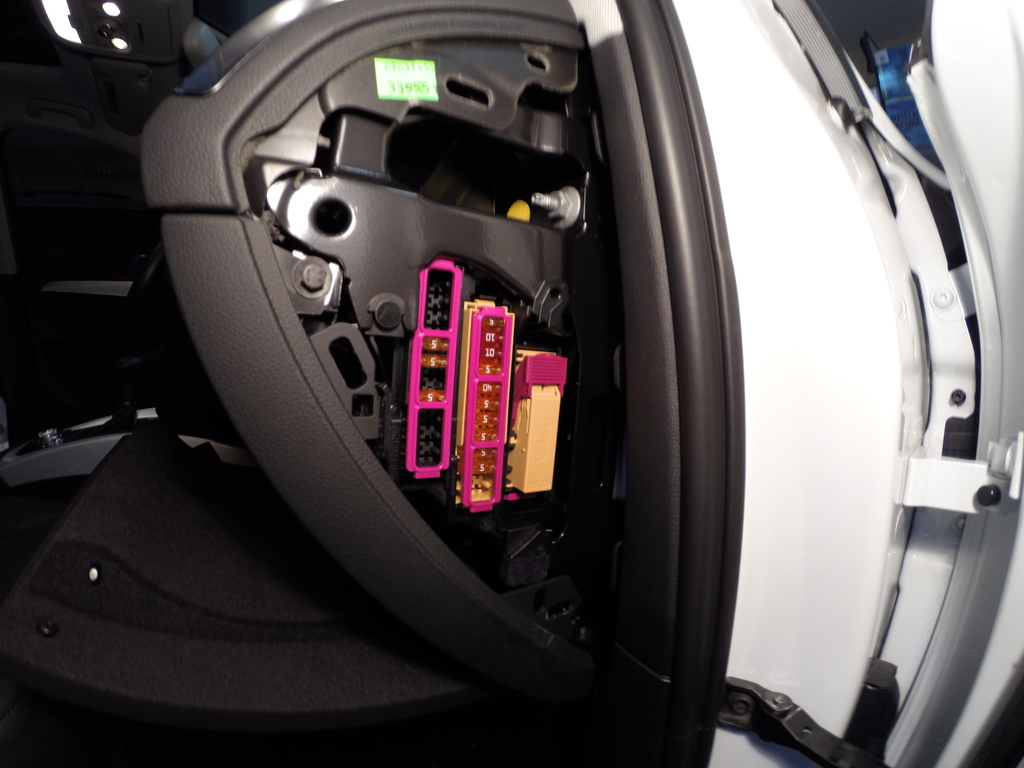
My only misgiving here and something I plan on addressing is that I wanted a VERY clean install and too look 100% OEM. I didn�t want to use a typical fuse tap and wanted to be able to use an opening in the fuse panel. However, I was unable to wire it from the back and left it wired from the front of the panel. I�m looking at remedying this in the next week or so�I just didn�t have my tools and my dad had none.
At this point�I tested AGAIN and everything worked perfect. The resolution on the screen is great and worked flawlessly every time the car was in reverse.
On the system I installed, it also shows a picture of a vehicle in the bottom left with front and rear sensors. This is strictly for looks, since the Q5 I installed in had rear parking sensors, but these did not visualize on the screen. The rear sensors continue to work, per design, and Eugene provided a firmware fix to remove the picture of the car and sensors�IMHO this would be great if it was integrated, but really isn�t of value by itself.
Overall the install took about 4 hours, but most of that was my dad second guessing almost all my decisions I simply continued to smile and thought, heck it's not a bad day helping out the guy who helped me so many times. Also, I think if I�d been in my garage I could have had it done in � that time
It�s a great product which works well and if you can do basic electrical work, you can do this. FWIW, my first job out of college was programming large scale PBX units, which meant running wiring was part of the job�perhaps that�s why that aspect of the install was fairly easy for me.
If you don't have RVC, get this product and do yourself a favor...you'll be happy you did.
2 days later I had the full kit and was ready for the install. The difference between my install and others is that mine was an MMI equipped unit.
Everything came well packed and complete, as you can see by the pic.
So I got my tools ready, as per what others have already stated on this thread. You don�t need much, but make sure you have the correct socket to remove the body panel screws.
The first step is to remove the lower hatch cover. There are only 4 screws to remove and you just need to use some gentle force on the top end (window) and lower portion to pry off the plastic�don�t be afraid to break things�since I don�t really think it�s possible, as long as you�ve removed the screws.
Once removed it�ll look like this and you can start removing the existing handle. You�ll need to remove the license plate, but other than that after you�ve used your socket wrench just disconnect and pry the existing handle out.
Part 2 - remove the upper plastic hatch piece on the passenger side. There are no screws, but what a PITA to remove. I thought I was going to break things at this point and this was the biggest frustration during the install for me. However, there are 2 metal body panel clips which are REALLY wedged in there. You just have to use leverage and force these up and the whole side will come up.
Part 3 � start the install. I placed the new camera/handle in place and ran the wire along the existing wires up the passenger side hinge, which is covered by a plastic hinge and is easy to remove. I used zip ties for most of this.
Part 4 � after passing the video wire over the hinge I dropped this down to the side access panel along the big yellow wire. Then used a hanger to pull the cable from the access panel to the edge of the plastic right behind the rear passenger seat.
Part 5 � at this point the install was pretty easy. I pulled all the wire through and simply laid it where I would be using the tools provided to push the wire under the plastic. This whole process tool less than 15-20 mins and a cake-walk. Just stay close the edge, keep things taut and create gaps using the great tools provided.
Part 6 � getting to the fuse panel and glove box. There are 10 screws you will need to remove to drop the glove box (7 inside, 2 underneath outside, 1 on the fuse panel). Once it�s dropped you will notice how much room there is back there.
Part 7 � pulled the MMI unit. The keys provided were AWESOME, I�ve used a number of these in the past, but this was the first time EVER that the key worked the very first time. Once the MMI was pulled it was a simple disconnect of the middle cable to the provided RVC unit and basically connecting everything up again. There is enough room in the area behind the MMI that I simply ended up leaving the RVC h/w behind the unit and would be easy to access in the future.
Part 8 � cabling up. At this point, simply connect the video cable to the RVC h/w and then connect the powering. I used the guidance provided and simply tapped into the power on the lower 5amp power using a scotch wire connector.
My only misgiving here and something I plan on addressing is that I wanted a VERY clean install and too look 100% OEM. I didn�t want to use a typical fuse tap and wanted to be able to use an opening in the fuse panel. However, I was unable to wire it from the back and left it wired from the front of the panel. I�m looking at remedying this in the next week or so�I just didn�t have my tools and my dad had none.
At this point�I tested AGAIN and everything worked perfect. The resolution on the screen is great and worked flawlessly every time the car was in reverse.
On the system I installed, it also shows a picture of a vehicle in the bottom left with front and rear sensors. This is strictly for looks, since the Q5 I installed in had rear parking sensors, but these did not visualize on the screen. The rear sensors continue to work, per design, and Eugene provided a firmware fix to remove the picture of the car and sensors�IMHO this would be great if it was integrated, but really isn�t of value by itself.
Overall the install took about 4 hours, but most of that was my dad second guessing almost all my decisions
I simply continued to smile and thought, heck it's not a bad day helping out the guy who helped me so many times. Also, I think if I�d been in my garage I could have had it done in � that time It�s a great product which works well and if you can do basic electrical work, you can do this. FWIW, my first job out of college was programming large scale PBX units, which meant running wiring was part of the job�perhaps that�s why that aspect of the install was fairly easy for me.
If you don't have RVC, get this product and do yourself a favor...you'll be happy you did.
Last edited by raj99; 12-30-2015 at 07:19 AM.
 12-30-2015, 08:56 AM
#26
AudiWorld Super User
Another success story! Nice job!
So if you have a MMI you need to pull it, that is nice that you got the removal keys with the kit. AMI owners don't seem to get the free keys with the AMI kit and you do need them to remove the in glove box AMI unit.
The review camera should have been standard on all Audi's many years ago...........
12-30-2015, 10:20 AM
#27
Another success story! Nice job!
So if you have a MMI you need to pull it, that is nice that you got the removal keys with the kit. AMI owners don't seem to get the free keys with the AMI kit and you do need them to remove the in glove box AMI unit.
The review camera should have been standard on all Audi's many years ago...........
So if you have a MMI you need to pull it, that is nice that you got the removal keys with the kit. AMI owners don't seem to get the free keys with the AMI kit and you do need them to remove the in glove box AMI unit.
The review camera should have been standard on all Audi's many years ago...........
I agree that the rvc should be standard in this day and age, since my brother's 08 mid range Odyssey has it!
01-02-2016, 10:33 AM
#29
01-23-2016, 09:57 AM
#30
AudiWorld Member

Got the kit a few days ago and researching all the details regarding the install. Everyone's detail above has been super helpful in visualizing the whole install process so I will def be posting a few pics of my install as soon as the weather warms up. I did notice one issue that I haven't seen come up in any of the posts - the replacement handle with camera no longer has the hatch opening switch so you'll have to use either the switch in the drivers door or on the on the key fob.
The only step I'm still mulling over is the power connection at the fuse box, whether to go with oem look or just go with a piggyback fuse tap. I'd prefer the oem not just for the look but also for keeping the fuse retainer once I'm done but just looking at the pics it looks very tight behind the fuse box if you tried to do connections back there. Anyone who's done this care to weigh in. Thanks.
The only step I'm still mulling over is the power connection at the fuse box, whether to go with oem look or just go with a piggyback fuse tap. I'd prefer the oem not just for the look but also for keeping the fuse retainer once I'm done but just looking at the pics it looks very tight behind the fuse box if you tried to do connections back there. Anyone who's done this care to weigh in. Thanks.