Rear hatch interior trim removal?
 01-27-2012, 11:37 AM
#11
Audiworld Junior Member

Join Date: May 2011
Posts: 65
Likes: 0
Received 0 Likes
on
0 Posts
When I had the rear camera put in I saw that they had to really give it a good tug to get each sides of the rear panel off (after the 2 or 4 screws that had to be removed). But before the whole panel gets removed the light and hatch opening button wires had to be disconnected. I cringed when I saw the rear hatch dangling off one of the wires while the light yanked off and fell on the ground. It comes off rather easily if you know what you're doing. They're all held in with those spring-loaded steel tabs, I'm not sure what they're called.
They didn't have to get the top window surround off to run the wires, they only took one side off and ran wires through. So I didn't see the top surround but the backside is probably held in with the same spring clips.
They didn't have to get the top window surround off to run the wires, they only took one side off and ran wires through. So I didn't see the top surround but the backside is probably held in with the same spring clips.
 01-27-2012, 04:11 PM
#12
Audiworld Junior Member
Join Date: Mar 2011
Location: Up North, Canada
Posts: 62
Likes: 0
Received 0 Likes
on
0 Posts
Maybe these pics will give you a better idea of what's behind the rear hatch cover.
<a href="http://smg.photobucket.com/albums/v225/szyszlo/Audi/?action=view&current=A70-10871.png" target="_blank"><img src="http://img.photobucket.com/albums/v225/szyszlo/Audi/A70-10871.png" border="0" alt="Photobucket"></a>
<a href="http://smg.photobucket.com/albums/v225/szyszlo/Audi/?action=view&current=A70-10998.png" target="_blank"><img src="http://img.photobucket.com/albums/v225/szyszlo/Audi/A70-10998.png" border="0" alt="Photobucket"></a>
<a href="http://smg.photobucket.com/albums/v225/szyszlo/Audi/?action=view&current=A70-11013.png" target="_blank"><img src="http://img.photobucket.com/albums/v225/szyszlo/Audi/A70-11013.png" border="0" alt="Photobucket"></a>
<a href="http://smg.photobucket.com/albums/v225/szyszlo/Audi/?action=view&current=A70-11054.png" target="_blank"><img src="http://img.photobucket.com/albums/v225/szyszlo/Audi/A70-11054.png" border="0" alt="Photobucket"></a>
<a href="http://smg.photobucket.com/albums/v225/szyszlo/Audi/?action=view&current=A70-11055.png" target="_blank"><img src="http://img.photobucket.com/albums/v225/szyszlo/Audi/A70-11055.png" border="0" alt="Photobucket"></a>
<a href="http://smg.photobucket.com/albums/v225/szyszlo/Audi/?action=view&current=A70-11056.png" target="_blank"><img src="http://img.photobucket.com/albums/v225/szyszlo/Audi/A70-11056.png" border="0" alt="Photobucket"></a>
10-02-2012, 05:05 AM
#13
AudiWorld Newcomer

Join Date: Mar 2012
Posts: 5
Likes: 0
Received 0 Likes
on
0 Posts
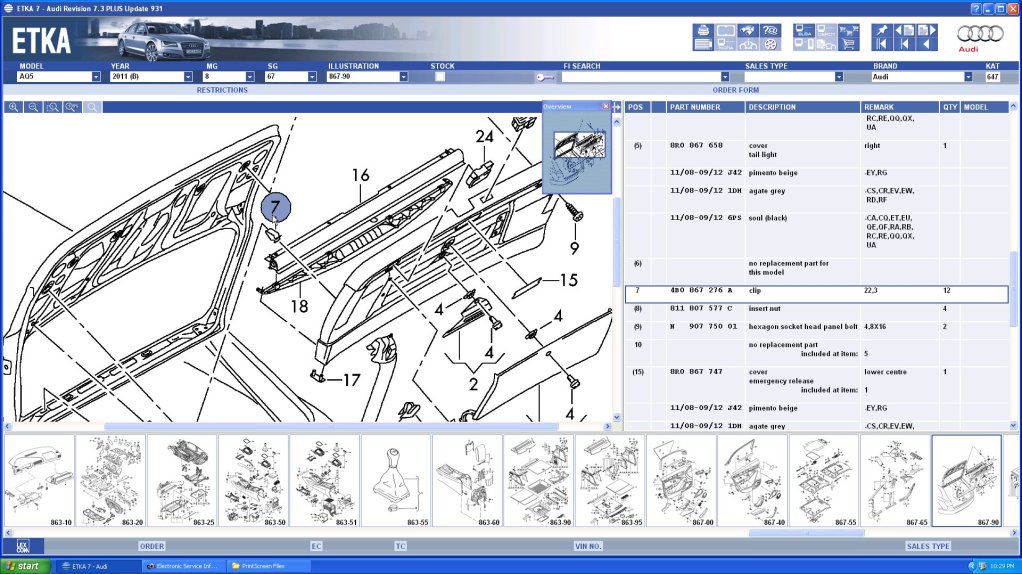
This is exactly what i need, on my A6 rear brake led panel has gone out. Most probably there is bad connector somewhere. So how to open joint No 17?

 10-02-2012, 07:56 AM
#15
AudiWorld Super User
 10-02-2012, 10:52 AM
#16
AudiWorld Newcomer
Join Date: Mar 2012
Posts: 5
Likes: 0
Received 0 Likes
on
0 Posts
Actually not sure is it No 17 or No 7 from this picture, anyhow, its that clip what holds main panel (item 1 from picure) from both sides attached to the rear hatch, didt want to brake anything either, so dropped whole thing. It may need some special tool, what you think?
10-02-2012, 11:34 AM
#17
Audiworld Junior Member

Join Date: Sep 2012
Posts: 42
Likes: 0
Received 0 Likes
on
0 Posts
Not hard at all actually. Took it off yesterday and put it on today. Probably could have taken pictures, but didnt think about it until now.
All you need is a 10mm socket, 6" extension, T25 torx socket/screwdriver, and probably some spare plastic tabs if you're prone to breaking them (like myself).
To remove the bottom half:
1. Remove those two plastic handles, they just pop out with a little tug.
2. There's one T25 screw on each side, remove and store somewhere.
3. Pull that center black piece out (has a 90 degree turning handle on it) and you'll find two more T25 screws.
4. Slowly pull off the plastic, it's just held in place with those metal clips someone mentioned earlier.
4a. You'll find little pieces of rubber randomly falling off, just watch where they go and pick them up later.
5. The lower plastic half is connected by two plugs, one on the left which is the lights and the one on the right which is the trunk control button. Disconnect those two and you're good for the bottom half.
Top half:
1. There's a T25 screw on each of the upper sides, unscrew and remove.
2. There's those cheap plastic push screws on each side - remove those.
3. The top plastic half also has the metal clips holding it in, pull it out slowly. Watch for more pieces of rubber.
Took me about a half hour to take it off just to make sure I wasn't breaking anything, but maybe ten minutes to put it back together.
10-02-2012, 11:41 AM
#18
AudiWorld Super User
Actually not sure is it No 17 or No 7 from this picture, anyhow, its that clip what holds main panel (item 1 from picure) from both sides attached to the rear hatch, didt want to brake anything either, so dropped whole thing. It may need some special tool, what you think?
What you model, year, and what do you need????
 10-03-2012, 03:41 AM
#19
AudiWorld Newcomer
Join Date: Mar 2012
Posts: 5
Likes: 0
Received 0 Likes
on
0 Posts
 10-03-2012, 03:59 AM
#20
AudiWorld Super User