How do I replace the headlight bulbs?
 11-02-2012, 11:09 PM
#31
AudiWorld Newcomer

Join Date: Nov 2012
Posts: 5
Likes: 0
Received 0 Likes
on
0 Posts
After reading all these post several times, I was not too confident that I could replace the headlight. I have had my Audi in for various light replacements, so many times I can't recall in the last 18 months. It was free under warranty, but last time I was there they told me this was a 30 minute labor operation, and with the bulb itself it would be $100. So that's what I paid... I asked the service manager if it wouldn't be better to change both bulbs while they were in there. He gave me a strange look and said they really didn't recommend changing a working bulb. I didn't push the point. I later realized that their billing system probably doesn't deduct the "overlap" labor operation, and he likely didn't want to explain to me that the cost for 2 bulbs would indeed be $200. I think he was wise, as I would undoubtedly have made quite the scene out of that. This is a great shop by the way. Unlike all other shops in my area of southern California, they are very trustworthy and honest. In any case the other bulb went out one month later; hence this post.
I am a complete mechanical idiot; meaning I will usually mess it up if I try something beyond taking a lid of a can. Sometimes I will mess that up also... I did manage to replace the bulb, and it took me about 20 minutes the first time. I would think I can do it in less than 5 minutes now. There should be no risk of the engine check-light going on as someone has mentioned. My shop told me they had not heard of that happening, and indeed it did not happen to me either. Make sure all power is off when you replace the lights, though...
Here are the steps, including a few details not mentioned in other posts.
1. Disconnect the power harness. This is actually very easy once you know the trick. Make sure to have good light. Use a medium size screw driver, and insert that inside, from the right side, the little hatch on the right side of harness connector (looking from front on left light) and give it a slight twist while pulling back on harness with other hand. It comes off easily without force.
2. Pull up on the right side tab; a medium strength pull should do it. Then push on right side button; you can simultaneously lift on the connecting part of the light assembly to release it. The whole assembly comes loose.
3. Now slide the assembly out. This is very scary the first time. You get the sense that the whole thing can get stuck. This will not happen though. It can get stuck on the right hand side , but gently slide it through by looking from the top and using fingers to steer it. Be patient the first time, and don't panic (yeah I panicked a bit...). Just be gentle and it comes out pretty easy.
4. Now put the whole thing on a table. The long light is behind the circular "door" which screws off, and the dipped light is behind a slider door, which slides with a push in direction of arrow indication.
5. Remove the power harness to the bulp, by just pulling it off. The light bulb is snapped in place and comes out easy using a regular plier. I mention this, because if you happen to be a mechanical idiot like me, you might be stumped for several minutes wondering if the German engineers now wanted you to screw of the whole front plate with 4 very hidden unusual screws... In any case this step should take about 7 seconds.
6 Put in new bulb, harness, door....
7 Slide the assembly back in. The trick here is to look from the top on the inside and make sure the flange on the assembly slides in place on the right hand side rail. As long as it is in place there, the whole assembly will slide in quite easily. As before be gentle and patient; no force is needed. Assembly harness snaps on easily.
A 100 dollars!? Come on; really Audi!? Next time I will do it in 5 minutes tops and make a YouTube video also...

 11-04-2012, 08:27 AM
#33
Audiworld Junior Member

Join Date: Jun 2007
Posts: 20
Likes: 0
Received 0 Likes
on
0 Posts
I just followed the steps in this post to remove my driver's side headlight assembly yesterday. I wanted to see how difficult it was and check the part number of my xenon headlight bulbs before ordering replacement bulbs. It's not difficult at all, but more photos would help.
I hope to edit this post with more photos in about a week after my new bulbs arrive, but the attached photo should be enough to help with releasing the wiring harness described above. For the driver's side headlight assembly, insert a flathead screwdriver into the opening on the release tab from the passenger side as shown. While twisting the screwdriver counter-clockwise gently with your left hand, wiggle the connector up and down with your right hand while pulling it straight back toward the rear of the vehicle. Eventually the connector will come loose.
I hope to edit this post with more photos in about a week after my new bulbs arrive, but the attached photo should be enough to help with releasing the wiring harness described above. For the driver's side headlight assembly, insert a flathead screwdriver into the opening on the release tab from the passenger side as shown. While twisting the screwdriver counter-clockwise gently with your left hand, wiggle the connector up and down with your right hand while pulling it straight back toward the rear of the vehicle. Eventually the connector will come loose.
11-06-2012, 02:04 PM
#35
AudiWorld Newcomer

Join Date: Nov 2012
Posts: 2
Likes: 0
Received 0 Likes
on
0 Posts
You are correct, just pull up that tab that is in the inner part of the head;lamp housing and then push down the tab that is on the outside of the assembly then push out the front of the car. Those screws hold the lamp assembly mount. The headlamp just slides into that mount.
Thanks.
11-09-2012, 09:55 PM
#37
Audiworld Junior Member
Join Date: Jun 2007
Posts: 20
Likes: 0
Received 0 Likes
on
0 Posts
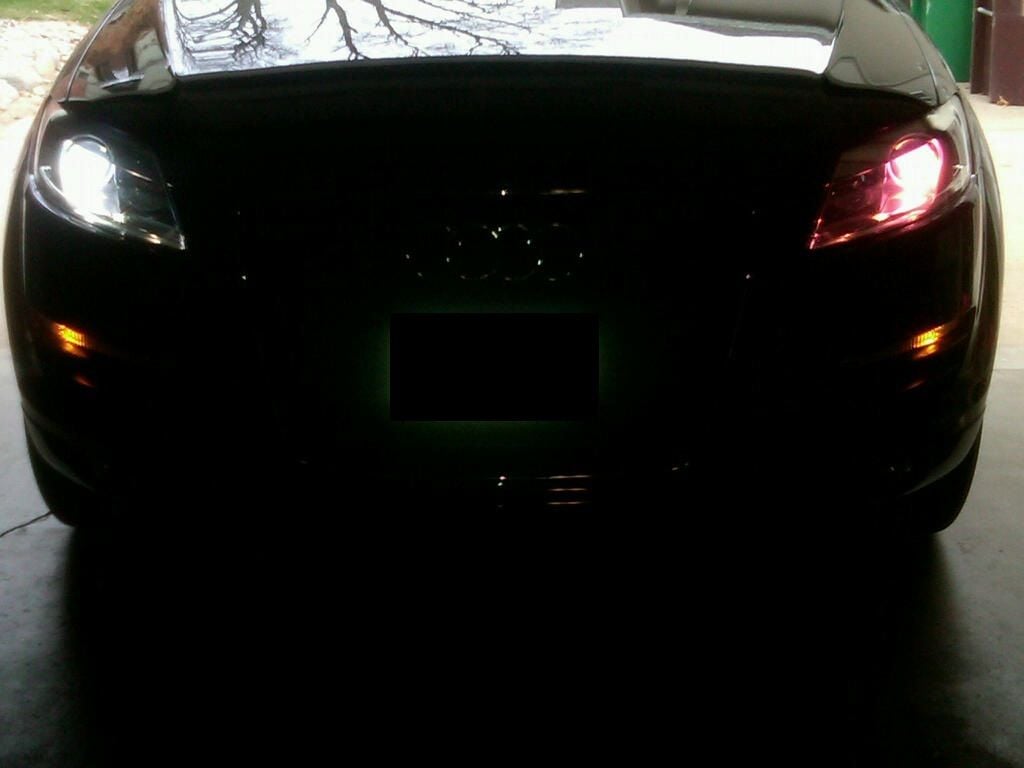
After five years and 52,000 miles, one of my daytime running light bulbs blew out. A couple of weeks later, one of my xenon headlight bulbs started turning purple, so I decided to replace all four bulbs at once.
Thanks to all of the preceding posters, who provided just enough information for me to tackle this job myself. I thought additional photos would be helpful for others.
Here are the relevant steps for replacing xenon adaptive bulbs and incandescent daytime running lights in a 2007 Q7. All of the photos and instructions refer to the driver's side assembly. The passenger side is a mirror image of the driver's side.
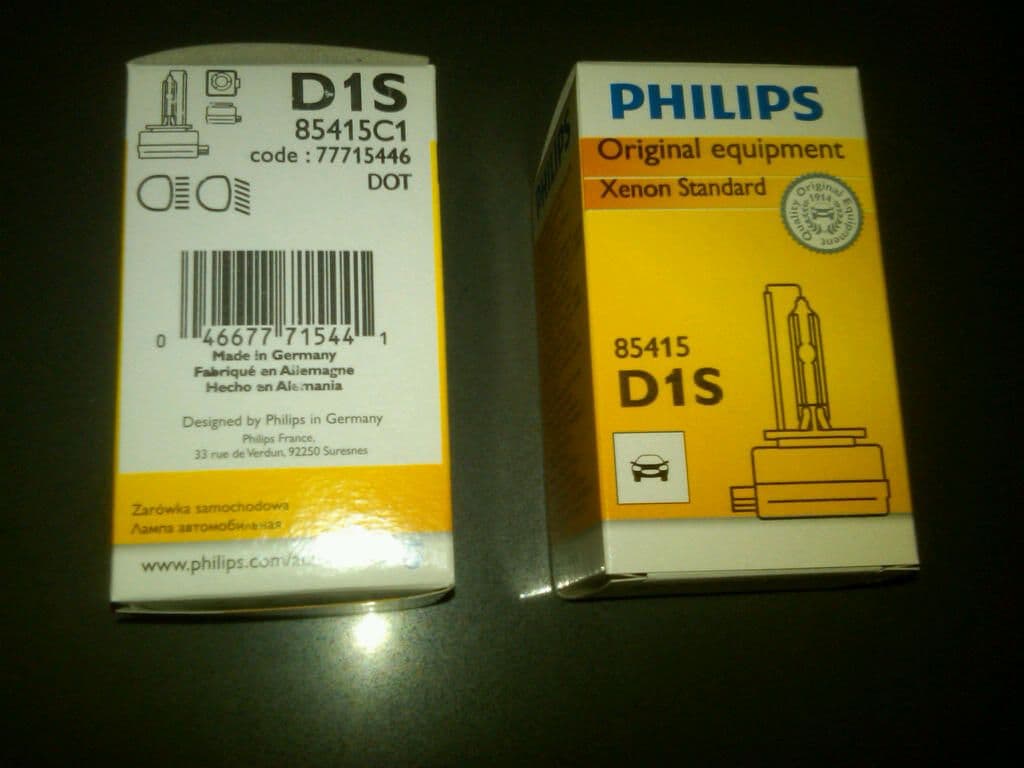
Here is a photo of base of the OEM bulb. It is a Philips D1S 35W Bulb. I assumed it's a 4300K bulb, so that's what I replaced it with.

I purchased new bulbs from kbcarstuff.com for $80 each.
A couple of notes before you start. You have to remove the headlight assembly to replace the xenon headlight bulb, but it is possible to replace the DRL bulb without removing the headlight assembly because the round access hatch is accessible while the headlight assembly is installed. I replaced the DRL bulbs myself that way, but it was awkward. The smaller your hands and the longer your fingers, the greater your chance of success. Access is easier with the headlight assembly removed.
Wear close fitting gloves for as many of the steps as you can. Not only do you keep your skin oil off of the lamps (which shortens their life), but you also avoid tearing your skin on the many sharp plastic edges that you will contact as you apply force during some of these steps.
Ignore the safety warnings in the owner's manual that recommend the dealer replace your xenon bulbs because they are high voltage. You have to remove the wiring harness before removing the headlight assembly, so the power will be disconnected from the xenon bulb before you get near it.
Replacing xenon and DRL bulbs didn't cause any fault codes to appear on my dashboard, so that shouldn't be a problem either.
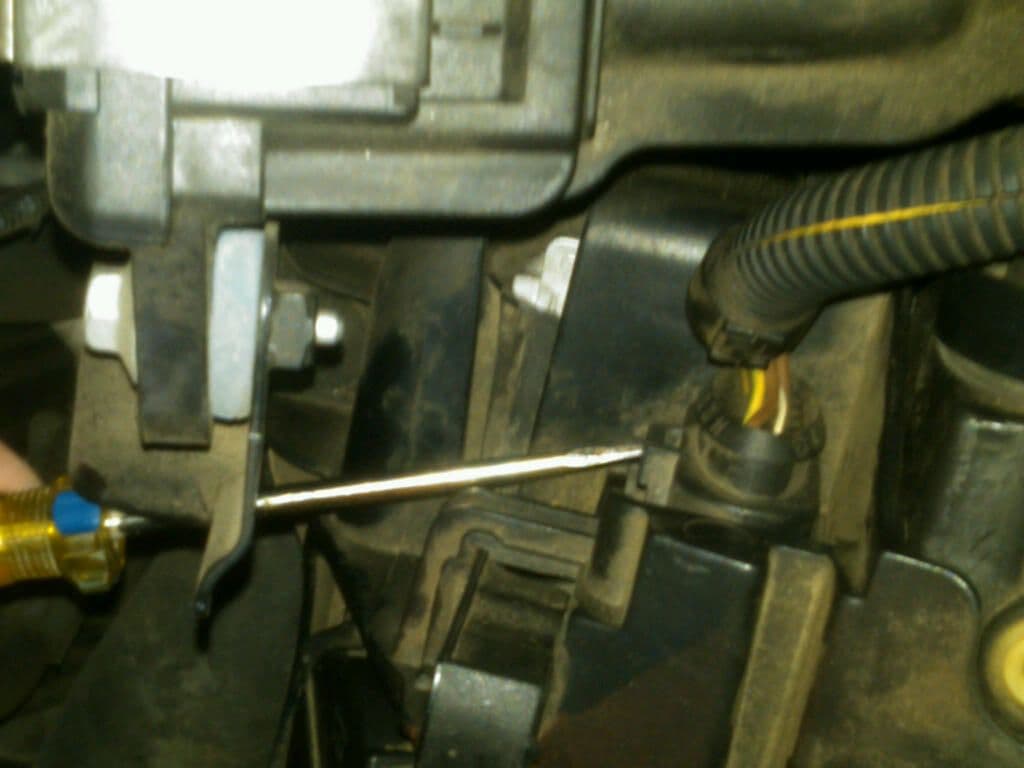
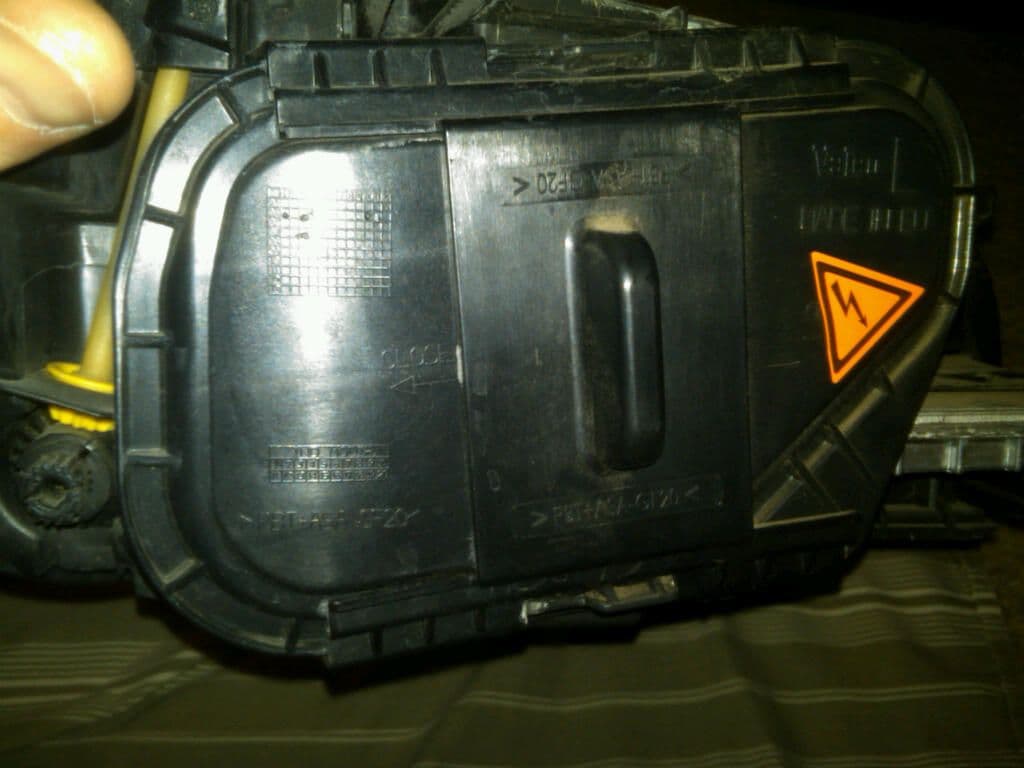
Step 1 - Disconnect the wiring harness from the back side of the headlight assembly. Insert a medium sized flathead screwdriver into the release fitting as shown below. The screwdriver shaft is level with the ground and sticking into the fitting from the side. Gently twist the screwdriver in either direction until you feel resistance. As you twist, it retracts a plastic catch inside of the fitting. Wiggle the base of the wiring harness up and down with your other hand as you pull it straight back toward the rear of the vehicle. If it's really stuck, look for an edge to pry back with another flathead screwdriver. Don't twist the first screwdriver harder - that doesn't help. It only takes a little bit of pressure to release the catch. Everything else is just the friction of removing the harness from the assembly.
Step 2 - Remove the headlight assembly from the vehicle. Pull up on the latch circled in red on the left side of the photo (it rises about 1 inch) and push down on the tab circled in red on the right side of the photo.

Now pull the headlight assembly straight out toward the bumper. As soon as it's moved a couple of inches, stop and look down at the inside edge of the assembly so you can see how the grooves of the alignment slot line up when you're ready to reinstall it.
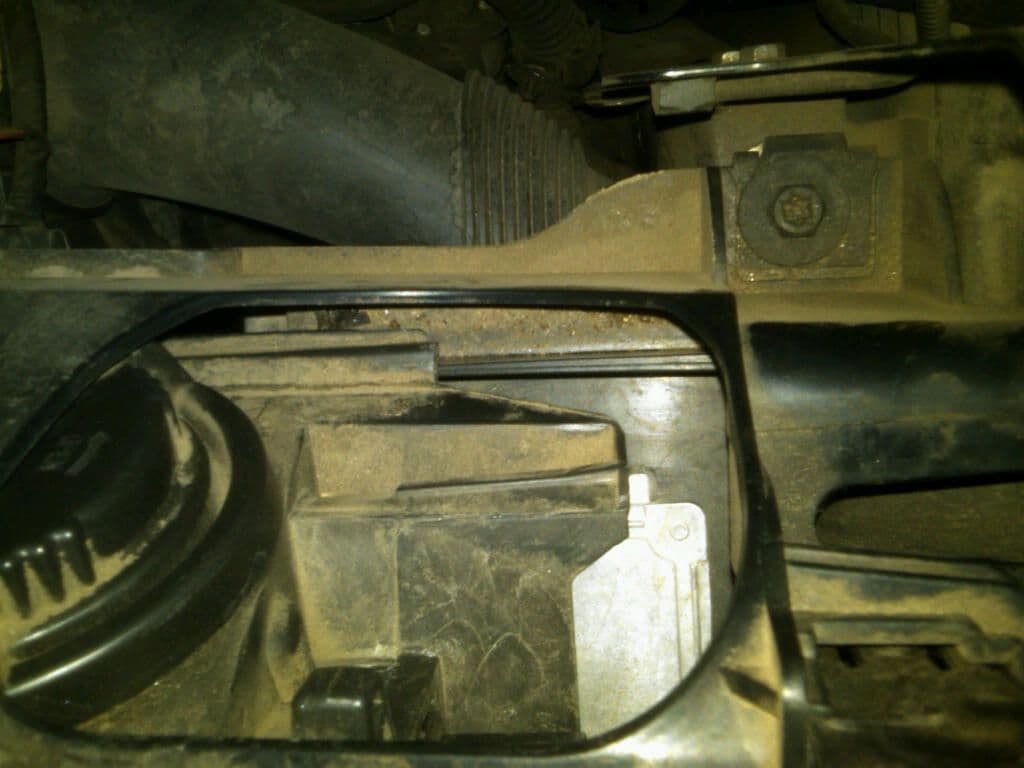
The assembly doesn't glide out smoothly. The inside edge will catch on the grill area. Pull it away from the grill as it comes out and it will eventually come free.
Step 3 - Replace the daytime running light bulb. Twist the circular hatch counter-clockwise to remove it. Reach in and grab the base of the DRL bulb. Push it in while twisting counter-clockwise to release it. Pay attention to how it was aligned as it came out so you will know how it goes back in. Remove the wires from the base of the bulb if necessary to gain better access. Replace the bulb and reverse the steps to reinstall.
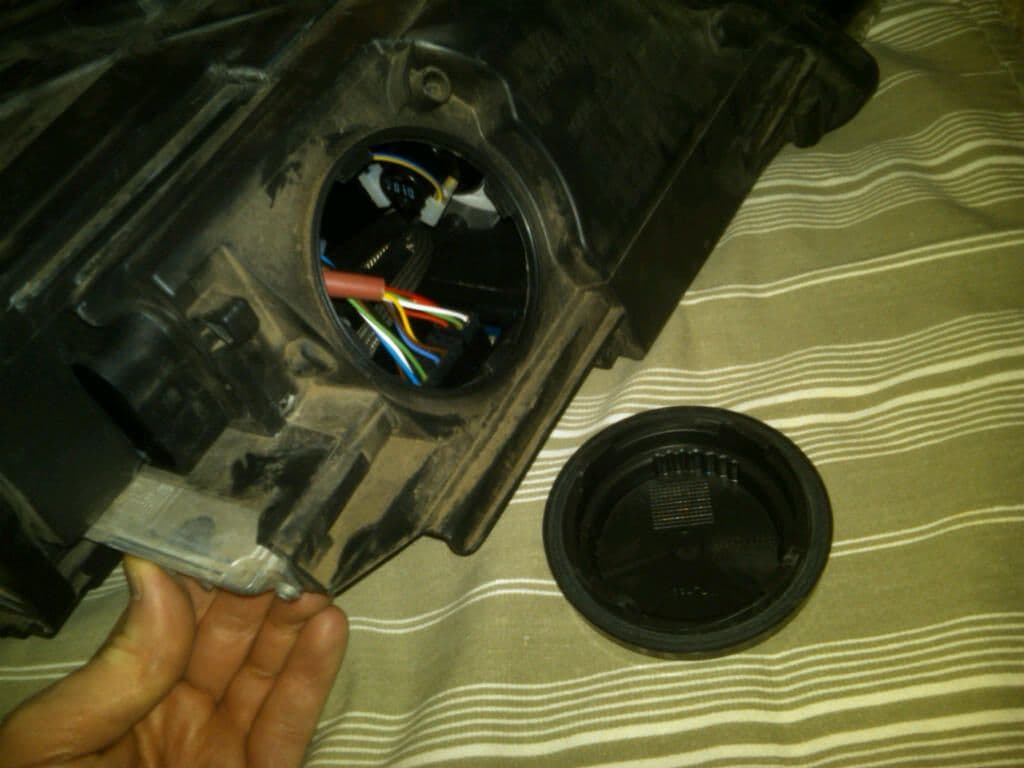
Step 4 - Replace the xenon light bulb. Slide the hatch to release and remove the back cover.
Disconnect the wiring harness from the bulb. This fitting doesn't have a release - it pulls straight down away from the base of the bulb. Reach past the base of the bulb with two fingers and find the two tabs on the plastic locking ring. Rotate the ring counter-clockwise to release. Wiggling slightly, pull the bulb straight back out of the silver gripping "fingers." Here is what the assembly looks like with the xenon bulb removed:
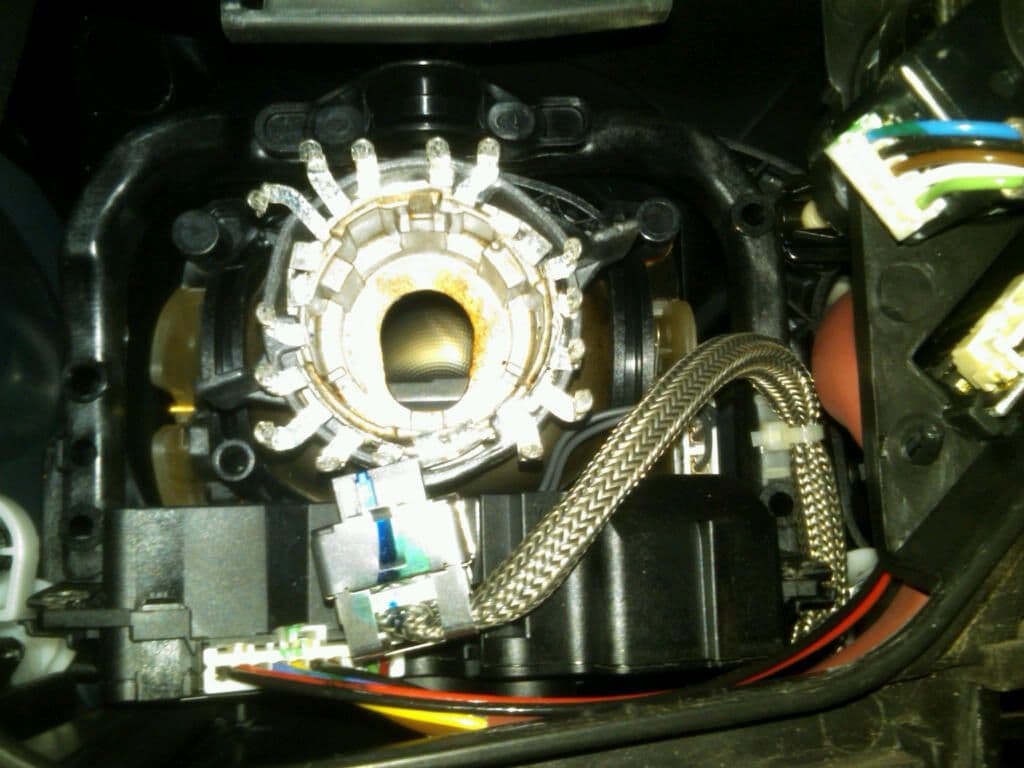
Step 5 - Install the new xenon light bulb. Making sure only to touch the base of the bulb assembly and not the filament, push it into place so that all of the fingers are gripping. Make sure it is fully seated on all sides. Tighten the locking ring by turning clockwise. Connect the wiring harness to the base of the bulb. Reinstall the hatch and slide to lock.
Step 6 - Reinstall the headlight assembly. Make sure that the alignment slots line up on the inside edge of the assembly. It doesn't go back in easily, but try slightly different angles until it lines up. Push the assembly all the way in until the outer catch is secure. Push down the inner catch. Reinstall the wiring harness by pushing straight onto the back of the asssembly until you hear the click of the catch falling home.
Success!

Thanks to all of the preceding posters, who provided just enough information for me to tackle this job myself. I thought additional photos would be helpful for others.
Here are the relevant steps for replacing xenon adaptive bulbs and incandescent daytime running lights in a 2007 Q7. All of the photos and instructions refer to the driver's side assembly. The passenger side is a mirror image of the driver's side.
Here is a photo of base of the OEM bulb. It is a Philips D1S 35W Bulb. I assumed it's a 4300K bulb, so that's what I replaced it with.
I purchased new bulbs from kbcarstuff.com for $80 each.
A couple of notes before you start. You have to remove the headlight assembly to replace the xenon headlight bulb, but it is possible to replace the DRL bulb without removing the headlight assembly because the round access hatch is accessible while the headlight assembly is installed. I replaced the DRL bulbs myself that way, but it was awkward. The smaller your hands and the longer your fingers, the greater your chance of success. Access is easier with the headlight assembly removed.
Wear close fitting gloves for as many of the steps as you can. Not only do you keep your skin oil off of the lamps (which shortens their life), but you also avoid tearing your skin on the many sharp plastic edges that you will contact as you apply force during some of these steps.
Ignore the safety warnings in the owner's manual that recommend the dealer replace your xenon bulbs because they are high voltage. You have to remove the wiring harness before removing the headlight assembly, so the power will be disconnected from the xenon bulb before you get near it.
Replacing xenon and DRL bulbs didn't cause any fault codes to appear on my dashboard, so that shouldn't be a problem either.
Step 1 - Disconnect the wiring harness from the back side of the headlight assembly. Insert a medium sized flathead screwdriver into the release fitting as shown below. The screwdriver shaft is level with the ground and sticking into the fitting from the side. Gently twist the screwdriver in either direction until you feel resistance. As you twist, it retracts a plastic catch inside of the fitting. Wiggle the base of the wiring harness up and down with your other hand as you pull it straight back toward the rear of the vehicle. If it's really stuck, look for an edge to pry back with another flathead screwdriver. Don't twist the first screwdriver harder - that doesn't help. It only takes a little bit of pressure to release the catch. Everything else is just the friction of removing the harness from the assembly.
Step 2 - Remove the headlight assembly from the vehicle. Pull up on the latch circled in red on the left side of the photo (it rises about 1 inch) and push down on the tab circled in red on the right side of the photo.
Now pull the headlight assembly straight out toward the bumper. As soon as it's moved a couple of inches, stop and look down at the inside edge of the assembly so you can see how the grooves of the alignment slot line up when you're ready to reinstall it.
The assembly doesn't glide out smoothly. The inside edge will catch on the grill area. Pull it away from the grill as it comes out and it will eventually come free.
Step 3 - Replace the daytime running light bulb. Twist the circular hatch counter-clockwise to remove it. Reach in and grab the base of the DRL bulb. Push it in while twisting counter-clockwise to release it. Pay attention to how it was aligned as it came out so you will know how it goes back in. Remove the wires from the base of the bulb if necessary to gain better access. Replace the bulb and reverse the steps to reinstall.
Step 4 - Replace the xenon light bulb. Slide the hatch to release and remove the back cover.
Disconnect the wiring harness from the bulb. This fitting doesn't have a release - it pulls straight down away from the base of the bulb. Reach past the base of the bulb with two fingers and find the two tabs on the plastic locking ring. Rotate the ring counter-clockwise to release. Wiggling slightly, pull the bulb straight back out of the silver gripping "fingers." Here is what the assembly looks like with the xenon bulb removed:
Step 5 - Install the new xenon light bulb. Making sure only to touch the base of the bulb assembly and not the filament, push it into place so that all of the fingers are gripping. Make sure it is fully seated on all sides. Tighten the locking ring by turning clockwise. Connect the wiring harness to the base of the bulb. Reinstall the hatch and slide to lock.
Step 6 - Reinstall the headlight assembly. Make sure that the alignment slots line up on the inside edge of the assembly. It doesn't go back in easily, but try slightly different angles until it lines up. Push the assembly all the way in until the outer catch is secure. Push down the inner catch. Reinstall the wiring harness by pushing straight onto the back of the asssembly until you hear the click of the catch falling home.
Success!
08-13-2013, 07:40 AM
#38
Audiworld Junior Member

Join Date: Jun 2013
Posts: 11
Likes: 0
Received 0 Likes
on
0 Posts
Guys, I don't think this work on a 2010+ model with the LED DRL. There is no way to take off the headlight without removing the bumper and I can unplug the wiring hardness connector.
Anyone attempt on the 2010+ LED DRL
Anyone attempt on the 2010+ LED DRL
08-16-2013, 06:29 PM
#39
Audiworld Junior Member
Join Date: Jun 2013
Posts: 11
Likes: 0
Received 0 Likes
on
0 Posts
Anyone in here know how to change the bulb for the the headlight that come with Daytime running light LED ? Please help. I really want to change mine to 6000k but I can't take out the bloody headlight.
08-19-2013, 04:37 AM
#40
Audiworld Junior Member
Join Date: Sep 2010
Posts: 17
Likes: 0
Received 0 Likes
on
0 Posts
Its the same steps. I had 2007 Q7 before and now 2011 Q7 and did it. Once you are able to slide the headlight, it takes patience and some wiggling to the left or right for it to slide out. The same goes when its time to put it back in.
I put in painter's tape on the bumper where it will make contact just so I don't scratch it.
I put in painter's tape on the bumper where it will make contact just so I don't scratch it.