DIY HID bulb replacements
 12-24-2009, 11:16 AM
#1
AudiWorld Super User
Thread Starter
Merry Cristmas eve all! I've gotten the pics, and the lights swapped out, total time for this mod (assuming some minimal mechanical hands on experience, and the right tools, 30 - 45 minutes start to finish both sides.
Stock bulbs are 4,300 (4.3K brightness), this is the light temperature measured in Kelvins. Suitable replacements cost around $140 a pair generally, our stock lights are 35 watt, some sell at 55 watt, and I would highly recommend you don't exceed the stock 35 watt, it can cause heat issues with the plastic headlamp assembly. Typical ratings over stock are 5K, 6K, and 8K, there is generally no cost for the different types.
The higher the rating, the "bluer" the light looks, but you also sacrifice distance the light illuminated. I couldn't tell much difference between the 4.3K stock and 5K, so I went with 6K - this gave me a cleaner, bluer light but I don't lose as much distance for going 8K, which has an almost purple hue to the lights (reference thread here, this is the company I ordered from - http://www.audizine.com/forum/showthread.php?t=329010
This DIY will cover the Driver's side removal, and once you can do that, the other side is nearly identical.
Stock lights:

Tools required:
- D3S or D3C replacement bulbs
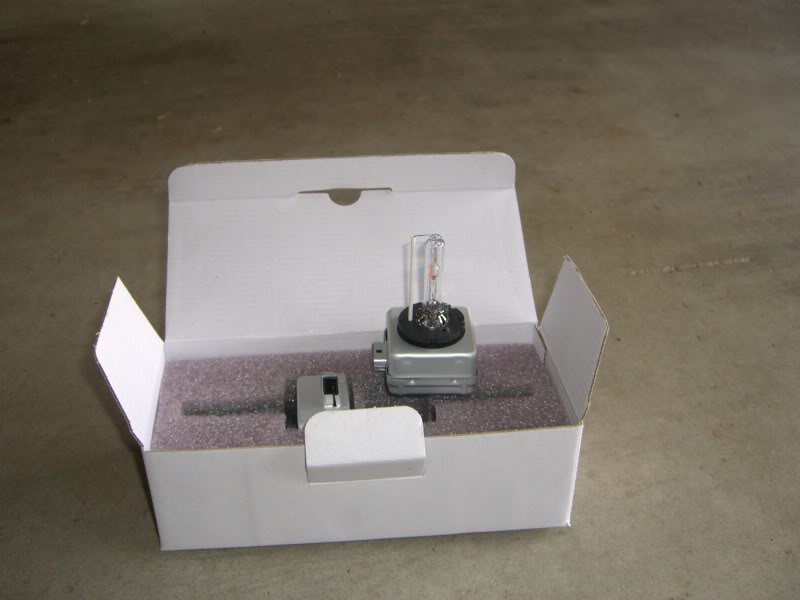
- Torx #30 bit (recommended rather than a screwdriver, as you will want an extension for this, the 2 rear headlight screws are deep)
- Clean, soft cloth to set light assembly on.
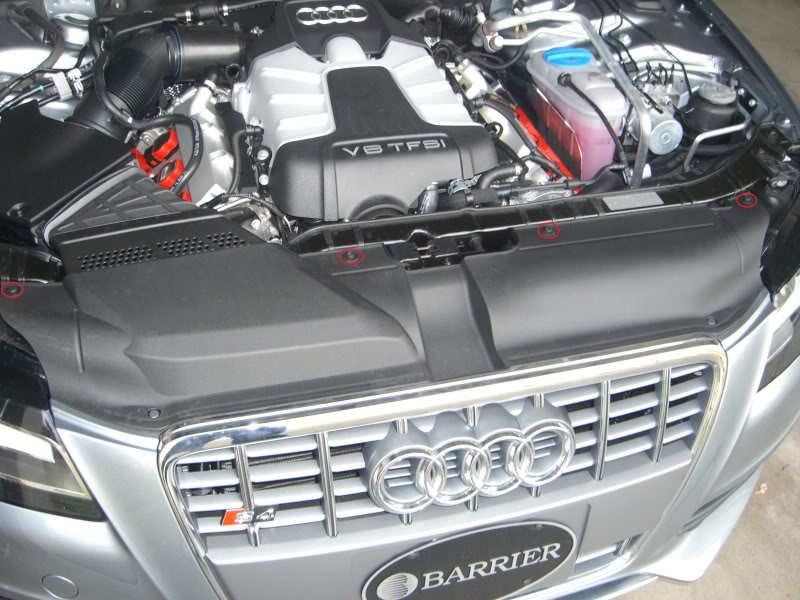
First you will need to remove the 4 screws holding the plastic cover across the top of the radiator crossmember circled in RED.
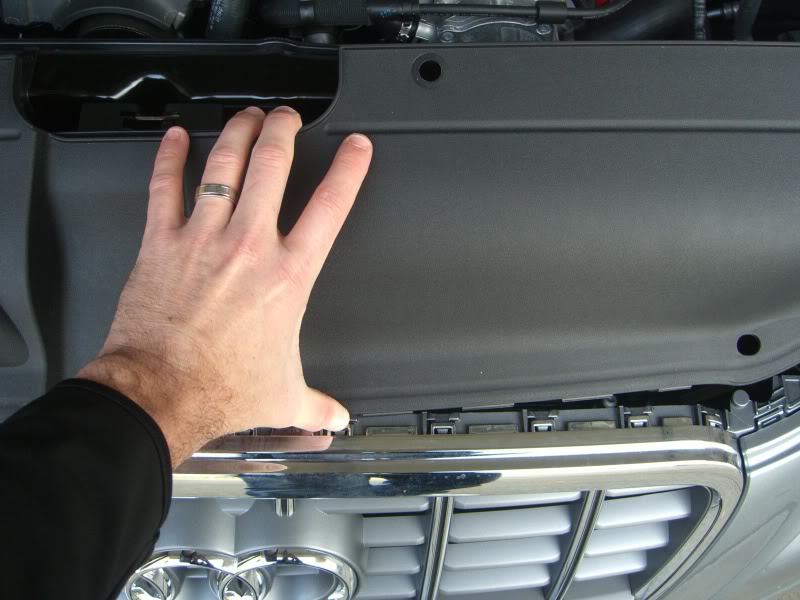
Now you will carefully remove this cover, by lifting the side towards the rear of the car, and pressing down, then back on the front side of this plastic cover as seen here:
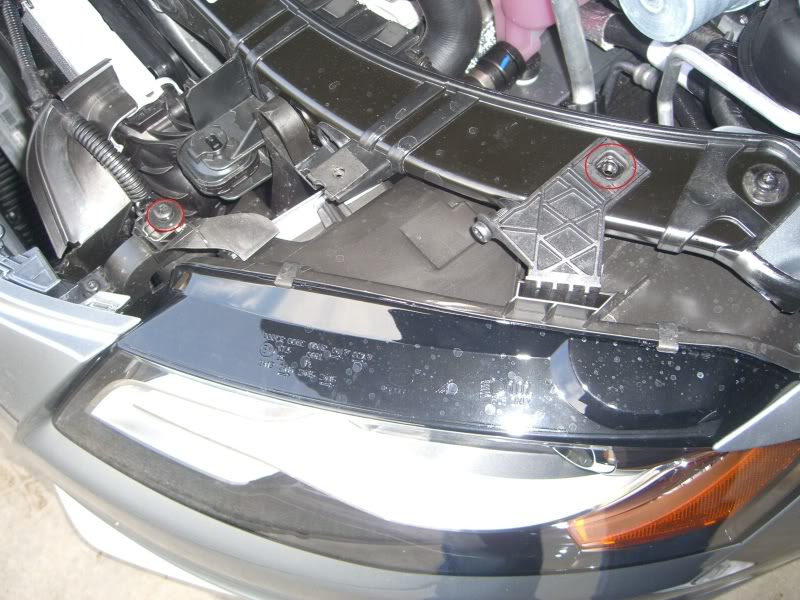
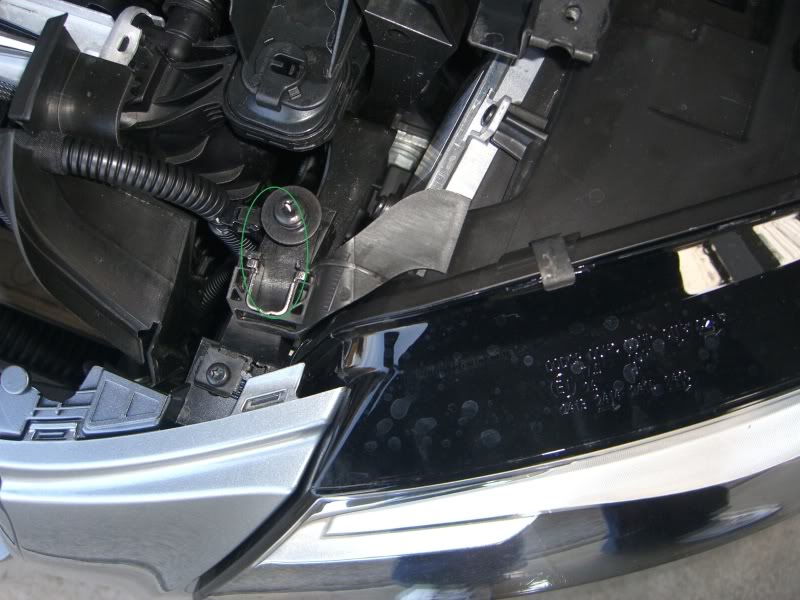
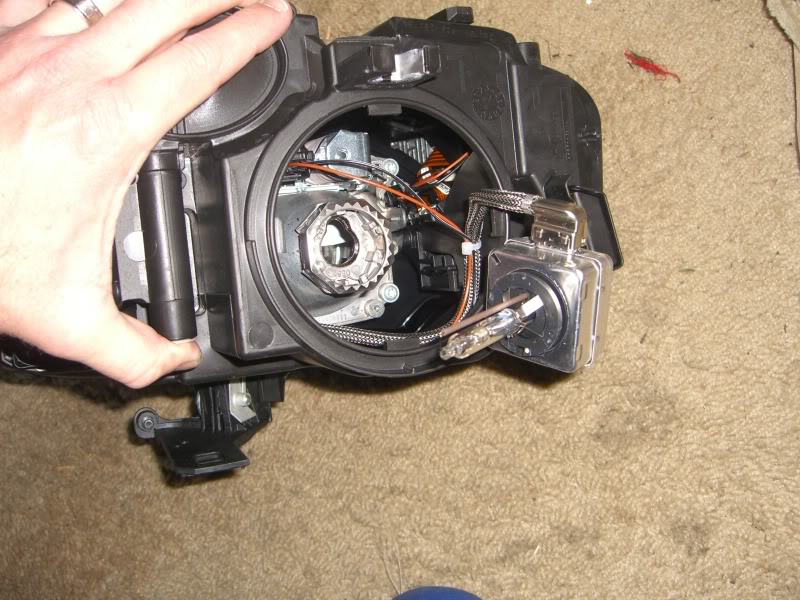
Once this cover is off, you will need to locate the 4 screws holding the headlamp assembly in place. You will remove the screw which is already removed and circled in RED, then loosen the other screw circled in RED.
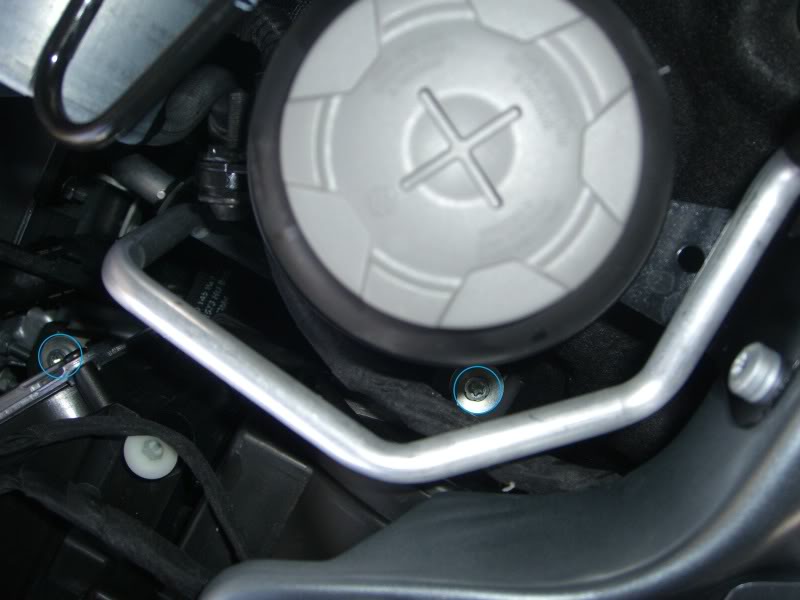
Next in the back of the headlamp assembly, locate the 2 shiny silver screws circled in BLUE and loosen these. About 2-3 turns is plenty loose for all the ones you are loosening.
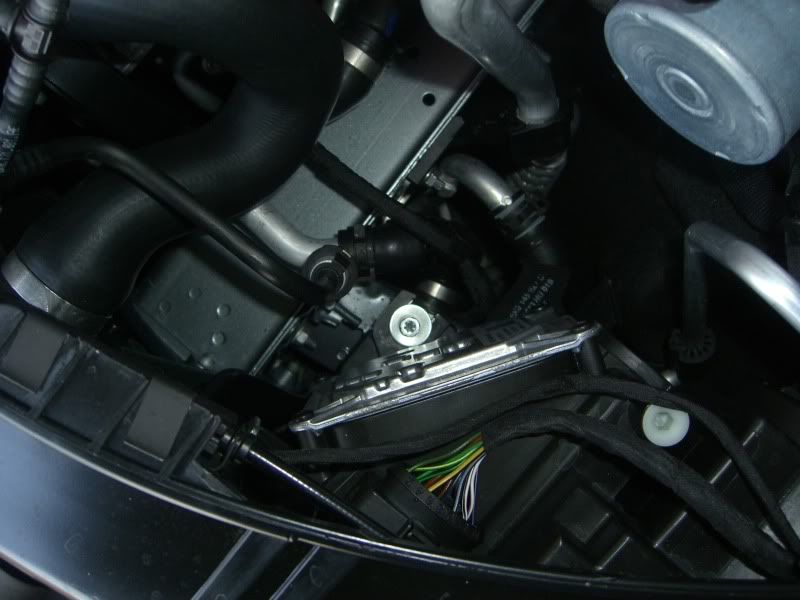
Now, using a small flathead screwdriver, you will insert it into the wiring harness tab that goes into the headlamp (seen below with all the colored wires going into it), to release the plastic tab and pull the plug off.
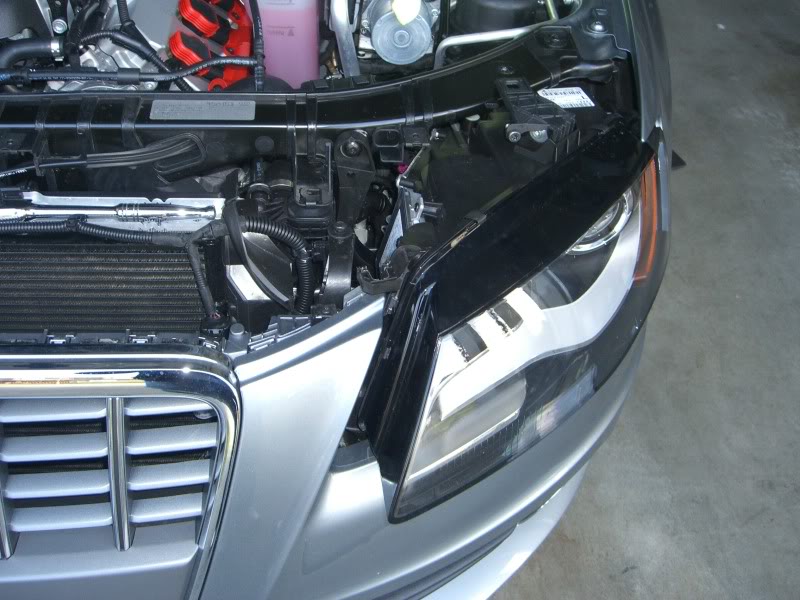
Once this is done, slide the assembly forward, you can see it's moved about 1/2 an inch circled in GREEN:
Next, you will tilt the front of the headlamp assembly up, and rotate it towards the front wheel on that side of the car, allowing easy removal:
Once out of the car, you can set the assembly down (lens side down) on something soft, and you will twist the ~3" round door on the back of the assembly counter clockwise about 1/8th of a turn and remove it, exposing the HID bulb.

Now, you remove the bulb, carefully grabbing the silver box housing and also gently turning it counter clockwise about 1/4 of a turn and VERY CAREFULLY pulling it straight out, minding not to bump it on the edges during removal.
***** These bulbs are sensitive, DO NOT TOUCH the glass at all, especially not with your hand. The oils from a fingerprint can damage these, not to mention from the heat they produce cause bulb failure *****
Reassembly is just the reverse order, carefully inserting the bulb to line up the marks on the assembly, twist to lock it, replace the door, twist and lock it. Re-inserting the headlamp can be tricky, as you need to reach in the back and lift the black plastic tray is sits on, and help guilde the openings on the bottom rear into the loosened 2 silver screws.
Once it's all lined up and sitting square like you had it, you can tighten the 3 screws again and replace the one you removed from the headlamp assembly. You will need to leave the 4 removed plus the plastic cover to repeat this for the passenger's side light. It's rear screws are down on the sides of the air filter box.
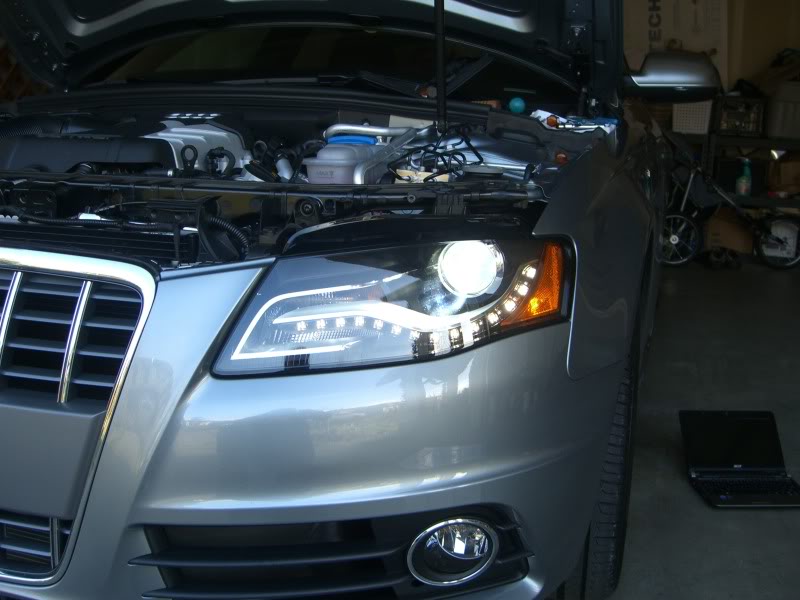
You are done, and this is what a 6K bulb looks like. You can compare this with the stock shot up top. I took all these pics as I was doing this today, they are all shots of my car
I'll get some night shots later on I hope!
Stock bulbs are 4,300 (4.3K brightness), this is the light temperature measured in Kelvins. Suitable replacements cost around $140 a pair generally, our stock lights are 35 watt, some sell at 55 watt, and I would highly recommend you don't exceed the stock 35 watt, it can cause heat issues with the plastic headlamp assembly. Typical ratings over stock are 5K, 6K, and 8K, there is generally no cost for the different types.
The higher the rating, the "bluer" the light looks, but you also sacrifice distance the light illuminated. I couldn't tell much difference between the 4.3K stock and 5K, so I went with 6K - this gave me a cleaner, bluer light but I don't lose as much distance for going 8K, which has an almost purple hue to the lights (reference thread here, this is the company I ordered from - http://www.audizine.com/forum/showthread.php?t=329010
This DIY will cover the Driver's side removal, and once you can do that, the other side is nearly identical.
Stock lights:
Tools required:
- D3S or D3C replacement bulbs
- Torx #30 bit (recommended rather than a screwdriver, as you will want an extension for this, the 2 rear headlight screws are deep)
- Clean, soft cloth to set light assembly on.
First you will need to remove the 4 screws holding the plastic cover across the top of the radiator crossmember circled in RED.
Now you will carefully remove this cover, by lifting the side towards the rear of the car, and pressing down, then back on the front side of this plastic cover as seen here:
Once this cover is off, you will need to locate the 4 screws holding the headlamp assembly in place. You will remove the screw which is already removed and circled in RED, then loosen the other screw circled in RED.
Next in the back of the headlamp assembly, locate the 2 shiny silver screws circled in BLUE and loosen these. About 2-3 turns is plenty loose for all the ones you are loosening.
Now, using a small flathead screwdriver, you will insert it into the wiring harness tab that goes into the headlamp (seen below with all the colored wires going into it), to release the plastic tab and pull the plug off.
Once this is done, slide the assembly forward, you can see it's moved about 1/2 an inch circled in GREEN:
Next, you will tilt the front of the headlamp assembly up, and rotate it towards the front wheel on that side of the car, allowing easy removal:
Once out of the car, you can set the assembly down (lens side down) on something soft, and you will twist the ~3" round door on the back of the assembly counter clockwise about 1/8th of a turn and remove it, exposing the HID bulb.
Now, you remove the bulb, carefully grabbing the silver box housing and also gently turning it counter clockwise about 1/4 of a turn and VERY CAREFULLY pulling it straight out, minding not to bump it on the edges during removal.
***** These bulbs are sensitive, DO NOT TOUCH the glass at all, especially not with your hand. The oils from a fingerprint can damage these, not to mention from the heat they produce cause bulb failure *****
Reassembly is just the reverse order, carefully inserting the bulb to line up the marks on the assembly, twist to lock it, replace the door, twist and lock it. Re-inserting the headlamp can be tricky, as you need to reach in the back and lift the black plastic tray is sits on, and help guilde the openings on the bottom rear into the loosened 2 silver screws.
Once it's all lined up and sitting square like you had it, you can tighten the 3 screws again and replace the one you removed from the headlamp assembly. You will need to leave the 4 removed plus the plastic cover to repeat this for the passenger's side light. It's rear screws are down on the sides of the air filter box.
You are done, and this is what a 6K bulb looks like. You can compare this with the stock shot up top. I took all these pics as I was doing this today, they are all shots of my car
I'll get some night shots later on I hope!
 12-24-2009, 11:54 AM
#3
Audiworld Junior Member

Join Date: Oct 2009
Posts: 69
Likes: 0
Received 0 Likes
on
0 Posts
Nice writeup!
How many lumens do your bulbs put out VS the stock ones?
While 4300K is OK, noon sunlight at the equator during the summer is about 5500K, so there would be a lot of benefit going to 5K or 6K (assuming 5500K is not available).
How many lumens do your bulbs put out VS the stock ones?
While 4300K is OK, noon sunlight at the equator during the summer is about 5500K, so there would be a lot of benefit going to 5K or 6K (assuming 5500K is not available).
 12-24-2009, 02:00 PM
#7
AudiWorld Senior Member
Join Date: Apr 2009
Location: Washington State
Posts: 720
Likes: 0
Received 0 Likes
on
0 Posts
Great DIY - thanks for the write-up. A couple quick questions:
- Are the lights on our car self-leveling?
- Are there any adjustments for re-aiming the lights after this mod?
Trending Topics
 12-24-2009, 05:50 PM
#10
AudiWorld Super User
Thread Starter
They self level (HID's in the US are required by law to have this), and there is a tray you slide the assembly into, which assures that nothing has changed by this mod. There is no recalibration required. Just drove home with them, and they are perfect.