Audi A6 C6: How to Replace Headlight Bulbs
Has the headlight bulb in your Audi A6 died out? Get it fixed quick before it becomes a driving hazard, and a reason for a cop to pull you over.
This article applies to the Audi A6 C6 (2005-2011).
Headlight bulbs go out all the time. It can be surprisingly costly to have them repaired by a body shop – you're not only paying for the new parts, but the labor too. Save yourself some money and complete the job yourself, at home. The whole thing takes about 45 minutes, and if all you need to do is replace the bulb (as opposed to the entire light assembly), this is actually a pretty inexpensive job.

Materials Needed
- New headlight bulbs
- Phillips head screwdriver
- Flat head screw driver
- Socket wrench set
Passenger Side Headlight Replacement
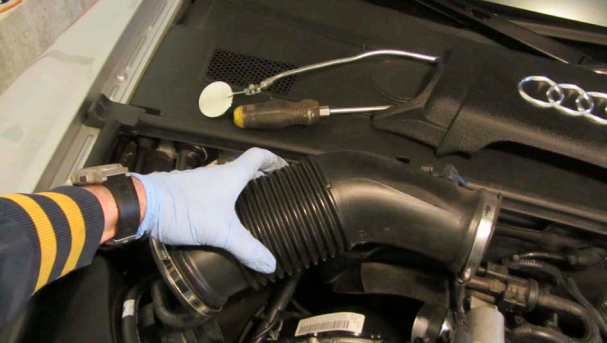
Step 1 – Remove the cold air intake
Remove the two screws holding the air intake to the front engine cover. Rotate the front piece counterclockwise to free it from the rear piece. When free, pull it out and then remove the rear by grabbing hold of it and popping it out of the air box.
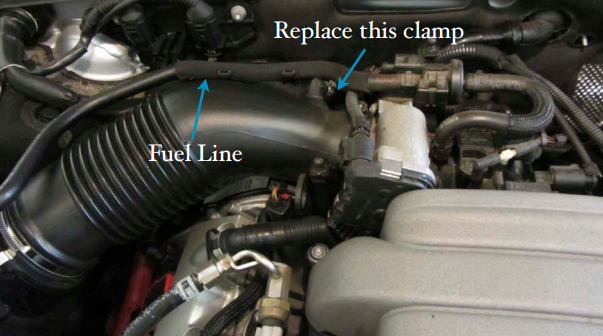
Step 2 – Remove the air hose
This component connects the air box to the throttle valve assembly — simply remove the plastic cover over the rear of the intake manifold. You’ll note there are three hose clamps — open them up with a screwdriver in the crimp area, discard, and replace with a small screw type. Once the hose clamps are loosened, remove the fuel line from the slip-in clamp on the rear of the air hose. Twist and pull the air line until it’s removed.
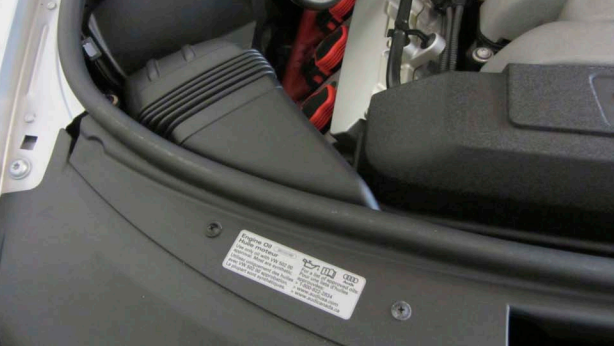
Step 3 – Take the cover off the air box
Remove the two clamps that secure the fuel lines to the top of the air box using a small screwdriver — pull the house out and slide the clamps off. Now undo the two metal clips that hold the air box cover closed (one’s on the front of the box and the other is near the rear; both are close to the top).
Pull the top of the air box open and remove the filter —you should now be able to see the bottom of the air box. Remove the fastener at the top right corner of the area (it attached the box to the fender) by pulling out the center pin. When you do this, grab the top of the box and pull it towards the center of the car, and lift the air box out. There’s a vacuum hose and wire on the rear of the box — the hose can stay (just slide out of the one clip); remove the connector and place the air box atop the intake manifold.
Step 4 – Remove the bulb
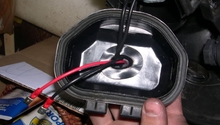
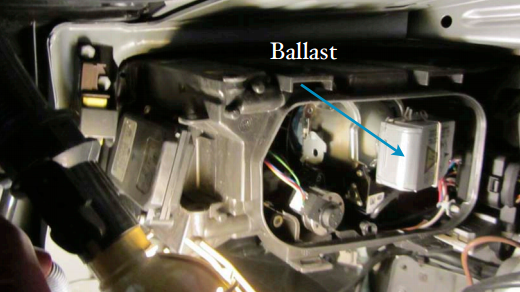
You finally have access to the rear of the headlight housing. Two clips that hold the cover on are located at the bottom of the unit. Get both hands in there and pull up one of the tabs. Repeat for the other tab. When they’re both out, you can pull the cover off. When it’s away, you’ll see an aluminum box on the right of the headlight—there’s a clip there that holds the ballast in place. Disconnect the power. Remove it and twist the ballast about 45 degrees counterclockwise and pull it off the bulb (make sure to disconnect power before doing this – you are at risk of being shocked if you slip).
Doing this also ejects the connector from the socket—remove it the rest of the way and put the ballast to the side. You can now see the bulb — it’s being held in place by two clips. Remove them and take out the bulb.

Step 5 – Replace the bulb, and reinstall all components
- Do not touch the glass of the new bulb when installing it (the oil on your fingers can damage it). Wear gloves. Hold the bulb by its base, position the tabs properly, and slip it into the headlight. Go ahead and quickly fasten in both retaining clips.
- Move on and install the ballast and position it so the arrow on it is pointing about 45 degrees above horizontal. Slide it onto the bulb. Rotate the bulb clock-wise to lock into place.
- Reinstall the connector on the ballast, and route the clip over the wire before sliding the wire into the recess. Refasten the ballast clip.
- Turn the headlight on and test bulb to ensure it works. If it does, install the air box, filter, and cover. Then, reinstall the air hose and tighten the clamps to ensure it’s in there tight.
- Finally, reinstall the cold air intake, covers and all.
Driver's Side Headlight Replacement
Step 1 – Remove the rear cover from the headlight
There are two clips on the back of the driver side headlight – press each one down and pull out slightly until they’re no longer attached. Pop the cover open and pull it up and down to remove it from the low tabs and clips holding it in place.

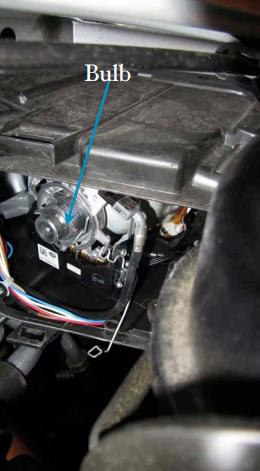
Step 2 – Remove the bulb
Slide your arm through the gap between the power steering reservoir and feel to access the headlight. Remove the clip on the ballast, rotate the ballast 45 degrees counter-clockwise, and remove it from the bulb. Remove the wire from the ballast, unfasten the two bulb retaining clips, and remove the bulb.

Step 3 – Replace the bulb and reinstall all components
Hold the bulb by the base (again, do not touch the glass with your fingers) and slide it into the headlight; fasten both retaining clips. Now go ahead and install the ballast — position it 45 degrees to the left of vertical and slide onto the bulb. There are four tabs on the ballast that should slip into the slots in the headlight. Rotate the ballast 45 degrees clock-wise to lock into place.
Reinstall the connector on the ballast by routing the clip over the wire and sliding the wire into the recess; refasten the ballast clip.
Turn the headlight on to ensure it works. If so, replace the rear cover on the headlamp by aligning clip slots and snapping into place.
Featured Video: How to Replace Headlight Bulbs in Audi A6
Related Discussions
- How to Replace Light Bulbs in an Audi - Audiworld.com
- How Replace 2008 A6 4-2 Headlight Bulbs - Audiworld.com