Audi: How to Install Backup Sensor
Have you ever been backing up in your Audi and thought it would be easier with a backup sensor? This article will teach you how to install one.
This article applies to the Audi A3, A4 B7/B8, A6 C5/C6 and Q5/Q7 (2009-Present).
Buying an Audi is an investment, and it is a car you want to keep in pretty good shape; after all, nothing ruins the look of your new car like a big dent in the rear bumper. To keep this from happening, a lot of drivers rely on backup sensors in the bumper to let them know that there's something behind them that they may not be able to see. These handy devices are optional equipment on a lot of cars, but Audi's exceptional crossover didn't come with one as standard equipment, and that has led to a few dents in otherwise pretty rear bumpers. In this article you'll learn how to avoid all that by installing your own backup sensor in your Audi.

Materials Needed
- Phillips screwdriver
- 10mm socket
- Torx socket (or screwdriver)
- Drill with a step-bit
- Electrical tape
Step 1 – Remove the rear bumper
Before you can begin your installation, you'll need to get the rear bumper off of your car. This is one of the things that can intimidate some people, but as long as you are careful, there won't be a problem.
Begin by removing the tow hook covers on each side of the rear bumper. Once those are off, if you look into the assembly from an angle, you will see a Phillips screw. Remove that screw and then the tail light assembly will come straight out. Undo the electrical connections to the lights and set them aside.

Once the tail lights have been removed, the next thing you must do in order to take off the bumper is to detach the plastic cover along the back side of your trunk. There are no bolts for this one, just plastic attachment pegs, so just pull straight up and it will come off for you. This will reveal some wiring and, more immediately important, a pair of black plastic openings. There is a 10mm bolt in each of them you will need to get out of there.

Now open the access panel on the driver's side of the hatch. You will need to remove your tire pump and its Styrofoam holder by rotating the plastic clips holding them in place counterclockwise (left loosens just about always). You will find a 10mm nut to remove low in the hatch here. Once that is done, you will need to remove another nut on the passenger side, although it may be useful to move the lower fuse panel over so you can access it a little easier on that side.

You will find four Torx screws that need to be removed in each wheel well. Once those are removed, you can pull up the cover to see the support your bumper was screwed to. You need to pull the bumper out and over the support. When you pull out on the bumper cover, remember to also be pushing up so as not to break the clips that hold the bumper in place.

Pro Tip
The bumper will be hanging on by its electrical wires. Don't worry, you haven't missed a step.
Step 2 – Drill the holes for your sensors
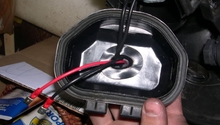
Now that you have the bumper removed from the car, you need to drill the holes for your sensor nodes. Conveniently, the bumper has an "x" already marked where you will need to drill. Drill a small hole out from the back of the bumper where it is marked, and then drill from the outside with your step-bit up to 13/16". Once your holes are drilled, cutoff or drill a small notch to give the locator ridge on your sensors clearance.

Step 3 – Run your wiring
As soon as your sensors have been installed into the holes drilled in the previous step, it's time to run your wires. Take your wiring and the tail light wiring up to the rubber grommet on the passenger side. Pull out the grommet and run your wires through it. You'll want to wrap electrical tape around where the wires come through the inside.

Step 4 – Set your grounds and tap the reverse light wiring
The head unit for your sensors will need a ground. For this you can pick just about any metal bolt you can reach; it is recommended to use one that is holding down a fuse box. Next up, locate the black wire with white stripes (that's your reverse light), and follow it to the grommet inside the car. Tap into the wire and connect the line from your sensor here. If you're confident in your soldering technique, here you can solder the wires together, although the wires simply need a connection, so any effective method will work here.

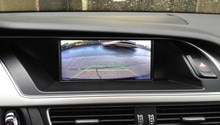
Once you have the wires set up, place your bumper back on the car loosely and test the unit by putting the car in reverse and listening for the sensors' alert tone (usually a beep). Your instruction manual will usually include a "set-up" procedure, which you should complete before tightening everything down, but once that is done, tighten down the couplings to your bumper and you're done. You can now breathe just a bit easier when you're in reverse, but remember: you'll still want to check your mirrors just to be on the safe side.
Related Discussion
- Backup Sensor Install - AudiWorld