|
|
Tools required 1 x Phillips head screw driver 1 x flat head screw driver 1 x 13mm socket & wrench 1 x mm socket 1 x side cutters 1 x pliers Contact cleaner and lubricant 5 x cable ties 1 x friend to help if available 1 x hour of your time and a little patience. First remove door trim as per JimR,s procedure from earlier post. "First: You MUST HAVE a nylon trim stick to do this. I expect that if you try to get by with a screwdriver, you will booger something up. Second: The Bentley CD misses about half the fasteners needed to remove the trim. If you're reading the manual, and looking at this, that's why they're so different. 1. Pry off the wood trim with a nylon trim stick. This will reveal 3 large Phillips head screws that are a major part of what holds the trim to the door. These screws are not mentioned by Bentley. 2. Pry off the lower door handle cover with a trim stick. This will reveal 2 screws that, when removed, allow removal of the upper door handle cover. Beneath that are two larger screws that attach the door handle to the door. 3. You'll need to lock the door, so you can work the top of the door trim over the pop-up. To the left of the arrow, there's a little Phillips screw in the door end at the trim that you'll need to remove. 4. There are a zillion plastic pop-ons around the lower perimeter of the door. Start at one end with the trim stick, and pop off the trim panel. 5. Once you get the trim panel loose, there's a cute little mechanism connecting the door handle to the door locks. Lots of small parts. Examine carefully before you remove. may Good luck! I'm going out to finish mowing the lawn, will be available for questions later. This ought to give you something to play with for a while. ;-) JimR" Thanks JimR. ..... THEN...... ***Cautions: *** 1.At all times take care not to bend cables as they may kink.2. Insulate all disconnected wires to avoid short circuits during procedure. 3. Mark window carrier position carefully before loosening bolts. 4. Watch for small clips attached to the Bowden cable at the door trim end. These traps aside the procedure is quite simple. First the obvious---check bulbs Then proceed to: Unfasten two Bowden cables and unplug wires from window carrier-remove cable ties etc. Remove rubber door seal to window height. -[fig 1.]  [fig1] Carefully mark position of carrier with felt pen then Loosen four large bolts in alphabetical order -[as per: fig 2 and 3] [Bolts c and d are the slightly longer ones].  [fig2]  [fig3] **Note:** Look carefully a route of release Bowden cable through carrier. Ignore Support carrier until removed. Do not to lose adjusting wedge -[E] fig 3. Then remove carrier by lifting up and taking care not to damage the Bowden cable [suggest easier with two people, also for replacement] [see fig 4&5]  [fig4]  [fig5] Release outside door handle from lock by swinging plastic clip to the side and gently pulling the metal lever attached to lock from handle mechanism. *Note: observe how this is connected at both ends for ease of reassembly. Undo two hex screws on outside edge of door and release plastic wire clips/cable ties to remove lock from door. - [ fig 6.].[The hose on top of the lock for central locking may be left connected if ties to door are released but take care not to bend kink 0r break this hose]. Suggest clean, lubricate and work the lock mechanism- [ Fig 7.] and check for damage.-You may want to reconnect wires so that behavior of lights can be observed but note that after some seconds the lights automatically switch off needing the door to be closed and opened again or the central locking operated on and off to reactivate switch.  [fig6] 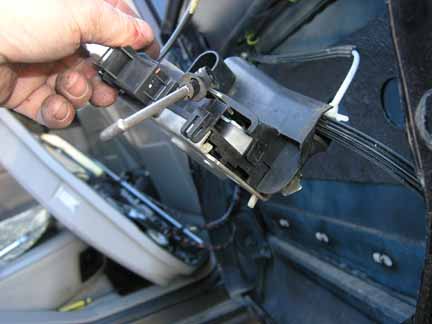 [fig7] Check that the cables are sliding very freely and allowing the lock to return to rest fully so closing the circuit and lighting puddle lights and door red warning lights. Also check the internal spring has enough power to pull the latch completely back to rest position with all cables connected and central locking operated as this pump is not all that powerful. **Note:** I observed that the lights worked fine when the release cable was disconnected and then on closer inspection noted my cable was a little impeded. As the inner was a solid sprung wire and because of the slight bend in the cable route from lock to handle had become ever so slightly kinked. [This would not matter in a new assembly, as the return spring in the lock would still be strong enough to pull the cable and catch to full rest position]. So I have had a soft wire inner made up to prevent recurrence. The cable inner should be very free moving to allow time-weakened spring in lock to return easily. If this does not fix then repair/replace lock or rig external return spring. [fig 8] shows part # for 1996 A8 heated lock  [fig8] Then carefully reassemble taking care to feed Bowden cable through the same route as it was without kinking. Use earlier marks to realign window carrier and tighten bolts in alphabetical order. Don’t forget the adjusting wedge. Reconnect wires and cables. Wash hands thoroughly Reassemble door trims. Pack up tools then go see what is for tea knowing that you have achieved something today that might stop someone stepping out of your car and into a puddle. “Oh the important things in life” |
|
Advertising |
Contact Us |
Cookie Policy |
Privacy Statement |
Terms of Service |
Do Not Sell My Personal Information
© 2020 MH Sub I, LLC dba Internet Brands |