|
|
My Audi iPod adapter came with version A.10. I'm sure there will be the same treasure hunt for Audi iPod updates in the future as it is for the Dension but for now it seems to be working fine (within the limitations of a CD changer like device course). I will go back and update the IceLink to version 2.10 or 2.14 (both available on the Internet) to see if that's an option instead of the Audi adapter. The other issue I had was that I didn't want to lose my XM radio and therefore I had to collect a couple of plugs, pins and wires before I could get this project started. After this rather long introduction I'm proud to report that my iPod works just fine together with XM. This is what you need to build a custom SAT+CDC harness between the SAT receiver and the 20pin mini-ISO plug behind the head unit:  - 9x pin mini-ISO male (or 5x repair wire part # 000 979 020) - 9x pin mini-ISO female (pin only part # N-103-357-06 or N-103-358-07) - 3x pin female for terminal housing T8s (or 2x repair wire part # 000 979 009) - 1x Connector I mini-ISO housing for male pins - 1x Connector I mini-ISO housing for female pins (part # 4B0-972-643) - 6m/18ft wire, shielded, 3 conductor, AWG 18-22 - 2ft wire, AWG 18-22 (only if you are not using repair wires for the mini-ISO male pins) An easy way to get most of the pins and plugs is to get the PIE AA3-HAR adapter from logjamelectronics.com. You will need to have the pin extraction tool to remove all wires from the plugs but then all you need in addition to the adapter is the 18ft wire, 2 repair wires for the T8s plug and a couple connectors. 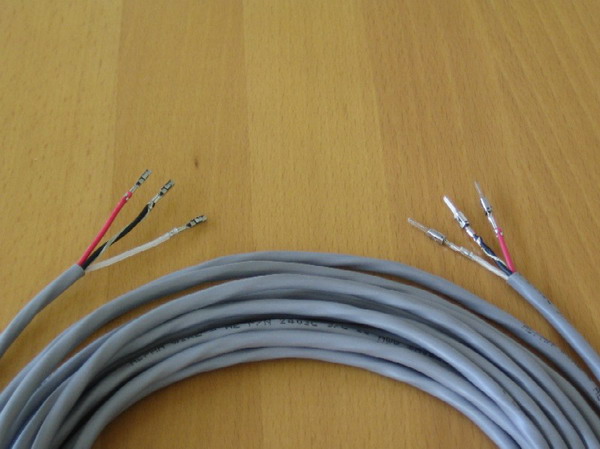 To get the audio extension, crimp the pins for the T8s housing to one end of the 3 conductor wire. On the other end get 3 of the mini-ISO male pins crimped.  In order to get the CD changer control wires to the new 20 pin terminal housing you will need 8 wires with a mini-ISO male pin on one end and a mini-ISO female on the other end. If you got the PIE adapter you can take those. If you got the male repair wires take those and crimp a female pin on the other end (4-5 inch of wire are plenty).  Insert the 3 audio wires into position 18, 19 and 20 in the new 20 pin Connector I housing. Insert the 6 remaining wires into 10, 13, 14, 15, 16 and 17. 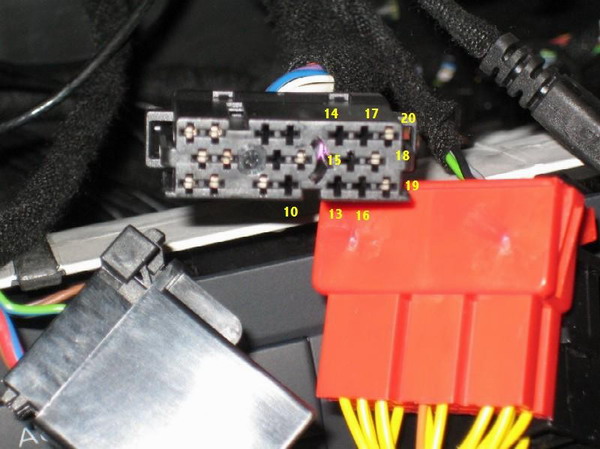 This is how Connector I looked in my SAT pre-wired 2004 A4. You can see that position 18, 19 and 20 are already used for the SAT audio. The other positions are left free. This is where the 6 wires from our new Connector I go. Carefully insert the pins into the same position on the old Connector I to extend the CD changer control and power wires to the new Connector I. When you are done you will have an empty Connector I available behind the head unit, ready to plug in any CD changer like device.  Now, all you have to do is to route the 3 audio wires back to the SAT receiver. I did that without removing the trim except the one under the steering wheel. I just stuck the wire under the trim, routed it under the rear seat and rear left trunk trim back to the SAT receiver. The SAT receiver in my B6 A4 Avant is located behind the left trunk trim, inside the black box which would also hold the CD navigation unit. To get the receiver out you would need to remove the trim (which requires to remove a couple other things as well) and the black box. Since I did it already once when I swapped my 1st generation receiver with the new 2nd generation receiver, I was to lazy to do this again this time. I managed to get the two plugs removed from the receiver through the opening in the black box. If you can't get the plugs out, see rtbarry's tech article on how to remove the trim to get to the SAT receiver You only need to remove the T8s housing (the one located further left looking at the SAT receiver from inside the trunk) but since it wrapped together with the T8r housing, it's easier to remove both.  It was a little tricky to get the T8s plug out of the SAT receiver but eventually it worked. Once you got the plugs out, slide the small lid open to get to unlock the pins. You may be able to insert new pins without sliding the lid open but I did it anyway. Once you got the T8s terminal housing out of the SAT receiver you will see that position 3, 4, and 8 are unused. This is where the 3 three pins from our custom audio harness go: Connector I, position 20, audio right -> T8s, position 4 Connector I, position 19, audio left -> T8s, position 3 Connector I, position 18, audio ground -> T8s, position 8 That's it. If you cannot select the CD changer on your head unit after plugging in a CD changer like device into the new 20 pin Connector I check the following two things: - Make sure that your head unit is coded to support a CD changer. Some head units will not allow the selection of a CD changer until they got properly coded. - If you are using an RNS-E adapter make sure that pin 10 is properly connected to CDC-GND. On some adapters this wire is missing. If your CD changer like device comes with a separate ground wire you can either connect that ground wire to pin 10 in Connector I or to chassis ground somewhere near the head unit. However, at least in one case the device (a Phatbox) did not work until the ground wire got connected to pin 10. If you get the Audio OEM iPod adapter you will see that it comes without a female Connector I terminal housing. This is because according to the Audi instructions, you have to remove the SAT audio wires from the existing Connector I and insert the iPod adapter wires into position 10 and 13 to 20. Now, if you got the adapter from logjamelectronics you will have a spare female terminal housing. If not then you would need to get a 4B0-972-643 to hold the Audi iPod wires. Have fun... |
|
Advertising |
Contact Us |
Cookie Policy |
Privacy Statement |
Terms of Service |
Do Not Sell My Personal Information
© 2020 MH Sub I, LLC dba Internet Brands |