|
|
For the B5 Guys (I know you like it short and sweet): 1)Find donor A4 to obtain heated seat controls, wiring harnesses and seats 2)Strip parts out 3)Install seat controls and wiring harnesses in your car 4)Optional Step: Swap seat covers to match your interior 5)Enjoy heated seats And to my fellow B5'ers...thanks for all your assistance with my A4! For those of you that have some time to kill tonight: I spent several months last year looking for a dedicated track car so I could retire the A6 from those events. Part of the "sale" to Mrs. GBW included the discussion that this A4 would also become the family transportation for skiing trips and trips into Manhattan, etc....places a few bumps and scrapes wouldn't matter. I finally found one in exceptional condition that had the timing belt, water pump and a bunch of other stuff recently completed...the only real disadvantage being a lack of the Winter Package and Sun Roof options. Not having those heated seats for the skiing trips was a major issue for Mrs. GBW....thus our journey begins! Parts List: From a donor A4: -Heated seat controls -Dash wiring harness (heated seat controls to kick panel) -Seat wiring harness (kick panel to seats) -Seat heating elements or a set of heated seats Various electrical items: -(1) 30 amp fuse holder (NAPA 782-3127) -(4) 22-18 Gauge Ring Terminals - waterproof/crimp/shrink tube (NAPA 784446) -(2) 12-10 Gauge Ring Terminals - waterproof/crimp/shrink tube (NAPA 785917) -(10) 22-18 Gauge Butt Terminals - waterproof/crimp/shrink tube (NAPA 725114) -(3) 16-14 Gauge Butt Terminals - waterproof/crimp/shrink tube (NAPA 785925) Hog Rings - 1 Box (500 rings) #5 size (NAPA 1220) Sheet Metal - .5*3 inches (to make a bracket for the fuse holder) You're going to need to know your Radio Code Tools: - 4 Audi radio removal tools - 8, 10, 13mm socket wrenches - #2 Phillips screw driver - wire stripers - Putty knife - lighter/matches - towel - Hog Ring Pliers - Needle Nose Pliers - Blue Masking Tape (to mark parts) - Torex T40 driver - Bentley Manual Step 1: Obtain the Wiring Harnesses: Fortunately, 4driver4 had just found a 1999.5 that had some issues, and he was parting it out. I stepped up to the parts line and the adventure was about to begin: 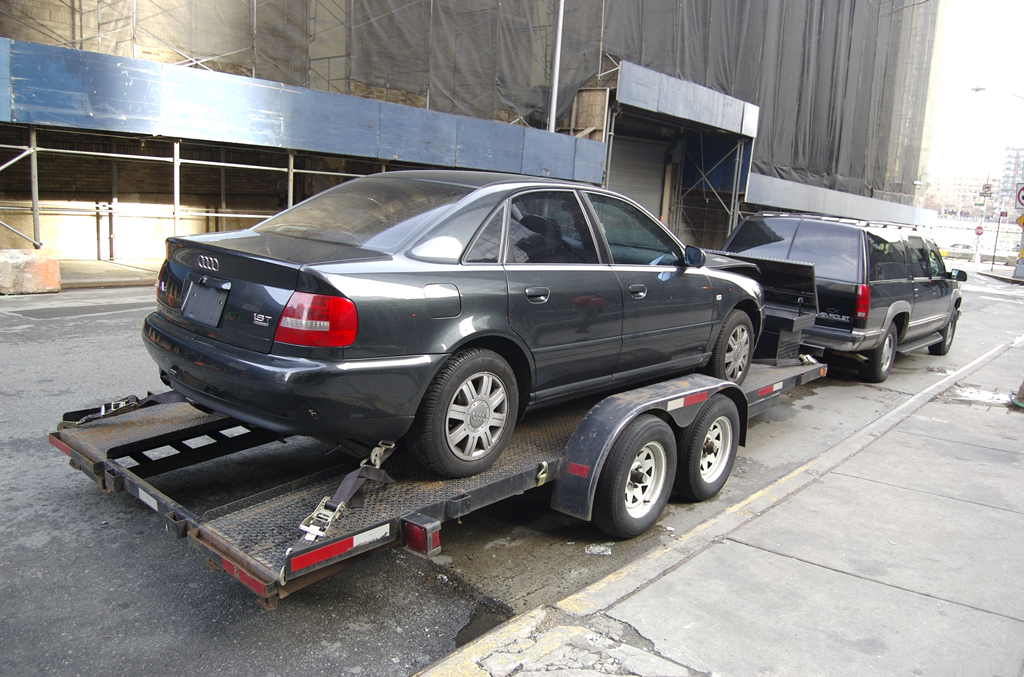 Since our objective was to obtain the wiring harness, we ended stripping the interior of the car to get to the main wiring harness under the dash, everything had to be removed to get to the harness. Before you remove the harnesses, label which Green Connector goes the drivers and passenger sides (at the "button" end in the center stack and under the front seat): 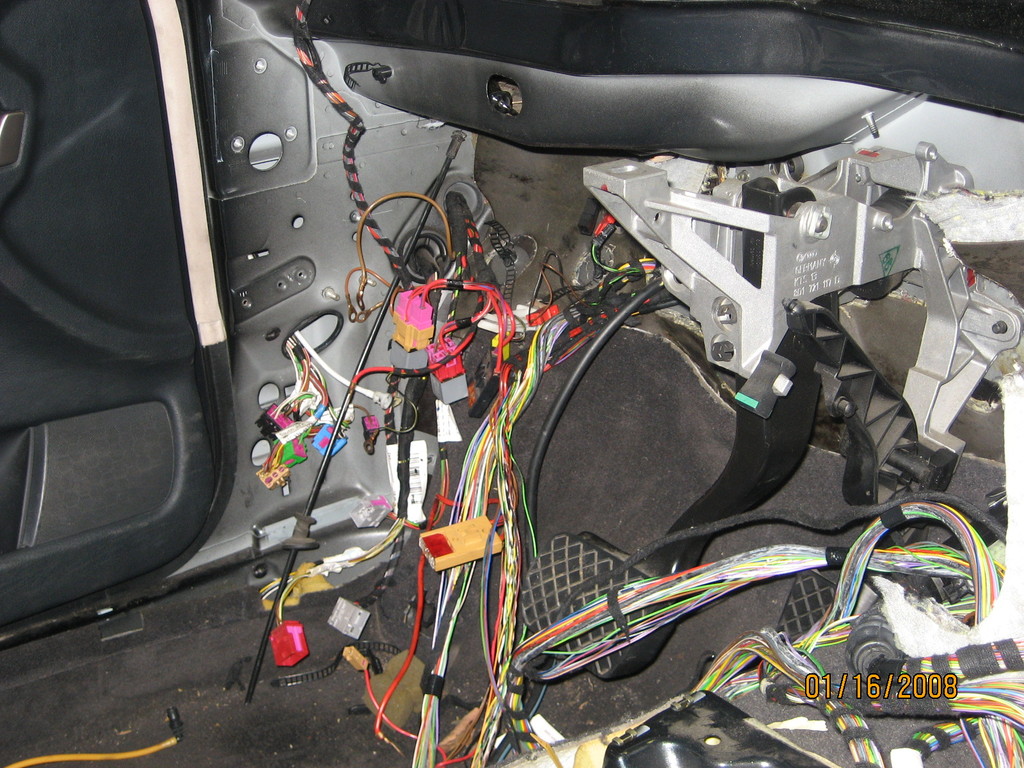 And this is what the dash wiring harness looks like. The next step was to peal off the black cloth tape to identify and separate the heated seat wiring harness from the controls to the kick panel:  Once I pealed off all the black tape, I traced out and numbered each wire end to end, using blue masking tape to identify each wire. I numbered them 1-12. There are a number are areas where Audi will clamp common wires together in the wiring harness with a large connector. Since I was going to have to cut the Heated Seat Control Harness lose at those locations, I put two blue tape identifies there, one on one side the future wire cut, and the other on the wire to be removed. This would allow me to be able to trace wires out later after I had separated the control harness from the main harness. I did this tracing several times, so be sure you label them.  With the wiring Heated Seat Control Harness separated, I had to extend the cables that I had cut to ensure they would be long enough for me to work with. I cut identical color/stripe and gauge wire from the main dash wiring harness, and butt connected the extensions to the harness Step 1 probably took us 5 hours to get the wiring harness out of the car in one piece (along with the Seat Wiring Harness from the kick panel to both seats, no photos of that) and 3 hours to separate the Heated Seat Control Harness from the Main Dash Wiring Harness. Step 2: Install the Wiring Harnesses: Step 2a: Install the Heated Seat Control Harness: Note: At this point have the car in a location you can leave it in for a few days....once you start disconnecting the seats, you don't want to turn the key/power on....I'm told the airbag controller will not like not finding the seat air bags. A - Remove the radio using the radio keys, put some towels on the center console and protect the HVAC Controller with it...this will allow you to rest the Radio and disconnect the various connectors without scratching anything...Make sure you have your radio code! B - Remove the HVAC Controller - Depending on the year of your A4, you'll have a single or double DIN radio, which will impact the type of heated seat "buttons" you have on the dash. For the 2000 A4, I have the double DIN radio, so I needed a Double DIN HVAC unit with the heated seat controls built into it. Some of the earlier A4's have a separate row of switches at the top of the central stack where the heated seat "buttons" will go, some of the middle years have a single DIN HVAC unit with the build in heated seat "buttons". C - Remove the Ash Tray D - Drop the Drivers side Knee Panel> E - Remove the Driver's Kick Panel to expose the front edge of the door sill; be aware that it clips into the Door Sill where they meet, be careful not to snap that tab. F - Remove the side panel on the dash to access the fuse panel G - Run the heated seat control harness: - Run the Green Connectors behind the Radio/HVAC area and leave slack wire - Splice one Grey/Blue Stripe wire from each Green Connector on the heated seat control harness into the Grey/Blue Stripe wire that goes to the ash tray using a butt connector - Splice one Black/Red Stripe wire from each Green Connector on the heated seat control harness into the Black/Red Stripe wire that goes to the Radio using a butt connector H - Re-install the Ash Tray (be careful not to pinch the wire) I - Connect Green Connectors to your heated seat "buttons" (HVAC unit or separate buttons) J- Re-install HVAC unit K - Re-install your radio L- Extend the heated seat control harness to the kick panel area, tie wrapping the harness as you go (I took a number of the nylon mesh cable covers from the main wiring harness and reused these to protect the cables). Leave it loose for now....it's time to run the seat harness. Step 2b: Install the Heated Seat Harness: A - Remove the front seats> B - Remove the Console> C - Spread the Heated Seat Harness on the car floor as it should be installed D - Loosen Door Sill - From the front, run your finger under the sill until you feel a clip, then gently pull up to detach, repeat 2 more times moving down the sill towards the B pillar E - Run the Heated Seat Harness: -from the driver side rear seat vent (under the driver seat), pull the white connector through the opening to the door sill, then down to the kick panel. Tie wrap the cable to the existing cables running along the sill. 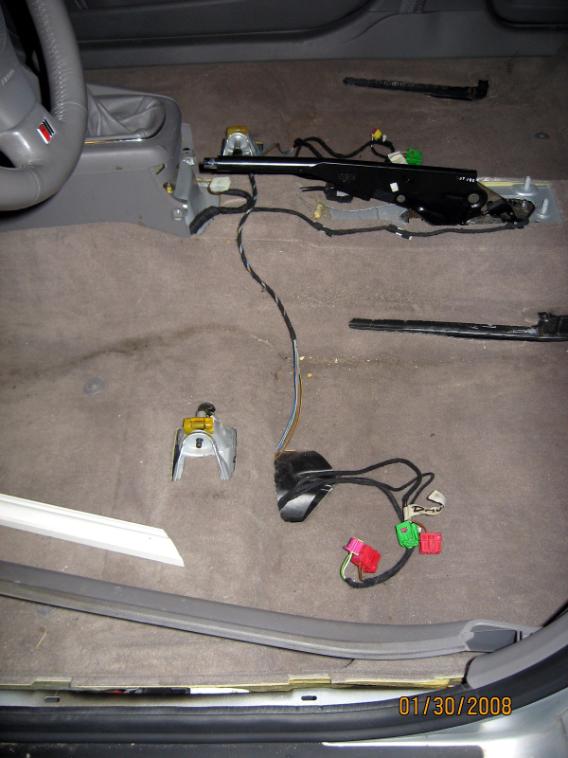 - from the driver side rear seat vent (under the driver seat), pull the passenger side Green Heated Seat Connector to the center console area. Use the carpet cut outs for the power seats to assist in pulling the cable under the carpet. Pull the connector to the passenger side rear seat vent (under the passenger seat). - Going over the center hump, there are three wire holders, one on each side, and one on the top. Slide those clips open, insert your Heated Seat Harness and clip them closed again. - Complete the installation by pulling the passenger side Green Heated Seat Connector under the carpet to the passenger side rear seat vent opening. 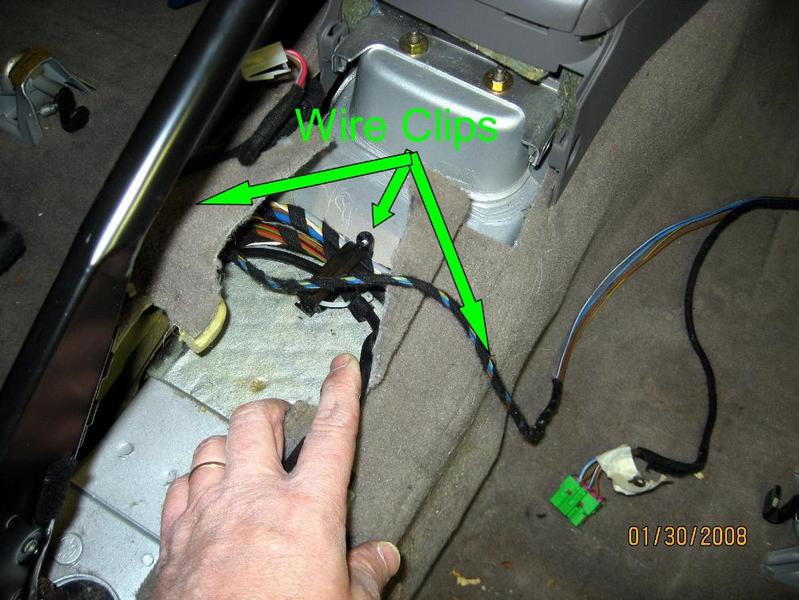 Step 2c: Connect the harnesses, ground and power: I seriously contemplated opening up the fuse box and connecting leads to the #44 fuse for a true "factory" installation, and it would have been doable, but I decided to take the easy way out. It's our little secret. I decided to install an after market 30amp fuse holder in the opening above the fuse box, making a "L" bracket holder that I attached to the dash support. 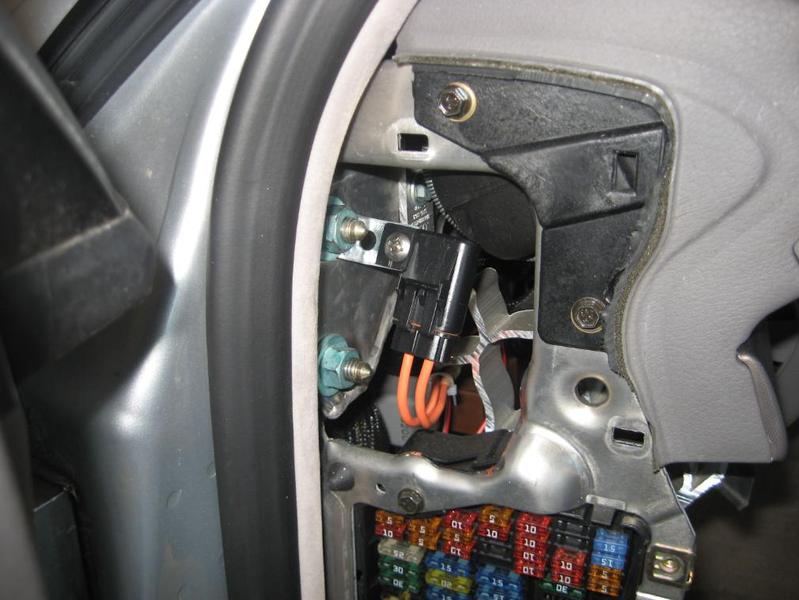 A - I connected one end of the fuse holder to the large red wire for the Dash Heated Seat Controll Wiring Harness, and the other wire on the fuse holder I extended with 12ga wire and added a ring terminal. This "Power" wire is connected to the 30 slot under the dash, shown below.  B - Take ground (Brown) wire from the Heated Seat Control Harness (with ring connector installed) and the ground (Brown) wire from the Heated Seat Harness (with ring connector installed) and attach to the "Ground" stud in the kick well. C - Install White Connectors in Kick Panel - I had one open slot in the kick panel "egg crate" - Run the Heated Seat Harness white connector behind the "egg crate" kick panel slot and snap it into an open slot. - Connect the Heated Seat Control Harness white connector to the Heated Seat Harness white connector Step 2 probably took 4 hours Step 3: Adding the heated seat elements to the seats: From the donor A4, I had both front seats and the heated seat elements. Plan A was to simply swap my Opal Grey seat covers onto the donor A4 beige seats, and replace the bottom heated seat element on the donor driver's seat which was badly ripped. However, once I opened up both donor seats, I determined that I needed to replace the bottom element on both seats, which I ordered from Carson. Step 3a: Separate the Seat Back from the Seat Bottom: -Under the seat, disconnect any wires that run from the back rest -Exterior Side of Seat - o Remove the seat back adjusting wheel, by gently prying behind it. My 2000 had a round ring between the wheel and the bottom trim piece. The 1999.5 donor car did not. o On the bottom trim piece remove two screws under the seat on the edge. Grab the front of the trim piece and gently lift up to pull it out of a clip, pull the back up to disconnect from another clip -Console Side of Seat - This didn't seem to work well, and I had a practice set of seats to work with. The concept is there are three open hubs on the trim piece that you push through holes on the L bracket connecting the seat back and bottom. These hubs are filled with color matching pins that are driven even with the exterior surface, but extend through the hub locking the hub against the L bracket. I used a nail head that was the a shade smaller diameter than the pin and drove the pin down into the seat to release the bracket. 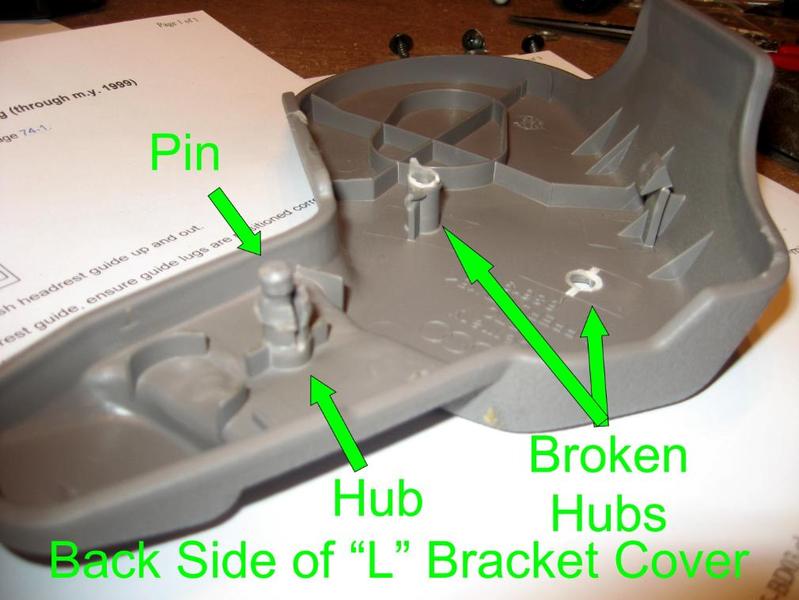 - Remove the two bolts with the T40 driver. Note that the bottom bold has a washer and the top one does not. Repeat on other side. When you reinstall these bolts, do not over tighten, they should only get 17 ft lb. 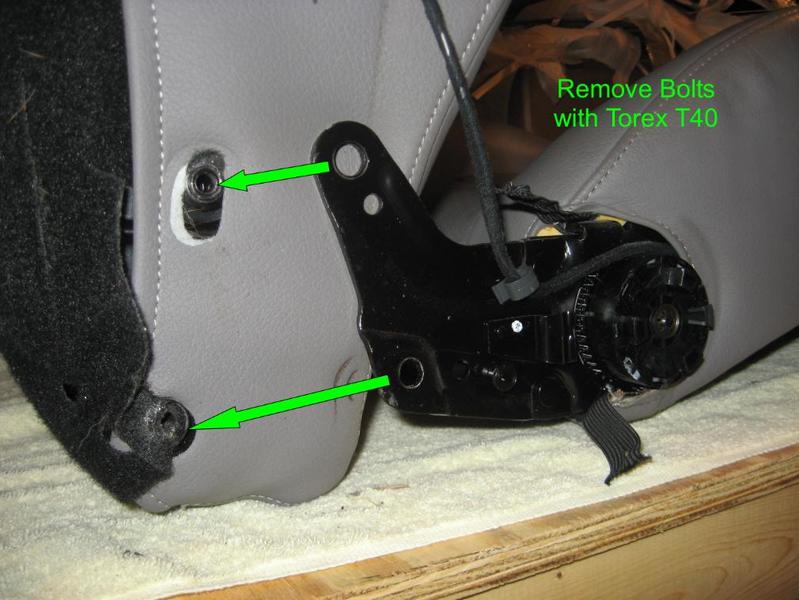 -With the bottom lose (but a wire still connects the back from the bottom), begin to remove the bottom seat cover, cut the hog rings and bend up the tabs  -On the back corner of the seat bottom, fold the felt back to expose the wire wrapped around the seat bracket, and unwrap the wire to loosen tension 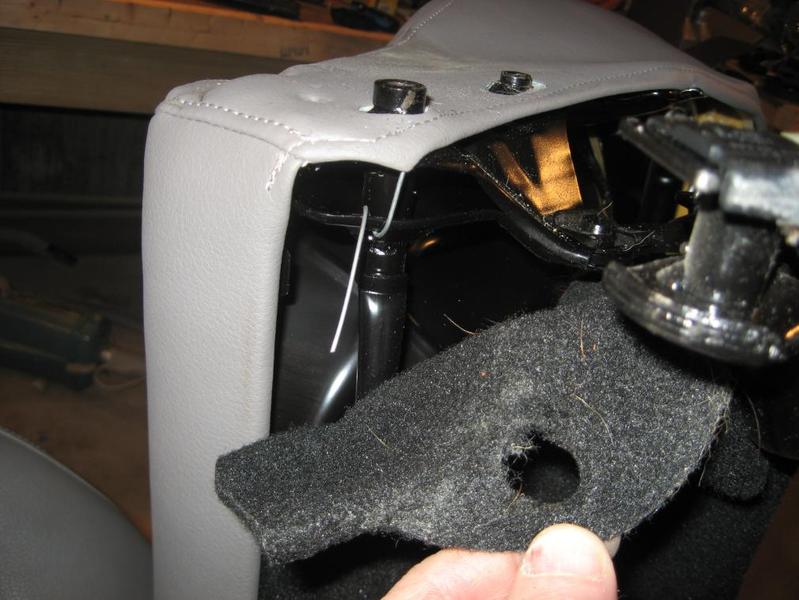 -On the back corner of the seat bottom, find the black plastic "lock" piece and carefully dislodge it from the seat frame slot  - Work your way around the seat bottom loosening the seat cover from the frame - Gently lift up the foam cushion with the attached seat cover and disconnect the wiring clip from the metal seat bottom frame to release the wires under the frame. Pull the wires though the opening in the seat cover Step 3b: Seat Bottom Heating Element: The seat covers are attached to the foam cushions with hog rings. The hog rings wrap around a wire imbedded in the seat foam and a wire suspended from the seat cover attached at the seat seams. The photo shows installing a hog ring, you just want to cut the ring to release the cover. 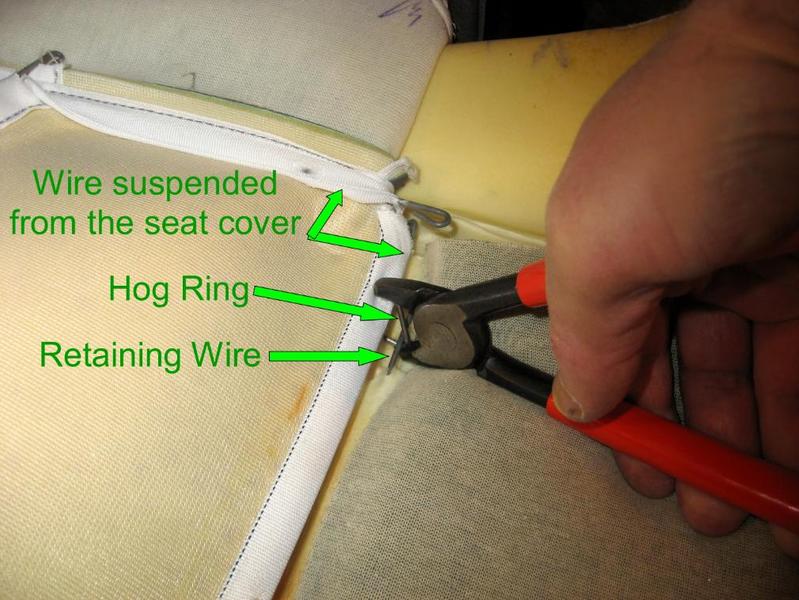 -Fold the seat cover away from you to expose the Hog Rings. Carefully clip the Hog Rings in the following locations, being careful not to clip the seat cover or pull the retaining wires out of the foam cushion 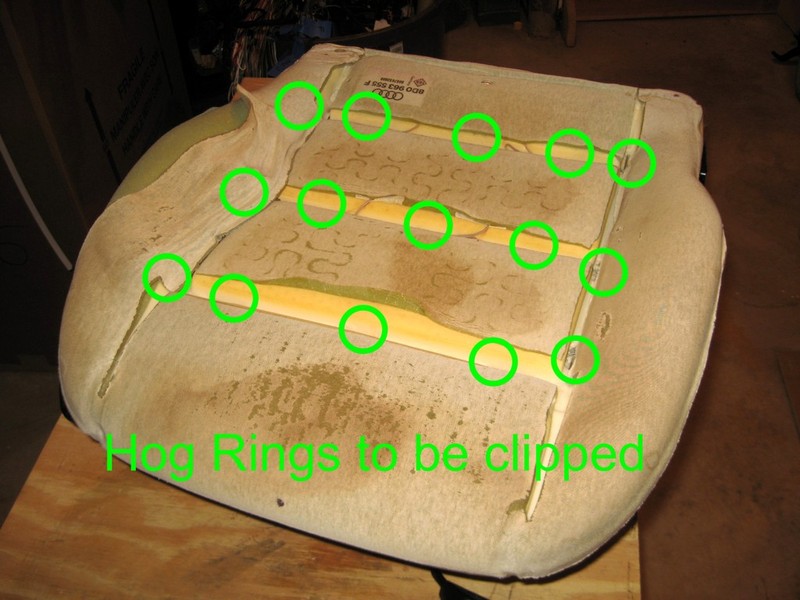 -I found that some of the heated seat elements were in worse shape than I anticipated once I had the covers off. So, here's how I replaced the elements. Since I had my existing seats and the cushions were in excellent shape, I just installed the new elements on those: - Starting at the back, I put the cable through the opening in the seat cushion. Then I pealed off the protective covering for the tape on the heated seat element, stuck it to the cushion and moved up to the next section 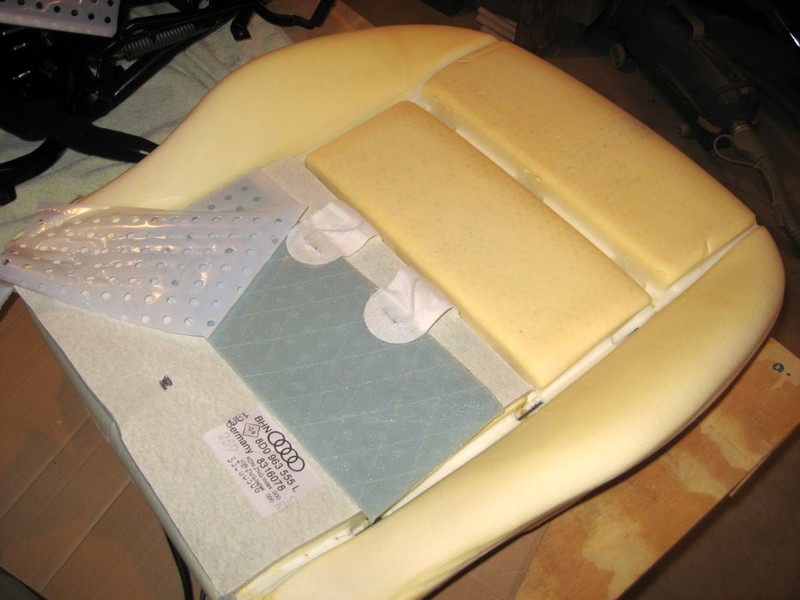 -The end result 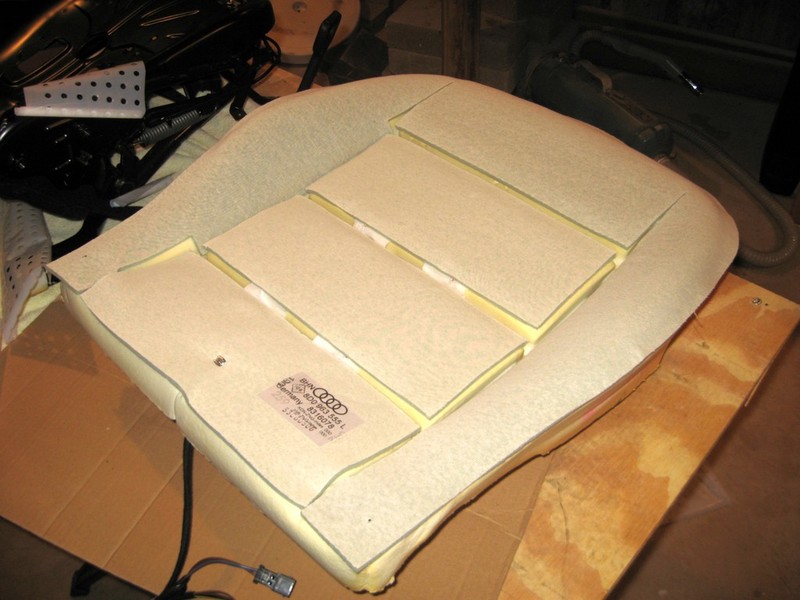 -At this point, I reversed the seat cover removal steps, reattached the seat cover to the cushion and then the seat bottom frame. Time to move on to the seat back. Step 3c: Seat Back Seat Cover Swap : -Remove the headrest from the seat back -Remove the headrest guides - this step will very by year, but for the 1999.5 and 2000, it was the same. Each guide is held in by a clip that you need to depress to release it. I found it easiest to identify where the clip was (in both cases it was the back side of the seat), slide a screw driver in to depress the clip, and pull the guide out of the seat. Bentley suggests you put the screwdriver in the guide and pull back....I was unsuccessful with that method. Here's a shot of the glides: 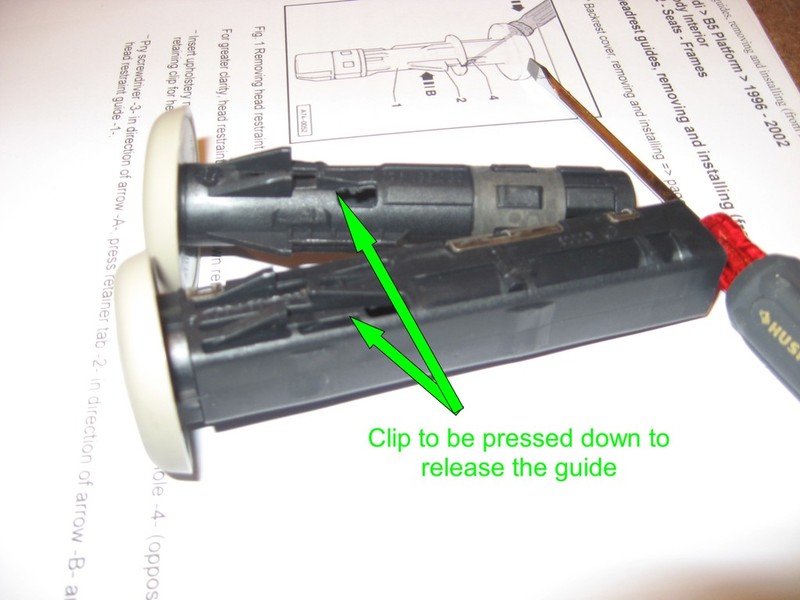 -Here's a shot of the removal: 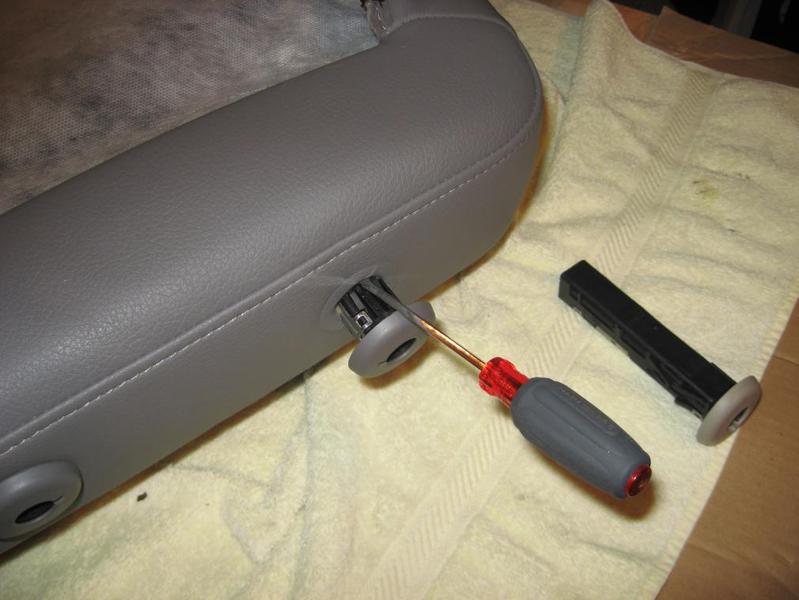 Remove the Seat Back Cover - again, this will very by year, but was the same for the 1999.5 and 2000.. Using a long screwdriver, you'll need to slide it under the cover to release a plastic clip. If you gingerly pull up the back and shine a flashlight in there, you'll see the clip and be able to position the screwdriver. With a little work, you'll unclip it and be able to move to the other clip. Here's what the clips look like: 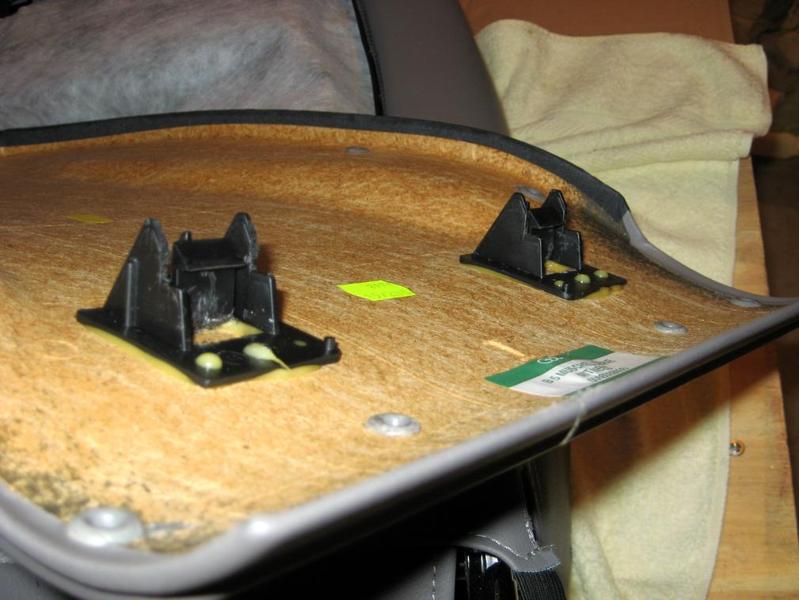 -Here's a shot of the removal: 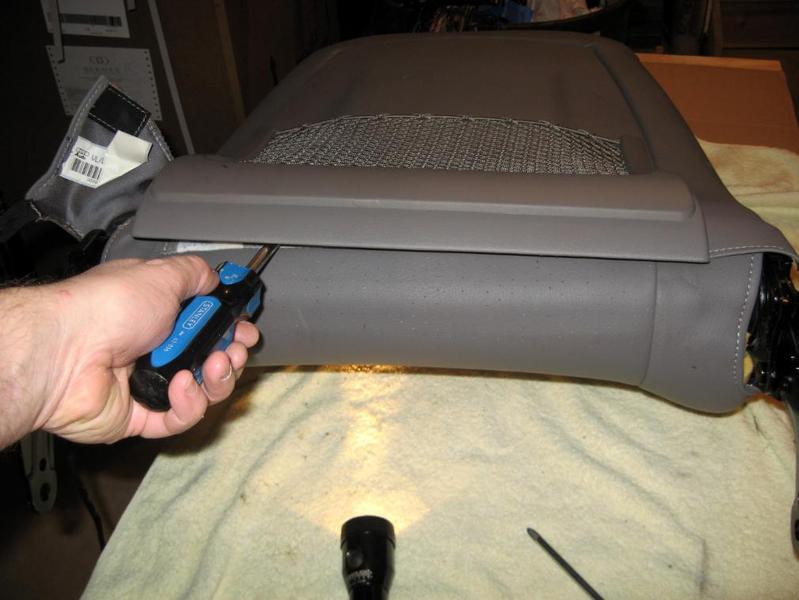 Once you've un-clipped the back, just slide it towards you to pull it out of a slot in the seat back frame. With the seat back off, on the lower edge, pull up the black plastic clip to release the cover bottom: 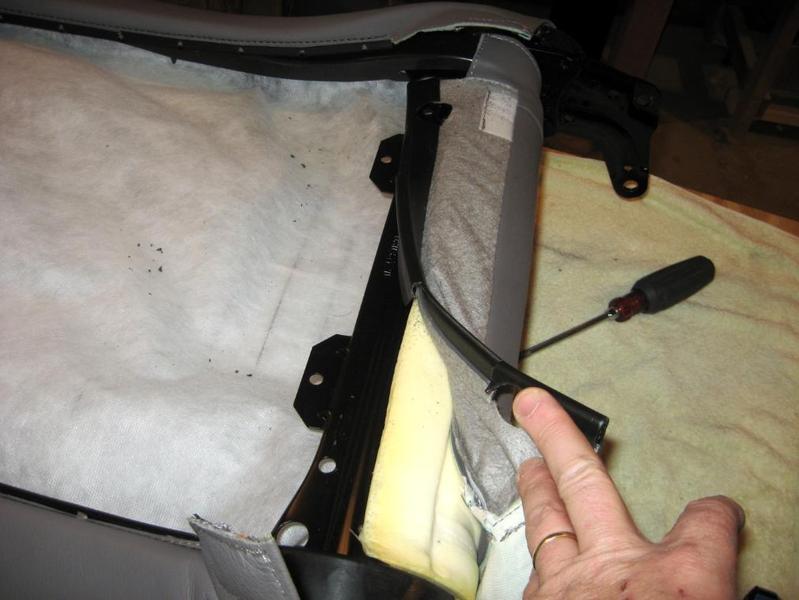 Remove the seat cover and cushion by pulling the cover from the bottom up over the top of the seat back. (This photo is from my test seat, before I learned it was easier to separate the seat back and seat bottom) 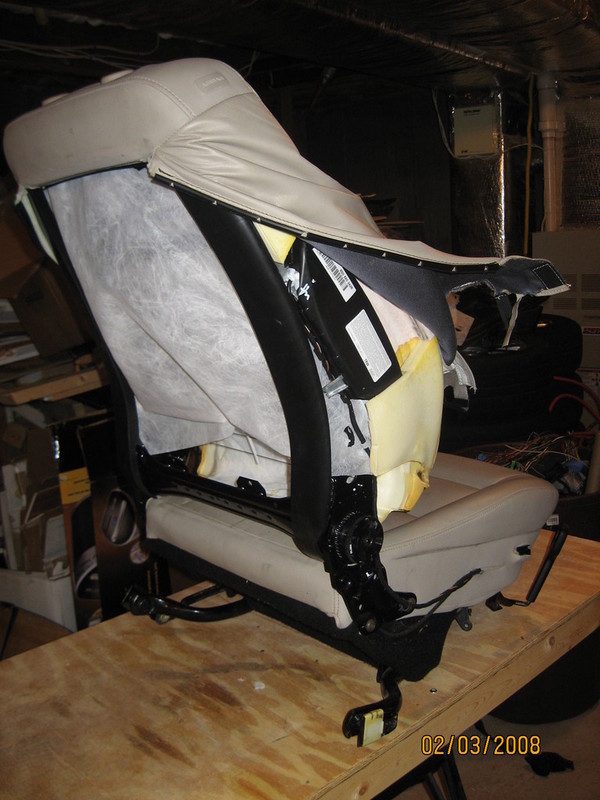 On the top inside edge, there is a black plastic piece you'll need to pull out of a slot in the seat frame to fully release the seat cover. To complete the cover removal, you'll need to cut the hog rings. They'll be in the same locations as the seat bottom - 3 rings across each section opening, and 3 rings across top to bottom on each side following the retaining wires.  Obviously, if you desire to change the seat back heating element, this is the time. Re-install the seat cover by reversing the steps, and keep going until the seat is back together. If you're replacing the seat cover, get the retaining wires from your old seat cover; they are not included with your new cover. Make sure that you reattach the seat back heated seat wiring to the bottom heated seat element under the seat bottom frame. At this point, reinstall the center console and the seats (might be a good time to lube the seat tracks), make sure you reconnect the air bag and seat belt connectors under the seats (on the driver seat use the original wiring, just connect the green plug from the new harness), and of course your green heated seat connectors. Perform a test that the seats both heat up (bottoms and backs), and if they do, reinstall the kick panel and the drivers side knee panel, fuse area cover and you're done. Step 3 probably took 8 hours (3 seats including my test seat) Wiring Summary: 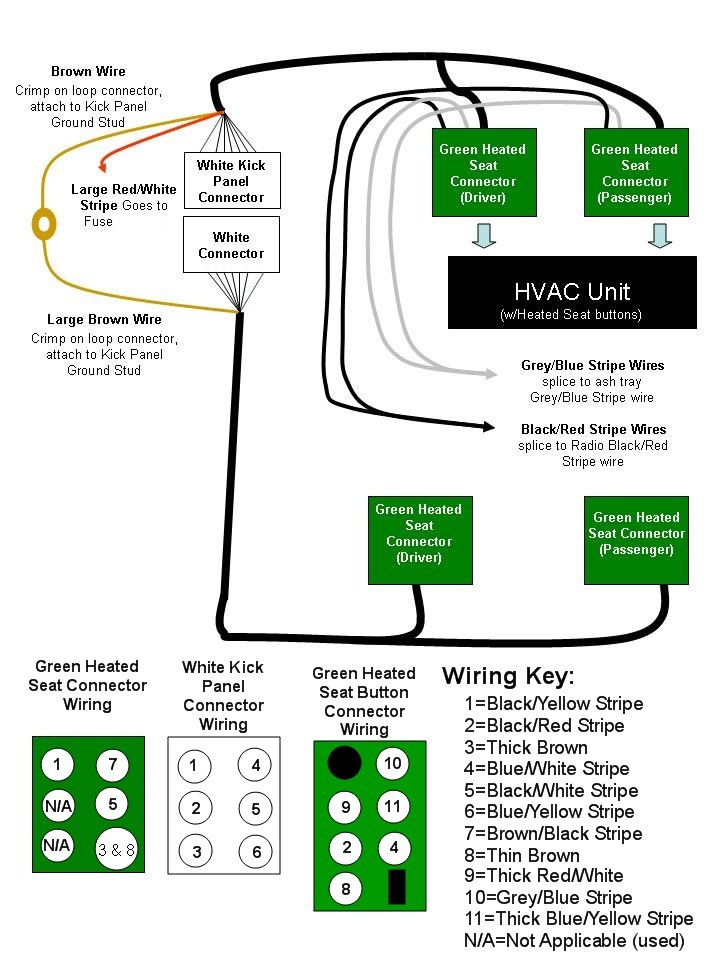 So, you're probably asking why I would do this. Primarily, the answer would be because it seemed like a challenge and I enjoy doing this kind of stuff....it's better than my day job. I also got to learn a lot about how these cars really are put together. I figure I spent around $600 in various parts, and should recoup $300 when I eBay some of my extra parts from the adventure. So to get OEM Heated Seats I'll end up spending around $300 and 20+ hours part time over 4 weeks to do it....and I learned a lot. It would be faster for somebody more experienced; this is the first job I've done like this one. To those of you that made it this far...thanks for reading, hope it helps somebody or that you at least found it entertaining. This forum has been a tremendous resource to me, especially the B5, C5 and New England forums. From time to time, I'll see somebody post about what it would take to add heated seats and here's one solution and there are some after market solutions out there also. Huge thanks to 4driver4 for his assistance with all of this, especially in getting the wiring harness out of the donor A4, and answering all of my questions. Thanks as always to Carson for exceptional service with the parts.. |
|
Advertising |
Contact Us |
Cookie Policy |
Privacy Statement |
Terms of Service |
Do Not Sell My Personal Information
© 2020 MH Sub I, LLC dba Internet Brands |