|
|
So... you have many gadgets able to play MP3 but no line input in your Audi. I faced this problem and found a few ways to put MP3 in my car. I tried the cassette adapter where you insert a "cassette like" tape into the head unit and plug it to your MP3 player. But the problem is that the frequency response of the cassette deck is not compatible with the MP3 high quality sound. The result is that you fell like your high frequencies are dead. Also, I tried the FM modulator. But every time the car is moving, some external radio signal interfered with my device making it simply impossible to use. The last option you can buy is an adapter to connect to the back of the head unit like Patbox, etc. This is perfect except for the price. This solution may cost at least $100.00. After thinking for a while, I came up with this solution that is practically free using materials you probably have in your home and have the same or better sound quality then your CD changer. Also, you may keep your CD changer and switch to it whenever you want. The only requisite is that your car must have a CD changer and you will keep it. If you don't have a CD changer, sorry this won't work. PS.: You will not be able to control the external player using the head unit. While you listen to your MP3 player, the head unit will show CDX TRACK XX. This applies to all Audi/VW units with a CD changer. The connector on the back may differ but if you have the pin-out you can adapt this method to your unit. If you don't have this tool, you can make you own using an old credit card. Use two layers of credit card material to make it harder. Just cut a strip in a width to fit exactly the hole in the unit and cut the tip in an angle of 45 degrees or more. In other words, cut it as close to the shape of the original tool as you can. Insert the tool in the unit to release it. If you are using the credit card method, insert your fingers in the cassette deck and pull it out. May be a little hard but keep going until you take it off.
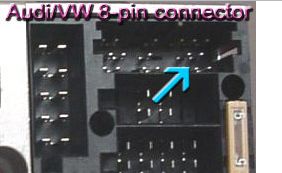
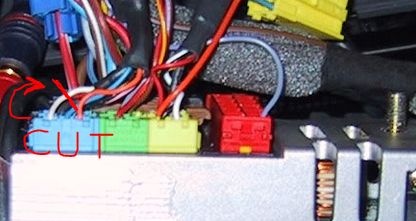
2) Look at the back of the head unit. Search a blue connector that is attached with two other as one unique block. One yellow and one green. This blue connector is the CD changer line.
Above: the head unit pin-out and the connector. The position of the desired wires are marked with red circles. 3) Uncover the cable so you can access the wires. The white, red and black wires are united in one unique smaller cable. You will identify it easily. Cut the red and the white wires in a length (middle is OK) that you can solder another wire to it in both pieces. Also, uncover the black one so you can solder one wire to it. Do not cut the black, just uncover the cooper wire inside a little. The white is the Left channel, the red is Right and the black is ground/common.
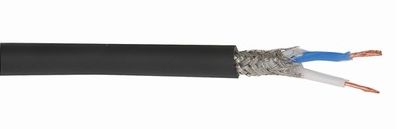
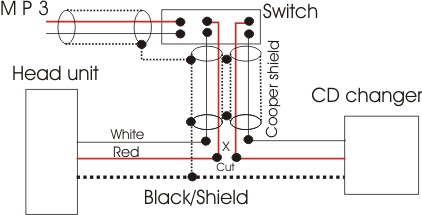
Solder extension wires to them all. Including the black, but without cutting it. Always use a shielded cable like this to make all extensions: You may prefer to solder a normal wire to the opening you did in the black cable to make things easier. Then this will be soldered to the shield of all the extension cables like a web. If you want to be able to switch between the CD changer and the MP3 player, you will need a switch. Otherwise, if you will not use the CD changer anymore, you can solder your MP3 cable right to the wires in the blue connector (easiest solution). If you prefer the switch, choose one bipolar with two positions like this:
Any other switch with the same function will be fine. The central lead will be connected to the one in the left when you slide the switch to the left and to the right will be the same. You see two rows of 3 leads. Each row is individual and does not have any connection to each other. You will use one row to reds and one to whites.
Try to use these extension cables as short as you can to avoid interference. Place the switch wherever you want. After this work you can change between CD and MP3 by sliding the switch. 4) Solder a 3.5mm connector to the other end of the MP3 cable. I used a piece of cable from an old headphone so it was easy because the 3.5mm was already there and the color matched (red, white and cooper). Remember to check if the left and right channels are not inverted before putting the head unit back in place.
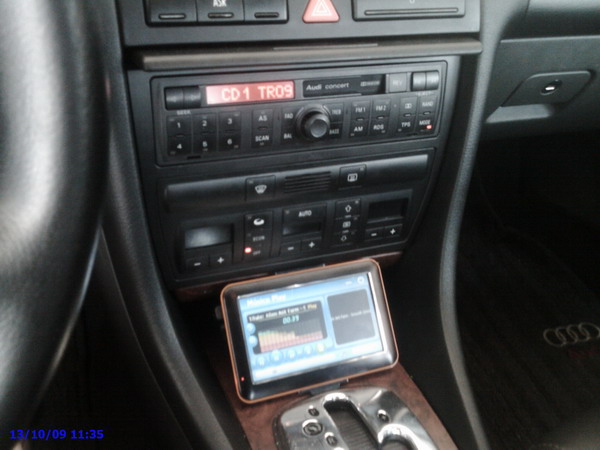
5) Now you just have to run the MP3 cable to a place where you will put your MP3 player. I decided to run it down the dash. You may remove the A/C unit to have more space to work around with the cabling. I fixed the GPS holster using double sided tape.
I was really impressed with the sound quality out of that Bose unit with MP3. It is better than the sound of the OEM CD changer! Since my GPS has touch screen and an equalizer, I can easily adjust the sound quality to be perfect. And what a quality!! Connect you gadget, push the MODE button on the unit and enjoy. |
|
Advertising |
Contact Us |
Cookie Policy |
Privacy Statement |
Terms of Service |
Do Not Sell My Personal Information
© 2020 MH Sub I, LLC dba Internet Brands |