|
|
 Caveat: This is applicable for left hand drive Allroads. see right-hand drive notes below... If you're planning on not reading
this through before diving in, I would suggest you at least look at tools and supplies needed
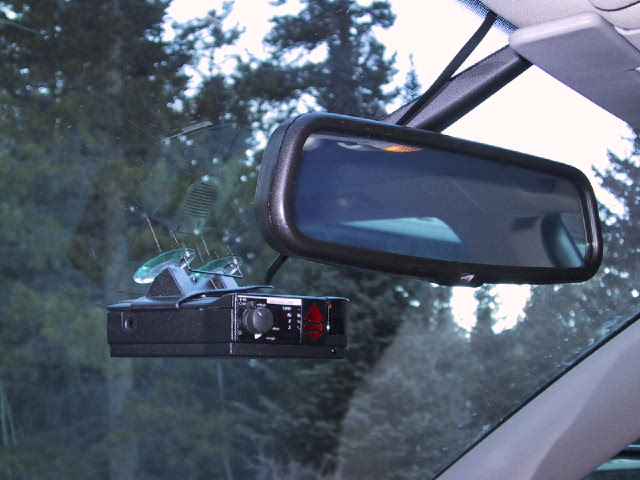
before you go at it. Rational for placement: Problem1 : The V1, because it has 2 sensors fore and aft, requires a clear "view" both out the front windshield and out the back window too. (this precludes mounting it on the dash deck, which is a problem because of the depth/height of the wipers anyway). Problem2 : The visor clip seemed pretty well useless. The visor when closed isn't horizontal, it is pitched toward the ground. You can pull the visor down to make it horizontal but it won't stay there. It also bothered me by being "in my face"... Problem 3: Using the suction cup mount because of the curve of the windshield requires that it be mounted in the center-line of the windshield. Down low it sits right over the defroster vent and got quite hot which I didn't feel would be good for the detector over time (even though the manual states that its operating range was up to 140deg F). Also the rear "view" from the low position is obstructed by the rear seat and head rests. Preference 1: I didn't want to make any permanent changes (damage) to the car if I could help it (holes, screws, etc). Preference 2: I wanted the display in my vision line, rather than having to look up to the rear-view mirror. So I wanted a remote display somewhere in the center of my vision line (dash, instrument panel, etc). So I ordered a remote display, the mounting options I tired are listed below in its install section. I investigated the possibilities of mounting it in the rear of the car, but the padded recessed head-liner made that problematic. So, it became apparent that the only reasonable placement was below the inside rear view mirror. A temporary install was going to be unworkable as the power source was directly below it which required the wire to fall down the center of the cup holder, stereo, and ventilation controls. Plus required that the ash tray be open so the lighter socket be accessible. Unpleasant and awkward. The coiled cord pulled too much on the unit actually pulling it from the glass one morning after putting it up. I caught it before it crashed into the wood covered center console. This made up my mind... I had to find a better solution. Installation of V1 main unit: So the center of the windshield placement seemed a given, what to do with the wires...
I discovered that the head-liner and windshield pillars were padded and had some give to them. Further I found that I could push the RJ11 flat cord into the space between the head-liner and the glass. Because the outside edges of the windshield have a black screening on them the wire couldn't be seen from the outside, and could be completely hidden on the inside. There were power sources available at the end of the dash board because the fuse panel was there. A plan was forming...
So I mounted the V1 on its suction cup mount, under the rear view mirror, pulled the wire up behind the mirror and started working the wire into the head-liner, behind the visor, around the corner and down the pillar to the base of the windshield. You can do all of this (down to the bottom corner of the windshield) with your fingers. Make sure the cord is flat and not twisted and just work at it in a few inches at a time, top to bottom.
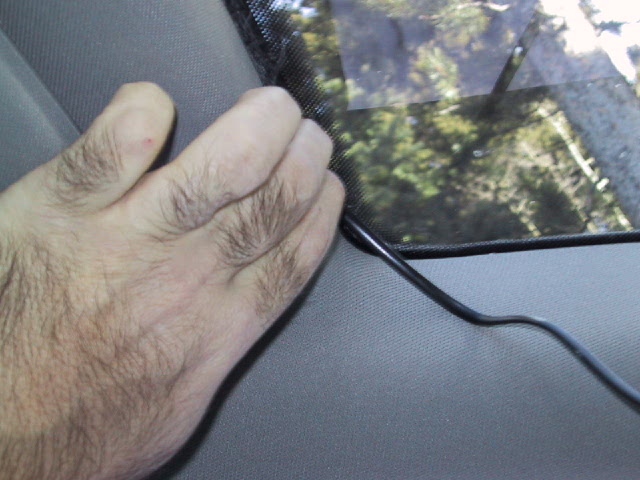
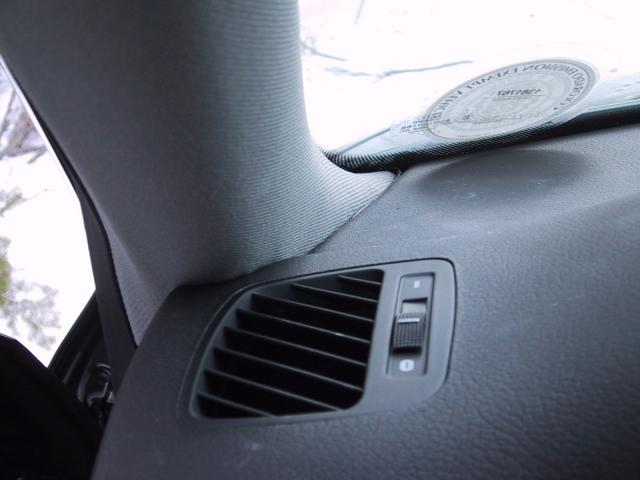
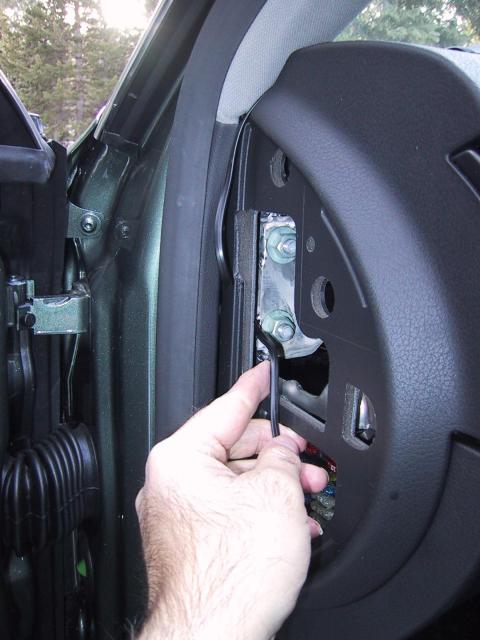
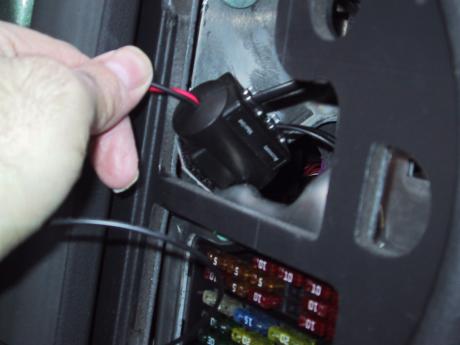
When you get to the bottom, you'll need a tool for the next part. Work the wire around the corner of the windshield until you get to the joint in the head-liner and the dash deck. Lay the wire so that the flat is perpendicular to the joint, hold the wire with one hand at the glass (where it makes the bend) and pull with the other hand and the wire should slip down into the joint near the top of the vent (closest to the door -- see pic on left). Make sure there is some slack in the wire across the dash joint. Take the push tool and start working the wire into the joint from the vent, back to the corner windshield. This will be slow, but you should be able to work it into the joint completely.
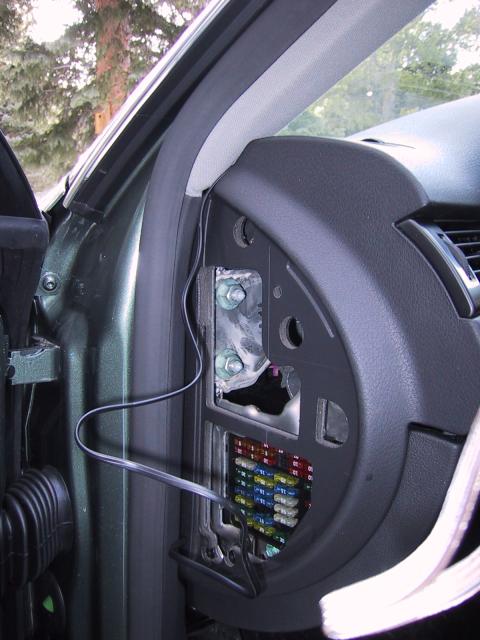
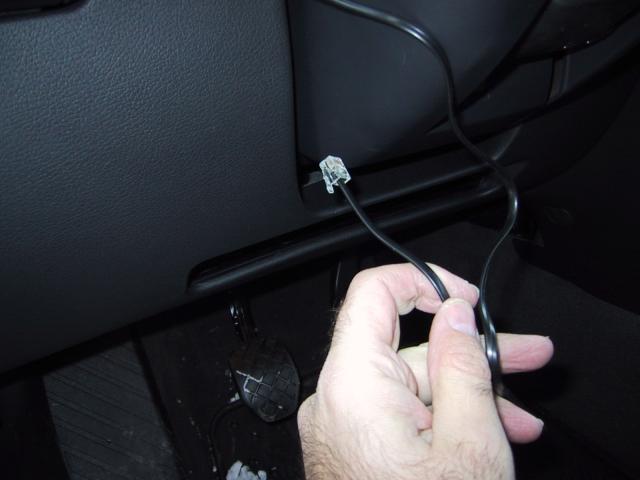
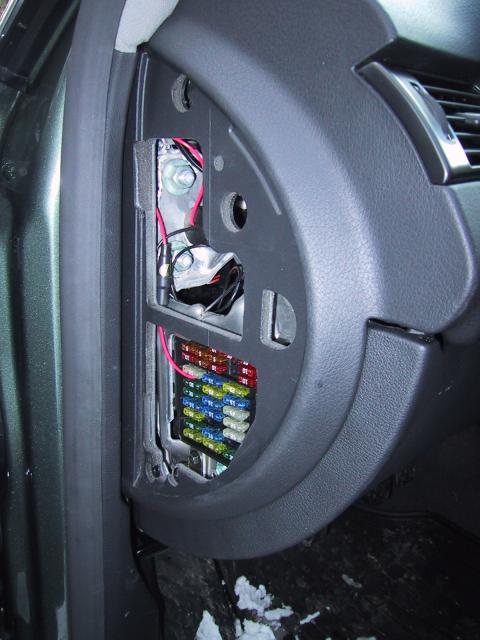
Ok, now move to the end of the dash fuse panel (you pulled the cover off, right?) It should look like the pic on the left. This is the point that if you don't have a RJ11 crimp tool it will become a little more difficult. I cut the plug off the end of the wire at this point to make it easier to snake through the next step. You should be able to get it through with the plug on it, but it will be bit harder.
There is a small strip of dash material running down the joint with the door frame. Snake the wire under this strip and into the cavity above the fuse panel. Now take your push tool and work the wire into the joint between the dash and the door frame. Be sure and push the wire at the top corner as deep as you can, as this is where the corner of the fuse panel door re-seats. If you don't get it in far enough the fuse panel door won't re-seat properly. (e.g. try again pushing the wire in further until it does, don't force the door it just buckles.). If you don't have (or don't want to install) the remote display skip to power installation. Otherwise, read on.
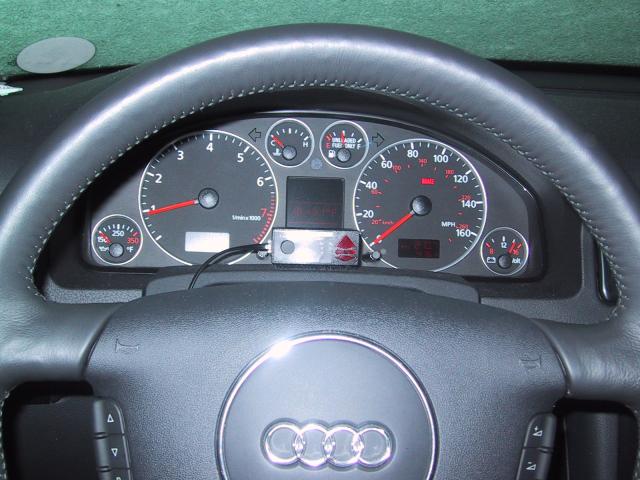
First off you need to decide where you want to put the remote display. I've thought though a few. I first placed it dead center on the front edge of the instrument cluster. This may work for some of you. I'm tall and tend to rake the seat back somewhat and I found that the display blocked the bottom of the computer display. I thought at first that this would work ok, until I was low on fuel one night and found that it was annoying to not be able to see the mileage-left display.
I then tried the lower right side of the cluster. This worked ok but found it was easily blocked by my right hand/wrist when on the wheel during normal driving. Any slight left turn and it was blocked from view completely.
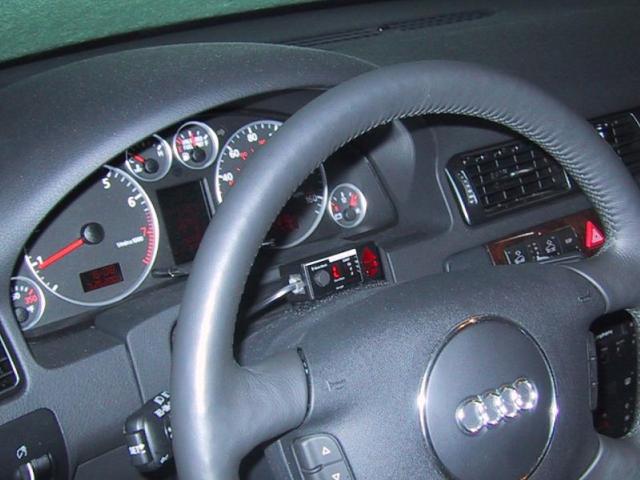
I ended up moving it forward on to the steering column, which dropped it low
enough so that it no longer blocked the computer display. The cord drapes off
the left side of the steering column, and everything is easily visible and
reachable (for muting) without having to reach very far or having to take my
eyes off the road. The wire for the remote needs to be one of the
following lengths depending on which position you want to mount it in: Remote Display
wiring Warning: The next step can be a bit frustrating. I was able to do this with out the aid of a fish wire or other such device simply because it was about 12deg F and the phone wire was stiff. If you are unable to route the wire get a piece of thin bend-able but rigid wire (18ga copper or steel should work) about 24" long, tape the end of the phone wire to the end of the rigid wire and go at it.
Insert the remote wire into the slot under the steering wheel on the left side. If you look through the opening above the fuse panel you should be able to see the end of the wire. Fish it over to the cavity opening. The wire will route up the side of the steering column and over the the top. There is plenty of room for the wire to run in the joint down the side of the column without problem. Let the wire just hang down for now. Once you get the hard-wire module in place then you can hook up the wires. Go ahead and mount the remote display head with hook and loop fastener in your location of choice, just wait on the wire. I mounted the power adapter on the bulkhead above the fuse panel with hook and loop fastener. There is a stud just above the fuse panel, this is a good location for the (black) ground wire. The main power wire (red) I used a simple shade-tree mechanic trick to hook it up. I pulled the heater blower (#25) fuse out. Then I figured out which was the hot side (turned out to be nearest the front of the car). Cutting the red wire about 4" from in-line fuse, I stripped off about 1/2" of the insulation off the red wire, twisted the loose strands a couple times, and fold it over the hot spade of the fuse and re-install it in the socket. The alternative to this is to disassemble the dash/fuse box to find a hot wire that you can use the vampire tap that comes with the V1. This to me had two problems with it, one it required a lot more work to get to the wire (there are are complete under-dash cover panels below the fuse panel) and secondly it would cut through the insulation of the car's wire, perhaps damaging the wire itself. I've used above this technique several times in the past, one of which was a passport radar detector install in a Toyota that has lasted 7 years with no problems. So I believe it to be a reasonable connection method. You do need to verify the hot side of whatever fuse you are going to be using, as if you use the wrong side the panel fuse will be carrying both the detector's load as well as what ever the circuit is carrying too (e.g. it could be too much but with only 1/2 amp I doubt you could do this). I picked the heater blower (#25) fuse as it is a 30 amp circuit, and the added half amp load on the circuit will be minimal as it it only about 1.5% additional current to the total. (This is load on the wire to the fuse not to the load on the car fuse itself). All that is left to do now is to connect the main detector rj11 cable, and remote display rj11 wire (if you installed one), into the hard-wire module and mount it on the bulkhead. Put the remote display in the location of your choice (if you haven't already) and plug it in. Replace the fuse panel cover and you should be done. Tools & Supplies Required, well the ones I found useful...
RJ11 crimp tool. This tool will put an RJ11 phone plug on flat 4 or 6 wire phone cord (also called satin cord). A simple plastic tool will do, you can probably find such a tool a local hardware or department store for $10(US) or so. The one I have even came with a small supply of plugs. You'll need at least two 4-wire RJ11 plugs if you cut the wires to proper lengths. One if you don't have a remote display. NOTE: You can probably get away with not shortening the wires, but it will be a messier install as you'll have a wad of wire to do something with under the dash. This is more a problem with the remote as there will be about 5 feet (1.5m) to deal with. The main unit's cord is only about a foot (30cm) too long. RJ11 wire detail
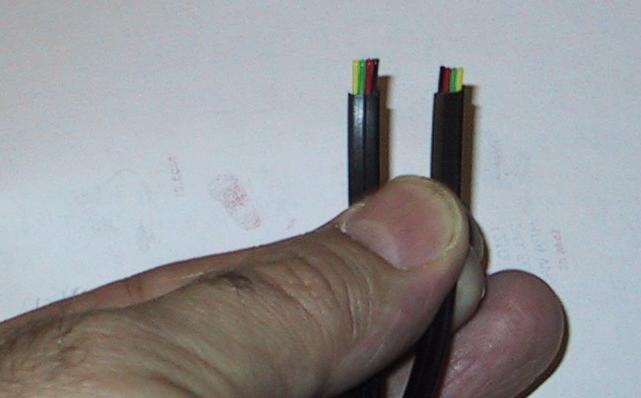
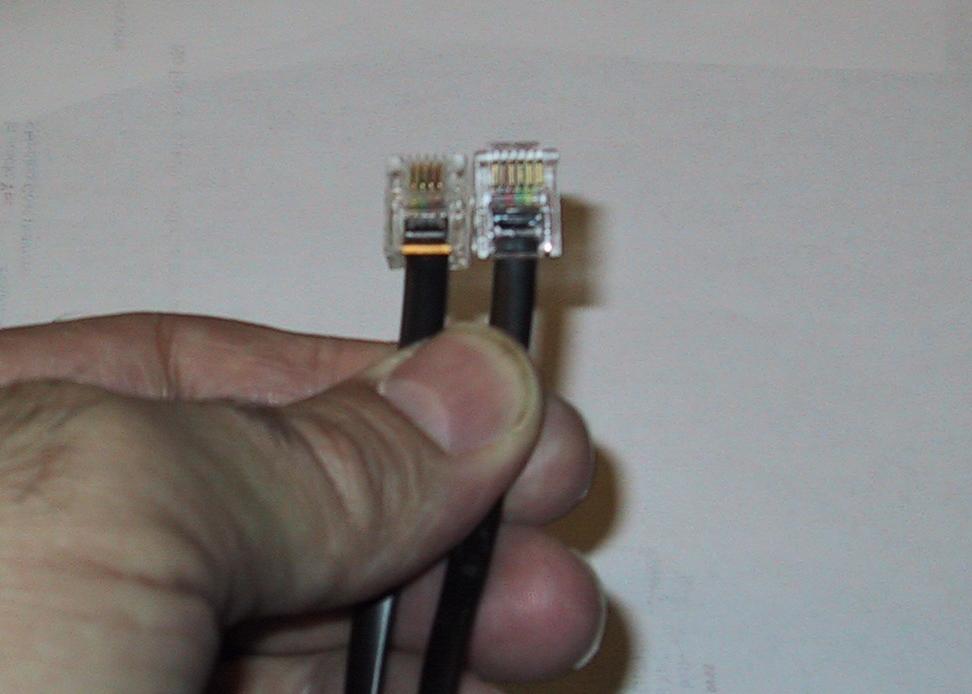
The pin-outs of the wires are wired the exact same way a standard 4 wire RJ11 phone wire is. It is commonly called a "roll over" cable, in that if you hold the wire so that the connectors (or stripped wires as show in the picture) are pointed the same way (lock key to the back) the wires are rolled over end to end (as opposed to straighter through). example: the yellow wire #1 goes to wire #4 on the other end, #2 goes to #3, etc. Also if you have 6 conductor connectors, the wires should be in positions 2 through 5, 1 & 6 are left empty. Push tool
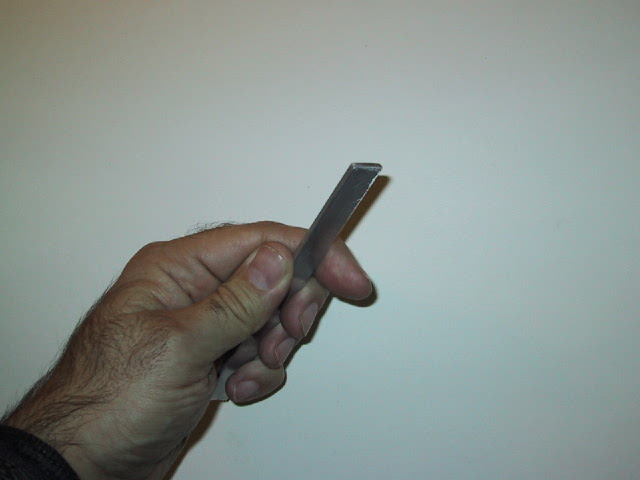
A push tool of some sort. I made mine out of a piece of aluminum bar stock 6"x.5"x0.125" (150mmX12mmX3mm). Round/smooth all the sharp edges off of one end with a file and you should have something that works. You will be using it to push the RJ11 wire in between the cloth pillar liner and the plastic dash deck, so you want something that won't scratch the deck, hang on the cloth or damage the wire. Do NOT use a screwdriver; that's for screwing things (up). The back of a pocket comb would be a better idea if nothing else comes to hand (though this might not be stiff enough). It doesn't require much force to push the wire in, but isn't something you can do with your fingers. Hook and Loop (velcro) Self stick 1/2" or 3/4" wide by 3" long for mounting the remote display on the dash. (The kit comes with a 1/2"sq which I didn't think was secure enough and the display wouldn't stay straight as the cord made it cock to one side.) I assume that you should be able to follow a similar procedure, by reversing all the directionals and pictures. The thing I'm not sure of is if your fuse panel is still on the left side of the car or if it is reversed as well. If the panel is on the left side this install should work, but the remote wire will have to be run back across the car to the instrument cluster. I'm unsure how well you will be able to do that as the under-dash is pretty well jammed with stuff and covered with panels. (good luck) If the fuse panel is on the right side, then reversing the directonals and pictures should work out. You'll have to figure out the details though. Sorry. |
|
Advertising |
Contact Us |
Cookie Policy |
Privacy Statement |
Terms of Service |
Do Not Sell My Personal Information
© 2020 MH Sub I, LLC dba Internet Brands |