| Tech Article Title
|
Author
|
Date
|
| Replacing
A6 Keyless Entry |
Dipesh
Maini
|
2002 |
Applies to the Keyless Entry system on a 1996 A6 (2 button remote)
I bought a used 1996 A6 Quattro which was fully loaded but did not come with the remotes. I found out from the Audiworld forums that I did have the locking controller under my rear seat cushion and all I needed was new remotes. I then found out that I could use only a particular remote with this model of controller and the dealer told me that it was on a special order and each remote would cost me $120. I had read Dale Kirstein article on the Audiworld tech pages and decided to take that route.
After some research I decided to install the Valet 711T system made by DEI. This is very similar to the Valet 710T System installed by Dale Kirstein, but it has on board relays and it also has some added channel functionality which I thought I could use. I bought this system from Radios&more.com for $69 (It was on sale) and they shipped it to me with five SPDT relays at no extra charge!! (I was pleasantly surprised!!), and of course the system came with 2 Key FOBs. I also went and purchased 3 1N4004 diodes from Radioshack.
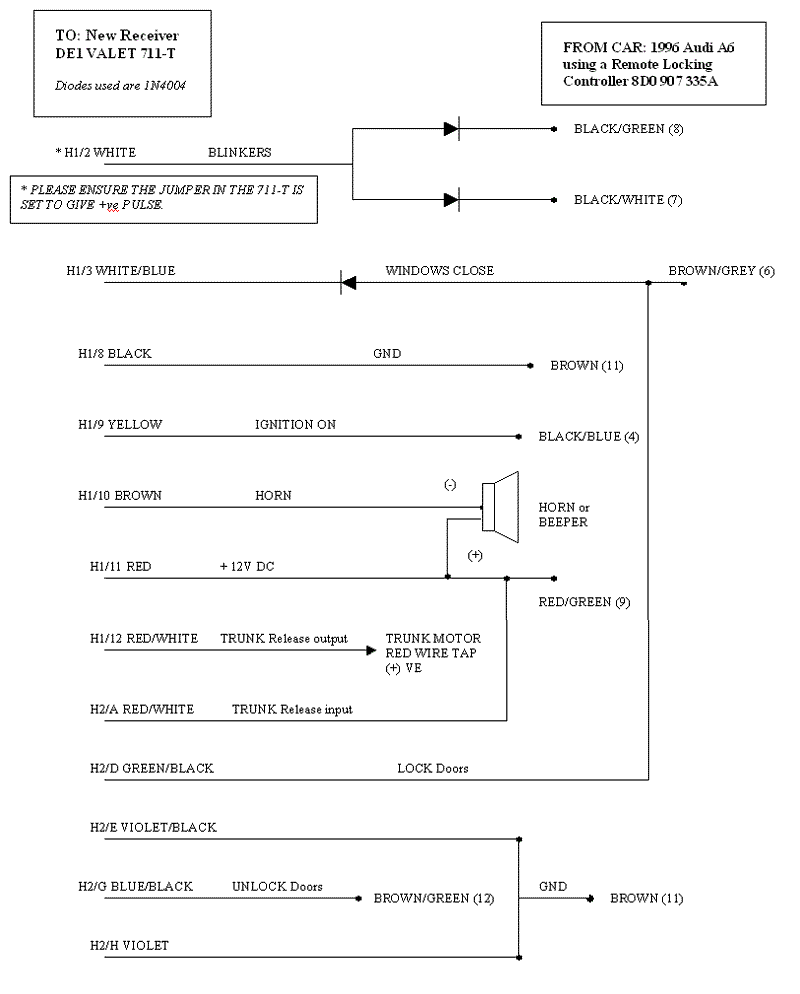
The installation was fairly simple after I found the controller as mentioned in Dale's article right under the rear cushion on the driver's side, disconnected it and removed it. I used the following Wiring Diagram, which is modified to fit into a 1996 A6 using the color codes I found on my car. But however if you have exactly the same controller as mine that is Part Number 8D0 907 335A as shown in the picture. The all you have to worry about is the PIN outs and not the wire colors.
Wiring
diagram

A few things are different from Dale's installation. I am using no external relays for flashing the lights, I am also able to pop the trunk with this implementation and use a beeper for the audible warnings, without affecting the Audi alarm system and keeping the process completely reversible. Please carefully note that the Valet system comes factory default to give out negative pulses for blinking the lights and this needs to be changed to positive pulse to be used in the Audi. To do this there is a small jumper setting which needs to be changed by opening a very small lid on top of the Valet System and moving the jumper setting, please refer to the provided manual to do this correctly, otherwise you lights will not be blinking.
I also ran a single wire from the controller to the trunk from the driver's side and after pulling out all the padding on the side of the trunk, I traced out the wiring coming from the Trunk release motor. For this I had to remove the padding fitted on the trunk lid itself. I located a single Red wire (no stripe), which essentially provides a positive pulse to the motor to release the trunk, and this happens when you turn on the ignition and press the trunk release button in the glove compartment. I traced this red wire (no stripe) to the side of the trunk and used a wire-tap to connect to it directly from the controller. For the audible warning I used a 12V DC beeper available at Radioshack, you could use a horn or tap into the car horn system if required, but that would be extra work of tracing cables.
The Valet needs to be programmed. Follow the instructions that came with it. I also decided that before fitting it into the car I must program it before hand so that if something does not work as expected then we know that it is not really the Valet programming giving the problem. I found that the power supply of my Toshiba laptop gives an out put of 14V and 3A, I thought that this was OK to use as although the car battery is 12V the alternator and regulator gives out voltages between 12-14.5V depending on the charge condition of the battery (Hey I am just saying what I keep seeing on my car's dash voltmeter) and I guessed all accessories made for the car can easily handle 14V. So I set up a small rig to power the Valet and program it using the instructions that came with it. I also used a 12V bulb to test out the functionality one by one if it worked correctly or not. This pre programming and testing of the system really saved me a lot of time during installation. Here is how I set mine up:
Key ON programming:
1. Use Channel 4 (Lock/Arm, Panic) on Button I
2. Use Channel 5 (Unlock/Disarm, Channel 2 output) on Button II
Key ON then OFF programming:
1. Active arming, ON
2. Honks On
3. Auto lock OFF
4. Auto unlock OFF
5. Active locking ON
6. Ignition dome light control (OFF) the Audi alarm takes care of this)
7. 0.8 pulse duration ON (ignore what the book says, the system works better with short
pulses)
8. Double pulse unlock ON
9. Security features (not used)
10. Code hopping ON
After all this programming, I am able to Lock/Arm the car pressing Button I and I get one flash of the blinkers and holding down this button I get into Panic mode and the lights start flashing and the beeper beeping continuously. I am able to Unlock/Disarm all doors by pressing Button II and holding this button down for 1.5 seconds I release the Trunk. On holding down both Button I & II together I am able to roll up all windows and close the sunroof if they are open.
Once again, be sure that you have the skills to do this before you start the work. If not,
I'm sure that the local stereo store will do the work for a price, and it will still be cheaper
than a new fob from Audi. I can't promise that what worked for me will work for you.
GOOD LUCK!