| Tech Article Title
|
Author
|
Date
|
| Removal
of TV/Video lock on Audi Navigation Plus |
Rune Kvernland
|
2002 |
On the Audi Navigation Plus there is a lock which prohibits display of TV/Video image on the
display while driving the car is moving. This brief guide explains how to remove this lock and
enjoy the TV/Video image when driving you Audi. The guide is based upon a 2002-model
Audi A2.
Warning: Do not view the TV/Video image on the display while driving. Keep you eyes on the
road, and let the side passenger enjoy the TV/Video image. There is a good reason why the
lock is originally there from Audi. I do not take any responsibility for anything that will happen
if you remove the lock.
Tools required:
If you do not have a multi-function steering wheel:
- 2-3 meters of 0.75mm2 cable
- Cable pincer kit with cable connectors
- Switch
If you do have a multi-function steering wheel:
- VAG part 3BO 051 530 (see picture below)
- Non-conducting tape to isolate cables
|
 |
Guide
1. Turn off the ignition and Navigation Unit.
2. You must have the security code for you Navigation Unit available before you continue.
This can be found in the Navigation User Manual, or in the document folder supplied by your
car dealer. If you do not have this security code, then you will not be able to use your
Navigation Plus after removing the lock.
3. To remove the Navigation Unit, you need a special tool from Audi. This tool is 4 small metal
'sticks' with VAG part number 3BO 051 530.
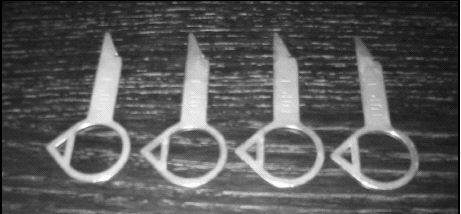
Picture 1. The metal 'sticks'
4. These metal 'sticks' should be inserted into the following 4 locations in the
Navigation Unit:
Above the button labeled 'Display' in upper left corner
Above the button labeled with a small flag (Point of interest anchor) in upper right corner
Below the button labeled 'Radio/CD/TV' in lower left corner
Below the button labeled 'Navigation' in lower right corner
These locations are shown in Picture 2 below.
Please note the direction of the sticks; the arrow on the handle should face outwards, away
from the Navigation Unit.

Picture 2. Placement of the four metal 'sticks'
The metal 'sticks' should be inserted firmly, and once you hear a 'click'-sound, they are in
position.
5. Pull the Navigation Unit out from the console, alternating between upper and lower metal
'sticks'.

Picture 3. The Navigation Unit is out of the console.
6. Make sure you use caution when pulling the Navigation Unit completely out from the
console. The length of the cables connected to the unit is limited.
7. Place the Navigation Unit on your lap/in the hands of a friend while you remove all the
connected cables. Make sure you do not drop the unit on the floor/gear shifter!
The cables are locked into position. Use caution when you remove the connectors from the
sockets on the back of the Navigation Unit. The connectors cannot be inserted in the wrong
position when you are going to put them back, but it can be nice to remember their position.

Picture 4. Cables from the back of the Navigation Unit.
8. Identify the black connector with the following shape:

Figure 1. Connector
The connector has 8 input terminals, and a slot on the upper right corner if you look at it from
the front (the back is where the cables are connected).
9. Find the thin Blue/Yellow cable connected to this connector. It is located at the lower right
corner when you look at the connector from the front. (When you turn it around, it will be on
the lower left corner).
This cable is for the GALA; automatic adjustment of the volume of the stereo when the car
speed is changing. It gives a signal to the Navigation Unit telling it the car is in motion.
10. Cut this cable approximately 5 cm from the connector.
11. If you have a multi-function steering wheel, you may isolate both ends of the cable you
just cut. The GALA does not work on cars with this type of steering wheel.
12. If you do not have a multi-function steering wheel, you may choose to insert two cable
connectors, an extension cable (0.75mm2 diameter) with suitable length and a suitable switch
to maintain the GALA when not watching the TV/Video image. These parts are available from
Biltema or similar car accessory suppliers.
Install the GALA control switch below the steering wheel (or any other suitable place) to
ensure easy access when driving.

Picture 5. Suitable cable connector and switch
13. Connect the cables connectors in the right sockets on the back of the Navigation Unit.
14. Insert the Navigation Unit carefully into its place in the console while making sure no
cables are damaged or squeezed between the Navigation Unit and the side walls of the
console. It requires some use of force when putting the unit back in the console. The
metal `sticks' should loosen from the place where they are inserted when you have the Navigation
Unit fully inserted. If not, pull the Navigation Unit out from the console and remove the metal
`sticks' by pressing the locking mechanism in the corners of the unit.
15. Turn on the Navigation Unit and enter your security code.
16. Press the button labeled `Radio/CD/TV' to display a TV/Video image on the Navigation
Unit's screen.

Picture 6. TV/Video image on the Navigation Unit
17. While keeping an eye on the road, start the car and accelerate. The moment of truth is
close.
18. When your car reaches more than 5 km/h, you will still be able to see the TV/Video image.
You have removed the TV/Video lock successfully! No nagging message telling you "For your
own security........". ENJOY!
Remarks
On a German website, there is another guide to removing the TV/Video lock on the
Navigation Units. This guide describes two wires that should be cut and installed switches on.
You can find this guide at http://www.meckisfaq.de/antworten/innen/navi.htm.
About the author:
Rune Kvenland, Norway, email runekvernland@netcom.no. Currently driving a fully loaded
Audi A2. More information about this car can be found at www.audi-a2.co.uk.