| Tech Article Title
|
Author
|
Date
|
| LE-30
Install (B5 S4) |
O.W. Kenobi
|
2004 |
Finally set out to finish my Lidatek LE-30 install this weekend (I already ran the transponder cable through the firewall using an existing spot shared by my amp power cable).
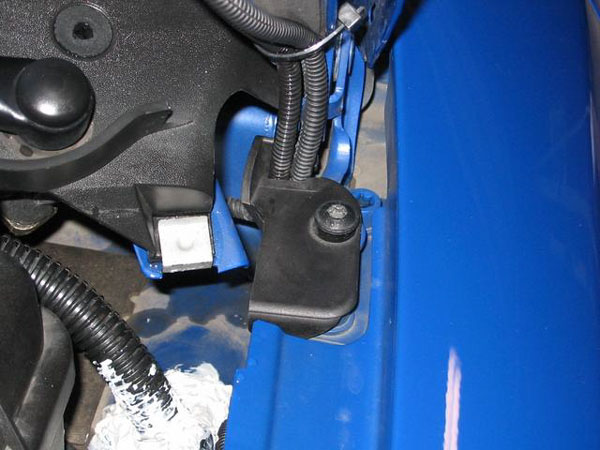
First, I loosened this T-30 torx bolt at the driver/rear corner of the engine bay and removed the plastic wire holder. Note all of the tub/tile caulk that is sealing the firewall run - lots of cables going through there; looks crappy, but it's covered up by the plastic thing that goes over the battery:
Then, I removed the foam grommets and the rubber hole covers from these holes on the hood (where the washer hoses go in and come out), and I ran the transponder cable in and dangled the end out near the washer nozzle:

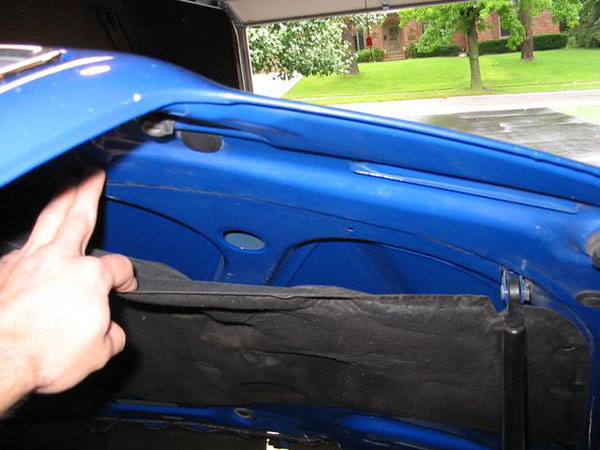
Then, I removed several of the plastic clippy things that hold the hood insulation in place, so that I could pull it away and see what was underneath. See that hole? That's where we're going to route the transponder cable:
Next, I ran the transponder cable down through that hole and out the same hole as the other half of the cable. See both cable ends dangling out near the washer nozzle:

Connect the cable ends:

Shove the cable back into the hole and replace the grommet/cover:

Replace the other grommet/cover, zip tie the transponder cable to the washer hoses, and replace the plastic hose holder and torx bolt:

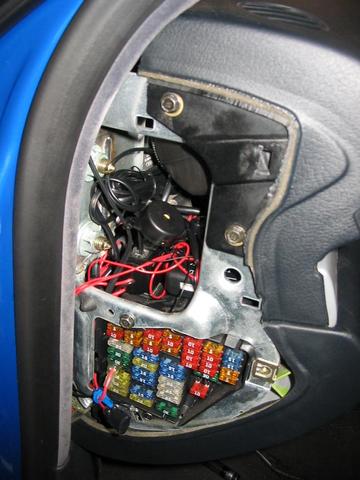
Next, leave the transponder dangle there for a few minutes and open the fuse box cover. Get your power using the same fuse slot as you do for your Valentine One. If you don't have a V1 yet, stop reading immediately and go buy one, then hardwire it according to the tech section article (don't tap into the Homelink control, either - that's stupid; this is far easier). Use the supplied wire tap to tap off of the V1 power wire. Be careful here - the wires are different sizes. I later realized that the wire tap didn't cut into the smaller wire's insulation, so I had to redo it. Check that part carefully. Use the same ground as you did for your V1. Plug in the speaker, transponder cable, and power/ground/switch to the control unit, and velcro it near your V1 phone jack thingy. I
zip tied the speaker to a few loose wires, figuring that I'd be able to hear it (later tested okay). Make it neater if you can, I just wanted to get done faster:
Run the switch wire along the knee panel and wedge it here, just above the gas pedal (keeps it nicely out of sight, keeps it accessible, and doesn't require any drilling):

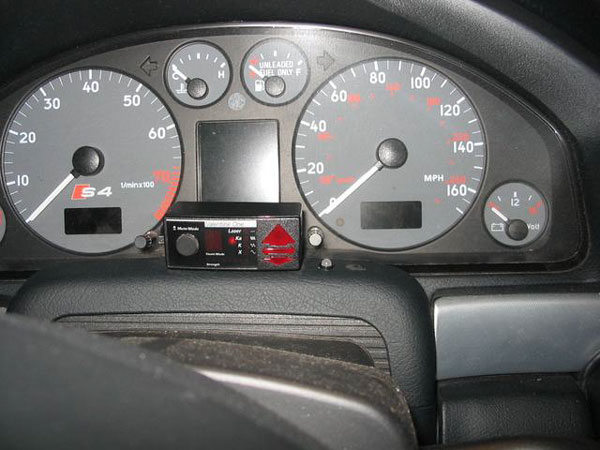
Pull off the steering column cover, drill a hole for the LED through the part of the cover that has two layers, run the wire next to the steering column and behind the dash to the control unit, and replace the cover. Be very careful to note the positioning of the LED. See just to the right of it? That was a bad hole (JB Welded for now, I'll buy a new cover later). Drill through the part of the cover that has two layers. If you don't, the LED will bump into the plastic tab that's on the upper corner of the steering column. If you don't know what I'm talking about, stare at this picture while you remove/replace your cover a few times, paying attention to where everything fits, and you'll figure it out. Or just put your hole where mine is or farther towards the center. Replace the
fuse box cover, and you're done with the interior. Fire up the ignition to test it out and see if it gets power, and if the speaker and LED work:
Back to the transponder. Remove the grille, and dremel out the middle horizontal bar from the driver's side ring. Then, cut into the walls of that area to give yourself some room. Keep your
forward most vertical lines perpendicular to the lower horizontal bar. Go as far forward as you can, because there's not much to rest the transponder on:
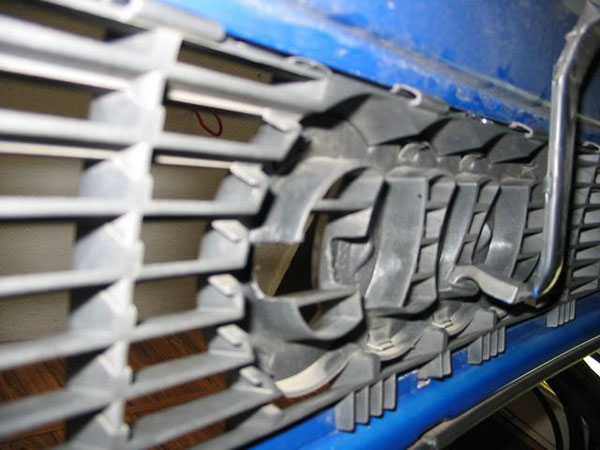
Replace the plastic clips on the hood insulation. Get some electrical tape and tape down the transponder wire so that it's not in the way. I put some tape on the leading edge of the insulation, just so that it was again flush with the hood. Zip tie the wire to the two grille clips. Tape the transponder wire to the transponder itself, to keep it from wanting to rest on the radiator (not much room back there). Cut about 1/4" of the supplied industrial tape, stick it to the rearward portion of the lower horizontal slat, and mount the transponder. Tape the sides of the transponder to the inside of the grille just for more hold. If you position the transponder wire just right (with the proper amount of tension/slack), that will support the rear of the transponder, while the front is held in place with the tape and industrial sticky foam tape:


It looks like you can really see the transponder from a distance, but keep in mind that I'm inside my garage using a flash. I would have pulled it outside fully, but my neighbor was cutting the grass, and I didn't want to explain what I was doing (you know how that goes). The flash highlights it, but in reality, it's very easy to overlook:

The transponder seems to be securely mounted, and it cannot be pulled out from the front. If you play with the slack/tension of the transponder cable (made easy with some tight
zip ties on the grille), you can make some micro adjustments to the transponder to get it level (using the supplied bubble level).
I'm pretty sure that I have 10 degrees of visibility on either side. I chose this location because I thought that with a lowered car, elevated laser positions might not get picked up by an under-bumper location. Also, I figured that the cops would aim at either my bumper or my headlights, and the grille location is better for a headlight shot.