| Tech Article Title
|
Author
|
Date
|
| Hands-free
Phone Installation - Motorola T730/V60 |
Boston
Driver
|
2004 |
Many thanks to TeddyBGame for the inspiration to do this install myself, and for sending many links from the various forums on AW!
Disclaimer: This is a fairly straightforward install, but keep in mind that you will eventually have to hook up leads to battery power. If you are timid about touching electrical stuff, do not do this installation yourself. Pay the extra money to have a professional do this for you. If you decide to unhook the battery, make sure you have your radio security codes. These can be found in the owner's manual for your stereo unit. Also, you will have to remove A-pillar trim. Unless you are very careful, you may damage your side curtain airbags. Again, if you have any worries, leave it to the pros. My install went into a 2001 A6 sedan, but this install should work with most A6 models and years.
The end result is a very clean-looking phone setup. The only visible element is the phone cradle itself mounted next to the radio. Everything else is hidden in the dash or under trim pieces in the car's interior. The radio will mute when your phone rings (no more missed calls because you were jamming to your favorite tunes). The radio also mutes when you place calls. Mine had the factory phone-ready elements, but the only components from the factory I ended up using were the microphone housing and the speaker mounted in the B-pillar.

The only downside is that the buttons on the steering wheel do not do anything. Also, the speaker (which is factory mounted in the B-pillar) is very loud, and the only volume control ringer and voice volume) you have is on the phone itself.
This install took me about 6 hours total, in three parts (2 hours each), but would have taken a bit less if I could have done it in the daytime. Unfortunately, I only had time to do this at night after my 2-year old went to sleep.
Step 1: Install antenna and microphone (about 2 hours)
The main purpose of this step is to install the microphone and antenna, and run the wiring down the A-pillar. The microphone will be mounted in the small grille cutouts in the dome lamp panel above the driver. The antenna I chose was a glass mounted slim patch antenna that is mounted in the upper left corner of the windshield and fairly invisible. Most of the time was used removing and reinstalling A-pillar trim, which was not easy.
Parts:
Antenna: Glass mounted slim patch antenna from Hirschmann 927311-901 or similar
Microphone from Motorola hands-free kit
Zip ties
Tools:
Plastic putty knife
Small screwdriver
Torx screwdriver
Phillips screwdriver
Nail clippers
Remove fuse panel cover. Remove A-pillar - see detailed pictures of this here: http://forums.audiworld.com/a6/msgs/168740.phtml

Remove sunroof control panel (use a plastic putty knife). Disconnect wiring harnesses for various controls (4 in total, see picture below).
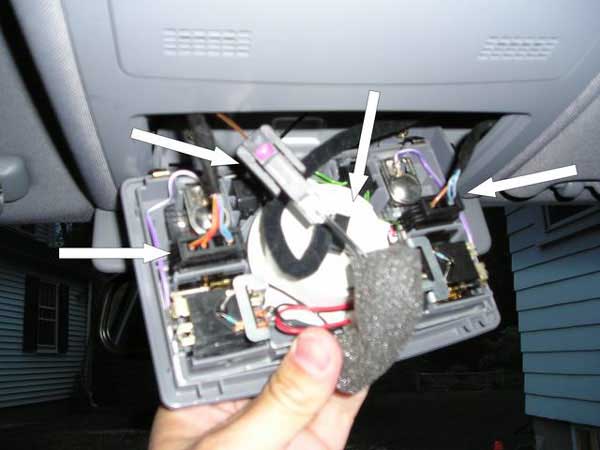
Remove dome lamp panel (reach in the opening from the sunroof control and push dome module out). On the inside of the dome lamp panel, you will see an OEM microphone assembly (if factory equipped).

If you have this OEM microphone, peel back felt cover and remove the microphone and wire. Pop the Motorola microphone out of casing by prying open cap's top using the small screwdriver or knife.

Note: the Motorola microphone is on the left, the Audi OEM is on the right. They are identical in size. Place Motorola microphone in the OEM assembly, and place OEM assembly back in dome lamp panel.
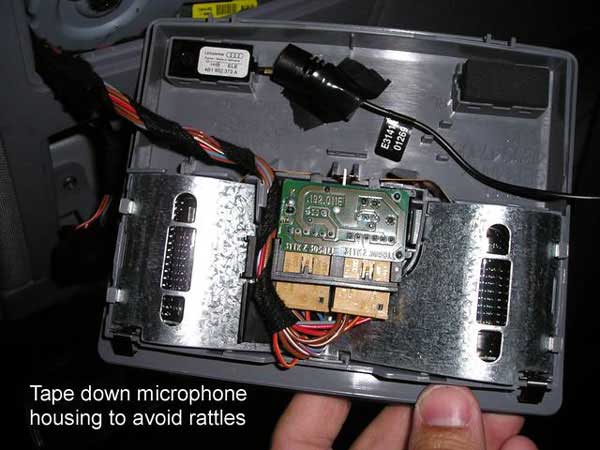
Note: I did not remove the Motorola microphone housing, but taped it down so it won't rattle. Fish wire through sunroof control and headliner to windshield. I made a loop with the microphone wire and pushed through until I saw it peek through the headliner (see picture below).

Pull microphone wire through, replace sunroof control panel and dome light panel.

Run wire along headliner to A-pillar. Stick antenna to windshield (VERY sticky stuff, make sure you like where you are placing this!). Using zip ties, run wires along the A-pillar as shown below.

Clip off excess from zip ties with fingernail clippers. Run wires into space above fuse panel.

Replace A-pillar trim, and fuse panel cover. Take a break!
Step 2: Wire the radio head unit and install phone bracket (about 2 hours)
The main tasks during this step are to install wires for the phone cradle and the stereo head unit. The end of this step is having all the wiring ready to hook up to the control module for the hands-free kit. Most of the time was fishing wires from the phone cradle behind the radio unit to the space under dash. Not much room to work, but it can be done. One advantage with working at night, I could see where there were openings under the dash by using a flashlight. Otherwise, this would have been very hard to do.
Parts:
(1) 10-pin connector block, Audi part #357 035 447B
(3) wire connectors, Audi part # 000 979 133
(1) Phone bracket, I got one from Pro-Fit
Motorola phone cradle and power cord
Tools:
Wire strippers
Socket wrench
Radio removal tools
Phillips screwdriver
Insert connector wires into block so that the wires will connect to the pins on the back of the radio as shown here (use the tab cutout as a reference), and lock the connectors into place by snapping down the locking tab.
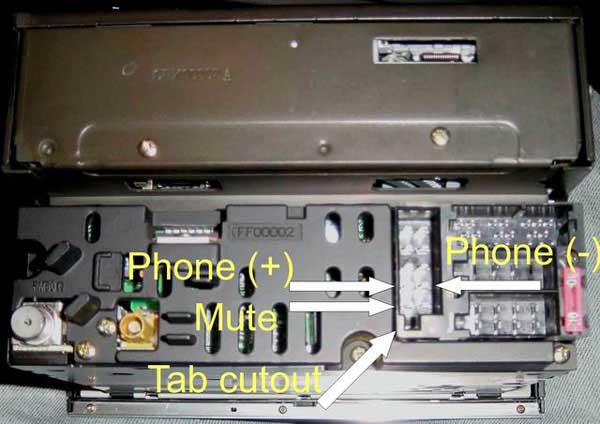
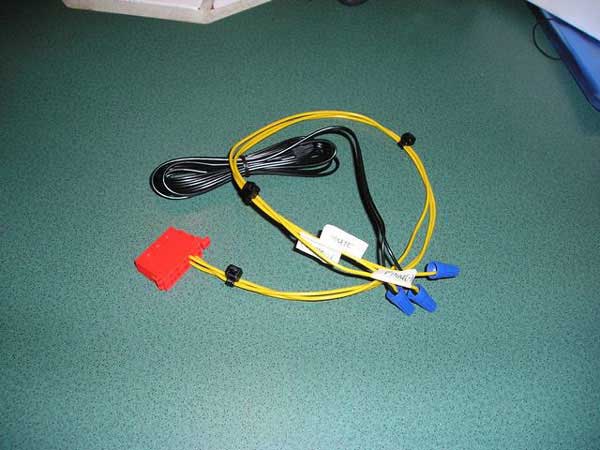
Label wires for phone (+), phone (-) (see picture below). Cut the wire to the hands-free speaker (only if you are using the Audi OEM speaker in the B-pillar). Strip wire ends, and attach to phone (+) and phone (-) using electrical connector caps. It does not matter which one is which. Your wiring should now look like this.
Remove stereo head unit from dash. Make sure you use the right tools for this, or have someone with the right tools pull it for you. Remove 10-pin connector block from the head unit (this leads to over-engineered wiring in the trunk). Replace with new connector block you just made. Mount cradle bracket to 2 screws on right side of radio opening.

Slide radio partially back in so you can remove again, you are just getting it out of the way for now. Safest place is in the dash.

Mount phone cradle to bracket.

Drop the dash trim under the steering wheel. Remove 5 bolts (2 behind trim piece above steering column, 1 in fuse panel, 2 lower part of dash). Remove the stereo head unit again. Wedge the cradle's wiring (antenna and power) through slot in dash between center console and glove box. Fish wire into the space behind the radio head unit. Fish phone cradle wiring and the wiring from the 10-pin block to the area under the dash. Sorry no pictures, but very tight space and I could not get a good image of the opening where the wires were fed.
If you need to stop now, replace the dash panel. Make sure that the two tabs at the lower edge of the dash panel feeds into clips mounted on the car's floor. Then bolt the upper 2 bolts first (by the steering column, then the one by the fuse panel, then the two underneath.
WARNING: Do not place the phone in the cradle right now. Since everything is not yet properly grounded, you might fry the phone's antenna. I did this by mistake, but luckily my phone was still under warranty, and I got it replaced at no cost.
Step 3: Mount control box, hookup to power source, and test system (about 2 hours)
This is the final step in which you will connect all the wiring to the control module, and connect the module to the car's battery. Most of the time was spent making sure connections were correct and reinstalling the dash panel properly.
Parts:
Motorola hands-free control module
Motorola control module power cord
O-ring wire connectors
Zip ties
Self-adhesive Velcro
Tools:
Nail clippers
Socket wrench
Pliers
If you replaced the dash panel in Step 2, remove the dash panel again. Remove the fuse panel cover
Affix the Motorola control box to the inside of the dash panel. There is plenty of space in the spot under the steering column. Even with the steering wheel lowered all the way, the column does not touch the box
I used self-adhesive Velcro (from my wife's sewing kit) to affix the box to the panel's insulation

Place the fuse box on the Motorola power cord above the fuse panel as shown. This allows you to access the fuses without dropping the dash again. Affix using zip ties as shown.

Affix O-ring wire connectors to the end of the green, red, and black wires from the Motorola power cord
WARNING - You are now going to hook up to the car's battery. Be careful not to touch the ground and other connections at the same time. If you are worried here, disconnect the battery, but make sure that you have your radio codes!!! From the Motorola power cord (the one with the small fuse box), do the following connections (sorry for the blurry picture):
1) Green "accessory" wire to X75 ignition bolt (as pictured, left bolt of four with yellow label).
2) Red "positive" wire to one of the 30 power bolts (as pictured, I used the second from the right).
3) Black "ground" wire to the chassis ground bolt with the brown wires (lower left in picture).
4) Orange "mute" wire to the mute wire from the radio wiring harness you made in step 2, using electrical cap connector.

You are now ready to hook everything up and test things out! Connect the wire from the antenna (that you left in the fuse panel area from Step 1) to the cradle's antenna wire (that you left under the dash from Step 2). Connect the microphone wire (you left in the fuse panel area from Step 1) to the control module. Connect the cradle's power wire from Step 2 to the control module. Connect the main power cord from Step 3 to the control module.
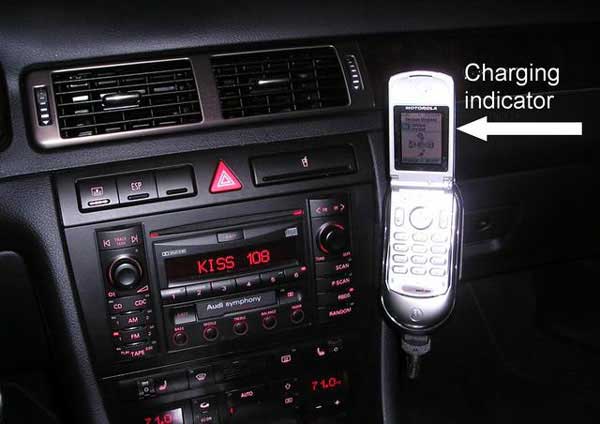
Turn the car and stereo on. Hopefully, you did not need to disconnect the battery. If you did, make sure you enter the radio's security codes. Place your phone in the cradle. You may have to remove a little rubber plug that is protecting the antenna lead (on the back of the phone, just under the antenna). First, make sure your phone is getting power. The battery indicator should appear just like when you plug in at home or in the cigarette lighter.
Place a call by either dialing on the phone keypad, or more appropriately, use the voice activated dialing feature. Your stereo should say "PHONE" as well as the dash display (when you are driving).


Control the B-pillar speaker's volume using the volume buttons on the phone. Have someone give you a call. When the phone rings, the radio should mute and the ring should sound on the B-pillar speaker. Answer by flipping the phone open, or if it is already open, press any key on the keypad.
FYI - If you shut the car off with the phone in the cradle, the phone will power off as well. I keep doing this over and over again. Get into the habit of removing the phone before you shut the car off, or live with having to turn your phone on again after exiting your car.
If you left the stereo head unit slightly out (in case you had to check connections in back), now is the time to snap it back into place. Tidy up the wires and replace the dash trim. As stated earlier, start with the upper two bolts above the steering column, then the one in the fuse box, then the two lower bolts.
You should be good to go! Best of luck!