| Tech Article Title |
Author |
Date
|
| 2.7t Valve Cover and Cam Chain Tensioner Seals |
absolutcq20v |
2007 |
Overall, I'd give the task of replacing the valve cover gaskets and cam chain tensioner seals a PITA (Pain In The Arse) factor of 7 out of 10. It's not necessarily difficult, but does require some acrobatics and blind faith (more on this later). I started with the passenger side, but went back and forth each step during the reassembly. All said and done, it took me about 4 hours to do the gaskets and seals on both sides.
The following portrays the steps I took; you can follow it step by step if you want, but read through the whole thing and make sure you know whats what. I'd keep this more as a security blanket than a walkthrough....oh, and the usual disclaimer that you are your own worst enemy, any damage isn't my fault, etc. etc.
Passenger side:
1. Remove the 4 engine covers, they just unclip.
2. Disconnect the 4 harness connectors and unclip the harness from the top of the airbox, and disconnect the MAF connector...swing all these wires out of the way. Also unclip the vacuum hoses from atop the airbox.
3. Remove air intake pipe from airbox as well as the portion in the core support (2 Phillips screws).
4. Remove spring clamp from air intake Y-pipe and disconnect the flex hose, unclip 4 clips from airbox (lower rear one can be tough to get to) and remove the airbox/MAF/flex hose assembly.
5. Remove hose clamps from Y-hose at Y-pipe and bypass valve (BPV), unclip the vacuum hose retained from the metallic intake pipe (you can remove the upper clamp and disconnect this hose at this time), and remove a 10mm bolt securing the intake pipe to the valve cover. Remove the intake pipe/Y-hose assembly (its held into the bottom pipe w/ o-rings and pops right out). Stuff a clean rag into the now-open intake pipe (there is a valve cover nut RIGHT above it that we'll remove later, you do the math).
---You should now be looking at something like this:

And notice the wetness along the bottom of the valve cover...

...and even atop the tensioner...
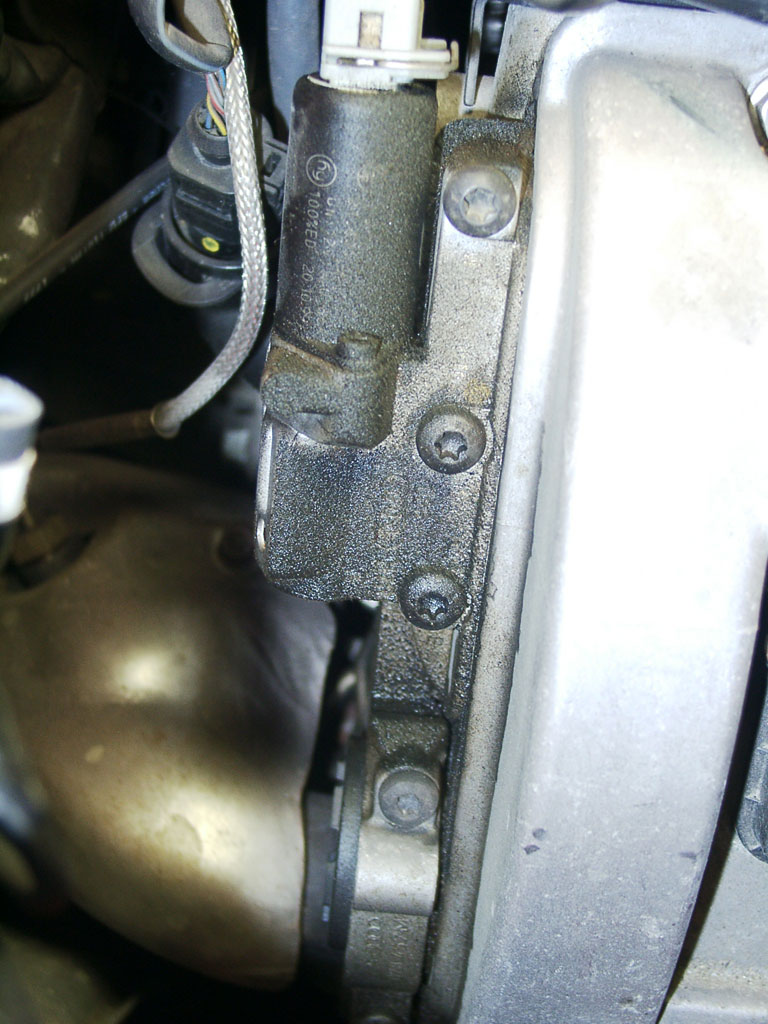
(the back of the head under the tensioner was really wet, but I couldn't get a pic)
6. Next, remove the clamps from the drivers side Y-pipe and BPV clamps at the Y-pipe, remove the breather from the back of the Y-pipe (squeeze at the two clips and it pops right off), unbolt the 3-10mm bolts securing the Y-pipe, and remove the Y-pipe.
7. (Back to the pass. side) Unclip the breather hose from the top of the valve cover (as in the first picture ^^), cut the 2-3 wire ties securing the harness to the top of the valve cover (mine all shattered), and remove a 4mm(?) Allen bolt that secures the timing belt cover the to front of the valve cover.
8. Remove two 10mm(?) bolts securing a black, metallic bracket from the front of the timing belt cover and the lower, front portion of the head and remove the bracket.
9. Unclip/remove the ignition coil connectors (the silver-metallic clips slide up and push the connector away, wiggle the connector out) and unbolt the 2-10mm bolts from each coil, the coils then slide out...

(one plug wire was showing some leakage [arcing] so I replaced it...they're inexpensive)
10. Next, you're ready to pull the valve cover: Remove the 8-10mm nuts securing the valve cover (I started with the outer 4 at the corners, then the top/bottom 2, then the 2 from the interior of the cover.
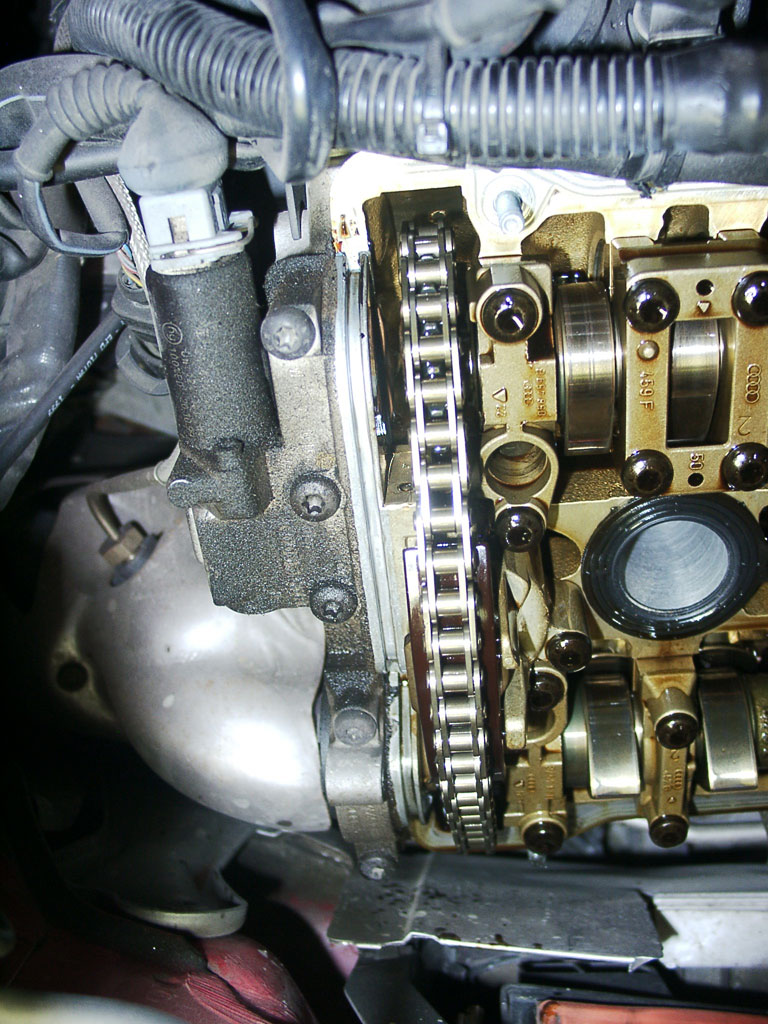
11. Use a soft-faced hammer to GENTLY bump the various corners of the cover while lightly pulling up on it...it will come loose. Wiggle the cover off the studs and clear of all the harnesses and hoses, then marvel at 5v technology...


12. Remove both the outer and inner valve cover seals. I had to get a pick under the edges as they were kinda stuck on. Also, the outer seal was cracked and had a 1/16" gap in it at the top/rear corner!!
13. Use a small wire-brush and brake cleaner to scrub off the old adhesive at the corners of the valve cover (see photo below) and any other places there's any goop present.
14. Next comes the tensioner seal/gasket (Others have taken photos, so I didn't). Clean off the tensioner so none of that crap gets in there during the next steps (I didn't, as you can see....tisk tisk)...
15. Insert/install the tensioner tool (just a `T' with an Allen bolt) until slightly snug. Then unbolt the 4-T30 Torx bolts securing the tensioner and it should rise a bit off the head due to spring tension under it.
16. Now the trickiest part: get the old gasket up and out from under the tensioner as well as get the old half-moon seal out (I used a pick set and some needle-nose pliers).
17. Spray liberal amounts of brake cleaner under the tensioner and where the half-moon sat.
18. "Install is reverse of removal". Slip the new half-moon into place and position so that the raised edges sit in the head properly...

...and then slip the new gasket into position; watch the notched portions on both the top and bottom of the tensioner, as they line up with the groove in the cam tensioner where the valve cover gasket installs (see photo below). The gasket has holes for where the 3 outer bolts go, so use them as guide pins. As you alternate tightening the 4 Torx bolts (ultimately to 7 ft-lbs), keep an eye on the gasket notches so that they line up...

(note I hadn't cleaned the goop of yet and that the blue stuff on the new gasket oozes out a little) * I asked several pro Audi mechanics, and everyone agreed that no sealant be applied to the half-moon or the gasket*
...also, be sure to remove the tensioner tool at this time.
19. Next, I used a silicone lube compound to cover the valve cover gaskets. This stuff doesn't harden and is resistant of hi temps; it was recommended by the aforementioned mechanics.
20. After verifying that the mating surfaces are clean, and spraying them w/ brake cleaner and wiping clean, place the new valve cover gaskets in place. Make sure the holes in the gaskets line up onto the studs and that the V-shaped portion sits in between the tensioner and the exhaust cam journal (see three photos up^^).
**Prior to reinstalling the valve covers, I cleaned them in a parts cleaner and took a straightedge to them. They were obviously warped, so I went across the street and slightly decked the flat mounting surfaces (placed on a big belt-sander in 2-3 second intervals, checking surfaces each time) to even them out (again, as suggested by the `master mechanics'). I then re-cleaned them in the parts cleaner to remove any particles/grit.
21. Position the valve cover onto the studs, being careful to keep the wire harnesses and other connectors, hoses, etc. clear. Double check that the outer gasket is still in place and install the nuts loosely (by hand).
22. Torque the nuts, starting with the inside two, then the top/bottom two, and then the outer four. I torqued them to 5 ft-lbs, then 6, then 7...going around 3 times at 7 ft-lbs.
23. That's it for the pass. side. Again, I did both sides at the same time...so I waited to reassemble the pass. side until I was finished the driver's side. Speaking of which...
24-49. Do the same for the driver' side. As for component removal, I removed the coolant expansion tank (3 Phillips screw), unplugged the sensor connector from the bottom of the tank, and pulled it upward and swung it out over the ABS module so it was out of the way. Other than the tank, everything is the same as the passenger side. However (and there always is one), getting the cam tensioner seals/gaskets swapped is a little tighter, as the timing belt cover is in the way and prevents access to the front/underside of the tensioner...

...The toughest part was getting the old half-moon out...but the pick set and needle-nose pliers got the job done. Getting the new half-moon in was actually very easy; I squeezed it between the cam and the tensioner (same way I got the old on out)...

The only hiccup, speedbump, whatever I ran into was when I removed the tensioner tool from the driver's side, the tensioner didn't spring back up into place. This made me nervous, so I turned the engine over (clockwise, via 12 point 24mm crank bolt) a few times...
(don't worry about the missing snub mount bracket, I took this while installing a PureMS snub mount)
...by doing so, I turned the oil pump and pressurized the oil system enough to get the tensioner `unstuck'. Another mech suggested just bumping the starter, but I didn't for two reasons: I didn't want any codes popping up and I didn't want the chain to hop off or out of time.
50. Finally, step back and marvel at your mechanical prowess as you crack open a bottle of self-pat-on-the-back...

:) :P
As I mentioned at the start, it took me about 4 hours...I started getting dirty around 1:15, stopped to help with a brake job on a BMW 5-series from 3-4, and finished under the hood between 6-6:30. If I had worked straight through, hadn't wasted time chatting, and knew where all the tools I needed were, it was about a 4 hour job.
|