| Tech Article Title
|
Author
|
Date
|
| Throttle Body Modification for 12v Engine
|
Dan Masi
|
1997
|
Unofficial Notes on the Schaumburg Modified Throttle Body
I. WHAT IS IT?
II. WHAT EFFECT DOES THE MODIFICATION HAVE?
III. INSTALLATION
A. A LOOK AT THE THROTTLE BODY
B. WHAT YOU NEED BEFORE STARTING
C. REMOVING/INSTALLING THE THROTTLE BODY
D. AIR FILTER
I have two purposes in mind as I type this. First and foremost, the intent is to document the procedure of
installing the throttle body, so that others who might want to do it themselves may have an easier time doing it (and deciding whether or not to do it). Note: This is NOTan undertaking for someone who has never done anything mechanical.
The second purpose is the one that I'll address first, though, and that is to share my impressions of the modification.
CAVEAT: This is NOT official information! It's just me, sharing my experiences, observations, and wild guesses. As in many other aspects of my life, I assume NO responsibility here.
NOTE: My car is a '96 A4 Quattro, manual transmission.
I. WHAT IS IT?
It's a throttle body for the Audi 2.8L V6 that has been modified by Schaumburg Audi. Craig Jones is the expert there, and he can be reached at 1-847-843-9975. The stock throttle body has a primary butterfly valve that looks to be, oh, about 1.25" or so in diameter. The body leading up to it, though, appears to be less than an inch in diameter. Schaumburg basically just bores out this restriction so that no place in the throttle body is the airflow constricted to less than the diameter of the butterfly valve.
Price: (at least what *I* paid) $295 for the modification, or $325 for the modification plus a K&N panel filter. Price includes one-day UPS shipping (but not the shipping to send your throttle body there).
II. WHAT EFFECT DOES THE MODIFICATION HAVE?
Schaumburg claims *no* increase in overall HP. The claim is that the engine breathes better down low. Some people have claimed slightly better gas mileage is seen after the modification.
I've only driven the car twice since I did the installation last night, which really isn't enough to get a good driving impression. I also replaced the stock paper air filter with the K&N panel filter (not the filterCharger). My initial impression is that there's not a dramatic difference. The car feels stronger in the 2500 to 3500 rpm range, though. I generally have thought that the car doesn't seem to really pull until around 3500rpm; my impression is that it now begins to pull well at around 2700. I'm guessing that if one drew a torque curve, the modified engine's graph would probably be a bit higher from 1500 to 4000, at which point they'd merge. NB that this is just a wild assumption.
Driveability is otherwise unaffected. The car sounds exactly the same. Don't know about gas mileage yet. Improvement is noticeable, but not strongly pronounced, and affects mostly the 2000-3500 rpm range.
III. INSTALLATION
Axiom: Engines get hot when you drive the car. Corollary: You will burn your hands when you work on an engine within a couple hours of driving the car.
A. A LOOK AT THE THROTTLE BODY (TB)
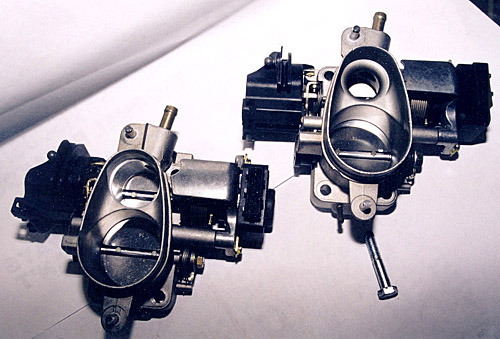
Once you've got the modified throttle body, take a look at it. There's an electrical connector at one end... this is the position sensor. At the other end is the black plastic cam that the throttle cable attaches to. The TB mounts at the rear of the engine, with the position sensor at the bottom and the throttle cable cam at the top. It mounts to the engine with four bolts, you can see the holes. A black plastic air plenum feeds air into the throttle body from the rear. It doesn't fasten to the TB, but the two pins you see on the TB are alignment pins for the plenum to slide onto.
B. WHAT YOU NEED BEFORE STARTING
The mounting bolts are hex sockets, so you'll need a hex ("Allen") wrench of the proper size. I believe it's 6mm. I *strongly* recommend that you get a ratchet driver that has a 6mm allen bit... it is doubtful that you'll get the TB off if all you have is the standard Allen wrench (hex bar of metal bent 90-degrees into an L-shape). They're a bit tough to get to, and they are put on *tight*. If there's such a thing, a socket set with a 6mm allen bit, along with a short extension, will be ideal.
You'll also need:
- 10mm wrench or socket
- various screwdrivers
- first aid cream, band-aids, burn cream
C. REMOVING/INSTALLING THE THROTTLE BODY
NOTE: in the following, "right" and "left" are from the perspective of you standing in front of the engine... i.e. the driver's side (for US cars) is on your right, the air filter box is at the left in front, etc.
1. Remove the engine cowling by pressing down and turning the 4 screw catches 90 degrees with a screwdriver.
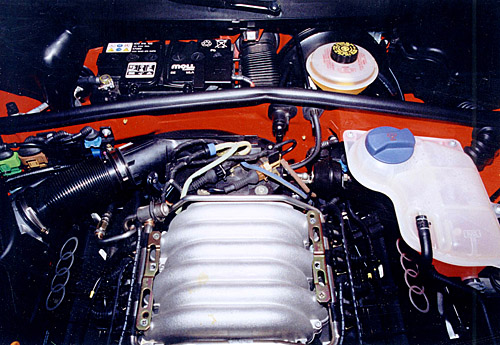
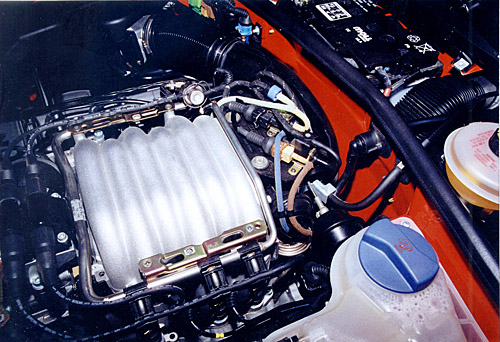
2. Remove the air hose which runs from the air box to the intake plenum, by loosening the hose clamps on each end. At the rear of the engine compartment in the center, you see some vacuum hoses around two solenoids on a black plastic thing. This "think" is the air plenum. The throttle body is beneath it, and the plenum extends down behind the TB. To remove the plenum, you need to remove some hoses. There are probably a half-dozen combinations of hoses that you could remove to do this... here's what I did.
3. Remove the electrical connectors from each of the 2 solenoids (push in the metal spring clip to release them, and they pull off easily).
4. There are two vacuum hoses that come from the front right of the plenum and attach to the solenoids; on my car, one is blue and one is brown. Disconnect each of these two hoses from its solenoid. (They just pull off).
5. To the left of the left solenoid is a Y-connector. Off the left of this Y-connector comes a black hose, that then goes off to the left-front of the plenum and disappears. Disconnect this hose from the Y-connector.
6. At the right rear of the plenum, a vacuum hose comes onto the plenum. Disconnect this hose from its connector. That should free the top of the plenum of all external vacuum connections.
7. Remove the two 10mm bolts at the front of the plenum.
8. Look underneath the area of the plenum where the air hose was attached. You'll see another black hose, maybe 3/4", that leads to the left side of the engine. Remove this hose from the plenum (it pulls off, it may help to grab the ring that you'll see and twist a bit).
9. On the other side is the same type hose, leading to the right side of the engine (I assume these are EGR hoses). Remove this hose from the plenum.
10. Right below the hose you just removed, you'll see a small vacuum hose that attaches to the throttle body, on the right side. Pull this hose off the throttle body (and if you think it's tough to get to, wait until you have to reattach it!)
11. The plenum is now "free" to be removed. The only thing holding it in place are the two alignment pins on the throttle body and the air intake on the throttle body, all of which just slide into the plenum. Slide the plenum backwards until it is clear of the alignment pins and air intake, and lift it out. This is easier than it sounds, because at first you'll think that the engine firewall is about 1/8" of an inch too far forward. Keep at it, you'll get it!
Axiom: Metal conducts heat. Corollary: If the engine is very hot, so is the throttle body.
11a. On the left side of the throttle body is a fairly large (about 1/2") vacuum hose, that is held on with a clamp. Loosen the clamp and remove this hose.
12. Detach the square-bar linkage from the throttle body as follows. First, look at your modified throttle body to get an idea of which part is supposed to come off. The square bar slides through a black piece of plastic; this plastic part has a socket which is snapped onto the ball that is a part of the throttle body mechanism. So you want to snap this plastic piece upwards and off of the ball on the throttle body. I used two small flat-blade screwdrivers, one on each side of the ball, and pried upwards. (I believe this is the cruise control linkage, may also serve to keep idle speed up when the AC compressor is on... I don't know).
13. Remove the throttle cable. Do this by first turning the throttle cable cam clockwise (increase throttle). You should now have enough play in the cable that you can remove it upwards and out of the cam. Also, remove the cable housing from the metal holder.
14. At the bottom of the TB, find the electrical connector. Remove it by finding a squeezing the metal spring clip and pulling.
15. Using the allen wrench bit, loosen the four bolts which mount the TB to the engine. Carefully remove these and lift the TB out. NOTE: the bracket which holds the throttle cable grommet is attached to the TB by the two right screws, so it will also come out. NOTE: there is a gasket between the TB and engine; it will most likely remain stuck onto the engine.
16. Remove the TB gasket from the engine.
17. Make sure the modified TB is clean, no metal shavings in it, etc.
18. Put the four bolts onto the new TB... don't forget to also put the throttle cable bracket on.
19. The stock throttle body has a black rubber grommet on its air intake. This is the grommet that mates to the air plenum. Remove this grommet and install it onto the modified TB. (This grommet may help to keep the bolts from falling out completely, as I think it gets in their way... but don't count on it.)
20. Install the new gasket (provided from Schaumburg) onto the new TB. One of the more challenging tasks is to keep the gasket aligned and not loose it or the bolts while installing!
21. Install the new TB. I pulled the 4 bolts out until just a thread was showing through the gasket, then positioned the TB and got each of the bolts started. Tighten the bolts snugly... I asked Schaumburg about torque specs, but they just said "we just snug 'em up".
Note: From this point on, everything goes in reverse. You might want to connect the throttle cable and have someone sit it the car and hold the gas pedal all the way down, while you verify that the throttle body is fully opened (cam has turned as far as it can clockwise). You can adjust the cable some... just to the right of where the cable housing is held by the throttle cable bracket (the one that came off with the TB), you'll see a U-shaped metal clip. You can remove this clip and reposition the cable a bit, then re-insert this clip.
D. AIR FILTER
If you are installing an air filter, do it before reattaching the air hose.
1. Pull of the cowling piece that covers the air box.
2. Remove the flexible part of the air hose at the front left of the car... then remove the piece to the left of it, that leads down into the air box.
3. Unclip the 4 clips that hold the air filter cover on to the air box.
4. Move the airbox cover enough so that the air filter can be removed. Remove the filter, put in the replacement, and reverse the process.
|