We'll start with the disclaimer, as always:
I did this to my car, it may be different on yours. I'm not responsible if you screw up and damage your vehicle in any way. I am not a professional Audi mechanic and have no credentials that make me any more qualified to do this job than you.
Now that that's out of the way we'll get on with the FAQ.
Tools:
Full set of 3/8" drive sockets, 10mm, 13mm, 19mm (12pt) for sure.
Torx sockets: T45, T40, T30, possibly others, make sure to have a variety.
Allen Sockets/Wrenches: 5mm, 6mm, 8mm, 10mm
Wrenches: 10mm, 32mm (I believe or a large-1 1/4"- crescent wrench)
Pliers
Phillips and Standard screwdrivers
Straight edge, long flat bar, decent yard stick or something similar about 3 ft long.
Supplies:
Water Pump and Gasket
Gasket Sealer
Timing Belt
Timing Belt Tensioner (recommended)
Timing Belt Roller (recommended)
1 Gallon G12 antifreeze (Audi only)
2 Gallon bucket for catching antifreeze
1 Gallon bucket for catching washer fluid, or a bolt and clamp to stop the flow.
Serpentine Belt (optional)
APR Snub Mount (optional)
Front Bumper Removal:
1. Lift vehicle and place on jack stands.
2. Remove plastic belly pan, there are about 8 screws holding it in.
3. Remove 4 10mm bolts from the inner fender wells, near the bottom.
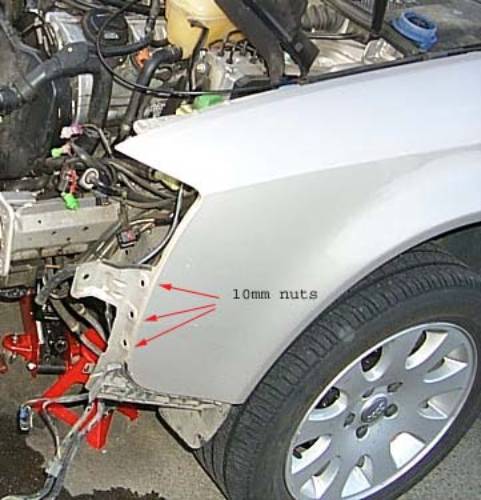
4. Remove 6 10mm nuts from the fender-bumper attachment. These are a little tricky to find, I removed a headlight to get an eye on them but all you really need to do is lay under the car and look for them. There are 3 on each side and run vertically along the seam of the bumper/fender.
5. Disconnect the tube that runs to the headlight washers. To do this find the point that it connects at a white junction near the drivers fender and twist and pull them apart. Put a bucket under it to catch the fluid or plug it with a bolt and clamp it off.
6. Remove fog light grilles. Also unplug the foglights from the wiring harness and the two horns as well.
7. Remove 2 really long bumper studs. They are an allen head 6mm or 8mm.
8. Carefully pull the fender edge of the bumper away, there are plastic guides that need to pop out.
9. Detach lower fender/bumper section by pulling down and away.
10. The bumper should pull straight out now.
Core Support Removal:
1. Drain the radiator by removing the coolant reservoir cap and then unscrewing the drain plug on the lower right corner of the radiator. You don't need to have it completely removed but you need to have a bucket to the right of it to catch the coolant.
2. Remove air temperature sensor from the bracket.
3. Remove the two air deflectors next to the radiator. (1 phillips screw each)
4. Remove the hood release, it pops out of its bracket then the ball is easy to get out. It needs to be taken out of the way.
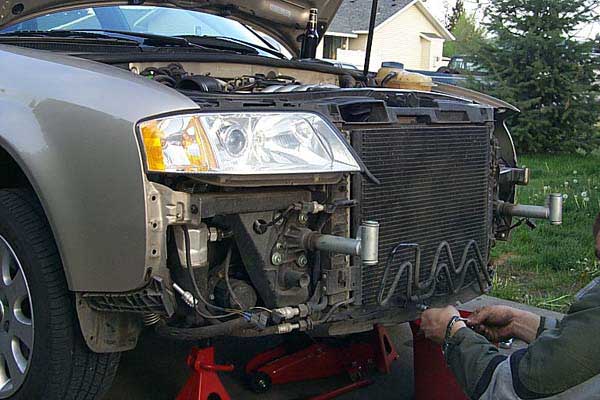
5. Remove 2 bolts that hold the power steering cooler on. It is the oddly bent tube in front of the radiators. Swing the tube out of the way as far as possible
6. Remove 4 bolts attaching the top of the AC radiator. Lift the radiator out of the lower rubber mounts. Swing the AC radiator to the passenger wheel. You will have to rotate it 180 degrees as you are bringing it around so you don't damage or kink any lines.
7. Under a black cover next to the ABS block you will find a large gathering of wires. Unplug all of them and detach the holster by pressing two clips under it and pulling it up. One of the wires needs to be taken out of this that goes to a sensor rearward.
8. Disconnect the upper and lower radiator hoses. The upper I had to remove from the radiator, which is fairly scary since the radiator sides are plastic and it is really hard to get off. There is a metal clip that you pop up with a screwdriver or pliers and then you just wiggle it off or use a screwdriver to carefully pry it off. The lower hose disconnected easily from the water inlet on the block side by taking the clamp down and wiggling it until it came off. You may need to try to get a screwdriver in there to get it to detach.
9. Disconnect the headlight wiring harnesses.
10. Remove the Torx bolts from the to of the core support (4), the sides under the headlights (2) and then the 7 larger ones that are attached with the bumper brackets. Now you can swing the core support to the right. The transmission coolant lines are still attached, and since the tranny is sealed you don't want to mess with those or kink them. If you have a 6 speed you probably can just remove the radiator core support entirely now.
11. You now have a clear view of the front of the motor.

Timing Belt/Water Pump Disassembly:
1. Here is a shot I took just after I started taking pictures. It shows the proper route for the serpentine. Trust me it will only go on one way, but if you forget how it could take a bit to figure out.

2. Remove the 3 top covers. To do this you will have to remove the coolant reservoir (3 screws) and the top of the airbox.
3. Remove the serpentine belt by using a large socket and pulling the tensioner loose then putting a pin or small screwdriver in the pin hole. You can now slide the belt off. It is very important to pin the tensioner. If you don't, you will need to buy a new one. The spring is very strong and pretty much impossible to get back together right.
4. Remove the tensioner, 2 allen bolts I believe.
5. Remove the power steering pulley, by placing an 8mm allen wrench in the center and removing the 3 6mm allen bolts.
6. Remove the clutch fan, 4 4mm allen bolts, then I used an allen wrench to keep the pulley from turning and removed the clutch with a large crescent wrench (1 1/4"). It is right hand threaded. You will need to loosen it clockwise rather than counter clockwise.
7. Now remove the Clutch fan bracket, there are 2 exposed allen bolts, and two hidden. One is below the threaded spindle of the clutch fan and is the same size as the others, and the last one is a size smaller and is removed through one of the small holes in the pulley.
8. Remove the cam gear/timing belt covers.
9. Now take your 19mm 12 pt socket and ratchet and turn the crank until the timing mark lines up with the arrow on the shield. This is very important to make sure everything lines up properly.
10. Mark the cam gears using a straight edge that reaches across the motor on the gears and a part of the housing. This is vital to the life of your motor.
11. Remove the 6 small allen bolts that hold the crank pulley/harmonic damper on. Remove the 10mm bolts that hold the lower timing belt shield and remove the shield.
12. Use an allen wrench to turn the timing belt tensioner all the way back and then put a strong piece of wire in the way to hold the pressure loaded tensioner back.
13. Remove the large bolt that holds the timing belt roller and the small bolt that holds the tensioner on.
14. Carefully remove the timing belt, it is hard to turn the gears but you may accidentally if you are not paying attention.

15. Remove the water pump; it has about 8 10mm bolts and 2 10mm nuts.
16. Use this opportunity to clean all the dirt and grime from wherever you can.
Reassembly:
1. Clean the gasket surface where the water pump mounts.
2. Use some gasket sealer to bond the gasket to the water pump and to the block. I prefer Ultra Gray; it looks best on aluminum and comes off easily but keeps a great seal.
3. Tighten the ~10 bots and nuts starting in the center and working your way out until the are all snug, then again until they are tight. Don't get carried away, the bolts are small and will snap, leaving you in quite the pickle.
4. Put your new tensioner and roller on.
5. Now thread the new timing belt on. I had started at the crank, went over the roller, moved up to the right bank, I had to turn the cam � tooth to get it to go on, then turned it back � tooth to get it back in alignment. The old belt was stretched just enough to make it too far to get on. Go under the water pump pulley, and over the left cam, you may have to repeat the turning of the cam, I did. Then go over the tensioner. Put a straight edge across the cam gears and make sure it is aligned properly.
6. Now you can pull the pin on the tensioner. Make sure the tensioner pulley is tight against the belt.
7. Replace the plastic lower timing cover and lower serpentine pulley. The timing mark should still line up with the arrow. If it does not take it down and realign it.
8. Now for the moment of truth! Use your 19mm 12 pt socket and turn the motor 2 full rotations. Watch the motion of the cams and everything. If anything looks `off' you will need to fix it now. This test is to make sure you won't grenade your motor as soon as you start it up.
9. Replace the timing belt covers.
10. Replace the clutch fan bracket, making sure all 4 bolts are tight, then spin on the fan and tighten it up (remember it is backward threaded.)
11. Replace the upper pulley for the power steering.
12. Replace the serpentine belt tensioner.
13. When you snake the belt back on it is easiest to get all the grooved pulleys first. The last thing I put on was the smooth tensioner. Once it is all in place you can pull the pin/screwdriver out of the tensioner.
14. You can also replace the 3 engine covers, airbox, and coolant reservoir, making sure to plug the coolant level sensor in. (I forgot this and had a coolant level light come up when I started it. It is easy to plug in even when it's in place though.)
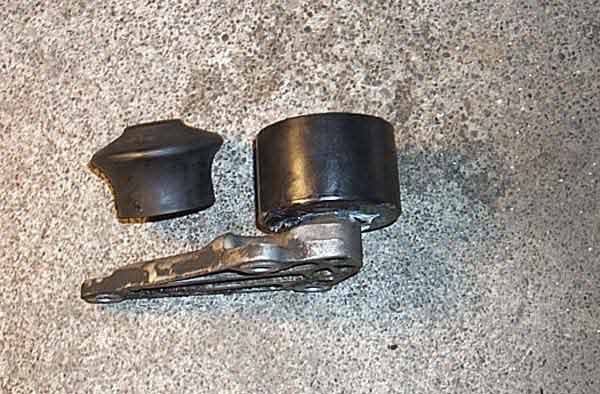
15. Here is where you would install the optional snub mount. It is a pita to get the new one on the spindle and you have to do it while it is bolted to the car, otherwise you can't get to the bracket bolts to tighten it up. Use plenty of water resistant grease, I prefer white lithium grease, it has prevented polyurethane from squeaking for me in the past. Put it on the spindle to ease installation and the outside of the mount to minimize friction. I beat mine on with a dead blow hammer and a metal plate (to minimize deflection from hitting the rubber.) Here is a picture of the test fit. The OD of the largest part of the old mount is the same size as the OD of the new mount
16. If you removed your headlights put them back in now.
17. Next is to get the core support back on. You can leave it several inches out and plug all the wires in and get the two hoses back on. Then replace the 13 bolts that hold it all together.
18. Replace your AC radiator and power steering cooler. Plug the air temp sensor back in its bracket.
19. Optionally you can now refill the coolant with a 50/50 mix of G12 and water, start the car and make sure there are no drips.
20. Replace the air flow deflectors on either side of radiator. And the cool air snorkel.
21. Finally you are ready to put your bumper back on. I started with getting it all the studs lined up in the fenders, then putting the big bolts in loosely. I then tightened the 6 nuts to line the bumper up properly and then the 2 large bolts, since they are floaters.
22. Replace your fog light grilles and the 4 inner fender bolts. Also plug your headlight washers back in and the fog light and horn wiring.
23. If you did not already do so, fill the car with your coolant/water mix, make sure you wait a bit to let it get into the system some. I started the car with the cap off, knowing that it would fill some air pockets somewhere, we old skool mechanics call it burping the system. Replace the cap as soon as it quits eating water. If you are dripping water you need to first check all your hoses. If they are not leaking and it is coming from the water pump are you probably: didn't get the water pump on tight enough, tightened it unevenly causing one side to stay up a little, or you over tightened it and potentially cracked the housing.
When you are satisfied there are no drips take it off the jack stands and give it a test drive. If you experience a loss of power you may have a one or both cams a tooth off or your air box may not be put together properly, causing a vacuum leak. If this is the case first check the airbox and all your sensors. If they are good you will have to pretty much do everything again and figure out which one is off. When the crank is at tdc (mark aligned with arrow) the cam gear brackets will be straight horizontal.
Hopefully everything went as smoothly as it did for me and you have no leaks.