|
To remove the ECU of the A4 here is what you'll need:
1 ratchet
1 8mm socket
1 flat head screw driver
And the keys to your A4
Removal
First: Park your wipers up on the glass in the 12:00 position (near the A-pillar). Take the keys to your A4 and turn on the ignition and start the wipers. Turn the ignition off when the wipers are in the vertical position up near the 'A' pillar.
Under the wipers along the bottom edge of the glass is a black plastic and rubber wiper fairing. If you look under the driver's wiper, there will be a circular plug that you can dig out with a flat blade screwdriver. This access port covers the rear bolt on the black environmental box containing the ECU.
On my 99.5, the access port is circled faintly, but is not punched out, so I had to take a different tack for removal and get at the 5th screw from underneath the windshield fairing.
Next, open the hood. You'll notice a long vented black plastic cover that has openings in it to service the battery and brake reservoir. It tucks in to the black wiper fairing at the rear, and is held to the front firewall by a thick rubber gasket. From either end, peel this gasket towards the front of the car slowly and it will come off the joint between the front firewall and the vented cover. The cover is now free, so lift its front edge and slip the rear out of the windshield fairing.
Removal of this vented cover allows you access to the ECU box.
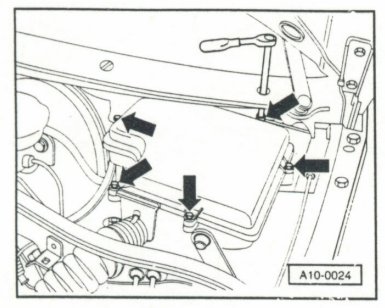
You can remove 4 of the 5 bolts fairly easily at this point with an 8mm socket. The fifth & last screw is hidden by the aforementioned black wiper fairing. If you don't have the access port plug, you will have to get at it from outside the hood. I dug my fingers in between the fairing and the windshield glass to see the 5th screw. Using a long extension, I loosened the screw several turns, then finished the job by relaxing the fairing, then reaching back under the hood, over the ECU box, and pulling the screw out. You do not want to drop this screw, as it would be a devil of a time getting it back.
Once all 5 screws are removed, remove the lid for the ECU box. There is a shiny metal hold-down clip for the ECU. This is removed by tucking a screwdriver blade down into the curled over end of the clip and prying outward & upward.
Look carefully at how the ECU box sits in the environmental housing, this will be important for reinstallation. A polaroid (or digital camera for the geeks) may come in handy here.
Lift up the ECU and gently pull it out until you can see the wiring connectors. They have slide locks that are pulled toward the edge of the ECU box. Slide these out for each connector, then the connector pops off. Once both connectors are loose, your ECU is free.
Reinstallation
Reinstallation is easy:
Pop open the hood. Assuming you left the car as it was when you disassembled the ECU:
Place the ECU in a good position so you can reconnect both of the plugs on back. They only fit one way, so slide out their retaining clip, carefully align up the
pins, and push the connectors on. Slide the locking clips in all the way to lock the connectors down.
Place the ECU in place on the plastic guides in the box. This is non obvious, so monkey it around some until it seems most stable. If you snapped a photo earlier, use it now.
Attach the spring clip over the ECU to hold it down. Make sure the clip seats in the lower holes. The best way to do this is to hook one side into the lowest hole first, then stretch the clip over the ECU and into its position on the other side. Slide the clip in place, and pry outward on the outer rolled edge of the clip from straight above, until you can seat the clip in its lower position. If you don't do this, the lid won't fit properly.
Put the lid back on the ECU box. Carefully put in the rearmost (bastard) bolt by reaching over the box with your hand. Carefully insert the bolt (Don't drop it!) and start the threads a few turns. Insert the other 4 and hand tighten, then
snug them down (not real tight) with a 8mm socket. Now go back outside and retighten the rear bolt by going through the gap between the windshield fairing and the glass. The torque setting is printed on the box for those detail freaks out there.
You have to synchronize the new ECU with the throttle position sensor. Turn the key on until the lights come on on the instrument panel, but don't start the
car! Leave the key on in this position for a minimum of 3 minutes.
While you wait for the ECU to sync up, go ahead and replace the black vented cover between the firewalls by tucking the rear edges under the windshield fairing, and align the front edge with the front firewall. Take the gasket and shove it hard against one of the side weatherstrip gaskets, and then feed it on the edge of the front firewall/vented cover assembly.
This should take the requisite 3 minutes, so go ahead and make sure there are no loose wires, spare parts, or missing tools. If all is OK, button up the hood,
and fire it up!
That should do it. You have replaced your ECU!
|