| Tech Article Title
|
Author
|
Date
|
|
RS4
Oil Cooler Installation |
VR life
|
2004 |
Thanks to:
- Taner for the tip on the Return Oil Line in the Diagram
http://forums.audiworld.com/s4/msgs/1778726.phtml
- Michael (BLK01S4) for the inspiration to get it done
(and for the photo's showing how it looks when done correctly)
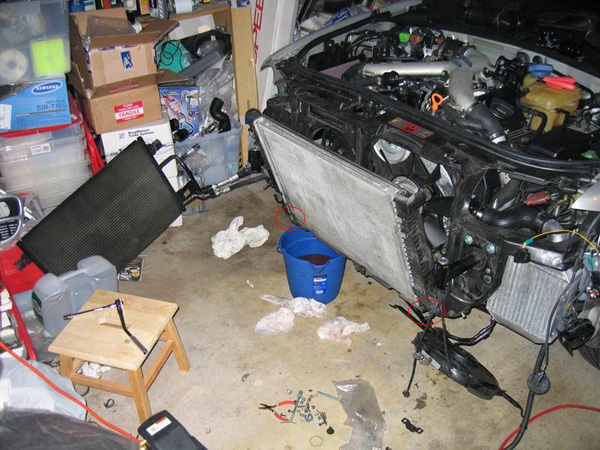
The story so far: so here I was, having just finished the installation of
Bi-Pipe, DV's, AWE IC, pressure tested OK, and feeling far too cocky for my own
good. Then I read the post by Michael and figured since I already had the bumper
off this was the perfect time fix that pesky oil temp problem for good with the
RS4 OC I had sitting nearby. I had bought it a while ago before the price rise,
under the notion it was a "bolt-on OEM upgrade, that fits like a glove". How
long, I thought to myself, could this possibly take?

Sigh ... if only I had known better ... and therein lies the key reason for writing
this up.
No liability is assumed by the author for the use or interpretation of
information contained within an article - all decisions based on the information
are the responsibility of the individual user. The user understands that any
modifications to the car can void warranty.
Tools needed
- Phillips & Flathead screwdrivers
- Metric sockets & ratchet : 10, 13 mm
- Metric spanners : 22 ~ 26 mm (do not use 8" shifter)Torx bits : T25,
T30, T45
- Hex bits : 6mm
- 8" Adjustable Spanner
- Torque Wrench with Socket adapter
- G12 Coolant (1 Gallon) & Distilled Water (1 Gallon)
- A clean > 2 Gal bottle or container with pouring spout
- A clean bucket > 4 Gal
- Mobil 1 0w40 Oil (8 quarts)
- Waste Oil collection & recycling tray
- Small funnel
- Oil Filter: (shorter than S4 stock part)
o Audi A4 1.8T Filter : 06A115561B (this is the one used on the RS4)
o K&N Gold : HP-2004 (I got from Kragen)
- Oil Sump Drain Plug & Washer : N90813201
- Oil Filter removal tool (recommend the "claw" style tool)
- Thermal Wrap, any will do such as fiberglass or other good thermal
insulating material
o High-temp insulation such as
http://www.heatshieldproducts.com is not needed
o Only need a few feet
- Extra Bits
o Manual Cars
▪ 2xM8-22mm Bolts + Washers
o Tiptronic Cars
▪ 2xM8-50mm Bolts + Washers (Longer Bolts)
▪ 2x 15mm Spacer or 4x M10 (Oversized) Nuts
o Foam Plastic such as used in thermal insulation
o Ear Plugs - yes, all will become clear ...
o Large rolls of paper workshop towels
- RS4 Oil Cooler Kit which includes:
o Condenser Core (15) : 078117021C
o Passenger's side Oil Supply Line (12): 8D0317815L
o Driver's side Oil Return Line (14): 8D0317815M
o 2x Core Rubber Side-Mounts (16): 8D0121275B
o 2x Flange Rubber Mounts (17): 8D0121275A, and 2x Sleeves (18):
8D0121337
o Filter Adapter Bolt (10): 078115721D
o Oil Filter Adapter (6): 078115405A (includes Seals: N0138271
& Unions : 078115721F)
Note: the Oil Return Line (14) is upside down in this diagram
1. Elevate the front of the car on even clean surface, by placing on stands or
on a lift
2. Remove the Bumper
- Use the T30 bits to remove headlights, place somewhere safe.
- Use the flat blade screwdriver to remove the screws securing the front
under-belly cover. Use the T25 torx to remove the screws securing the mud-flaps
linings to the fender
- Remove the bumper grills in front of the Foglights/IC's, undo the bolts
attaching bumper to the Bumper-Shocks. Detach the side of the bumper from the
clips by pulling outwards. Remove the bumper and store somewhere safe and out of
the way.
- Detach the Radiator & Bumper support. Use the T45 Remove the bolts securing
the bumper shocks and remove the shocks
- Detach the drivers side bracket supporting the Power Steering coolant line,
place out of the way (e.g. under the car)
- Use Phillips screw-driver to detach the clamps securing the Left/Right IC
lower hoses - this will significantly improve access to plumbing on both sides.
3. Make sure the car is cool before proceeding; if necessary leave the car
standing for a few hours.
4. Draining the Oil Sump
- Place Oil collection tray under sump
- Remove plug
- When drained, remove the Oil Filter using removal tool
- Dispose of used Oil properly
5. Prepare the RS4 OC Core & Hoses
- Remove the shipping caps from the OC Core and attach the Oil Supply and Return
hoses
- Tighten the nuts securing the hoses such that they will not leak in subsequent
steps. The OEM connectors do not have seals, wiggle the connectors while
tightening to ensure they are seated properly. I guess I tightened with roughly
~20ft.lbs of torque.
6. Pre-filling the Condenser Core & Hoses with Oil:
Some folks don't think it's important to pre-fill the circuit with oil, hence
this next step is optional. I tried to pre-fill the OC after I had mounted it
and then attached the hoses, which made it much more difficult, so I'm listing
it here to highlight that it should be done while still easily accessible and
air easily removed from the core.
- Place cap over one end of the hose leaving the other end open, hold up entire
assembly so that core and hoses are stretched out length-wise in a vertical
orientation with the open hose end at the top
- Using a funnel, pre-fill the OC Core with Oil, tap gently to remove bubbles,
seal with cap
7. Preparing the Radiator for removal
- Remove bolts holding the Fan & Brace, place out of the way
- Remove A/C condenser, leaving plumbing attached. Carefully move it out of the
way, and secure it so that some fool doesn't trip over it ripping the lines.
- Remove the screws securing the Coolant Expansion Tank but leave it on it's
mounts
- Remove Temp Sensor and bracket on the front bottom middle of the radiator
8. Drain the Radiator - yes you have to do this just to get at the mounts
(I couldn't find the coolant drain plug as indicated on Bentley diagrams so I
did it the hard way: as follows)
- Locate the passenger side lower coolant line where it attaches to the
Radiator, place a bucket underneath. It's the thicker of the two lines running
to the bottom of the radiator
- Remove clip from hose connection
- Slowly detach the hose, prepare the bucket to catch the draining coolant
- Very SLOWLY unscrew the lid of the Coolant Overrun reservoir until the rest of
the coolant starts to drain - do not open too fast or the in rush of air will
allow the coolant to gush out covering everything.
9. Detaching the Gear Oil Cooling Lines
- Remove screw attaching Differential Gear-oil return line on the upper
passenger side rear face of radiator.
- Quickly plug the oil line using the Ear Plug. Be careful not to use Plugs that
are too small, nor allow bits of it break off into the supply line.

10. Detaching the radiator
- Use the T30 torx to remove the screws securing the fender to the radiator
support, and the fender screws under the hood front.
- Locate the driver side coolant line at the upper point where it attaches to
the Radiator on. Remove clip from connection.
- Remove plastic pegs at top of radiator. Gently pull Radiator forward and up
- Remove the Rubber Mounts at the base of the Radiator Core, these will be
replaced by new Rubber mounts in the RS4 OC kit.
11. Mount the Oil Cooler Core
- While facing the Car, hold the Condenser Core so that the side brackets are up
at the top, and pointing backwards towards the rear of the car.
- Insert the new RS4 OC Rubber Mounts into the holes in the brackets, flange
side up, so that the narrower portion with the hooks points downwards.
- Lift up the Radiator and insert the RS4 OC such that the Radiator now mounts
on top of the RS4 OC Rubber Mounts and brackets.
- Re-install the Radiator and RS4 OC core.

[1] [2]