| Tech Article Title
|
Author
|
Date
|
|
RS4
Oil Cooler Installation |
VR life
|
2004 |
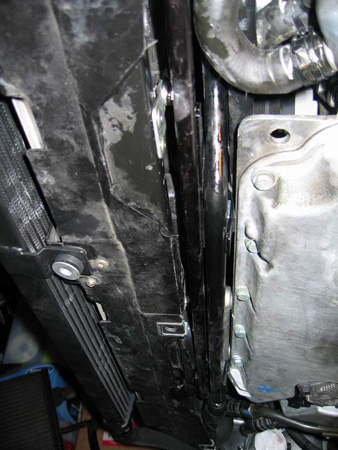
12. Mount the Oil Cooler Lines to the Sump
So here's where I had to decide to either remove the radiator entirely, or leave
it mostly hooked up and work around it. I chose to leave it still hooked up,
which means the steps of attaching the oil lines needs to be done on your back
from under the car.
Move the Radiator-support and assembly forward as much as possible on the snub
mount at the base to allow access to the area between the sump and the rear of
the radiator. Be careful not to pull it off the mount, which would twist the
remaining gear oil supply line at the base of the radiator - which would not be
good. The objective is to allow enough working space to get hands and tools in
between the area in front of the oil sump, while still keeping the OC in roughly
the same position.
Manual Cars
- Run the Oil Supply Line in between the Oil Sump and the Radiator support
- Use the M8-22mm to secure the brackets on the top of the supply line to
mounting holes along the front edge of the Oil Sump
Tiptronic Cars
- Run the Oil Supply Line in between the Oil Sump and the Radiator support
- Remove the screws securing the Tranny Oil supply line to the Oil Sump, these
will no longer be needed
- Use the M8-50mm to secure both the brackets on the RS4 OC supply line, and the
Tranny Oil Supply line, onto the mounting holes along the front edge of the Oil
Sump
- Use a Spacer or two over-sized nuts to separate the brackets

13. Routing the Oil lines
Routing the Passenger's Side RS4 OC Oil Supply line
- As per the diagram the end of the RS4 OC supply line attaches to the core
while the connector end goes inside the area where the stock Oil Cooler is
located and towards the rear of the car.
Routing the Driver's side RS4 OC Oil Return line
- The RS4 OC return line goes the opposite way of what's indicated in the
diagram, the rigid section attaches to the core, while the section with the
Rubber Spacers goes towards the adapter.
- Feed the line through the gap between radiator core and support, ending inside
the area where the stock Oil Cooler is located. The connector goes towards the
front of the car.
14. Attach the Oil Cooler Adapter - this was the most difficult part for me - be
very careful not to damage the adapter
Use the proper Metric Spanners.
Do NOT use adjustable Shifter Spanners.
- Clean the Oil Cooler Adapter (6) thoroughly, removing any contaminants
- Clean the area around the stock Oil Cooler where the Oil Filter screws on
- In this order attach the Return Line (14) to the Oil Cooler Adapter (6), then
attach the Supply Line (14)
- Use the Metric Spanner to tighten the oil line connectors to the Adapter while
carefully holding the Adapter parallel to the face of the stock OC where it will
be mounted. The OEM connectors do not have seals, wiggle the connectors while
tightening to ensure they seat properly. I guess I tightened with roughly
~20ft.lbs of torque
- Wipe down the RS4 Oil Cooler Adapter (6) thoroughly again, removing any burs
or contaminants.
- Use some of the Engine Oil to moisten the seal on the inside of Oil Cooler
Adapter (6) facing towards the towards Stock OC.
- Insert the Filter Adapter Bolt (10) and finger tighten until firm, use the
metric spanner to tighten, being extremely careful not to damage the face of the
Adapter. I guess I tightened with roughly ~20ft.lbs of torque.
- I ended up rotating my RS4 OC Adapter slightly so that the hoses were
positioned just right. Be careful NOT to cause the Stock OC body to be rotated
as this will cause the Coolant lines to pinch, interfering with and restricting
the flow of coolant. The Stock OC should be co-planar with the underside of the
sump.
- Position the rubber buffers around the Driver Side Return Line so that it is
not rubbing or touching other high temp lines.

15. Refill with new Oil
- Pre-fill the new - shorter - Oil Filter with Engine Motor Oil, rub oil around
the rubber seal at the top of the Filter. Attach the Oil Filter onto the Adapter
Bolt until finger-tight. Then turn one extra complete rotation using the Filter
removal wrench
- Re-install new Oil Sump Drain Plug & Seal. Tighten using the Torque Wrench
~22ftlbs
- Fill up with about 6 quarts of Motor Oil, then monitor the dip stick while
adding in the last one. Be sure not to overfill!
- Wipe off all the filters, connectors in the Oil Cooler circuit with paper
towel (when the engine starts we'll be re-checking each seal)
- Check under engine, around the Oil Cooler hoses for leaks
- Re-install the lower IC Hoses and tighten clamps
16. Re-attach the Radiator
- Install the pins securing the radiator at the top
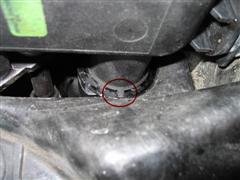
- Mix ~2 Gals of Coolant and Distilled water in a 50/50 ratio. Refill the
coolant. Loosen the bleeder screws on the Coolant hoses (circled in red) as
necessary to allow trapped air to escape.

17. Re-attach the Fan, Air-Temp Sensor and Power Steering Cooling line
- The RS4 OC interferes with the location previously used for mounting and
supporting the fan, air temperature sensor and power steering fluid lines
- I used Zip-ties and some Foam to prevent rubbing, to secure the fan to the
flange on the top of the RS4 OC. I'm sure something more professional could be
done
- Since the sensor bracket must be removed I mounted the sensor on the grill in
front of the Fan and again secured with Zip-ties
- When re-attaching the Power Steering Cooling Lines some effort may be needed
to carefully bend them around the RS4 OC Return Line (indicated in the red
circle of the following diagram). Be VERY CAREFUL not to make a kink in the
cooling lines which may restrict flow!
- Wrap the RS4 OC Return Line and Power Steering Lines with Thermal Wrap at the
location where they will touch. When the bumper is mounted the IC shrouds
will push these lines against each other hence the wrap

18. Here goes nothing
- When everything is reasonably reconnected it's time to fire it up
- Place the Oil Collection Tray under the Oil Cooler & Filter
- Start the car - do NOT gun the Engine - allow the starter to turn over a few
times
- Let it idle and immediately get back under the car with the lights
o Check under engine, around the Oil Cooler hoses and at every
connector seal, use a clean paper towel to detect leaks
o If there are any leaks immediately shut down the engine,
re-tighten as necessary
- Let it idle for about 10 mins with Fan only (turn on Econ mode to disable A/C)
running at Max heat
- Maintain engine speed of 2000 rpm for about 5 mins
- Check the Coolant expansion reservoir, carefully unscrewing the lid and
refilling with diluted coolant as necessary
19. Re-check
- Shut down the engine. Check the Oil dip-stick and top-up as needed
- Check under engine, around the Oil Cooler hoses and at every connector seal,
use a paper towel to detect leaks
- If you got this far without leaks well done, mission accomplished. Otherwise
it's time to go back and re-tighten thing
Continue the rest of the re-assembly as the reverse of steps 7~1
Congratulations - Enjoy lower Engine Temperatures!
[1] [2]
|