| Tech Article Title
|
Author
|
Date
|
|
Allroad Oil Change |
RMcQ
|
2005 |
The
allroad has the most involved oil change procedure of any vehicle I have
ever done due to the belly pan. So to give encouragement or direction to
someone who hasn't tried it yet, here is THE ALLROAD OIL
CHANGE...
TOOLS REQUIRED (some substituions are obviously
possible. This is just what I used.)

For
belly pan:
- Standard screw driver
- Stubby standard screw
driver
- 8mm allen driver, 3/8" drive
- 3/8" drive ratchet
- 3/8"
drive extension
- T30 Torx driver
For everything
else:
- Ramps (not pictured above, see below)
- Oil drain
collection pan (not pictured)
- Funnel
- Filter wrench or strap
wrench
- 19mm box wrench
- Shop towels
- Appropriate
storage/transport container for used oil (not picured)
MY
PROCEDURE (again, some variations are possible. This is not
necessarily the perfect way - its just my way. Constructive feedback
encouraged.)
1. Prepare Vehicle
Warm the engine
to suspend contaminants and to encourage a thorough drain. Raise the
vehicle to level 4 and and park the car on ramps. FWIW - I have Rhino
Ramps that are great because they are plastic and can be stored outside
with no ill effects.

2.
Remove Belly Pan
For those that have not crawled under their
car, this is what the belly pan looks like in situ. Unfortunately I did
not capture all the fasteners in this photo, but it gives you an idea.
There are actually two (2) panels that make up the overall belly pan
system. For an oil change it is not necessary to drop the rear one. Once
all the fasteners are out of the front one, you can tilt it down a bit and
slide it rearward to get it out. Leave the other panel in place. You can
see the seam that delineates the two panels just behind the 3 indicated
quick lock screws at the bottom of this photo.

Shot
of 1st and 2nd pan overlap, from the side:

The
three (3) Torx fasteners are all the way at the front, attaching the belly
pan to the lower front bumper.
The T30 Torx fastener:
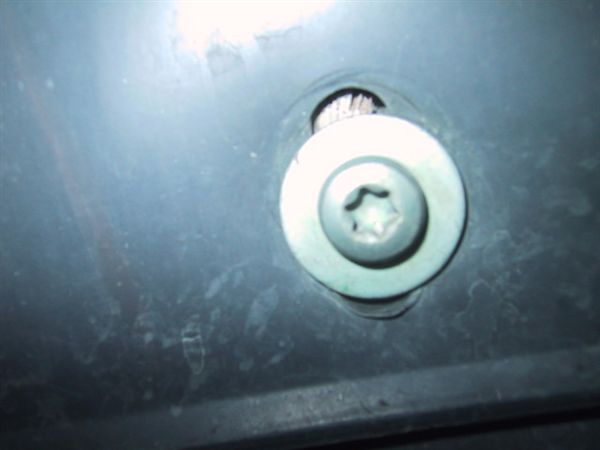
The
Allen bolts are just a little further back. They are the most substantial
fastener in the belly pan, though there are only two (2) of
them.

The
six (6) quick lock screws are all around the perimeter. They are all
vertically into the belly pan. They require a simple ? turn to
remove.

What
you can not see in the above belly pan picture are the four (4) plastic
quick connect screws that are in the fender well. These are oriented
horizontally and also require a ? turn to extract. There is little space
to access these due to the tire being in the way. This is where I used the
short, stubby screwdriver to access two (2) per side.

Detail
of fender well fastener:
[1] [2]
|