| Tech Article Title |
Author |
Date
|
| Replacing 1.8t Valve Cover Gasket |
Kenny Garreau |
2006 |
Note: I did this on an '01 AWM engine. I also assisted last week on an AEB motor last weekend, and the AEB requires much less effort. There may be some steps you do not need to follow if you aren't DBW.
Tools required:
Valve cover gasket set
10mm socket
5mm, 6mm hex
Philips screwdriver
Gasket sealant
Dikes
Time required:
About an hour.
Steps:
1) Open the hood, and remove the engine cover:
2) Remove the airbox cover, disconnect the inlet hose and remove the air dam that is held in place by two phillips screws.
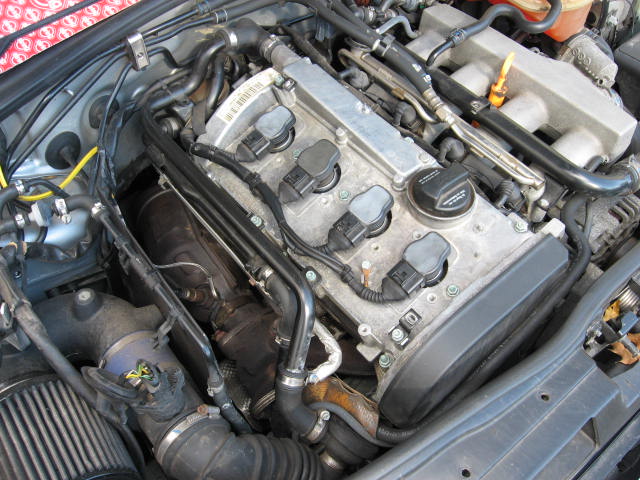
3) Remove the coilpacks and disconnect the engine ground. Pull the plastic fasteners off the valve cover and move to the side.
4) Remove the toothed belt cover at the front of the engine. Two clips hold it on opposing sides of the engine. Unclip, and deftly remove from the engine bay.

(in this picture you can see the accumulation of oil that has been leaking from the valve cover)
5) Remove the two 10mm bolts securing the secondary air piping to the heatshield. Remove the two 6mm hex bolts securing the oil return line to the turbo, they are "behind" the heatshield.
6) Remove the PCV plumbing at the back of the valve cover. I removed the hose attached to the valve cover by snipping the metal clip off with a pair of dikes.
7) Remove the four 5mm hex bolts securing the PCV lines to the engine. Move them out of the way.
8) Remove the 9 10mm nuts securing the valve cover to the engine. I removed the inner bolts, then worked my way removing bolts diagonally.
9) Remove the valve cover and have a peek at the valvetrain:

Note: the valve cover may be stuck. A rag around a flatheaded screwdriver and prying at the corners will bring the cover up easily.
10) Remove the old gaskets:

11) Clean up and marvel at your mechanical prowess! Be sure to clean off the plane of the head so that the gasket makes good contact with the metal. Lightly moving a flatheaded screwdriver along the metal will remove any build-up DO NOT PRESS HARD.

12) Install the spark plug gasket (writing on the gaskets faces UP), and then put four beads of sealant down:


(the red in these photos is where you need to apply, also apply at the opposite end of the head)
13) Yuck. Clean this up.

14) Installation is the opposite of removal. Torque the valve cover nuts to 10 Nm, starting with the center three nuts and then tightening from the outside diagonally.
15) Once she's all back together, fire her up. Congratulations, you've just saved yourself over $500 at the dealership!
|