| Tech Article Title |
Author |
Date
|
| Remove and Replace Factory Fuel Pump |
Robert Gedeon |
2006 |
Difficulty:
The hardest part was getting the OE clamps off the feed and return lines and off the pump outlet. Anyone who's removed one of these clamps knows it can be more irritating than "difficult," per se. Outside the frustration with the clamps, it's pretty basic.
Time required:
Took me about 2.5 hours, with taking pictures.
Tools required:
While the factory recommends two specialty tools for the job, the specific tasks calling for them are actually quite easy to perform with simple garage tools. In fact, the steps calling for specialty tools were actually among the easier steps, with the hardest being the simple removal of the OE clips from the feed and return lines. I mention this only because I was nervous to do this job since I didn't have (nor wanted to buy) the specialty tools, and didn't want to have to fab a tool either. I went back and forth on whether or not to buy the special tools, but in the end decided I'd give it a shot without them. After doing the job, it's very clear that the spcialty tools are definitely not needed. If not having them is what's holding you back from doing this yourself, trust me - the obstacle is more apparent than real. Just go for it, and you'll see.
Anyhow, here's the tools I ended up using:
2 largish flat head screwdrivers
Small tip flathead screwdriver
Phillips head screwdriver
Fuel resistant butt connectors*
Crimper for butt connectors*
4 smallish Oetiker clamps (a handfull of 11.3 - 15.7 should do)
Clamp crimping tool or wire snips
Rubber mallet
Replacement fuel pump
*These parts were only needed because I put in a Walbro - if replacing with another OE pump, these won't be necessary.
Getting Started:
The first thing I did was drive the car to 0 miles left on the trip display. For me, that corresponds to about 1 gallon left in the tank. The less fuel you have in the tank, the better. I later did this with just under a 1/4 tank in the car, and it was a much messier ordeal. Do yourself a favor - if you don't like working in gasoline, drive the car till the tank is as close to empty as possible.
With the tank close to empty, get ready to work. Open and close the gas cap for your gas tank and move the passenger front seat to it's fully forward and inclined position. This will give you maximum room to work with as your dealing with the pump.
After moving the seat forward, and in the hopes of minimizing the risk of blowing my ass up, I disconnected the negative from the battery.

The next step was to move the rear bench seat from the car, to get access to the fuel pump itself. This can be done by pulling up on teh front edge of the seat. It requires a good yank, as there are clips there holding the thing down. Pull the bench up just enough to release the clips, as there may be some wiring connected to the underside (for heated seats, for instance) and you don't want to screw them up.
Once the bench is free, I had to disconnect the wiring by squeezing the obvious clips, and then snipped a set of zip ties holding the wiring in place on the bottom of the bench. After disconnecting the clips and snpping the two zip ties (one on the passenger side, one on the driver's side), the bench could be removed freely from the car.


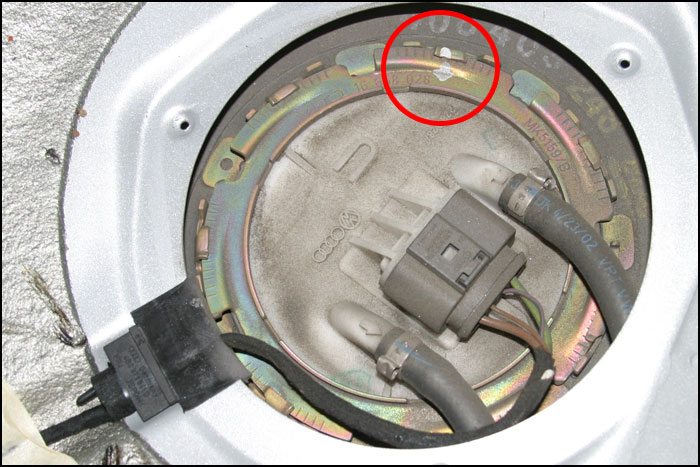
With the bench out, the panel covering the fuel pump assembly was visible on the passenger side of the bench foundation. I removed the panel by unsrewing the three screws with a phillips head screwdriver, then just lifting up on the panel. Before lifting it off, I was sure to note the location of the obvious "hump" on the panel, as it would need to be re-installed in the same fashion (the hump is there to clear some fittings on the top of the fuel pump assembly).

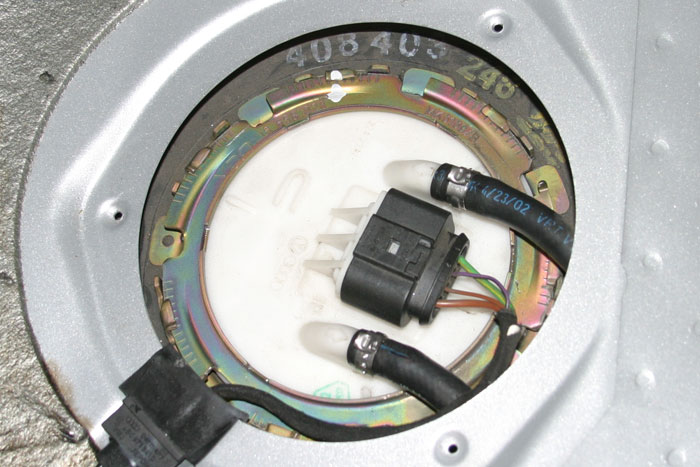
With the panel off, you can see the top of the pump assembly, with feed and return lines (indicated with visible arrows on the hard pipes), as well as an electrical plug and a round retaining ring. The ring spins clockwise / counterclockwise and has slanted extensions that lock in place via friction underneath tabs on the mount.
On my ring, there was a white marking indicating the degree of rotation of the retaining ring. If no mark is present, I'd make a mark on the ring. This will help when re-securing it, so you know how far it must be rotated.
Before removing the retaining ring, the plug and feed / return lines need to be disconnected. First, I tried to wipe the area clean from dust. After that, to remove the plug, I inserted a small flathead screwdriver to depress the locking tab, and the pulled the plug straight back and off.

With the plug off, it was time to remove the lines. I marked each as feed and return (with arrows on masking tape), and stuffed some rags into the area to catch any excess fuel before finagling the clamps free. With the clamps off, I wedged the blade of my flat head screwdriver between the end of the hose and the hardpipe for each line, and started the removal of the lines with some gentle prying. I kept the rag at the ready when removing the lines, and let the excess fuel pour out of the lines into the rag. In total, there was maybe 1/4 cup of fuel.
You definitely want to be ready with rags or you're going to get fuel pouring out. Not the end of the world, but not just more mess you'll have to deal with. Once the lines are disconnected, you can sort of tuck them out of the way under the lip of the bench.


With the hoses and plug disconnected, you can now remove the retaining ring to access the inside of the tank / pump housing. This is the first task where a specialty tool (tool 3087) can be used. This tool is basically a modified socket that has a wide ring with tabs on it. The tabs fit into the notches on the retaining ring, and the tool can be used to wrench the retaining ring free.
The alternative is to simply use a screwdriver and a mallet to knock the ring free. I placed the blade of the screwdriver against the edge of the notches on the retaining ring, and hammered the other end of the screwdriver with a rubber mallet. I did this in a rotating fashion using all notches on the retaining ring, trying each time to knock the ring counterclockwise and loose. You'll start to notice progress, and bit by bit the retaining ring will start to move and before you know it, the ring will be free. It helps to alternate from notch to notch on opposite sides of the ring. Once free, remove the ring.


With the retaining ring removed, the cover to the tank / pump can be lifted out of place. There is a rubber gasket in place, so it will take a light pulling to get the cover off, but don't yank on it too hard - there is not much slack in the return line and electrical wiring connected to the underside of the lid. If you yank hard on it, you risk doing some damage. Just pull enough to lift the lid so you can get a look under it.
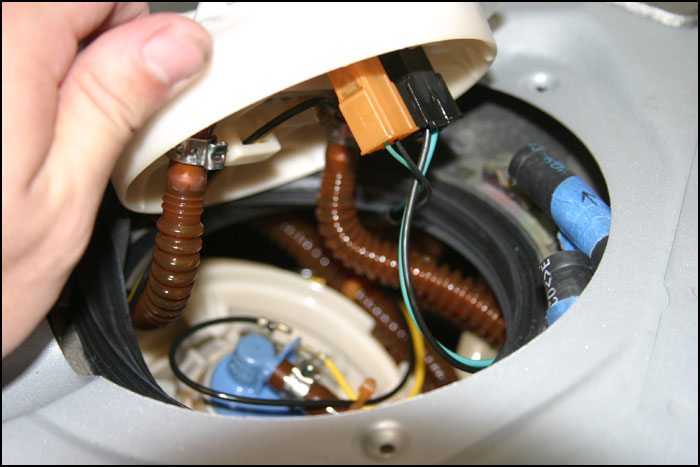
The next step is to disconnect the electical plugs and the return line. I marked the plugs (so I'd remember which went where) before disconnecting them, and then removed the clip holding the plastic return line onto the underside of the lid. This clip was a bit of a PITA to remove, and the line is on very tight. Again, I ued a small flat head screwdriver in a gentle prying movement to start the line off, then pulled it off the rest of the way with my fingers.
With the electical plugs and return line disconnected, you can pull the lid out of the way and get full access to the pump.
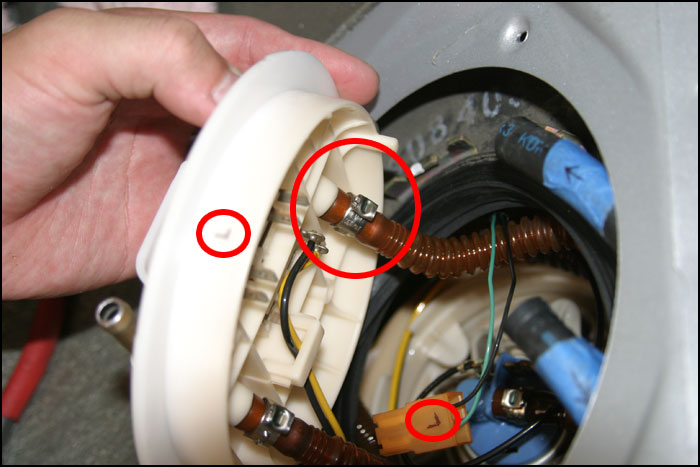

There is a special tool (tool 3214) that can be used to remove the basket assembly. In essense, it's like a ring with a handle on it. The ring has tabs that stick out and catch in the notches of the fuel pump basket. Turn the ring, and the basket turns.
You can remove the basket just as easily, however, with a pair of screwdrivers. First, locate the rectangular notches in the top edge of the fuel pump basket. They are very apparent, and highlighted in red circles below (two are not showing, since they are concealed under the lip of the bench at the angle the picture was taken).

To remove the pump, place two flat-head screwdrivers in a crossed pattern against one another, with the blades resting against the walls of the notches on opposite sides of the basket. Depending on the way you cross the screwdrivers you can use opposing force to rotate the basket either clockwise or counerclockwise. To unlock the basket, hold one screwdrivers in each hand with shaftes pointing down. Make an "X" with the shafts of the drivers, resting the shaft of the screwdriver in your left hand above that of the screwdriver in your right hand. In this position, rest the blades against the notches in the basket, and push the handle in your right hand forward while pulling the handle in your left hand backward. The screwdrivers will offer opposing force at the place where they meet, and allow you to rotate / snap the basket counterclockwise to it's open position.
I was very nervous about lacking the special tool for removing the pump basket. I was suprised at how easy it was to do this, though, without it, and am very glad I didn't spend the money on a tool I'd likely not ever use again.


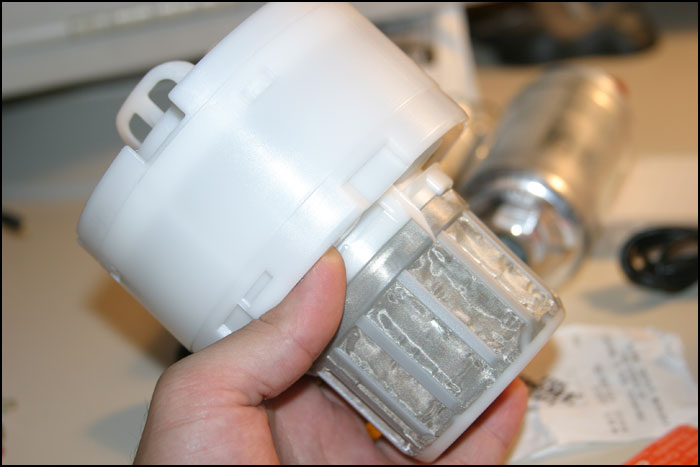
Once the basket snaps into the open position, you can lift it straight up and out of the fuel tank. It will likely be dripping fuel, so you might want to have a rag handy to catch any drippings. Here's a picture of the fuel pump removed from the tank, and of the tank sans pump...


The remaining steps were taken to fit a Walbro 255lph hp pump in place of the stock pump. If fitting a replacement OE style pump, you will likely follow similar steps, but some might be unnecessary.
To install the Walbro, it's neessary to detatch the feed line and electrical lines from the stock pump. Undue the metal clip and pull the plastic hose off the outlet nipple of the stock pump. Again, these guys are on there tight, and it's a little work getting them off. Gentle prying with a small flat screwdriver might help here.
Next, detach the electrical pins from the stock pump. In the case of my pump, the black wire was positive (indicated by the "+12" marking on the pump housing. The stock pump / basket is now free from the lid, feed line, and electrical connectors.

These lines must next be connected to the replacement pump. if it's a stock pump, this ought to be relatively straightforward. If it's a Walbro, like mine, there are a few extra steps (the pictures belwo show the walbro pump in the A100 / V8 basket - a nice fit if anyone's considering this route).
First, I installed the plastic hose onto the outlet nipple of the Walbro pump, and secured it with a small Oetiker style clamp, which I crimped with a set of wire snips (the angle precluded the use of the Oetiker clamp tool). I THINK I used an 11.3 or 13.3 size clamp, but can't remember exactly.

Once the fuel line is clamped into place, the Walbro wiring harness needs to be wired in with some fuel-resistant butt connectors. I simply snipped the ends of the stock pump's wiring, and used the butt connectors to connect them to the Walbro's little pigtail. Again, the black wire is positive in this case. If using the walbro harness as-is, you should connect the black wire to the red walbro wire. Or, you could reverse the walbro wiring to keep black to black, and yellow to red. Your choice...

Once the butt connections are made, the plug end can be inserted into the new pump and the pump can be re-seated into the tank.
From this point foward, installation is the reverse of removal. Seat the pump into the tank in the open position, and reverse the order of your screwdrivers to snap it back into place (this time left UNDER right, turning the basket in a clockwise direction). Be sure to align the "V" notch on the basket appropriately, so that everything will fit!
Once seated back in the tank, you can re-install the electrical plugs and fuel return line to the bottm of the lid. The fuel line will require another small clamp, and you should be careful to isntall the electrical plugs in their original positions (the markings made earlier might help here if your memory is short, like mine).
With all connections in place, replace the lid of the pump assembly. Be sure the gasket in the well is in good shape while your at it, or you might want to replace it. Mine was fine at 70K miles. Be sure, when seating the lid, to align the large arrow on top with the arrow on top of the fuel tank.

It might take some work to arrange the lines under the lid so it seats well, but play with it and you'll get it.
Once the lid is re-seated properly, re-install the retaining ring on top of the lid. Rotate the ring clockewise, being careful to lock the ring under the tabs on the ring mount. Use the screwdriver and rubber mallet to tap the retaining ring clockwise, until it returns to it's original position. The markings present or made earlier will be helpful here to know how far to rotate the locking ring. It wlil rotate slowly with each tap - alternate tabs and take your time, and it will rotate into place.

Once the ring is fully rotated, use two additional small clamps to re-secure the feed and return fuel lines (again, the markings made earlier will ensure you connect them properly), and then reinstall the electrical plug. I THINK I used 13.3 or 15.7 clamps here, but can't remember exactly.
That's about it! Replace the panel (again, remembering the location of the obvious hump), reconnect the plugs on the bench seat, throw in a couple zip ties, and push the seat back down into place, and you're done!! Enjoy the short-lived, cheap-thrill high you got from working with gasoline vapor, and enjoy your new fuel pump!!

|