|
|
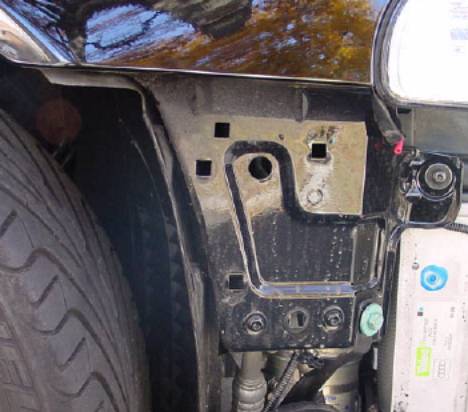
This tech article applies for S4 / B5 platform. After getting my car back from a dealer warranty radiator repair, both outer trailing corners of the front bumper were sticking ˝" out from the front fender viewed from the top. It looked as if the car had been hit in a light front-ender, but it was just an extremely poor reinstallation. I knew both from previous experience & numerous AW posts that the standard method for releasing the bumper ends is supposedly to wrench the trailing edges up & outwards. This procedure is not only hit & miss, but exerts a lot of force on what's holding the bumper ends to the car. It's pretty inefficient since most of the force goes in bending the bumper & its supports, not in releasing the ends. Here is the large plastic clip which locates the outer ends of the bumper (borrowed from AW pics since I didn't take photos at this stage).
The clip is mounted to the body by 4 x flat-headed Torx screws into plastic plugs. The steel panel onto which it mounts is actually the lower part of the front fenders & has almost no lateral stiffness. It's obviously designed to allow floating location in the fore-aft direction for front-end collisions, plus allow easy pop-in installation.
So when you wrench outwards - it tries to tear the plastic clip off or bends the metal panel or both. Just didn't seem a great way of approaching the job. Note: The following procedure only deals with
removal & realignment of the bumper ends. The other procedures for removing
& aligning the bumper are already well documented elsewhere in
Audiworld.
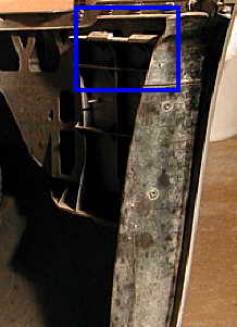
Ideally the best way would be to lever between the bumper
& the plastic clip. This would minimize excessive force on the supporting
parts, which caused my bumper misalignment in the first place. A quick look
revealed slotted access holes in the wheelwell liner which seemed designed for
this exact purpose.
Once the first jaw is pryed apart, the bumper can then be levered with much less force to release the second upper & also lower jaw. Removal of the bumper then follows the normal procedures (documented elsewhere in AW). After the bumper was removed, it was apparent the steel panels on both sides had bent outward & some of the plastic screw inserts were partially torn out by the heavy handed dealer "blacksmith". This was easily rectified by placing a 1" diameter plastic dolly over the lower 2 Torx screws shown in the photo here & giving a few hefty whacks with a rawhide hammer to bend the panel back into position. I first removed the plastic clip to replace the plastic screw inserts, then refitted it & the screws before hammering. This spread the load more evenly by reinforcing the steel panel.
It took a couple of tries to get it right, but wasn't too difficult. This is basically the "procedure" to laterally align the bumper trailing corners with the wheelarch since there are no other provisions. It's painfully apparent when they are only slightly out of line, so it's worth getting right. Fore-aft alignment is achieved by adjusting the bumper with the 2 long vertical M8 bolts loosened, then tightening.
I used a 10mm in-hex socket (or 10mm allen key) from underneath to adjust once the bumper had loosely been fitted. The final results:
|
|
Advertising |
Contact Us |
Cookie Policy |
Privacy Statement |
Terms of Service |
Do Not Sell My Personal Information
© 2020 MH Sub I, LLC dba Internet Brands |