|
|
I've recently installed a McCulloch 6000K HID kit into my 98.5 A4 2.8Q (Canadian).Ā I've upgraded the headlights to the 2 piece Euro projectors as well.
Items required:
I've started out by removing the OEM headlights and side parking lights. From there, I jump onto the 2 piece Euro projectors. A 1" hole is required for the rubber grommet where the wires from the ballast and start pack will pass through. I choose to make the hole on the dust cover of the headlights.
Once the wires and the plastic grommet are in place. A plastic connector that's included with the kit will be used to install with the wires from the starter pack.Ā This connector will plug into the OEM plug from the H7 bulbs.Ā Make sure the white wires from the starter pack line up with the yellow wire from the OEM plug and the black wire from the starter pack with the brown wire of the OEM plug.
All the hard part is done.Ā The rest is simple.Ā Place the HID bulb into the socket where the H7 bulb used to be.Ā Next, carefully decide where you'll place the ballast and the starter pack.Ā I've decided to mount it on the backside of the dust cover using a tie wrap and a screw.Ā I placed the dust cover back onto the headlights.Ā To make things neater I used some electrical tape and tie wraps for the rest of the loose wires.ĀĀ Once that was done, it was time to mount the new Euro projector headlights with the HID.
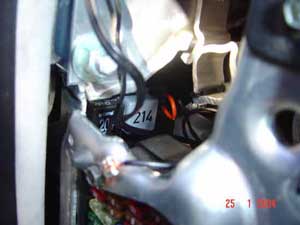
For us Canadians that wish to disable the DRL, just follow the Tech Article by Jason Meaden http://www.audiworld.com/tech/ext7.shtml I removed the panel that's located under the steering column.Ā Then looked for relay 209 and remove it.Ā My jumper was a piece of wire about 2" long with two spades connector on each end.Ā The jumper was placed in the A to B terminal where the relay was.Ā Make sure you look at the relay for the A and B terminal and connect your jumper accordingly. I don't get the "burnt light signal" and I didn't have to change the fuse to a higher amp (yet).
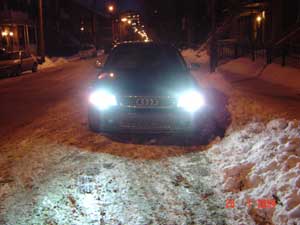
Finally, it's all done.Ā Here how they look with the DRL disable and when they're on...
|
|
Advertising |
Contact Us |
Cookie Policy |
Privacy Statement |
Terms of Service |
Do Not Sell My Personal Information
© 2020 MH Sub I, LLC dba Internet Brands |