|
|
I recently had the opportunity to purchase a set of polished "S" mirrors. The seller was upfront and let me know one mirror was perfect and that the other had a fair amount of sand blasting and some significant gashes and pitting. When they arrived, that description was spot on. Time to start the refinish process....except I couldn't find any posts on how to accomplish this. So, I've done some research and here are the results. Some housekeeping rules....wear safety goggles and a dust filter mask...both are a must. Work in a well lit area because you're going to need to see what you're doing, and work in an area that can accept a little damage and dirt (you'll have aluminum dust flying around and you sander may slip and damage your workspace)....the dining room table is not a good spot to do this! Tool and Material List: 1. 3M Scotch-Brite Finishing Sander - Medium Grit (part 9415NA) - this is a sanding disk 2-1/2" diameter x 1-1/4" wide sander has 1/4" mandrel to fit all electric drills. Perfect for light sanding of wood and metal. Leaves a smooth finish. 2. 3M Scotch-Brite Finishing Sander - Fine Grit (part 9416NA) - same description as above, just a fine grit 3. Rubber Sanding block - the kind you loop the sandpaper sheets into 4. 3M Imperial Wetordry Sandpaper Sheets - 600 grit 5. 3M Imperial Wetordry Sandpaper Sheets - 1000 grit 6. Several clean rags (cotton socks are good) 7. 3M Perfect-It II Rubbing Compound 8. Corded Drill 9. 4 Inch Buffing Wheel 10. Mother's California Gold Aluminum and Mag Polish 11. Clean Cotton Socks! 12. Black and Decker Workmate Project Center (or equivalent) 13. Torex T10 Screwdriver (mirror screws) 14. NAPA KLEANZ-EASY Surface Cleaner (paint prep) 15. Dupli-Color CP 199 Adhesion Promoter 16. Dupli-Color DAL1695 Clear Lacquer 17. Dremel Power Rotary Tool with Buffing attachment Here's our patient before we begin:  Step 1 - Clean the mirror Summary - Clean the mirror as you would wash the car. Get all the road crud off the mirror and make it a clean as possible before you begin. Step 2 - Remove the clear coat from the mirror Caution - if you're using a power sander be VERY careful not to gouge the aluminum. Smooth and easy are the key words here. Summary - you need to remove the entire clear coat from the mirror to be able to get to the aluminum. Aluminum is a soft metal, so you can't use too low grit sandpaper (the higher the grit number the smoother the finish) or you'll have gouges the size of the Grand Canyon. There's also a lot of surface to clear, so I'm using my drill (corded, not cordless) and a 3M Scotch-Brite Finishing Sander - Medium Grit (part 9415NA) to get the clear coat off (repeat after me, smooth and easy, smooth and easy)  2a - Using a smooth horizontal left to right motion to keep the grinding marks in a straight line, work to remove the clear coat. Use the same motion around the curves of the mirror  Step 3 - Remove the finishing sander scratches Summary - you've got the entire clear coat off, now it's time to remove the surface scratches the sand paper put in the soft aluminum. We are going to do this in a few steps, each time going to finer grit (higher number) sandpaper. The objective is to gradually eliminate all the sanding lines. 3a - switch the sander to the 3M Scotch-Brite Finishing Sander - Fine Grit (part 9416NA), and sand the entire mirror using the same smooth horizontal left to right sanding method. When no significant sanding lines are seen go to step 3b. This step is where you should remove any damage or pitting to the mirror. If the Fine Grit isn't doing the job, go back to the Medium Grit to work the blemish out. Make sure to blend your sanding into the mirror surface, you don't want any low spots to show when you're done, so blend it over a larger area. For example, if you have a 1/8 of an inch blemish, blend your grinding over an inch so what you had to grind out isn't obvious. When the blemish is removed, go back to the Fine Grit to smooth the finish again. Do not go to step 3b unless you are satisfied that all blemishes are removed from the mirror. 3b - Now we're getting to fine sanding, in this case wet sanding. If you do this in your kitchen or bathroom sink, you may want to put a rubber mat in it to protect the finish. I'm starting with 600 grit wet sandpaper on my rubber sanding block. This is wet sanding; I do the sanding under a continuous light stream of water. Again, sand the entire mirror using the same smooth horizontal left to right sanding method. When you don't feel the sandpaper is doing much, change to a fresh sheet. I used about 4 sheets to achieve a satisfactory result. 3c - Now switch to 1000 grit wet sandpaper on the rubber sanding block. Again, sand the entire mirror using the same smooth horizontal left to right sanding method. When you don't feel the sandpaper is doing much, change to a fresh sheet. I used about 6 sheets to achieve a satisfactory result. Wet Sanding:  At this point, the mirror should not show any deep sanding marks and you're ready for polishing the bare aluminum. Step 4 - Polish the Mirror for the "S" look Summary - You've got the mirror clear of any blemishes and you've minimized any sanding marks with the 1000 grit wetordry sandpaper. This step removes the minor sandpaper scratches and creates the mirror finish 4a - Preliminary Rough Buff - Get a clean and smooth rag and put some 3M Perfect-it II Rubbing Compound on it. Using a circular motion, rub by hand the rubbing compound into the mirror; the rag will turn black as you polish the mirror.  This step took about 30 minutes. The mirror must be perfect at this point. If you still see any blemish, go back to step 3c, work on those remaining blemishes, then repeat step 4a. Below is an example of where I had to spot sand with 1000 grit wetordry paper to remove blemishes that became apparent as I polished..  Repeat steps 3c and 4a until the mirror is perfect. I had to repeat steps 3c and 4a several times before I removed all the sanding blemishes. 4b - The High Speed Buffing Step - VERY CAREFULLY (you don't want to slip and damage the mirror) - buff the mirror with a power buffing tool at high RPM. I mounted a 4 inch Dico Buffing Wheel on my drill and applied by hand some 3M Perfect-it II Rubbing Compound to the mirror. Starting the drill at a low RPM so I don't spray the rubbing compound all over the basement, I slowly spread the compound evenly across the mirror, gradually increasing the drill RPM to its highest level. This step took about 5 minutes to achieve the appropriate luster.  4c - Using a clean rag, apply by hand the Mother's California Gold Aluminum and Mag Polish and rub it into the surface for a final buff. Step 5 - Clear Coat the Mirror Summary - The clear coat will protect the aluminum from getting dull and reduce the amount of polishing required to keep them shimmering. Various options include using Lacquer and Powder Coating. I decided to use Lacquer, primarily because I plan to install a clear bra on these and the cost of powder coating is high. Special Note - Lacquer is not Krylon paint...trust me, I refinished the mirror twice because I put the third coat of lacquer on too heavy on my first attempt which resulted in this finish:  I attempted to wet sand the lacquer smooth, but sanded through the lacquer in one spot and had to strip the mirror bare again and repeat everything. So go light with the coats of lacquer......Krylon is much more forgiving if you apply too much. 5a - Create a bracket to hold the mirror - I created a "painting stick" by using a piece of wood .25 inch thick, about 2 inches wide and 24 inches long to mount the mirror to while I painted it. I drilled holes (you'll need to counter sink them, the screws are short) to line up with the holes in the mirror. Mount the mirror to the bracket (Torex T10 screwdriver), and put the bracket in a Workmate Project Center (covered in plastic to protect it from overspray) to hold it in place.  5b - Prep the mirror service for painting - This step removes grease, wax and solvents that prevent paint from forming a lasting bond. I used a cotton sock and applied the NAPA KLEANZ-EASY Surface Cleaner to the mirror surface, ensuring the entire surface inside and outside was cleaned. Dry the surface with a second clean cloth. Make sure the cloths you use are 100% cotton clean and soft....you do not want to scratch the surface. 5c - Prime the Mirror - Following the product instructions, apply three light coats of the Dupli-Color CP 199 Adhesion Promoter. For each coat, make sure you use a smooth sweeping motion as you apply the paint. The mirror will have a perfect "frosted" look, but that will go away when you apply the lacquer. Read the instructions...you have 10 minutes to begin applying the lacquer when you've completed your coats of adhesion promoter.  5d - Prime the Mirror - Following the product instructions, apply three light coats (I'd suggest very light!) of the Dupli-Color DAL1695 Clear Lacquer. For each coat, make sure you use a smooth sweeping motion as you apply the paint. Follow the directions very carefully and do not apply too heavy a coat; lacquer will run very easily. 5e - Wait - Let the Lacquer cure for several days (I gave it two weeks.....didn't want to screw up at this point) I had some very minor runs that became less apparent over the two weeks while I allowed the lacquer to cure. 5f - Polish the finish - You can't do this step on the painting stick, so I clamped the mirror to my work bench using a cotton rag to protect the mirror from the work bench surface. I completed the job by applying a Griot's Garage Machine Polish 3 to the mirrors using a random orbital sander to smooth out some very minor blemishes in the lacquer and enhance the shine. You do not need to apply pressure at this point, the weight of the buffer is sufficient. I would spread a thin layer of polish on the mirror by hand and keep the foam buffing pad in contact with the mirror so I wouldn't spray the polish all over the basement. Just go nice and slow until you're satisfied with the gloss. Keep checking your progress frequently to make sure you are not polishing through the clear coat.  5g - I used the Dremel rotary tool to get into the tight curves where the Porter-Cable could not reach. I would spread a thin layer of polish on the mirror by hand and keep the felt buffing pad in contact with the mirror so I wouldn't spray the polish all over the basement. Eye protection is a good idea for this step. 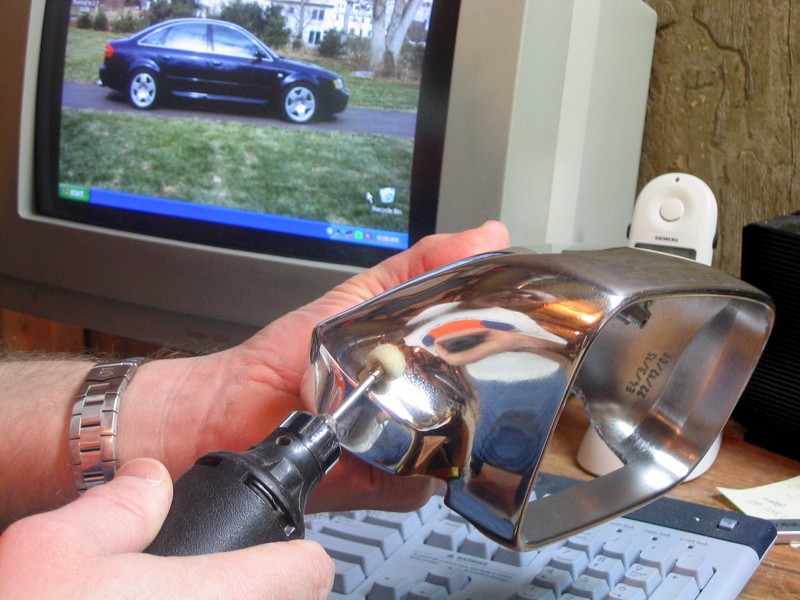 I didn't bother applying wax at this point, since I plan to apply a clear bra to the mirrors to provide a higher lever of protection. I have a quote from a local tuning shop to do that for $42. Step 6 - Enjoy the refurbished mirror!  Post Note - Applying the clear coat lacquer was the most difficult part of the project. At some point down the road, I'll probably refinish both mirrors. The refinished mirror looks better than the original mirror since the clear coat has become a little cloudy at this point in time. I think I'll strip them down and polish them, but the economies of scale with two mirrors I think will justify powder coating them. |
|
Advertising |
Contact Us |
Cookie Policy |
Privacy Statement |
Terms of Service |
Do Not Sell My Personal Information
© 2020 MH Sub I, LLC dba Internet Brands |