Right at the start I want to thank Redtwinturbo for the inspiration to start this project. I'm working on sticking LED lights in my exterior door handles, and this is the second-to-last part of that process. I've got the photos on flickr if you just want to look at pictures without the description, but the beginning is a little tricky because the clips are so tight. read on for more.... But first I disclaim all liability for any damage you do to your car as a result of following these directions. Good luck, be patient, remember plastic is brittle... work slow and don't break anything.
Tools: Phillips screwdriver, longish flathead screwdriver or trim prying/clip release tool, lots of patience, good light
Time: this took me about an hour to do, and I ran wires for the door handle and took pictures too. Plan an hour for the first side and ~30 minutes for the second one, if you're doing both.
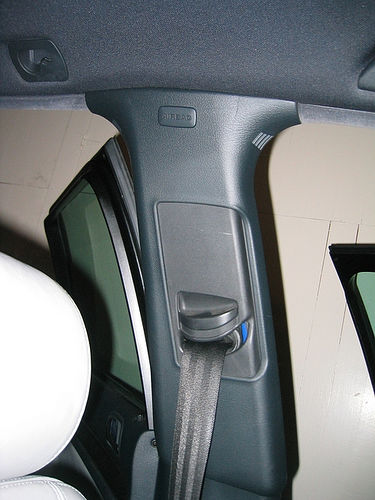
The B-pillar interior trim is composed of 2 parts, a top and a bottom. The top section has a hole and a slider to adjust the top attachment point for the 3-point seatbelt. The bottom section on the passenger side has nothing on it, and the bottom on the driver side has a button to deactivate the motion-sensor portion of the alarm system.
To remove the trim, first OPEN BOTH DRIVER AND REAR DOORS on the side of the car you're working on. The trim fits into the rubber that seals the doors, and it's a lot easer to get it out if the doors are open. You have to pop the clips at the top of the top section, and then pull up and out (towards the center of the car) to unhinge the top from the bottom section. Then, you have to remove two screws from the kick panel in the footwell on the side you're working on, and remove the kick panel itself. Once the kick panel is removed, you can lift up on the plastic interior liner of the door sill, which is held in by 3 clips in front of the B-pillar and another one or two behind it.
Once you have the door sill liner loosened, you can reach under the bottom section of the B-pillar, undo two clips there, and lift the whole thing out of the car. Pictures of the process are below...
First a picture of the top panel of the b-pillar, in its natural habitat.
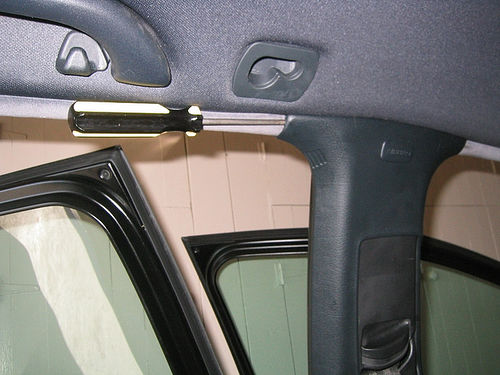
When I was starting this project, I noticed a couple of hairline cracks in the top section of my B-pillar. Does anyone else have these? These photos were taken before I had even laid a hand on the plastic... maybe the dealer mechanic caused this somehow in one of the warranty services they performed, maybe not... no way to tell now, and since my warranty ran out in May, I'm stuck with this piece. Other side has cracks like this too. Check yours carefully before proceeding, and use extra care if you find cracks.


The way I got the clips loose was to insert the head of a skinny flat-blade screwdriver between the B-pillar plastic and the headliner, and turn the screwdriver 90 degrees (like you're turning a screw) to pop the clip out. You have to kinda feel around blind with the tip of the screwdriver, but it's really not that hard to find the right spot once you're working it around in there.
REMEMBER TO DO THIS WITH THE DOORS OPEN.
Popping these clips is the trickiest part- RESIST the temptation to reach with your fingers behind the arms of the T to pull at the clips, becuase you'll end up tearing the plastic. Likewise, don't try to pry from above- just use the leverage from turning the screwdriver to pop the clips out, and the whole thing will basically come off in your hands.
Do both sides. Once you've popped the clips, the top section is kind of hinged onto the bottom section. Pull the top down towards you, unclip the cable that plugs into the socket at the top, unclip the wire from its retaining clips, and lift the whole plastic piece off of its hinges at the bottom. It's ok to let it dangle for now, or you can wrap the seatbelt around the front seat headrest to keep it out of the way.
The clips on the top section can be from 4-5 inches apart. The one closer to the front of the vehicle is about 2" back from the front of the plastic, and the clip on the rear is about 3" forward from the rear of the plastic.

With the top section removed, you can see the holes where the clips go. Do yourself a favor, and CRIMP the metal clips slightly, so that they go in and out of the holes easier. This will make it much much easier to put the whole thing back together, and then take it apart again once you realize you've misaligned the seatbelt slider mechanism (and then put it together again...)

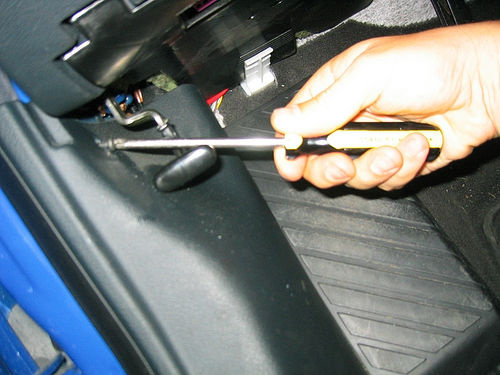
Now that you have the top section removed, let's do the bottom section. The bottom has two plastic L-clips that connect to the frame of the car at the very bottom. You need to remove the interior door sill trim to get at these clips to push them back and release the B-pillar trim. Start by removing the kick panel- there are two phillips screws, the bottom one behind a small cover. It will seem like the kick panel is fixed behind the dead pedal... but it's not. Just pull the damn thing out of there. It _IS_ hooked into the plastic trim on the inside of the door sill, but if you (gently) pull up and in on the edge of the kick panel where it overlaps the sill, after you've removed the screws holding it in place, the panel should just pop out.

Surprise! under the kick panel is lots of wires. Also, the end of the door sill interior trim.

The door sill trim is held down by three clips in front of the B-pillar, and at least one behind it. The three in front are 5, 15, and 24 inches back from the front edge of the trim strip. Lift straight up on the trim to pull out the clips, taking more care as you get closer to the joint where the door trim and the B-pillar trim meet, near the bottom seatbelt connection.
There are three plastic clips that hold the door trim under the B-pillar trim, seen below (left in the picture is the rear of the car). It is possible to pop the first two out by depressing the plastic around the seatbelt slot.
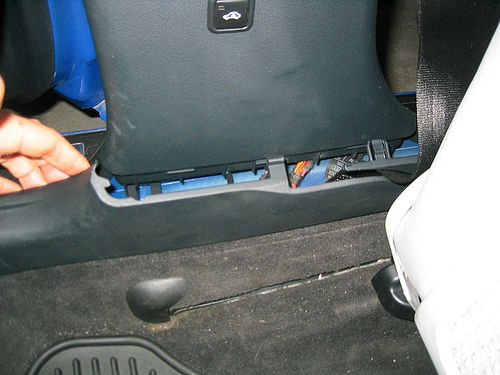
There are four "feet" that the pillar trim rests on. The inboard two are L-shaped clips. Reach down in the slot, push the clips gently towards the outside of the car, and simultaneously lift up on the trim, sliding it towards the roof of the car. once you free the clips from the car body, you can unhook the last clip from the door sill trim (near my fingers in the above picture).
Voila! You should be holding the lower section of b-pillar trim in your hands. Remove the cable clips and the plug for the security system button, and set the trim aside. The seatbelt is revealed.

With the seatbelt pulled out of the way, you can see the wire looms for the rear door puddle lights and window controls. I've added an extra pair of wires, using the existing wire looms to keep my wires from fouling the seatbelt.

When removing the bottom section, I broke a clip off. When I was reinstalling the trim, I tucked the cable behind the insulation, again, to keep it from fouling the seatbelt.

When you reinstall the bottom half, you need to set it in place so that the tabs near the top of the trim piece engage the white plastic doohickey with the D-shaped posts. Put it on the pillar higher than you want it to end up, and slide it down until the clips at the bottom engage.
When reinstalling the top section, seat the bottom on the plastic hinges, and then reattach the cable to its clips. Remember to seat the cable in the little hanger at the very top of the trim, or else it will restrict the motion of the seatbelt slider. Once you've got it all clipped back together, you should be able to lock the seatbelt into 5 different vertical positions. I think it's easiest to put the belt and the slider at the top of their ranges when reassembling, but your mileage may vary.

The trim should seat firmly in a slot in the rubber seal that surrounds the doors, on both sides. you don't want to catch the seal under the trim piece. Check everywhere before you pound the clips back in place with the heel of your hand. First picture bad, second picture good.


And that's it! Of course, if you're wiring the door handles to light up, there are a couple of other steps involved, but redtwinturbo explained those nicely and so they are left as further exercise for the reader.