I heard lots of positive comments about the UUC Audi Driveline Stabilizer
(ADS henceforth) so I decided to get my S4 one for her birthday (Oct. 12).
Since I didn't want to make her wait to open her present (birthday falls
mid-week this year) I gave it to her early so we could install it right away.
The ADS is a stout piece of hardware with heavy plate steel ends with a beefy
center section. Looks well made and it's finished well enough for a piece
that will forever live under the car. As usual with everything I buy I was
short one piece of hardware (one washer). Took me about an hour to install
since I was doing it on ramps, taking pictures and making mental notes.
Actually, I spent more time getting the car up on my ramps than I did on the
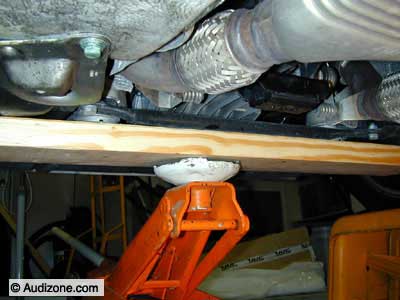
actual install. My ramps provide 9.5" of lift but the approach angle of the
ramps is so steep that the nose of the car hit the ramp before the tire was
within 4" of the ramp. Damiiiiit. I had to add on to the ramps with some
2x8s to get her up in the air. In case you're wondering, the wood add-on is
secured with 3/8" bolts to the ramp itself so nothing moves.
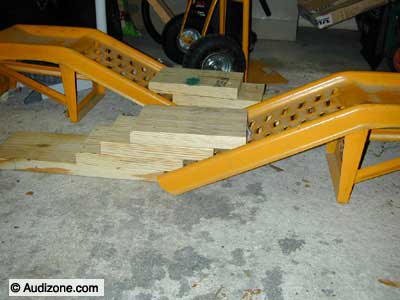
Getting the car on ramps proved harder than the ADS install
The difference in the feel of the car is pretty amazing. Gone is the
slop in the driveline I normally experienced while creeping along in traffic
while in 1st or 2nd gear. Before installing the ADS if I lifted off the throttle
in 1st at about 2,000 rpm the car would yo-yo (Car and Driver called it
"rubber banding") while the mass of the car and the torque of 1st gear
fought each other. Btw, this yo-yo feeling is not unique to the S4... most other
cars do the same thing. IMO, the reduction of just this annoying
behavior makes this mod worth the price all by itself. Other benefits are
crisper, more positive feeling shifts and a more positive feeling when letting
out the clutch quickly.
The only downside I see at this point is an increase in driveline noise
transmitted to the interior and a vibration that can be felt in the floor if I
hold the engine around 4,000 rpm. I checked the alignment of everything and
verified that the exhaust was not hitting on the center brace (it's very close
on the passenger side) but all looks good. I guess if everything is held more
secure a little more noise is to be expected -- not a big deal, just an
observation. My only other issue is that the brace would probably prevent
the transmission from tilting down and away in the event of a front end
collision -- may not be an issue, dunno.
UUC documentation is good but pictures would have been nice.
I suspect other performance vendors will soon offer an ADS type of brace of
their own if they have any common sense... nice modification.
The Install
Update
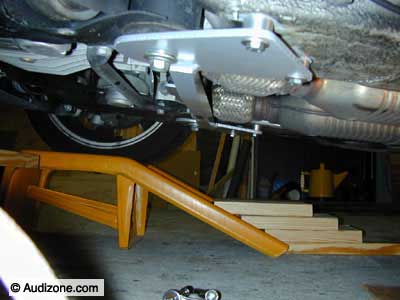
After some driving around for things to settle in and more aggressive
driving I found that the RH section of the exhaust was hitting on the bar.
This was very obvious as a noise resonated through the car. The
instructions mention if you have a clearance problem to install additional
spacers between the transmission and the new mount. I put in an extra pair
but it it was not enough to solve the problem. Putting an 2nd pair would have
put the transmission and the bar under constant tension once everything was
tightened down. I contacted UUC but their comment was just additional
spacers. Hmmmm, not possible. After some more fiddling I decided to
"make" room by putting a chamfer on the back edge of the bar where
clearance was tight. See updated installation instructions below that
should eliminate the need to do any modifications to the bar.
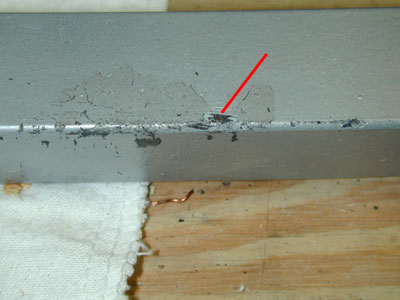
 |
- The point of contact (no, this isn't a Sprint commercial). The
exhaust was contacting the bar.
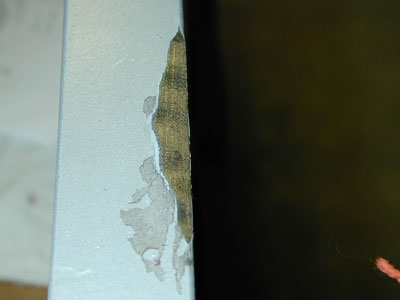
|
 |
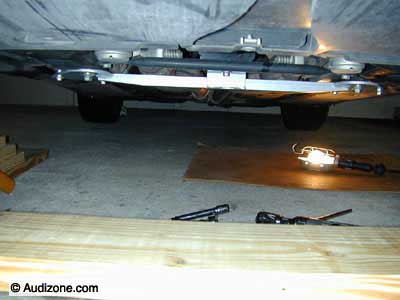
- My solution was to simply "make" some room since the bar
is solid bar stock. 10 minutes with a dremel tool and some
touch-up paint solved my problem.
|
Revised Installation Instructions
How to properly install the ADS. (courtesy of
Richard Hameroff)
This installation should really be performed on a lift. It should be mentioned,
that the ADS brace itself is perfectly produced, but the provided spacers were
made too short by the machine shop. This FAQ will in detail, explain how to make
a perfect install, with the provided hardware. In addition, you will need (4) ˝"
max washers, and about (20) 3/8" min washers.
(1) With a 2X4, support the rear of the engine cradle under the rear engine
mounts. The 2X4 should be long enough to cross the span between the mounts (they
look like round silver caps). With a jack stand, put enough pressure on the 2X4
to begin to raise the front of car off the lift pads.
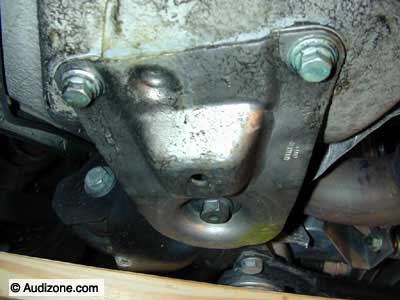
(2) Remove the large green headed bolt, and the two smaller bolts that hold the
triangular silver plate at each side of the vehicle (rear sub frame bolts) The
silver plates will not be needed anymore, so put them, as well as the old
mounting hardware in a safe place.
(3) Install the trans mount with the provided hardware onto the two empty
threaded holes on the bottom of the transmission. Just lightly snug it in for
now, so it can be adjusted later.
(4) Using the new provided hardware, place a washer over the large bolts. Insert
the bolt through the large hole on each end of the ADS. Then, place two of the
˝" max washers on the large bolt (after you have inserted it through the
ADS) then one of the provided large aluminum spacers. Do the same on the other
end of the ADS.
(5) Now, lift the ADS into place and thread the bolts in until it just becomes
snug.
Put one of the provided washers on each of the two smaller bolts, insert them
through the two smaller holes on the ADS.
The smaller provided spacers need to go in between the ADS and the body, and the
additional 3/8" washers are used to fill the void that has been created by
adding the two larger washers on each side. Put in enough 3/8" washers
until there is no clearance remaining between the ADS and the body. Repeat this
on the other side.
(6) Torque the large bolts to 125 ft/lbs. Torque the smaller bolts to 15 ft/lbs.
(7) There will now be a small space between the newly installed trans mount, and
the ADS center plate-mounting hole. Without putting any upward or downward
pressure on the transmission, fill the space with enough 3/8" washers to
fill the space. Insert the center transmission-mounting bolt through the ADS,
into the trans mount. Again, the washers go in between the ADS and the trans
mount.
The idea here is to make sure when you tighten the center trans mount bolt, that
you are not pulling the transmission down in the process. The transmission must
remain lax to be perfectly aligned. This is one of the most important steps.
(8) Tighten the two trans mount bolts on the transmission to 15 Ft/lbs, and the
center bolt to 20 ft/lbs.
(9) At this point you are done, and there should be ample clearance from
anything that can cause vibration.
Enjoy, (you will!). Richard Hameroff
PS, if your mechanic has ANY questions, just have him give Richard a call at
518-434-4077