| Tech Article Title
|
Author
|
Date
|
| S4
Headlight Washer Pump Replacement |
Dylan
Oxford
|
2002 |
Many of us have witnessed the erupting volcano warning
indicator light on our instrument gauge cluster. Usually this is soon after
using the headlight washers. Upon seeing this, you probably said (as I did)
"what the heck does that mean?", and promptly looked in your trusty
manual to decipher the cryptic animation. "Oh good", you say,
"it's only low on windshield washer fluid. I'll get some more fluid and top
it off. Glad it was nothing serious." So you get some 'special' OEM washer
fluid from the dealer and go about refilling the tank, very proud of yourself.
Soon however, you realize a puddle is quickly forming on the ground just under
the reservoir. "Uh oh. This is more serious than I thought."
Yes, now you are likely one of the proud owners of a
cracked headlight washer pump. So let's figure out how to replace this pesky
nuisance as you might need to do it more than once considering the reliability
of this part.
|

Notice the long split on the housing of the old pump
(top) compared to the new pump (bottom).
|
Since I'm out of warranty, I called the dealer to check
on the price to replace the pump. The pump itself is about $30, but the entire
dealer install is about $200. I opted to try the install myself. After verifying
that the pump indeed was the problem (I'll show you how), I bought the pump
and extra fluid (~$4), plus the parts manager said I needed the newer connector
(~$5) since the new pump's electrical connector interface was different. (
*Note: I didn't use the new connector, but I'll explain how later.) The
construction of the new pump is slightly different. I hope it helps the
reliability of the part.
Install time: about 1-1/2 hours including taking pictures.
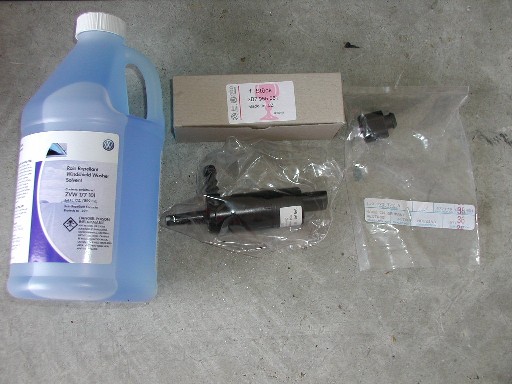
Parts Required
-
Pump: 3B7 955 681
- Washer Fluid: ZVW 177 101
- Connector (*Optional): 1J0 973 722A

- First let's make sure it's the headlight washer pump that's leaking. Note the location of the pump;
it's tricky to see and to get to. Add a cup or so of water to the reservoir while holding a flashlight
to see the pump. If it's split, you should clearly be able to see fluid freely leaking from it. If so,
then you've found the culprit. If not, but a puddle is still forming, then the problem could be a cracked
reservoir, etc. This procedure should show you how to replace any of the reservoir components.
- Note: It is also possible that a hose connection for the headlight washer up in the bumper is loose.
Mine was in addition to the pump being cracked. In this case, you must remove the front bumper just enough
to see the hose connections on the driver's side of the front bumper. Check for leaks and repair those as
required.
- Remove the belly cover using a short flathead screwdriver with a wide blade. It is held in with 3
metal 1/4-turn fasteners at the front edge, 3 at the rear edge, and 2 plastic 1/4-turn fasteners in each
wheel well. Removing the wheels is not necessary, but turning the wheels to one side or the other may
help in removing the plastic fasteners.
- Using proper jacking procedures, remove the driver's side front wheel. Use a jack stand to support
this corner of the car.
Standard disclaimer: I'm not responsible if you crush your head or body by not supporting your
car properly during this repair.
|

|
- Remove the wheel liner. The wheel liner pulls
out easily after removing the 11 T25 Torx screws and 2 plastic
belly cover attachment fasteners. Note: the plastic fasteners
should already be gone if you removed the belly cover first.
|
|

|
- Note 10 of the torx screws are alike and the
11th is different with a larger washer. It attaches the liner to
the lip of the fender. (One the plastic fasteners shown)
- Note: My T25 Torx driver was purchased in a
set from Advanced Auto Parts.
|
|

|
- Now remove the 3 screws holding in the fluid
reservoir using a 10mm socket. One screw is accessed from the
engine bay. The other two are accessed from the wheel well
|
|
|
- The 2 screws in the wheel well have been
loosened part way to highlight their location.
- The reservoir is loose now, but captured by
the electrical and fluid connectors
|
|

|
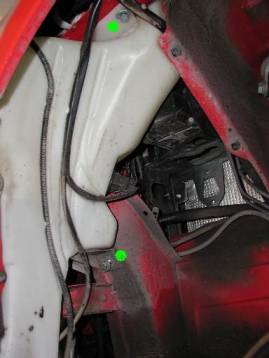
- Now you must drain the remaining fluid from
the reservoir. The green lines in the first picture help show the
fluid remaining despite the cracked pump.
- From below, pull off the hose from the lower
washer pump (noted in green in the second picture) and let the
fluid drain into a clean bucket. You'll want to reuse the fluid
later.
- Note: the headlight washer pump is hidden in
the pictures as it fits on the reservoir on the side against the
fender. You'll have to reach it from below to remove the hose. It
sits about the height of the fluid level in the first picture.
|
|

|
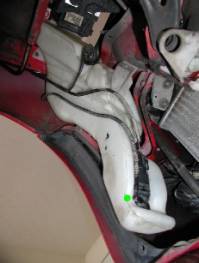
- Remove all connectors from the reservoir and
work it out through the wheel well. Red: electrical connectors.
Green: fluid connectors.
- The hose attached to the headlight washer
pump is locked on with a 'C' clip. Shine a flashlight on it from
below to see how to remove it. The pump slides out of a rubber
seal in the reservoir as shown.
|
|

|
- Now to replace the pump. Note the new pump
(on left) has a raised ridge on the flat of the D-shaped socket.
(Sorry for the blur). Rather than replace the supplied connecter,
I used a dremel to shave down the ridge to match the old pump.
This is much easier. An exacto knife would also work.
- Note: You can see the ridge from the side in
the first picture of this procedure.
|
|

|
- Now just reinstall everything in the reverse
order. Note the reservoir has grooves for the cables to fit in.
- Refill the reservoir with the drained fluid
you saved and then top off the reservoir using the new fluid.
Depending on your weather you may dilute the fluid up to 50/50
with water per the instructions on the bottle.
- Check for leaks before reinstalling the wheel
liner and belly pan.
|
|