|
|
A quick background, I had a slight shimmy in my 1.8TQMS. In the hunt, I did the fool proof wheel bearing check. This is where you have the car on a jack, and you try to wiggle the wheel. There should be NO play. I found that I could move the wheel back and forth (your hands at 3-9 on the wheel) a significant amount. Well looking around I found this: Ā The Disclaimer! I am not a mechanic and probably neither are you if your reading this. This article if for general guidance only and if you break yourself or your car it is your own fault!!! What you'll need:
What else did I use?
I used the Bently CD as a guide, but
keep in mind if you use it that its description is to remove THE ENTIRE TIE ROD
not just the end. It has an
excellent diagram of how things go, and of course the appropriate torque
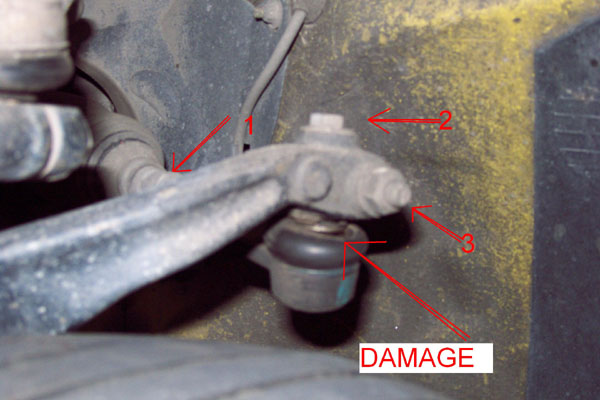
settings. Jack up the car and remove the wheel. If you haven't seen Andy_TN `s outstand pics of the proper jack/jack stand points here it is. Getting to work 1. Jack the car up and get it on the stands. While this is safer then leaving it on the stand you will need the jack. From the lower control arm, jack the entire suspension back up, so that is back at a "normal" height. This will make it much easier to remove stuff and make sure everything is lined back up later. 2. Next measure the distance from the back of the tie rod to the lock nut (1). You will need to know this for reassembly. The more precise this measurement is the better. I had my car aligned after this procedure, however the tech said the toe-in was just fine so if you are careful here you may not have to shell out for an alignment. 3. Use your 22mm box end or crows foot
and loosen the lock nut (1). Brace
the tie rod with a 18mm box end directly behind or you can do like I did and
grab with the channel locks CAUTION do not
damage this 18mm adjustment hex, as this is what is used to set the toe in of
your car. The nut (1) only goes on
with 30 ft/lbs of torque so it came off easily. 4. Remove top bolt (2) with 14mm socket
and nut (3) with the 16mm. The side nut (3) is on a self hold bolt, as you back
it off, it will try to turn, just hold it in (towards you) while you undo the
nut. Remove and discard the old
hardware except for the lock nut. (you got the hardware kit like I told you
RIGHT!) 5.
Pull down firmly on the tie rod, it will be pretty tight, you can wedge
something between control arm and the suspension structure if your are stuck. I
was able to remove mine with just a slight wiggling of the rod while I pulled
down. Once it is loose, just
unscrew the tie rod from the adjustment hex. (The 18mm thing you held) 6. Take the lock nut (1) and thread it
back on the new tie rod to the distance you measured in step 2, plus one or two
turns. This is where I used a little bit of the silver anti-seize compound on
the threads of the new tie rod end and then thread the tie rod back through the
adjustment hex, back up to the lock nut. Measure one more time and finger
tighten the lock nut. 7.
Make sure that the groove in the upright of the new rod end is aligned
with where the side bolt (3) will go through.
This is where are big hex key or hex socket comes in handy to turn the
upright. Now run the tie rod back in. Again
it will be very tight, a little wiggling will be necessary.
Avoid the temptation of hitting it from below, as this is where the
actual joint is. Adjusting the jack
stand up and down a little may help. Also
if your measuring wasn't exact this maybe a problem as the upright needs to be
exactly in line with the hole. 8.
Now you can replace the top bolt (2) and side nut (3).
I looked all through Bentley and could not find a specific torque value
for these two. They were not on
there particularly tight when I took them off, so I used 30lbs, with a couple of
drops of blue thread lock. 9. Tighten the lock nut (1) to 30lbs (if
you are using the crows foot connected to your torque wrench) or "pretty
tight" if you are using a box end wrench. All done! Replace the wheel, and do the other side. Not only did this get rid of the shimmy, but also the front end feels noticeably tighter. The first side took about 30 minutes as I figured stuff out, and the other about 10. Good Luck. Chris Haigh |
|
Advertising |
Contact Us |
Cookie Policy |
Privacy Statement |
Terms of Service |
Do Not Sell My Personal Information
© 2020 MH Sub I, LLC dba Internet Brands |