| Tech Article Title |
Author |
Date
|
| Installing
a Front Strut Tower Bar |
ModifiedA4
|
2004 |
Standard on B5 S4s and 2001.5 A4s is a front strut tower bar.
Older model A4s are lacking this chassis upgrade. Simply bolting the S4
bar is impossibly because the S4 chassis actually has the mounting blocks
for the bar welded in.
Our brethren in Germany noticed that the A6
also has a strut tower bar standard. Even better, A6s from '98 to '00 had
bolt-in brackets. The Germans have been adding the S4/A6
"domstrebe" in
some form to the early B5 chassis for awhile now.
Ok let's get
started....
<standard disclaimer>blah blah blah</standard disclaimer>
Tools needed:
- 16mm socket with
extension
- Breaker bar
- 8mm socket
- 6mm hex key
- Torque
wrench
- Razor blade
- Needle nose
pliers
- Calipers/ruler
- Dremel
- Drill
- Nail/punch
- Hammer
- 3/8"
drill bit
- Oil
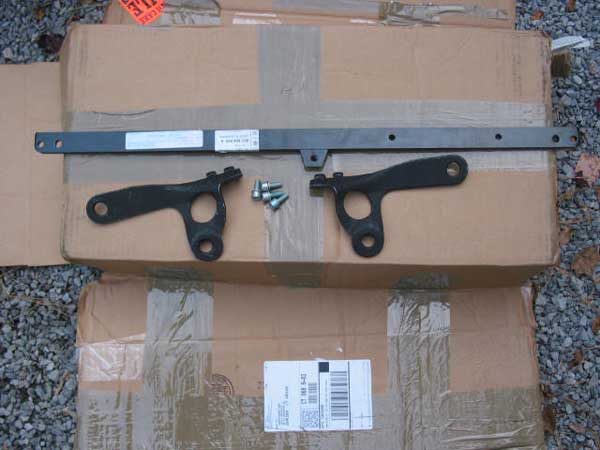
Materials/parts
A6
brackets:
(1) 4B0 803 357A LEFT BRACKET
(1) 4B0 803 358A RIGHT
BRACKET
S4 Cross bar:
(1) 8D0 805 645A CROSS BAR
Long
screws:
(4) N 902 533 02 SCREWS (m8 x 35) or N 090 378 2 (m8 x
25)
Misc:
Approx. 2" of 0.5"Id automotive rubber hose
Black
automotive spray paint
Modifying the S4 bar
In order to
use the S4 bar with the A6 brackets new holes and a chamfers must be
added. Use the drawing below to mark where the (4) new 9.5mm diameter
mounting holes will be drilled. Two holes will be drilled on the
passenger's side and two holes on the driver's side. Use the tab hanging
off the bar as reference.

Use a nail or a punch to
hammer a small indentation at the center of each hole. This gives the
drill something to bite. While drilling the hole, add some spare oil to
the hole to aid in drilling through the steel bar.
Now test fit the
brackets to the bar. You will notice the corner of the bar binds on the
inside bend of each bracket. Using the Dremel remove enough material from
each end of the bar to allow the bracket to sit flush against the bar.
Make sure the holes still line up and the top of each bracket is parallel
to the bar. Use to Dremel to slot holes as needed.
Modify the
passenger's side bracket (RIGHT)
On the passenger's side the
bracket will press against the A/C hardlines (see below). There is a sharp
edge on this bracket which should be broken with the Dremel tool.
Painting
The exposed metal on the S4 bar and the right
A6 bracket should be painted for corrosion resistance. I used some black
hi-temp paint I had lying around.
Fabricate the A/C line
jacket
To prevent the A/C hard line from touching the A6 bracket
edge fabricate a rubber "jacket" by cutting a 2" section of automotive
hose lengthwise.
Installation
Ok...pop the hood and
remove secondary firewall cover like you would if removing the ECU. Running off the positive terminal of the battery along the firewall on
the driver's side is a thick wire secured in two places to the firewall.
Pop the first wire anchor from the battery) off the firewall by using
pliers to squeeze the tabs together on the engine side of the firewall.
Remove the passenger's side window cowling as if replacing the pollen
filter.
Loosen the battery clamp and slide it back to the passenger
compartment as far as it will go.
Now remove two out of the three bolts
per side that hold the strut bracket to the body. You will probably need a
breaker bar for this.
Driver's side strut bracket bolts heavy
washers and A/C lines

Passenger's side strut
bracket bolts and heavy washers

Strut bracket bolt and
heavy washer removed

Remove the bolts and the
heavy washers. Since the A6 brackets are exactly as thick as the washers,
the washers will not be re-used.
Install the S4 bar. Make sure you have
it oriented correctly. The tab hanging off should be pointing down and the
"nut side" of the tab should be facing the passenger compartment.
Slide
the bar in between the battery and the firewall from the passengers side.
It should go under the brake reservoir.
Loosely install the driver's
side A6 (LEFT) bracket over its mounting holes.
Install the A/C jacket
as shown below over the closest A/C line to the battery.
Install the
passenger's side (RIGHT) bracket, do not position it over its holes yet,
instead keep it biased to the driver's side.
Bolt the passenger's side
bracket to the S4 bar using to of the M8 cap screws. Torque the screws to
24.5Nm.
Now slide the bracket under the A/C line and over its mounting
holes. This will require you to pull on the one A/C line for
clearance.
Check to make sure the "A/C jacket" is protecting the A/C
line from the bracket.
Install the (2) strut bracket bolts hand tight
for the passenger's side.
Install the driver's side bracket strut
bracket bolts hand tight.
Now bolt the bar to the driver's side bracket
using the last two M8 bolts. Leave hand tight.
Torque down the four
strut bracket bolts to 75Nm.
Torque the driver's side M8 bolts to
24.5Nm.
Driver's side

Passenger's side

Passenger's side A/C
lines

Reassemble
everything in reverse order and you're done!
Notes: this was
installed and tested on a 2000 1.8t with an OEM battery. If your A/C lines
do not look like the ones pictures or if you have an aftermarket battery,
you may have fitment issues.
Cost for parts was about
$100.
*Update* A better screw (slightly shorter) could be P/N: N
090 378 2 (m8x25).
Also, RKA has clarified why the S4 bar has a
threaded tab in the center of the bar--it seems the firewall is bolted to
the bar at that point. I know the A4 firewall doesn't have a hole there,
so it would take some drilling to add this feature**