|
|
One negative thing (might as well get it out of the way). STaSIS has to get the proper instructions with pictures up on their web site or print out the instructions with pictures on paper for this suspension kit for the B6 application. It was a bit confusing to get the front shocks installed until Jason sent us some pictures on how to do it. The next few pictures show the rear assembly already installed on the car. There were no problems of surprises when it came time to do it. It was strait forward and the springs were actually easier to install than the stock OEM ones because of their smaller size. As a matter of fact a spring compressor was not required. Spring assembly (rated at 1200 Lbs!).  Rear shock assembly (aluminum housing).  Rear shock, another angle. Check out the bump stop at the bottom instead of the usual top position. A real inverted shock system.  Close up of the bump stop.  Now onto the frustrating part of the installation, the front assembly. The problems start right from the beginning. Without the proper B6 installation instructions on their web site (STaSIS refers you to the B5 S4 installation) and the pictures showing the wrong way/parts to attach the shock to the top plate this leads you to think the B6 kit is wrong or missing parts. After talking to Jason we finally get to see the light at the end of the tunnel! Not only does he point out how to assemble the top plate and shock together he tells us how and where to pass the outboard reservoir (canister). Wait until you see this magic trick! Here's the underneath part of the aluminium top plate minus the rubber pad. This is where the OEM spring set up would come to rest on a rubber pad that fits right around the metal cup.  Another view.  The problem lies in the fact that the Motorsport's top portion of its shock is terminated differently than a stock shock and also as the line that connects it to the external reservoir (canister). Because of this line the cup that sits underneath the top plate gets in its way. It actually would come down and lie right against the canister's line fitting, not good.  So the solution to this problem is to remove the top plate's cup! By using a punch from the top side and slowly punching it out the cup will eventually come off the top plate's assembly. Here's a shot of the top plate as seen from its top side. The small shinny ring in the middle is the attachment point of the cup that lies underneath it. Sorry for the bad pictures (next few).  Using a punch and hammer to "punch" it out.  The top plate without the cup.  The cup removed from the top plate. 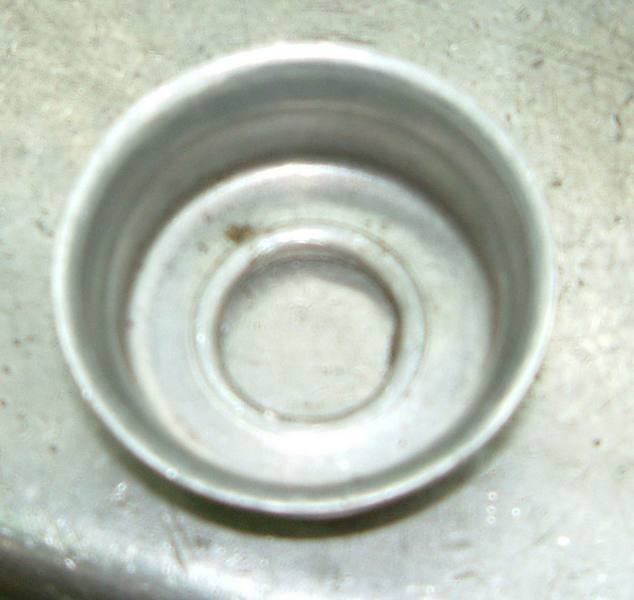 Now to show you how the shock fits right into the top plate coming to rest right up to the top, metal to metal.  Another view. This shows the gap between the top plate and the canister's line/fitting.  Better yet this angle shows I can actually fit a finger between the top plate and the fitting.  Here's a view from the top side showing how the shocks tower and treaded part comes trough.  Here we see the same thing but with the rubber bushing installed.  Here we see the strut assembly installed in the car. 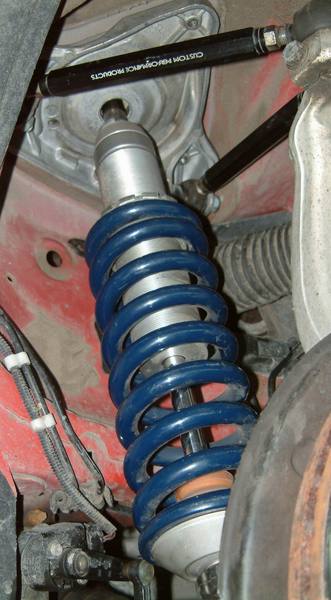 Now here comes the second magic trick of the installation. Where do we pass the canister and run its plastic covered stainless steel line? Answer, right here. Yes folks we are going to pass that canister and line through that small opening in there. That's right squeeze it through the same hole that the steering's tie rod ends come through! Believe it or not it works.  Here's a close up look at it.  Now I'm not going to show you where the canisters were secured in the engine bay because we ran out of time to do the permanent installation. So this will have to wait until the next time. Also you can imagine that after this installation, the wheel alignment was off. Take note that my four lower arms (links) and four upper arms (links) were also changed at the same time. Because we were short on time, we did a quick alignment so that I could drive the car tonight to put some mileage on it before a final ride height and wheel alignment is done (maybe tomorrow). It seems the ride height is settling just above 25 inches so it looks like we are going to have to lower the car a bit. I'll be happy with anything above 24 and 3/4 inches but not above 25.0 inches. Finally the initial road test review... Keeping in mind that the ride height is not at my optimal setting yet, that the wheel alignment is far from perfect with the wrong toe at the front, with mismatching camber settings and in the rear a toe in of about 0.6 and over -2.0 of camber (way too much), the car is now riding on 700 lbs springs in the front and 1200 lbs springs in the back and finally the most important fact of all, I did not know how and at what settings I should set the suspension's rebound and compression adjustments at, this is one incredible suspension! Not that I doubted STaSIS or some of the S4 guys I talked to before buying the kit, but again considering the spring rates on the car, the ride is incredibly smooth, I would say way better than stock, not harsh at all. Being that's the third suspension I try on my B6 and being a PSS9 advocate, I can honestly say this kit is on another playing field. I cannot wait to have it all tweaked out. Kudos to STaSIS and Ohlins for a fantastic suspension kit. Again thanks to Wes (have fun with the Porsches) and Jason at StaSIS. [page2] |
|
Advertising |
Contact Us |
Cookie Policy |
Privacy Statement |
Terms of Service |
Do Not Sell My Personal Information
© 2020 MH Sub I, LLC dba Internet Brands |