
 07-20-2016, 09:24 AM
Last edit by: IB Advertising
See related guides and technical advice from our community experts:
Browse all: Air Intake and Exhaust Guides
- Audi A6 C6 3.2L V6: How to Inspect and Clean Intake Valve Carbon Deposits
Step by step instructions for do-it-yourself repairs
Browse all: Air Intake and Exhaust Guides

3.2L FSI, How to inspect carbon deposit on intake valves and clean it
10-09-2009, 12:05 AM
#1
AudiWorld Member
Thread Starter

This guide is for information purpose only based on my experience with 2006 A6 Quattro with 3.2L FSI engine, VIN No. WAUDG74F96N03xxxx . Use them at your own risk.
I have no personal interest in any of products or companies I mentioned.
Please check the parts numbers with Audi dealer to make sure you get the latest level to fit your car�s VIN No.
After doing R&R of upper and lower intake for a couple of times due to P2294 problems, I realized that inspection for carbon deposit on the valve can be done without removing the lower intake and fuel lines with very cheap parts. I recommend it as part of 55K maintenance check for 3.2L FSI engine. Whole procedures including reassembly may take less than an hour (Part A Inspection for carbon deposit only).
A. Inspection for carbon deposit
Parts needed:
Gasket set - upper intake 06E-129-717-B
O-ring for PCV valve 06E-133-148-A
One small (1/2 inch or smaller) hose clamp
Tools:
Torx bits: T-20, T30
Flat head screw driver
Vacuum pump (optional)
Torque wrench with 1/4 inch drive (most of torque is 10 NM or lower). I used this one.
http://www.nashbar.com/bikes//Produc...2_126737_-1___
Preparation:
Use compress air to clean upper and lower intake manifold, and interface between cylinder head and lower intake to remove sand and dirt.
I sprayed with brake parts cleaner, and then used combination of paper towel and compressed air to clean them.
Fuel discharge:
If you are going to go ahead and clean the intake valve, fuel in the fuel lines and fuel rails need to be drained out before upper intake is removed. You need to be careful because high pressure fuel line can be up to 1500 psi.
If you have VCDS:
Start the engine
Connect Cable and start VCDS
Select �01-Engine�
Select �Basic Settings -04�
Type in �140� for Group number
Click Basic Settings �ON� button
Make sure that the pressure reading is 0 Bar for a couple of seconds and turn off the engine.
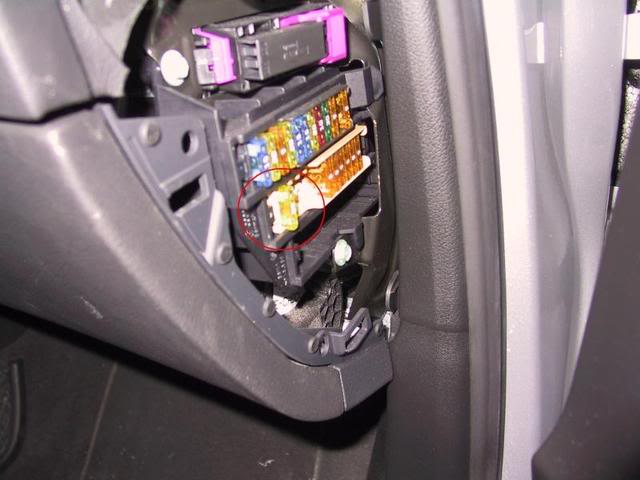
Pull out the fuse for fuel pump at fuse panel on right side of the dash
Crank/Start a couple of times until engine stalls.
No VCDS:
Follow the fuse pull method. Be careful! Cover with shop towel when removing high pressure fuel line. Fuel is not completely drained from fuel rail and still in high pressure.
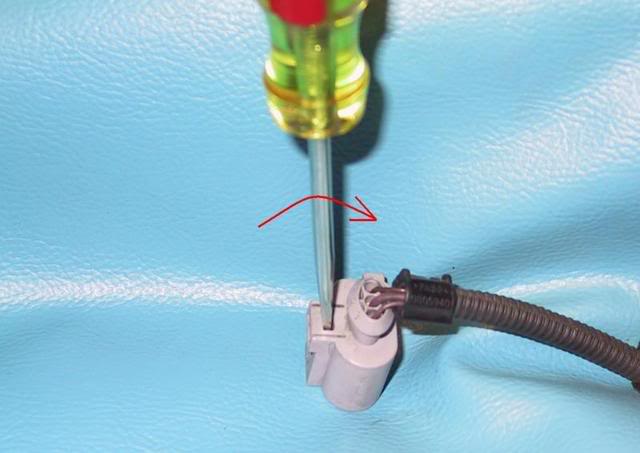
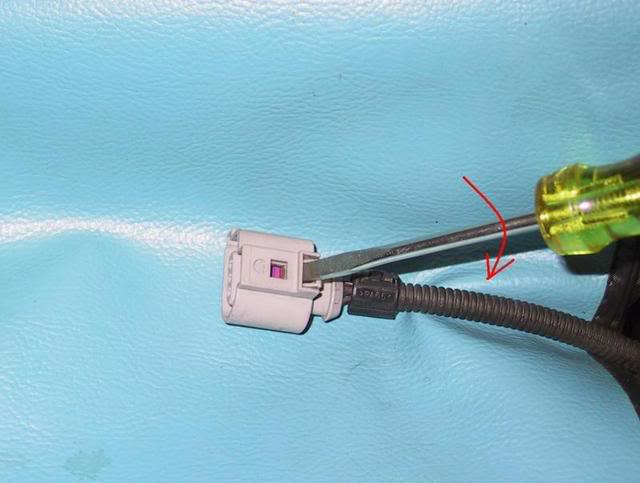
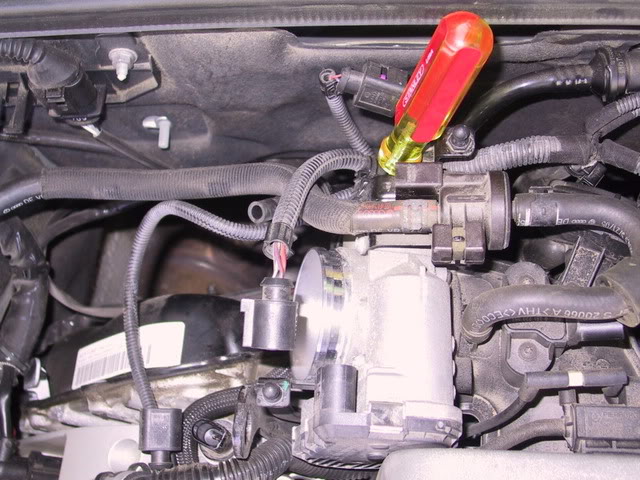
How to remove wiring connectors.
Put small screw drive in the opening as shown in the pictures depending on the available access.
Push toward the wiring side and listen for click noise, which indicates release of locking mechanism; then pull out the connector. Don�t use too much force.
Now we are ready to do real work!
Remove front and back plastic engine covers (pull them out).
Remove zip tube (2 hose clamps, 1 permanent clamp on small hose need to be destroyed).
Remove x-mas tree pin for brake booster vacuum hose from bracket under the t-body.
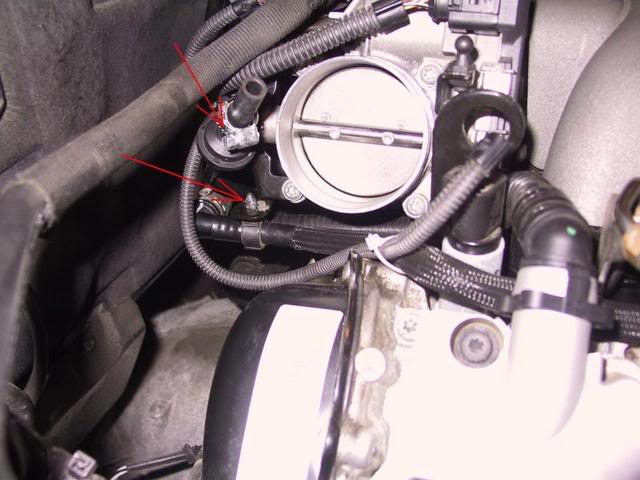
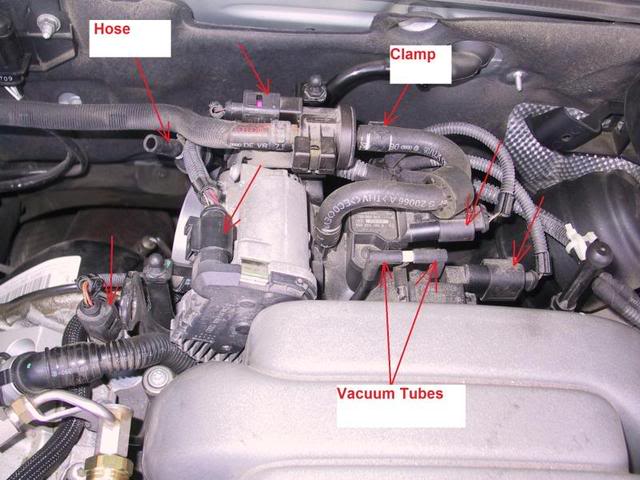
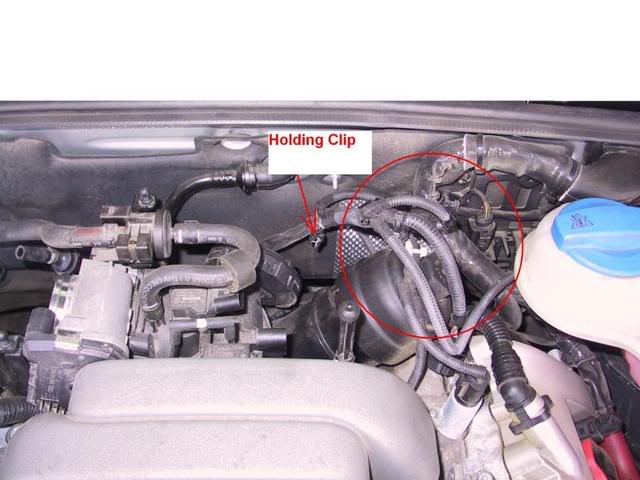
Remove 5 wiring connectors, 2 vacuum hose, 1 hose clamp and hose from back of the upper intake.
Remove 2 holding clips for wiring bundle. And set the wiring bundle and connectors behind the oil filter.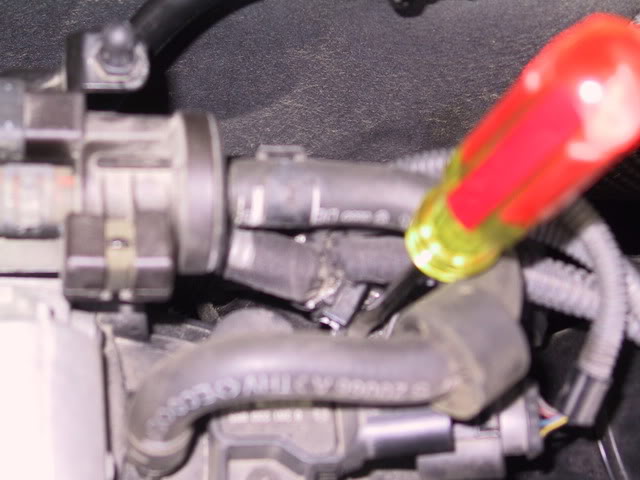
Remove a screw (T20) holding PCV valve to upper intake.
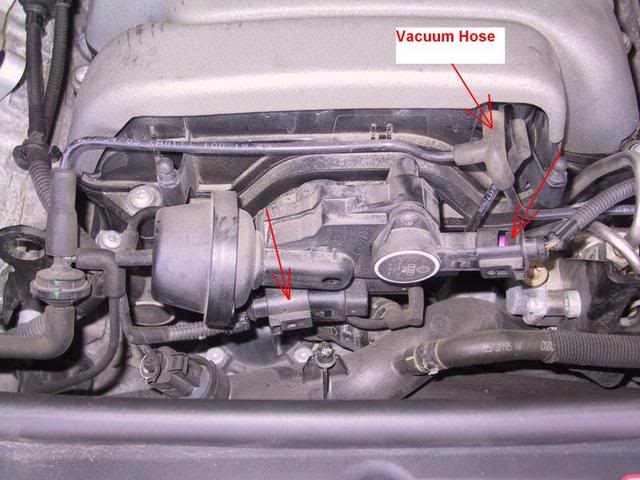
Disconnect 2 wiring connectors and a vacuum line from front of upper intake.
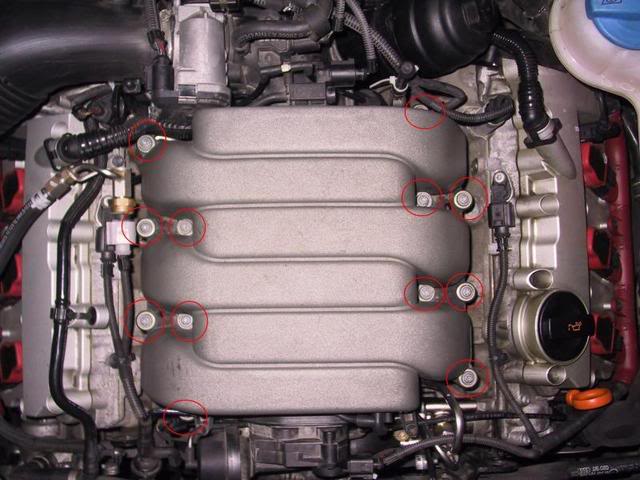
Remove 12 screws (T30) holding the upper intake to lower intake.
Push out the PCV valve from the upper intake � may need to force it out using screwdriver.
Slide back the upper intake to clear front vacuum hose and lift it out.
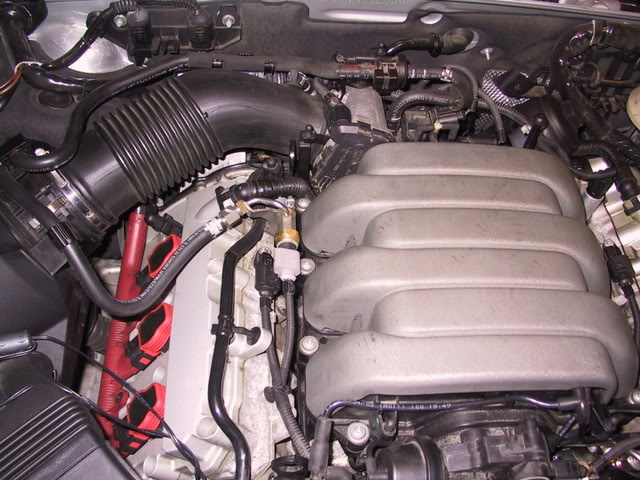
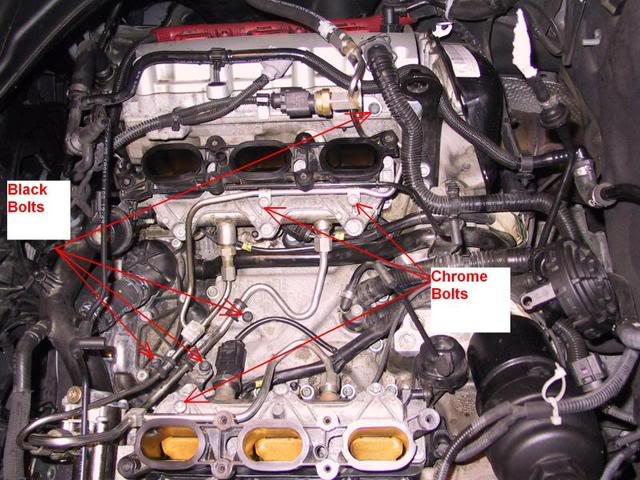
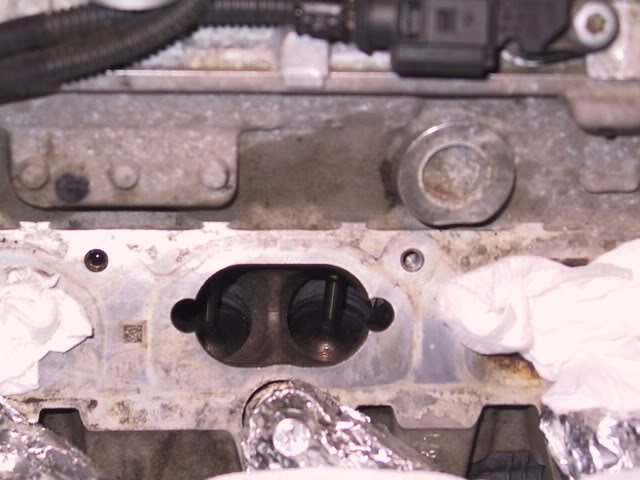
Here is a photo with the upper intake removed. I use paper towel to cover the intake opening
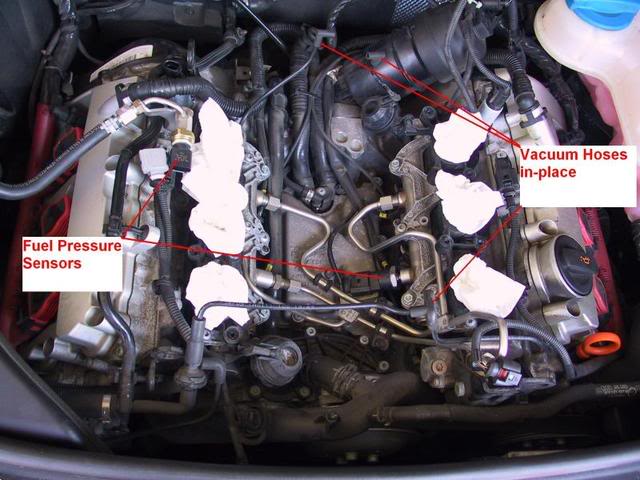
To inspect the carbon deposit, the intake runner flaps need to be open.
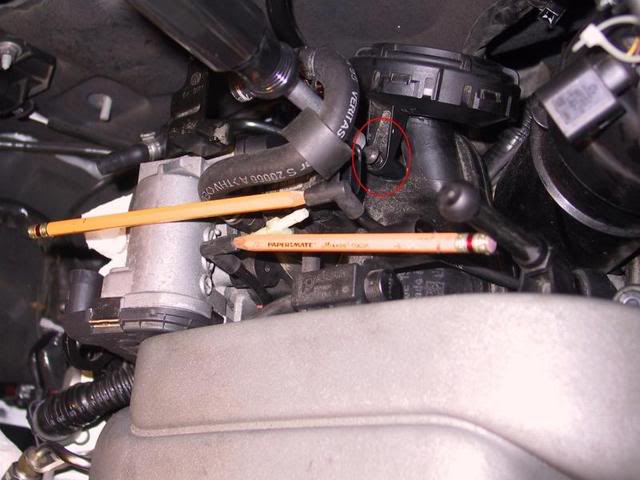
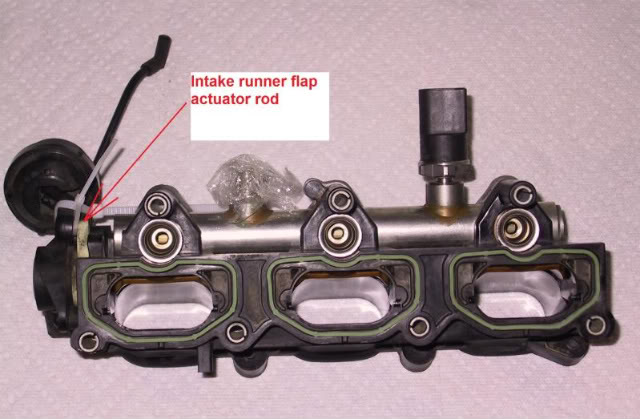
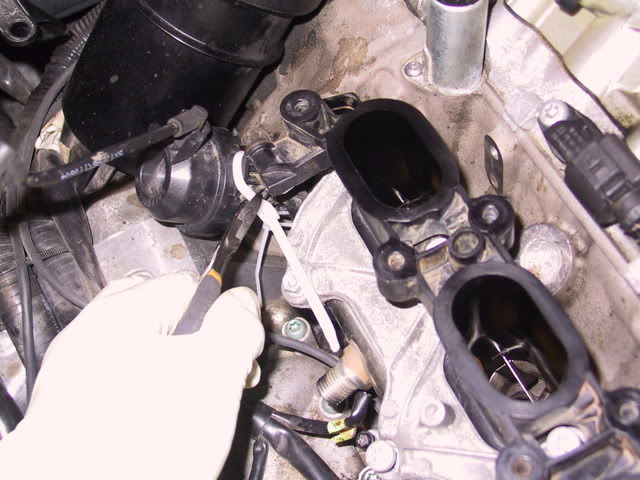
If you have a vacuum pump, connect it to the one of vacuum hose that had pencil on it in the previous picture to actuate and open intake runner flaps. If you don�t have a vacuum pump, you can manually operate the flap actuator by hand. Pull up the actuator rod shown in the picture where it is tie-strapped.
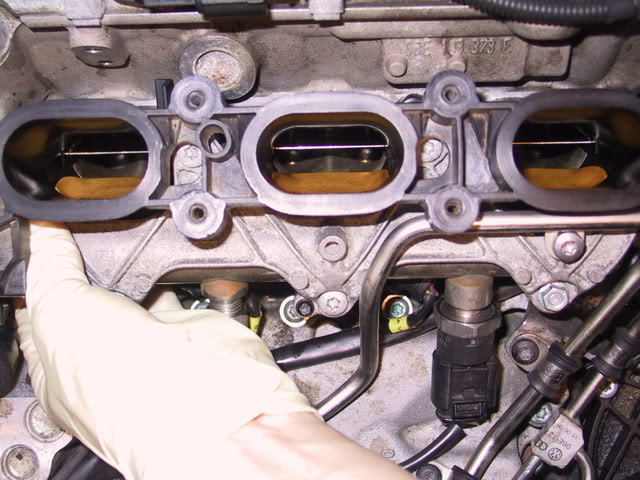
Here is flap open. You can clearly see the valves. Flaps, intake openings, and intake valves are clean because the photo was taken after cleaning.
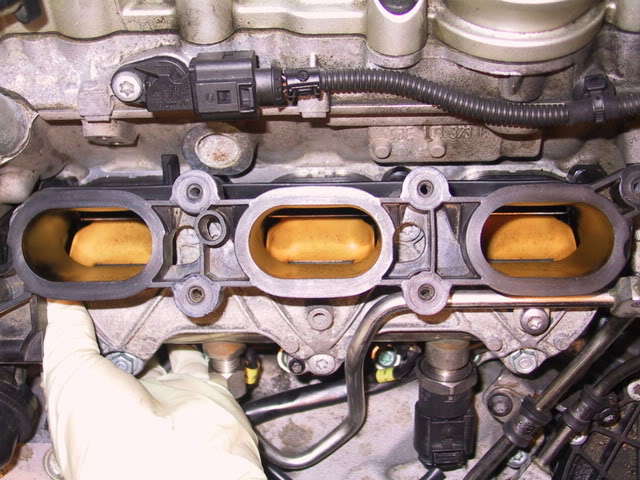
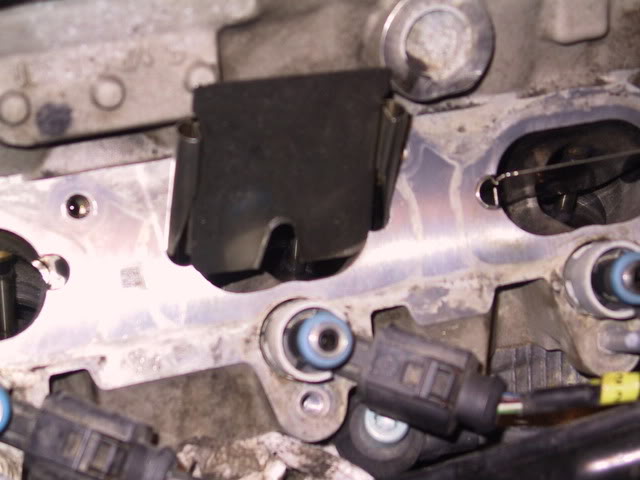
Here is a shot with flap closed.
If you don�t need carbon deposit cleaning, put new seals on the upper intake, new o-ring on PCV valve, and reassemble the parts removed.
Torque specification for 12 screws holing upper intake to lower intake is 6NM (T30). Tighten them in alternating (zig-zag) pattern.
Re-install PCV valve screw, vacuum hoses, wiring connectors, and zip tube.
B. Procedures to remove lower intake and clean carbon deposit
If you need to clean the carbon deposit, lower intake and fuel lines need to be removed. If you did not purge the fuel before removing the upper intake, you need to put the disassembled parts back together and purge fuel before proceeding to next steps.
Parts needed:
Gasket set - lower intake manifold 06E-198-717-A
Injector repair kit * 6 06E-998-907
(includes o-ring, split spacer gasket, and other hardware)
Tools and supply:
Torx bits: T30
Open-end wrench: 14mm 17mm
Flat head screw driver
Allen bits: 6mm 8 mm or 12 point spline bits (size ??)
Adaptor to turn crankshaft
Dental picks
Torque wrench with �-inch drive (most specified torque is 10 NM or lower)
Shop towels, CRC brake parts cleaner (3 cans), some aluminum foil
Preparation:
You need a special adapter to turn crankshaft. There is no center bolt holding the crankshaft pulley for this engine. The pulley is attached to the crankshaft by 8 spline bolts. The adapter sits in between these bolts. I got this idea from a very helpful local Audi dealer mechanic. I could not find this tool online and came up with this modified tool.
Update (Mar. 1, 2014); The tool (T40058) is now available from Ebay and other stores.
$25 from World Impex:
http://www.worldimpex.com/parts/oem-...l_2603753.html
$19 from Ebay (Thanks for mkongsiri's A6 3.2 Upper Timing Chain Tensioner Replacement guide)
http://www.ebay.com/itm/Audi-Crankshaft-Turning-Socket-Audi-6-cyl-2-4L-and-3-2L-FSI-A6-05-A8-03-/111183518354?pt=Motors_Automotive_Tools&hash=item19e30dda92&vxp=mtr
The adaptor picture.
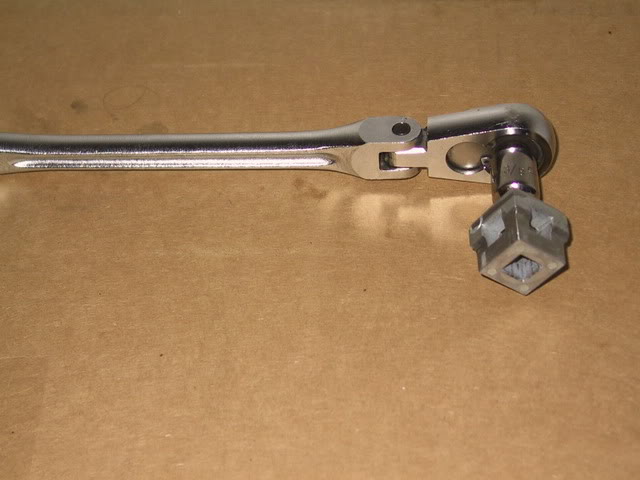
The adaptor is modified from the brake piston tool ground down to 22mm square. http://www.harborfreight.com/cpi/cta...emnumber=95713
Let�s start the dis-assembly of lower intake.
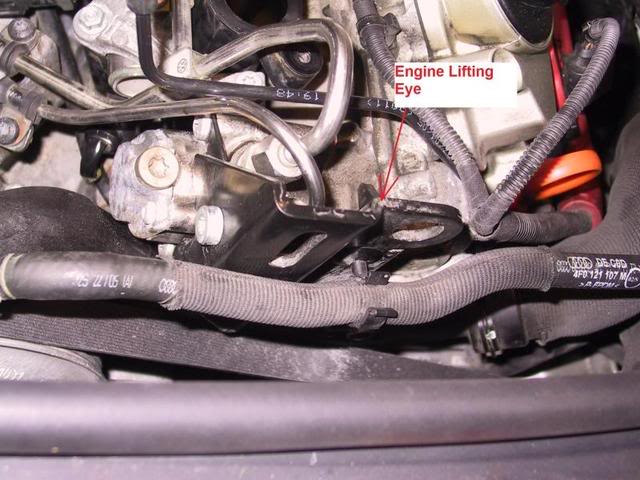
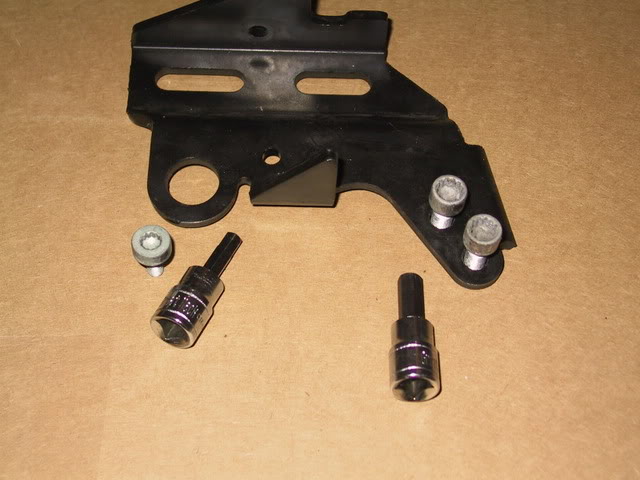
Remove engine lifting eye on HPFP and left cylinder head (use Allen bit 6mm for side bolt and 8mm for front 2 bolts)
Update (Mar. 1, 2014); There is a few spline tools set(XZN Triple Square)less than $25 available on Amazon.
Remove holding screws for high pressure fuel line and low pressure fuel line (T30)
Remove flare nuts for high pressure fuel line at HPFP and fuel rail (17/17, 14/14 mm). Watch out for residual fuel in pressure and cover the joint being loosened with shop towel
Set aside the removed fuel line.
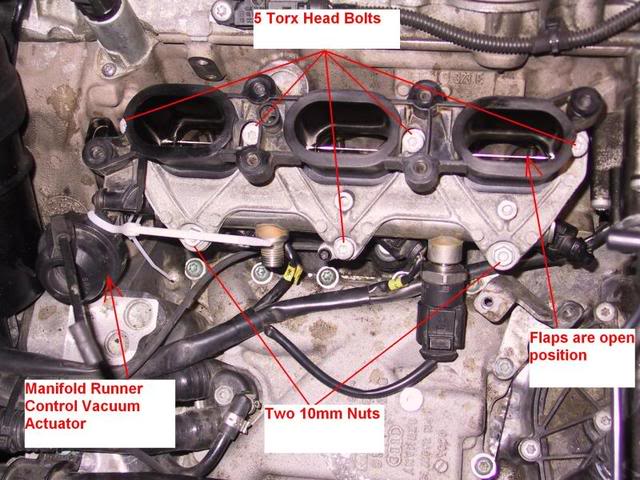
Remove 5 bolts and 2 nuts holding lower intake holder and pull out the entire lower intake assembly.
Put shop towels below lower intake to catch fuel left in fuel rail.
As you might guess, this picture was taken during assembly. It takes some effort to pull the lower intake and fuel rail out since injector o-rings are held tight in the fuel rail. Injector o-rings will mostly likely come out with the fuel rail.
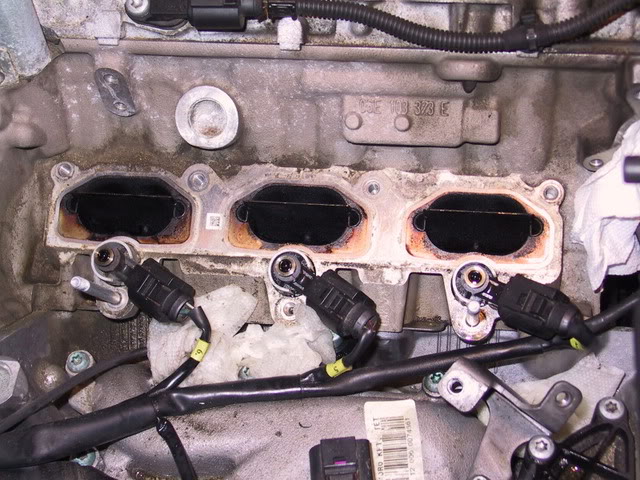
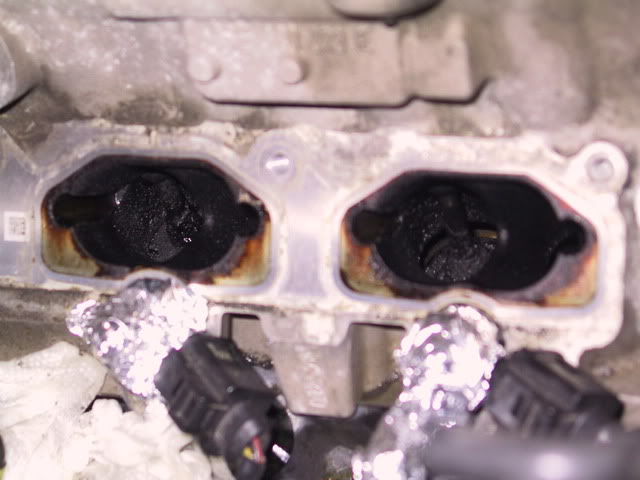
Remove intake splitters. You can clearly see the heavy carbon deposit on the valves.
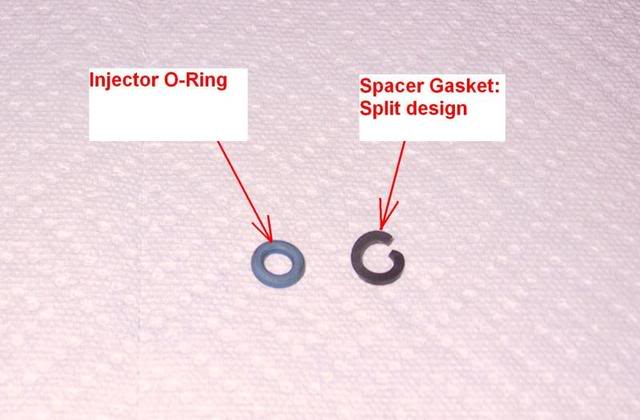
Remove injector o-rings if they are still on injectors and spacer gaskets (seals) underneath the o-rings.
After complete disassembly, protect injectors with clean cover. I used the aluminum foil.
In addition, block the intake holes with clean shop towels until ready to clean the carbon deposit.
Clean intake splitters, upper intake, and lower intake; install new seals, and set them aside
For lower intake, use a tie strap to hold open the intake runner control flaps if you don�t have vacuum pump as shown in the previous picture. If you don�t do this operation, flaps can interfere with intake splitters and will be stuck when you install it.
Cleaning fluid:
I tried CRC Green, CRC Red, SuperTech (from Wallie Mart), Seafoam, and Techron.
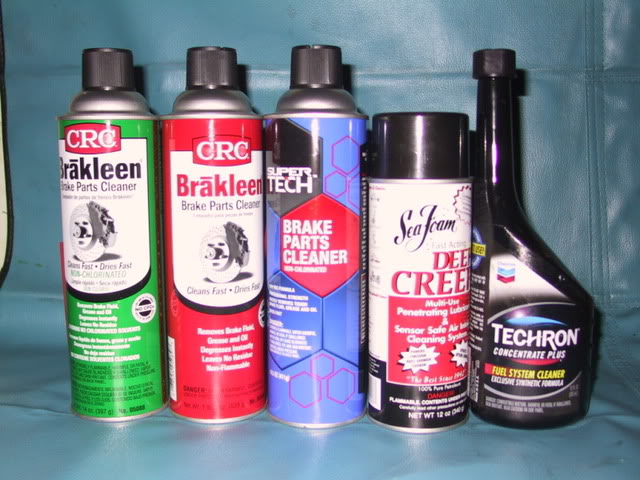
This is my subjective rating, but the best fluid to clean when engine is cold was the green CRC brake parts cleaner. SuperTech was OK too. The red CRC was not effective at all. I don�t know how they perform when engine is hot, but Seafoam and Techron were not as good as the Green CRC.
Turn the crankshaft so that intake valves for cylinders 1, 2, 5, and 6 are closed.
Spray with cleaner and let it work for 30 or more minutes. Soak it up with shop towel, then break loose the carbon deposit with dental picks. I had to repeat 3 or more times to achieve satisfactory cleanness.
Turn the crankshaft so that intake valves for cylinder 3 and 4 are closed, and repeat the cleaning procedures.
Here is the cylinder numbers.

I used this pick set, but they were a little to short for the job.
http://www.harborfreight.com/cpi/cta...emnumber=93514
Photos of before and after cleaning. Sorry for bad pictures. My camera is not a good one and doesn�t have macro.
Installation notes:
Install cleaned intake splitters.
Install new spacer seal (split seal) on the injectors.
Install new injector o-rings.
Note: Make sure to coat the injector o-rings with clean oil before installing lower intake.
Install lower intake � need slight push down.
Install 5 bolts (T30) and 2 nuts (10mm) and torque to 10NM in alternating pattern.
Repeat to the other side.
Cut off tie straps holding the intake runner flaps.
Install fuel lines starting with low pressure line - hand start the nuts.
Install bolts holding low pressure fuel lines � hand tighten.
Torque the flange nut on low pressure fuel lines to 25 NM at HPFP (14mm/14mm).
Install high pressure fuel line - hand start nuts.
Install bolts holding high pressure fuel lines - hand tighten.
Torque the all flange nuts on fuel lines to 25 NM (17mm/17mm).
Torque the flange nuts for the both fuel lines on the fuel rail to 25 NM (17mm HPFL, 14mm LPFL).
Torque all bolts holding both fuel lines to 10 NM (T-30).
Install engine lifting eye (do this after fuel lines are completely tightened at HPFP).
Install upper intake with new seals. Make sure 2 vacuum hoses in the rear are not trapped.
Install PCV valve to the upper intake manifold. Don�t loose o-ring.
Install a screw (T20) PCV valve.
Install 12 screws, align, and tighten to 6 NM (T30) in alternating pattern.
Connect hoses and electrical connectors.
Install zip tube, small hose to zip tube, and clamp.
Epilogue:
English is second language to me, as you might guess from my writing. And I made it a lot harder than actual job. I hope I didn�t discourage any DIYs.
I was very impressed with 3.2L FSI engine design. It had consistent design concept throughout such as electrical connectors, clamps, bolts, screws, and common size fasteners. There were no messy paper gaskets or RTVs to clean.
After cleaning carbon deposit, I noticed no more rough idle in the morning at first start, very quick startup, and quicker response when accelerating per my calibrated buttmeter
I have no personal interest in any of products or companies I mentioned.
Please check the parts numbers with Audi dealer to make sure you get the latest level to fit your car�s VIN No.
After doing R&R of upper and lower intake for a couple of times due to P2294 problems, I realized that inspection for carbon deposit on the valve can be done without removing the lower intake and fuel lines with very cheap parts. I recommend it as part of 55K maintenance check for 3.2L FSI engine. Whole procedures including reassembly may take less than an hour (Part A Inspection for carbon deposit only).
A. Inspection for carbon deposit
Parts needed:
Gasket set - upper intake 06E-129-717-B
O-ring for PCV valve 06E-133-148-A
One small (1/2 inch or smaller) hose clamp
Tools:
Torx bits: T-20, T30
Flat head screw driver
Vacuum pump (optional)
Torque wrench with 1/4 inch drive (most of torque is 10 NM or lower). I used this one.
http://www.nashbar.com/bikes//Produc...2_126737_-1___
Preparation:
Use compress air to clean upper and lower intake manifold, and interface between cylinder head and lower intake to remove sand and dirt.
I sprayed with brake parts cleaner, and then used combination of paper towel and compressed air to clean them.
Fuel discharge:
If you are going to go ahead and clean the intake valve, fuel in the fuel lines and fuel rails need to be drained out before upper intake is removed. You need to be careful because high pressure fuel line can be up to 1500 psi.
If you have VCDS:
Start the engine
Connect Cable and start VCDS
Select �01-Engine�
Select �Basic Settings -04�
Type in �140� for Group number
Click Basic Settings �ON� button
Make sure that the pressure reading is 0 Bar for a couple of seconds and turn off the engine.
Pull out the fuse for fuel pump at fuse panel on right side of the dash
Crank/Start a couple of times until engine stalls.
No VCDS:
Follow the fuse pull method. Be careful! Cover with shop towel when removing high pressure fuel line. Fuel is not completely drained from fuel rail and still in high pressure.
How to remove wiring connectors.
Put small screw drive in the opening as shown in the pictures depending on the available access.
Push toward the wiring side and listen for click noise, which indicates release of locking mechanism; then pull out the connector. Don�t use too much force.
Now we are ready to do real work!
Remove front and back plastic engine covers (pull them out).
Remove zip tube (2 hose clamps, 1 permanent clamp on small hose need to be destroyed).
Remove x-mas tree pin for brake booster vacuum hose from bracket under the t-body.
Remove 5 wiring connectors, 2 vacuum hose, 1 hose clamp and hose from back of the upper intake.
Remove 2 holding clips for wiring bundle. And set the wiring bundle and connectors behind the oil filter.
Remove a screw (T20) holding PCV valve to upper intake.
Disconnect 2 wiring connectors and a vacuum line from front of upper intake.
Remove 12 screws (T30) holding the upper intake to lower intake.
Push out the PCV valve from the upper intake � may need to force it out using screwdriver.
Slide back the upper intake to clear front vacuum hose and lift it out.
Here is a photo with the upper intake removed. I use paper towel to cover the intake opening
To inspect the carbon deposit, the intake runner flaps need to be open.
If you have a vacuum pump, connect it to the one of vacuum hose that had pencil on it in the previous picture to actuate and open intake runner flaps. If you don�t have a vacuum pump, you can manually operate the flap actuator by hand. Pull up the actuator rod shown in the picture where it is tie-strapped.
Here is flap open. You can clearly see the valves. Flaps, intake openings, and intake valves are clean because the photo was taken after cleaning.
Here is a shot with flap closed.
If you don�t need carbon deposit cleaning, put new seals on the upper intake, new o-ring on PCV valve, and reassemble the parts removed.
Torque specification for 12 screws holing upper intake to lower intake is 6NM (T30). Tighten them in alternating (zig-zag) pattern.
Re-install PCV valve screw, vacuum hoses, wiring connectors, and zip tube.
B. Procedures to remove lower intake and clean carbon deposit
If you need to clean the carbon deposit, lower intake and fuel lines need to be removed. If you did not purge the fuel before removing the upper intake, you need to put the disassembled parts back together and purge fuel before proceeding to next steps.
Parts needed:
Gasket set - lower intake manifold 06E-198-717-A
Injector repair kit * 6 06E-998-907
(includes o-ring, split spacer gasket, and other hardware)
Tools and supply:
Torx bits: T30
Open-end wrench: 14mm 17mm
Flat head screw driver
Allen bits: 6mm 8 mm or 12 point spline bits (size ??)
Adaptor to turn crankshaft
Dental picks
Torque wrench with �-inch drive (most specified torque is 10 NM or lower)
Shop towels, CRC brake parts cleaner (3 cans), some aluminum foil
Preparation:
You need a special adapter to turn crankshaft. There is no center bolt holding the crankshaft pulley for this engine. The pulley is attached to the crankshaft by 8 spline bolts. The adapter sits in between these bolts. I got this idea from a very helpful local Audi dealer mechanic. I could not find this tool online and came up with this modified tool.
Update (Mar. 1, 2014); The tool (T40058) is now available from Ebay and other stores.
$25 from World Impex:
http://www.worldimpex.com/parts/oem-...l_2603753.html
$19 from Ebay (Thanks for mkongsiri's A6 3.2 Upper Timing Chain Tensioner Replacement guide)
http://www.ebay.com/itm/Audi-Crankshaft-Turning-Socket-Audi-6-cyl-2-4L-and-3-2L-FSI-A6-05-A8-03-/111183518354?pt=Motors_Automotive_Tools&hash=item19e30dda92&vxp=mtr
The adaptor picture.
The adaptor is modified from the brake piston tool ground down to 22mm square. http://www.harborfreight.com/cpi/cta...emnumber=95713
Let�s start the dis-assembly of lower intake.
Remove engine lifting eye on HPFP and left cylinder head (use Allen bit 6mm for side bolt and 8mm for front 2 bolts)
Update (Mar. 1, 2014); There is a few spline tools set(XZN Triple Square)less than $25 available on Amazon.
Remove holding screws for high pressure fuel line and low pressure fuel line (T30)
Remove flare nuts for high pressure fuel line at HPFP and fuel rail (17/17, 14/14 mm). Watch out for residual fuel in pressure and cover the joint being loosened with shop towel
Set aside the removed fuel line.
Remove 5 bolts and 2 nuts holding lower intake holder and pull out the entire lower intake assembly.
Put shop towels below lower intake to catch fuel left in fuel rail.
As you might guess, this picture was taken during assembly. It takes some effort to pull the lower intake and fuel rail out since injector o-rings are held tight in the fuel rail. Injector o-rings will mostly likely come out with the fuel rail.
Remove intake splitters. You can clearly see the heavy carbon deposit on the valves.
Remove injector o-rings if they are still on injectors and spacer gaskets (seals) underneath the o-rings.
After complete disassembly, protect injectors with clean cover. I used the aluminum foil.
In addition, block the intake holes with clean shop towels until ready to clean the carbon deposit.
Clean intake splitters, upper intake, and lower intake; install new seals, and set them aside
For lower intake, use a tie strap to hold open the intake runner control flaps if you don�t have vacuum pump as shown in the previous picture. If you don�t do this operation, flaps can interfere with intake splitters and will be stuck when you install it.
Cleaning fluid:
I tried CRC Green, CRC Red, SuperTech (from Wallie Mart), Seafoam, and Techron.
This is my subjective rating, but the best fluid to clean when engine is cold was the green CRC brake parts cleaner. SuperTech was OK too. The red CRC was not effective at all. I don�t know how they perform when engine is hot, but Seafoam and Techron were not as good as the Green CRC.
Turn the crankshaft so that intake valves for cylinders 1, 2, 5, and 6 are closed.
Spray with cleaner and let it work for 30 or more minutes. Soak it up with shop towel, then break loose the carbon deposit with dental picks. I had to repeat 3 or more times to achieve satisfactory cleanness.
Turn the crankshaft so that intake valves for cylinder 3 and 4 are closed, and repeat the cleaning procedures.
Here is the cylinder numbers.
I used this pick set, but they were a little to short for the job.
http://www.harborfreight.com/cpi/cta...emnumber=93514
Photos of before and after cleaning. Sorry for bad pictures. My camera is not a good one and doesn�t have macro.
Installation notes:
Install cleaned intake splitters.
Install new spacer seal (split seal) on the injectors.
Install new injector o-rings.
Note: Make sure to coat the injector o-rings with clean oil before installing lower intake.
Install lower intake � need slight push down.
Install 5 bolts (T30) and 2 nuts (10mm) and torque to 10NM in alternating pattern.
Repeat to the other side.
Cut off tie straps holding the intake runner flaps.
Install fuel lines starting with low pressure line - hand start the nuts.
Install bolts holding low pressure fuel lines � hand tighten.
Torque the flange nut on low pressure fuel lines to 25 NM at HPFP (14mm/14mm).
Install high pressure fuel line - hand start nuts.
Install bolts holding high pressure fuel lines - hand tighten.
Torque the all flange nuts on fuel lines to 25 NM (17mm/17mm).
Torque the flange nuts for the both fuel lines on the fuel rail to 25 NM (17mm HPFL, 14mm LPFL).
Torque all bolts holding both fuel lines to 10 NM (T-30).
Install engine lifting eye (do this after fuel lines are completely tightened at HPFP).
Install upper intake with new seals. Make sure 2 vacuum hoses in the rear are not trapped.
Install PCV valve to the upper intake manifold. Don�t loose o-ring.
Install a screw (T20) PCV valve.
Install 12 screws, align, and tighten to 6 NM (T30) in alternating pattern.
Connect hoses and electrical connectors.
Install zip tube, small hose to zip tube, and clamp.
Epilogue:
English is second language to me, as you might guess from my writing. And I made it a lot harder than actual job. I hope I didn�t discourage any DIYs.
I was very impressed with 3.2L FSI engine design. It had consistent design concept throughout such as electrical connectors, clamps, bolts, screws, and common size fasteners. There were no messy paper gaskets or RTVs to clean.
After cleaning carbon deposit, I noticed no more rough idle in the morning at first start, very quick startup, and quicker response when accelerating per my calibrated buttmeter
Last edited by audi bug; 03-02-2014 at 06:43 PM.

The following users liked this post:
rmrodeon (01-12-2020)
10-09-2009, 08:00 AM
#2
AudiWorld Senior Member

Whoa... very nice!! I think the dealer did this to my car to fix the cold start (rough vibrations etc) issue. It did make a difference. I will check tocomfirm if these were the same part numbers used.
Mods - can we please make this a sticky?
Mods - can we please make this a sticky?
10-09-2009, 09:04 AM
#3
AudiWorld Member
This is supposed to take an hour?

Also my local tech has recommended a product called BG44k in the past. They apparently also have some injector cleaners as well.
Also my local tech has recommended a product called BG44k in the past. They apparently also have some injector cleaners as well.
10-09-2009, 06:45 PM
#5
AudiWorld Senior Member

The BG suggestion from you dealer is right on..there's a machine for commercial shops that uses it and it cleans the carbon like it was sand blasted..recommended after 50K by a local trusted shop whom I called today after reading audi-bugs post.
10-09-2009, 09:26 PM
#6
AudiWorld Super User
Nice writeup. I wonder if anyone has tried the standard seafoam procedure to clear the valve deposits. The one where you use the intake vacuum to suck in some seafoam then let it sit for a bit before starting.
http://www.seafoamsales.com/projects...-deposits.html
http://www.seafoamsales.com/projects...-deposits.html
10-10-2009, 06:19 AM
#7
AudiWorld Senior Member
Nice writeup. I wonder if anyone has tried the standard seafoam procedure to clear the valve deposits. The one where you use the intake vacuum to suck in some seafoam then let it sit for a bit before starting.
http://www.seafoamsales.com/projects...-deposits.html
http://www.seafoamsales.com/projects...-deposits.html
Trending Topics
10-10-2009, 08:02 AM
#8
AudiWorld Member
Thread Starter
C.R. Brown,
I am not a superman. One hour is for Part A Inspection only. Whole job will take all Saturday plus night for a shade tree mechanic.
gk1 and mystrodo,
Thanks for complements.
I used Seafoam and have a write up ready to post but can not post a new thread anymore. I got this message "Post rejected because of a score of: 43 Rejection set to: 30." I e-mailed webmaster and pierreb yesterday for fix.
The blasting material you mentioned is walnut shell. I did some research about it. There is cheap machine that needs an air compressor.
My Audi had 58K miles and the real issue I had was check engine light because of a faulty high pressure fuel pump. Before that I noticed slight rough idle at first startup when cold from the time I bought it as used car at 46K. I actually took it to dealer for that and got typical "no problem found" response.
10-10-2009, 08:27 AM
#9
AudiWorld Member
Yes, but start project only after drinking a min of 4 double lattes. An hour for Audi-bug, a week for me... then I call for a tow
The BG suggestion from you dealer is right on..there's a machine for commercial shops that uses it and it cleans the carbon like it was sand blasted..recommended after 50K by a local trusted shop whom I called today after reading audi-bugs post.
The BG suggestion from you dealer is right on..there's a machine for commercial shops that uses it and it cleans the carbon like it was sand blasted..recommended after 50K by a local trusted shop whom I called today after reading audi-bugs post.
I tried a can of the BG44k last year before a long 1600 mile round trip drive. I couldn't tell you if it worked or not but it didn't hurt. I will probably pick up another can since its been about a year now.
I may ask the tech about the BG induction cleaning.
10-14-2009, 08:28 AM
#10

Good write up, but damnz, that's alotta work. I used the Techron cleaner in my fuel tank after I changed out the fuel filter. Haven't notcied any changes not that there is anything with my car. It did not cure the suttle morning shakes, however.