
 07-20-2016, 09:25 AM
Last edit by: IB Advertising
See related guides and technical advice from our community experts:
- Audi A6 C6 How to Replace High Pressure Fuel Pump HPFP<br>Step by step instructions for do-it-yourself repairs.

3.2L FSI, How to inspect and replace HPFP (high pressure fuel pump) Cam follower
10-10-2009, 10:35 AM
#1
AudiWorld Member
Thread Starter

This guide is for information purpose only based on my experience with 2006 A6 Quattro with 3.2L FSI engine, VIN No. WAUDG74F96N03xxxx . Use them at your own risk.
I have no personal interest in any of products or companies I mentioned.
Please check the parts numbers with Audi dealer to make sure you get the latest level to fit your car’s VIN No.
Parts:
Cam follower for HPFP 06E-109-309-A
O-ring for HPFP 06E-127-248
Coolant cross-over pipe seal x 2 06E-121-119-A
Hose: T-stat to cross over pipe (optional) 06E-121-445-B
Tools:
Torx bit: T30
While I was searching internet to fix check engine light with P2294 (fuel pressure regulator 2 control circuit) code for my 06 Quattro 3.2L, I found this VW TSB on cam follower. http://moeuro.com/downloads/VW%20TSB%20Cam%20Wear.pdf
It was for P2293, but I though this could be applied to 3.2L FSI engine too. This cam follower replacement was done after I replaced fuel pressure sensors for both low and high pressure lines. Although it didn’t fix my problem, it gave me valuable information, and I want to share the procedures and my thought with fellow Audiworld members.
After reading the VW TSB, I feared the worst - cam follower was done and cam shaft was ruined -which will require camshaft replacement because rough idle and hesitation got really bad.
I remove the HPFP and checked cam follower. To my huge relief, my cam follower wasn’t bad, though it lost all the coating and showed some concave wear. Camshaft was good.
I strongly recommend changing the cam follower during 55K service because it will be very expansive repair if cam follower is completely worn and camshaft shows unusual wear. It is small price to pay for a piece of mind.
Preparation:
Follow procedures in the carbon deposit cleaning for preparation and removal of upper intake & lower intake
https://www.audiworld.com/forums/sho....php?t=2764902
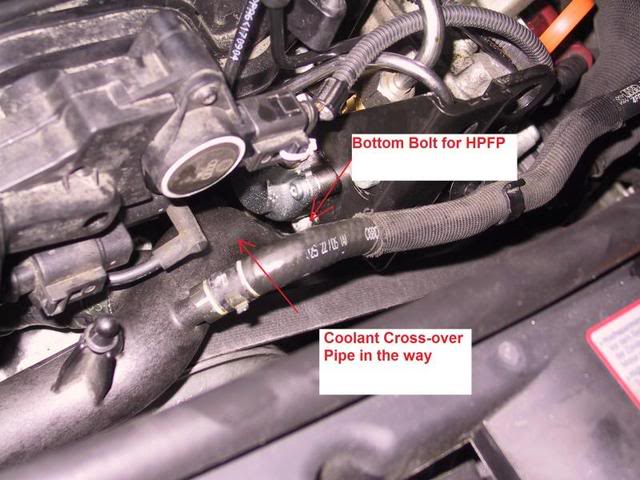
To remove the bottom bolt of the HPFP, coolant crossover pipe has to be moved forward, which requires draining coolant. I really wished Audi design engineers incorporated serviceability of cam follower. However, after going through the process, it wasn’t that bad at all. You might as well do the coolant change even though it is a little too early at 55K miles.
Drain the coolant as shown in this thread.
https://www.audiworld.com/forums/sho....php?t=2764905
Remove serpentine belt as shown in this thread.
https://www.audiworld.com/forums/sho....php?t=2764904
Slide the hose clamp off the small hose between t-stat hosing and coolant crossover pipe.
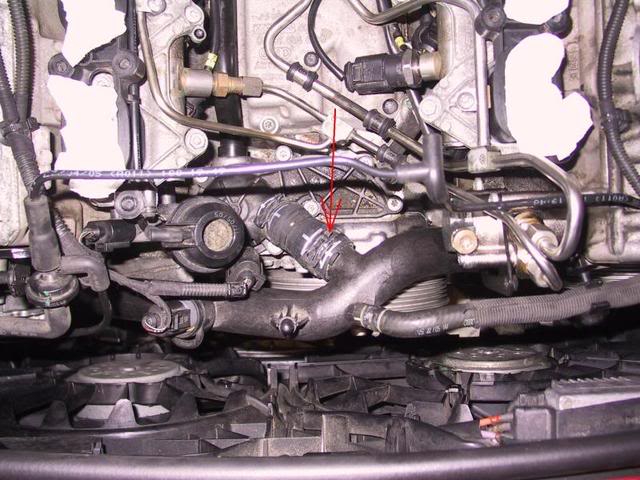
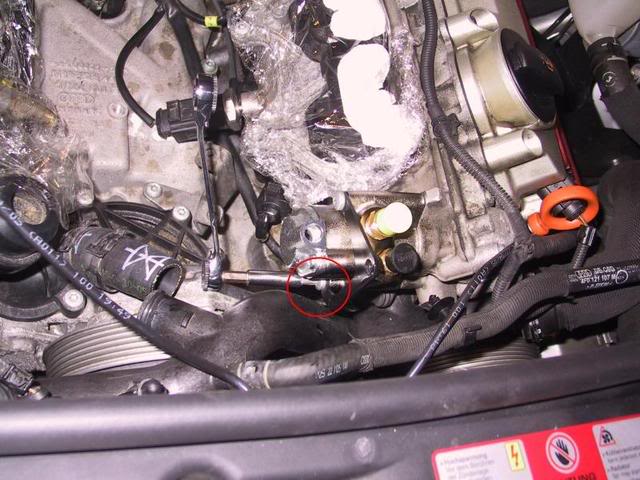
Remove mounting screws from both sides (2 on each side) and pull forward enough to get clearance to bottom screw for HPFP (Torx T30).
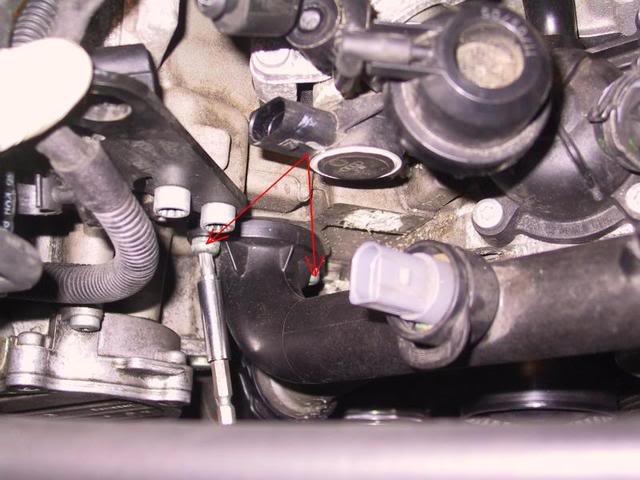
Left side lower bolt can be seen under the HPFP and the coolant pipe.
Remove 3 bolts holding HPFP to left cylinder head.
Pull straight out the HPFP. If it is stuck, use a screwdriver as leverage to break it loose
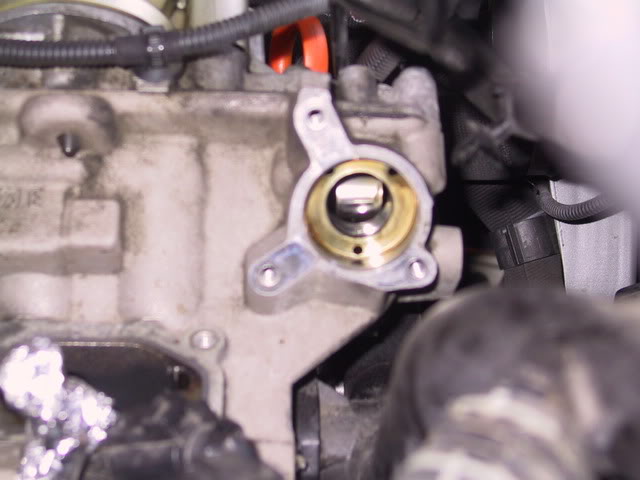
Remove the cam follower and inspect for excessive wear.
Check for abnormal wear on camshaft.
Installation note:
Install new seal for the coolant crossover pipe under the HPFP before installing the HPFP. There is no room to maneuver a new seal into the coolant pipe if HPFP is installed first.
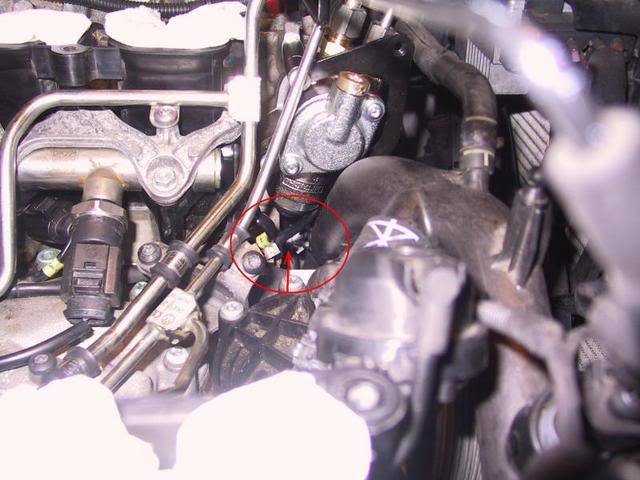
Don’t forget to connect the fuel pressure regulator connector
Dip new cam follower in new oil and insert into cylinder head
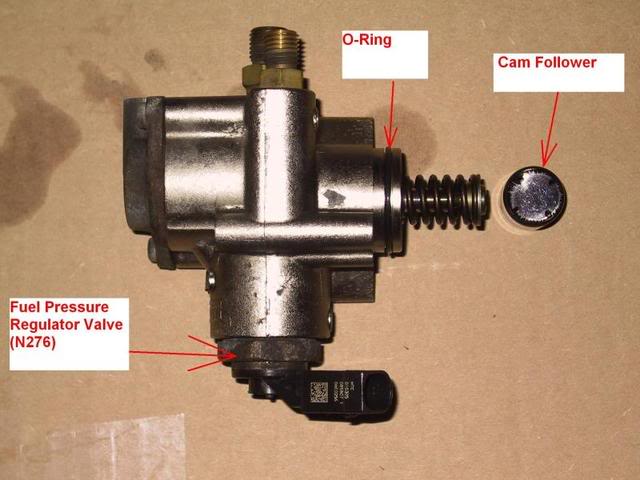
Remove old o-ring. Dip new o-ring in new oil and install onto HPFP
Install the HPFP to cylinder head
Hand start and tighten the screws in staggered manner so that HPFP doesn't get one-sided
Torque to 10 NM (T30)
Install the coolant crossover pipe starting with small hose coming out of t-stat housing.
Hand start bolts on the right side of pipe (need to wiggle to align the bolts), and then left side bolts.
Tighten the bolts with T30 to 9 NM.
Re-position the hose clamp for small hose at crossover pipe.
Follow procedures linked before to install the serpentine belt, lower intake, upper intake, coolant, and other parts removed.
BMW’s roller follower fix for its HPFP cam follower problem. I saw somewhere Audi’s new (2008?) 2-liter Turbo engine has this roller follower too.
http://www.golfmkv.com/forums/showthread.php?t=98358
I have no personal interest in any of products or companies I mentioned.
Please check the parts numbers with Audi dealer to make sure you get the latest level to fit your car’s VIN No.
Parts:
Cam follower for HPFP 06E-109-309-A
O-ring for HPFP 06E-127-248
Coolant cross-over pipe seal x 2 06E-121-119-A
Hose: T-stat to cross over pipe (optional) 06E-121-445-B
Tools:
Torx bit: T30
While I was searching internet to fix check engine light with P2294 (fuel pressure regulator 2 control circuit) code for my 06 Quattro 3.2L, I found this VW TSB on cam follower. http://moeuro.com/downloads/VW%20TSB%20Cam%20Wear.pdf
It was for P2293, but I though this could be applied to 3.2L FSI engine too. This cam follower replacement was done after I replaced fuel pressure sensors for both low and high pressure lines. Although it didn’t fix my problem, it gave me valuable information, and I want to share the procedures and my thought with fellow Audiworld members.
After reading the VW TSB, I feared the worst - cam follower was done and cam shaft was ruined -which will require camshaft replacement because rough idle and hesitation got really bad.
I remove the HPFP and checked cam follower. To my huge relief, my cam follower wasn’t bad, though it lost all the coating and showed some concave wear. Camshaft was good.
I strongly recommend changing the cam follower during 55K service because it will be very expansive repair if cam follower is completely worn and camshaft shows unusual wear. It is small price to pay for a piece of mind.
Preparation:
Follow procedures in the carbon deposit cleaning for preparation and removal of upper intake & lower intake
https://www.audiworld.com/forums/sho....php?t=2764902
To remove the bottom bolt of the HPFP, coolant crossover pipe has to be moved forward, which requires draining coolant. I really wished Audi design engineers incorporated serviceability of cam follower. However, after going through the process, it wasn’t that bad at all. You might as well do the coolant change even though it is a little too early at 55K miles.
Drain the coolant as shown in this thread.
https://www.audiworld.com/forums/sho....php?t=2764905
Remove serpentine belt as shown in this thread.
https://www.audiworld.com/forums/sho....php?t=2764904
Slide the hose clamp off the small hose between t-stat hosing and coolant crossover pipe.
Remove mounting screws from both sides (2 on each side) and pull forward enough to get clearance to bottom screw for HPFP (Torx T30).
Left side lower bolt can be seen under the HPFP and the coolant pipe.
Remove 3 bolts holding HPFP to left cylinder head.
Pull straight out the HPFP. If it is stuck, use a screwdriver as leverage to break it loose
Remove the cam follower and inspect for excessive wear.
Check for abnormal wear on camshaft.
Installation note:
Install new seal for the coolant crossover pipe under the HPFP before installing the HPFP. There is no room to maneuver a new seal into the coolant pipe if HPFP is installed first.
Don’t forget to connect the fuel pressure regulator connector
Dip new cam follower in new oil and insert into cylinder head
Remove old o-ring. Dip new o-ring in new oil and install onto HPFP
Install the HPFP to cylinder head
Hand start and tighten the screws in staggered manner so that HPFP doesn't get one-sided
Torque to 10 NM (T30)
Install the coolant crossover pipe starting with small hose coming out of t-stat housing.
Hand start bolts on the right side of pipe (need to wiggle to align the bolts), and then left side bolts.
Tighten the bolts with T30 to 9 NM.
Re-position the hose clamp for small hose at crossover pipe.
Follow procedures linked before to install the serpentine belt, lower intake, upper intake, coolant, and other parts removed.
BMW’s roller follower fix for its HPFP cam follower problem. I saw somewhere Audi’s new (2008?) 2-liter Turbo engine has this roller follower too.
http://www.golfmkv.com/forums/showthread.php?t=98358
Last edited by audi bug; 11-19-2018 at 09:36 PM.
 11-20-2012, 09:29 PM
#3
AudiWorld Member
Thread Starter
I think it had a hesitation when I accelerate. It was still drivable though. Sorry for being not much help.
Last edited by audi bug; 11-20-2012 at 09:43 PM.
11-21-2012, 06:50 AM
#4
AudiWorld Member
Join Date: May 2010
Posts: 281
Likes: 0
Received 0 Likes
on
0 Posts
I recently started having some long cranking issues and one of the possible causes is a leaky HPFP that lets the fuel pressure drop to much when the car is standing.
04-20-2014, 03:40 AM
#5

Hi Audibug,
Hope you can remember this far back-
I am in the middle of replacing the intake on my 06 A6 3.2L due P2006 code. I thought the cam follower on the 3.2 L has holes in it to allow the oil to pass thru and not cause the wear unlike the solid cam follower used on the older 2.0L engines. Am I correct?
Thanks for your response
Jay
04-21-2014, 01:32 PM
#6
AudiWorld Member
Thread Starter
Hi Audibug,
Hope you can remember this far back-
I am in the middle of replacing the intake on my 06 A6 3.2L due P2006 code. I thought the cam follower on the 3.2 L has holes in it to allow the oil to pass thru and not cause the wear unlike the solid cam follower used on the older 2.0L engines. Am I correct?
Thanks for your response
Jay
Hope you can remember this far back-
I am in the middle of replacing the intake on my 06 A6 3.2L due P2006 code. I thought the cam follower on the 3.2 L has holes in it to allow the oil to pass thru and not cause the wear unlike the solid cam follower used on the older 2.0L engines. Am I correct?
Thanks for your response
Jay
Did you check the actuator for the secondary flap before taking apart the intake? I know you were looking at the vacuum line before, but it would be next logical thing to do before removing the intake.
You might as well clean carbon deposit on the valves while intakes are out.
04-24-2014, 06:36 PM
#7
If you zoom the picture, you can see small 4 holes close to the edge of the follower.
Did you check the actuator for the secondary flap before taking apart the intake? I know you were looking at the vacuum line before, but it would be next logical thing to do before removing the intake.
You might as well clean carbon deposit on the valves while intakes are out.
Did you check the actuator for the secondary flap before taking apart the intake? I know you were looking at the vacuum line before, but it would be next logical thing to do before removing the intake.
You might as well clean carbon deposit on the valves while intakes are out.
Also now in the middle of the miserable job of cleaning all of the carbon.
My question for you is, at 125K miles, I have no symptoms that the cam follower is worn. Also, of the 4 dealers parts departments i talked to looking in my search for a cam follower, none of them indicated that they remember that last time they had to order the follower for a 3.2 liter. 2.0 liters were a different story. The solid version for this engine wore out. I can't find any indication that this is the case with the 3.2 liter.
When you replaced your cam follower, did you see any sign of were on the old one? Anyone else have any insight on this?
Thanks in advance.
Trending Topics
11-19-2018, 06:40 AM
#8

Thanks for posting this. My scanner showed the 00854 code plus a bunch of others when I scanned again later. None that had any text to describe the issue.
A warning to anyone about to undertake this repair is that if you have a lot of miles on your car and you haven't replaced the main plastic coolant pipe that has to be removed, it will probably break during this repair. Last year I just touched one of the small connecting lines and it snapped off. I could crumble the connector in my hands. So if you start pulling on that pipe, it may break.
the other thing I learned is to note how the large metal bracket it attached. I think it's a lift point for the engine. I had the holes correctly set, but had the thing reversed so there was no way to reinstall it without removing everything again. So I didn't install it (easy to do if engine ever has to come out.
my car had 140k miles when the coolant pipe was replaced and 152k now. The little cap was still in tact, so no metal in engine. Thank you Mobil 1. Bought pump and cap for just under $300. Job took about 5 hours, but I don't work fast. Easiest part was removing bumper and loosening lock carrier. Hardest part was dealing with the coolant pipe clamp that must be removed. My tool would remove it fine when it was on the pipe but not when just on the rubber where it got smaller. Had to fashion needle nose pliers. Remember to burp the coolant!
thanks again. Probably saved me $700 to $1000 from dealer.

Thread
Thread Starter
Forum
Replies
Last Post
ECS Tuning-Audi
A4 (B8 Platform) Discussion
21
09-11-2021 04:04 PM
ECS Tuning-Audi
A4 (B7 Platform) Discussion
0
09-01-2015 09:16 AM
ECS Tuning-Audi
Audi A5 / S5 / RS5 Coupe & Cabrio (B8)
0
09-01-2015 08:27 AM
