
 09-06-2016, 01:24 PM
Last edit by: IB Advertising
See related guides and technical advice from our community experts:
- Audi How to Lubricate Sunroof Track and Mechanism<br>Step by step instructions for do-it-yourself repairs.

Lubricating Sunroof and other stuff
04-04-2012, 08:03 AM
#1
AudiWorld Senior Member
Thread Starter

I was tempted to take it in and have it done but my local Audi dealer always seems busy with Kia owners (dealership combined) so maybe I'll do these lubrication's myself and know it's done.
First..the sunroof, where to lube and what lube material, can I use the same lubricant on the doors,hood and trunk. How about door locks? All help welcome, pics are extra nice.. since this maintence usually applies to all VW based cars.
First..the sunroof, where to lube and what lube material, can I use the same lubricant on the doors,hood and trunk. How about door locks? All help welcome, pics are extra nice.. since this maintence usually applies to all VW based cars.
 04-04-2012, 12:27 PM
#2
AudiWorld Senior Member
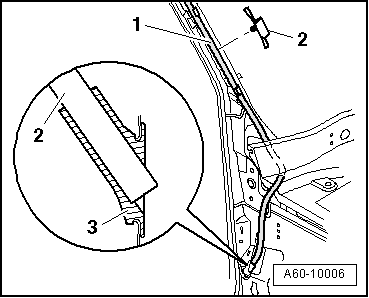
<TABLE cellSpacing=0 cellPadding=0 width="100%"><TBODY><TR><TD class=spalte-text><TABLE class="cc abstand-kap einzug-standard"><TBODY><TR><TD class=titel-kap><TABLE class="cc abstand-h-kap einzug-standard"><TBODY><TR><TD class=titel-h-kap>Water drain hoses </TD></TR></TBODY></TABLE><TABLE class="cc einzug-standard abstand-standard absatz-hervor"><TBODY><TR><TD>Saloon</TD></TR></TBODY></TABLE><TABLE class="cc abstand-standard erlaeutrg-explo"><TBODY><TR><TD class=einzug-nummer>1 - </TD><TD>Water drain hose (front)</TD></TR></TBODY></TABLE><TABLE class="cc einzug-explo abstand-explo "><TBODY><TR><TD class=einzug-liste>q </TD><TD>Water drain hoses (front) are located in A-pillars and end behind door at bottom of A-pillar.</TD></TR></TBODY></TABLE><TABLE class="cc einzug-explo abstand-explo "><TBODY><TR><TD class=einzug-liste>q </TD><TD>Cleaning is performed from sunroof frame.</TD></TR></TBODY></TABLE><TABLE class="cc abstand-standard erlaeutrg-explo"><TBODY><TR><TD class=einzug-nummer>2 - </TD><TD>Sunroof frame</TD></TR></TBODY></TABLE><TABLE class="cc abstand-standard erlaeutrg-explo"><TBODY><TR><TD class=einzug-nummer>3 - </TD><TD>Water drain hose (rear)</TD></TR></TBODY></TABLE><TABLE class="cc einzug-explo abstand-explo "><TBODY><TR><TD class=einzug-liste>q </TD><TD>Water drain hoses (rear) are located in C-pillars and end in wheel housing above wheel housing liner.</TD></TR></TBODY></TABLE><TABLE class="cc einzug-explo abstand-explo "><TBODY><TR><TD class=einzug-liste>q </TD><TD>Clean from lower end of hose.</TD></TR></TBODY></TABLE><TABLE class="cc abstand-standard erlaeutrg-explo"><TBODY><TR><TD class=einzug-nummer>4 - </TD><TD>Grommet for A-pillar</TD></TR></TBODY></TABLE><TABLE class="cc abstand-standard erlaeutrg-explo"><TBODY><TR><TD class=einzug-nummer>5 - </TD><TD>Grommet for C-pillar</TD></TR></TBODY></TABLE>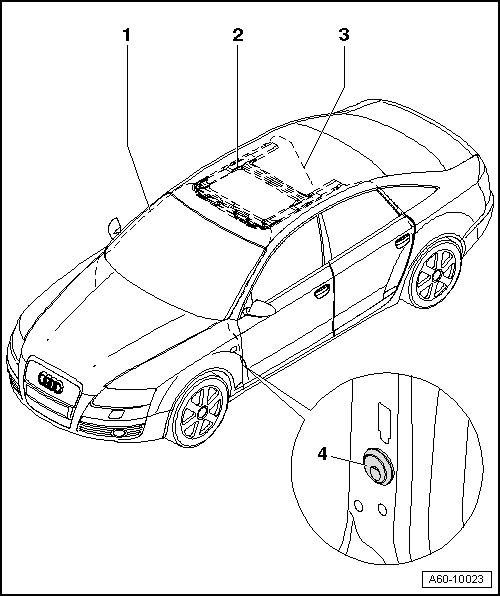
<TABLE class="cc einzug-standard abstand-standard absatz-hervor"><TBODY><TR><TD>Avant</TD></TR></TBODY></TABLE><TABLE class="cc abstand-standard erlaeutrg-explo"><TBODY><TR><TD class=einzug-nummer>1 - </TD><TD>Water drain hose (front)</TD></TR></TBODY></TABLE><TABLE class="cc einzug-explo abstand-explo "><TBODY><TR><TD class=einzug-liste>q </TD><TD>Water drain hoses (front) are located in A-pillars and end behind door at bottom of A-pillar.</TD></TR></TBODY></TABLE><TABLE class="cc einzug-explo abstand-explo "><TBODY><TR><TD class=einzug-liste>q </TD><TD>Cleaning is performed from sunroof frame.</TD></TR></TBODY></TABLE><TABLE class="cc abstand-standard erlaeutrg-explo"><TBODY><TR><TD class=einzug-nummer>2 - </TD><TD>Sunroof frame</TD></TR></TBODY></TABLE><TABLE class="cc abstand-standard erlaeutrg-explo"><TBODY><TR><TD class=einzug-nummer>3 - </TD><TD>Water drain hose (rear)</TD></TR></TBODY></TABLE><TABLE class="cc einzug-explo abstand-explo "><TBODY><TR><TD class=einzug-liste>q </TD><TD>Water drain hoses (rear) are located in C-pillars and end in wheel housing above wheel housing liner.</TD></TR></TBODY></TABLE><TABLE class="cc einzug-explo abstand-explo "><TBODY><TR><TD class=einzug-liste>q </TD><TD>Clean from lower end of hose.</TD></TR></TBODY></TABLE><TABLE class="cc abstand-standard erlaeutrg-explo"><TBODY><TR><TD class=einzug-nummer>4 - </TD><TD>Grommet </TD></TR></TBODY></TABLE>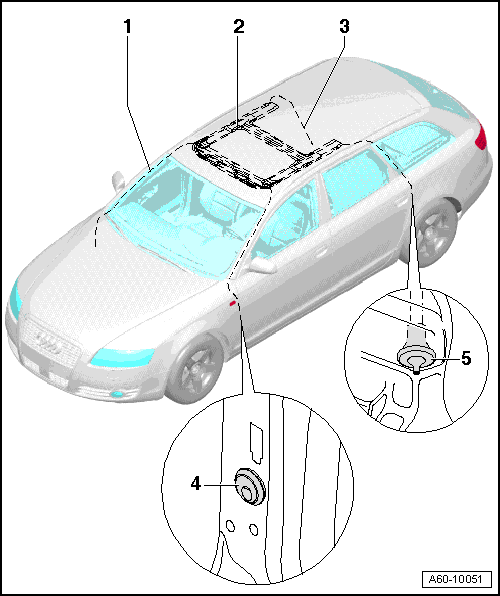
Cleaning water drain hoses
</TD></TR></TBODY></TABLE>Note
<TABLE class="cc abstand-liste-erster einzug-standard hinweis-rumpf"><TBODY><TR><TD>To clean the water drain hoses we recommend that you use an improvised tool (approx. 2300 mm long), made of the speedometer drive cable core.</TD></TR></TBODY></TABLE>
</TD><TD class=spalte-pfeil></TD><TD class=spalte-marg></TD></TR></TBODY></TABLE><TABLE cellSpacing=0 cellPadding=0 width="100%"><TBODY><TR><TD class=spalte-text><TABLE class="cc einzug-standard abstand-standard absatz-hervor"><TBODY><TR><TD>Water drain hose (front)</TD></TR></TBODY></TABLE><TABLE class="cc einzug-standard abstand-standard "><TBODY><TR><TD class=einzug-liste>� </TD><TD>Water drain hoses (front) -1- are located in A-pillars and end behind door at bottom of A-pillar in grommet -3-.</TD></TR></TBODY></TABLE><TABLE class="cc einzug-standard abstand-standard "><TBODY><TR><TD class=einzug-liste>� </TD><TD>They can be cleaned from the sunroof opening.</TD></TR></TBODY></TABLE> </TD></TR></TBODY></TABLE>
<TABLE class="cc einzug-standard abstand-standard absatz-hervor"><TBODY><TR><TD>Water drain hose (rear)</TD></TR></TBODY></TABLE><TABLE class="cc einzug-standard abstand-standard "><TBODY><TR><TD class=einzug-liste>� </TD><TD>Water drain hoses (rear) -2- are located in C-pillars and end in wheel housing above wheel housing liner -3-.</TD></TR></TBODY></TABLE><TABLE class="cc einzug-standard abstand-standard "><TBODY><TR><TD class=einzug-liste>� </TD><TD>Clean from lower end of hose.</TD></TR></TBODY></TABLE><TABLE class="cc einzug-standard abstand-standard "><TBODY><TR><TD class=einzug-liste>� </TD><TD>For this purpose, remove rear wheel housing liner</TD></TR></TBODY></TABLE>
<TABLE cellSpacing=0 cellPadding=0 width="100%"><TBODY><TR><TD class=spalte-text><TABLE class="cc abstand-kap einzug-standard"><TBODY><TR><TD class=titel-kap>Sliding/tilting sunroof: cleaning and lubricating</TD></TR></TBODY></TABLE><TABLE class="cc abstand-standard einzug-standard"><TBODY><TR><TD class=wz-liste-kopf>Special tools and workshop equipment required</TD></TR></TBODY></TABLE><TABLE class="cc abstand-standard einzug-standard "><TBODY><TR><TD class=einzug-liste>t </TD><TD>Lint-free cloth</TD></TR></TBODY></TABLE><TABLE class="cc abstand-liste einzug-standard "><TBODY><TR><TD class=einzug-liste>t </TD><TD>Brush</TD></TR></TBODY></TABLE><TABLE class="cc abstand-liste einzug-standard "><TBODY><TR><TD class=einzug-liste>t </TD><TD>Workshop vacuum cleaner, e.g. wet/dry vacuum cleaner</TD></TR></TBODY></TABLE><TABLE class="cc abstand-liste einzug-standard "><TBODY><TR><TD class=einzug-liste>t </TD><TD>Lubricant G 060 751 A2 for guide rails</TD></TR></TBODY></TABLE><TABLE class="cc abstand-liste einzug-standard "><TBODY><TR><TD class=einzug-liste>t </TD><TD>Krytox paste G 052 141 A2 for seals</TD></TR></TBODY></TABLE><TABLE class="cc abstand-liste einzug-standard "><TBODY><TR><TD class=einzug-liste>t </TD><TD>Isopropanol for cleaning seals</TD></TR></TBODY></TABLE>Note
<TABLE class="cc abstand-liste-erster einzug-standard hinweis-rumpf"><TBODY><TR><TD>Bend brush (commercially available, approx. 15 mm wide) by approx. 40� using workshop equipment.</TD></TR></TBODY></TABLE><TABLE class="cc achtung-rahmen abstand-standard einzug-standard"><TBODY><TR><TD class=achtung-inhalt>Caution
<TABLE class="cc einzug-standard abstand-liste-erster achtung-rumpf"><TBODY><TR><TD>Hold a cloth under the relevant part of the sunroof to protect the interior from dirt.</TD></TR></TBODY></TABLE>
BUY LUBRICANTS - http://www.idparts.com/catalog/index.php?cPath=37
http://www.jimellisvwparts.com/products/Volkswagen-VW/Jetta/Servicing-materials-lock-cylinder-lubricant-spray-LOCK-ZYLINDER-SPRAY-LOCK-LUBRICANT-LOCK-SPRAY-MATERILAL/5346465/G052778A2.html
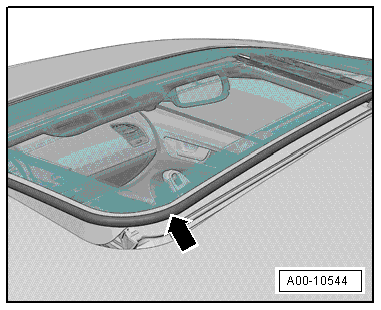
</TD></TR></TBODY></TABLE><TABLE class="cc einzug-standard abstand-standard absatz-hervor"><TBODY><TR><TD>Cleaning and lubricating glass panel seal</TD></TR></TBODY></TABLE><TABLE class="cc einzug-standard abstand-standard "><TBODY><TR><TD class=einzug-liste>� </TD><TD>Tilt open glass sunroof.</TD></TR></TBODY></TABLE>Note
<TABLE class="cc abstand-liste-erster einzug-standard hinweis-rumpf"><TBODY><TR><TD>With glass sunroof open, first lubricate seal at front, then tilt sunroof at rear.</TD></TR></TBODY></TABLE>
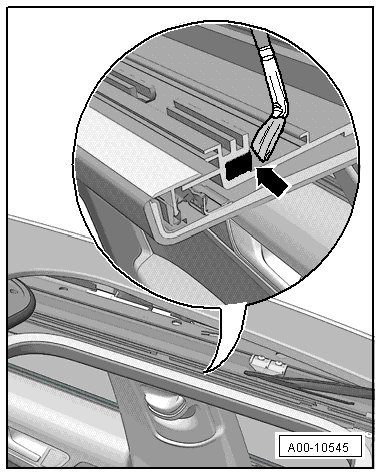
</TD><TD class=spalte-pfeil></TD><TD class=spalte-marg></TD></TR></TBODY></TABLE><TABLE cellSpacing=0 cellPadding=0 width="100%"><TBODY><TR><TD class=spalte-text><TABLE class="cc einzug-standard abstand-standard "><TBODY><TR><TD class=einzug-liste>� </TD><TD>Remove grease and dirt from glass panel seal -arrow- using isopropanol and a lint-free cloth.</TD></TR></TBODY></TABLE><TABLE class="cc einzug-standard abstand-standard "><TBODY><TR><TD class=einzug-liste>� </TD><TD>Using a paintbrush (commercially available), apply a small amount of Krytox paste G 052 141 A2 as far as possible on glass panel seal -arrow-.</TD></TR></TBODY></TABLE><TABLE class="cc abstand-standard einzug-standard "><TBODY><TR><TD class=einzug-liste>l </TD><TD>Make sure that no white grease film remains visible after applying lubricant.</TD></TR></TBODY></TABLE><TABLE class="cc einzug-standard abstand-standard "><TBODY><TR><TD class=einzug-liste>� </TD><TD>Remove surplus Krytox paste from seal with a lint-free cloth.</TD></TR></TBODY></TABLE><TABLE class="cc einzug-standard abstand-standard absatz-hervor"><TBODY><TR><TD>Cleaning and lubricating guide rail</TD></TR></TBODY></TABLE><TABLE class="cc einzug-standard abstand-standard "><TBODY><TR><TD class=einzug-liste>� </TD><TD>Open glass sunroof completely.</TD></TR></TBODY></TABLE><TABLE class="cc einzug-standard abstand-standard "><TBODY><TR><TD class=einzug-liste>� </TD><TD>Remove grease and dirt from guide rail with a lint-free cloth. (If necessary, use a workshop vacuum cleaner to remove sand and fine dust from guide rail.)
</TD></TR></TBODY></TABLE>
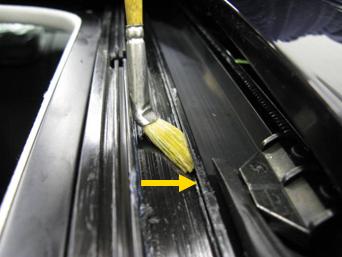
Apply lubricant G 060 751 A2 to inside of guide rail -arrow- using a paintbrush (commercially available).
</TD></TR></TBODY></TABLE>
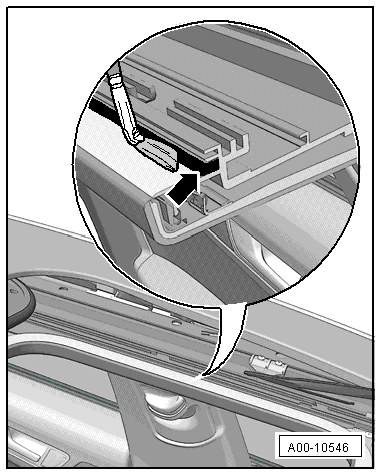
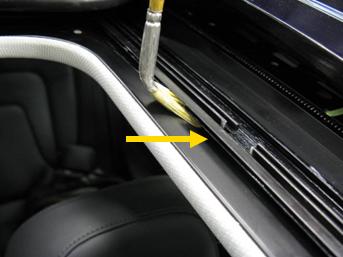
Apply lubricant G 060 751 A2 to outside of guide rail -arrow- using a paintbrush (commercially available).

<TABLE cellSpacing=0 cellPadding=0 width="100%"><TBODY><TR><TD class=spalte-text><TABLE class="cc einzug-standard abstand-standard "><TBODY><TR><TD class=einzug-liste>� </TD><TD>Apply lubricant G 060 751 A2 to side guide rail of sliding headliner -arrow- using a paintbrush (commercially available).</TD></TR></TBODY></TABLE><TABLE class="cc einzug-standard abstand-standard "><TBODY><TR><TD class=einzug-liste>� </TD><TD>Remove surplus lubricant on guide rails with a lint-free cloth.</TD></TR></TBODY></TABLE><TABLE class="cc einzug-standard abstand-standard "><TBODY><TR><TD class=einzug-liste>� </TD><TD>Repeat procedure on opposite side of vehicle.</TD></TR></TBODY></TABLE>
<TABLE width="100%"><TBODY><TR><TD>Technical product information
</TD><TD><NOBR>Transaction No.:</NOBR> 2022771/2
</TD></TR><TR><TD>Greasing sun roof - A6/A8 4F/4E
</TD><TD><NOBR>Release date:</NOBR> 27-Jan-2011
</TD></TR></TBODY></TABLE>
Customer statement / workshop findings
Technical background
Production change
Measure

All round seal.
Outer guide rail.
Guide rail for sun roof lining.
</TD></TR></TBODY></TABLE>
<TABLE cellSpacing=0 cellPadding=0 width="100%"><TBODY><TR><TD class=spalte-text><TABLE class="cc abstand-kap einzug-standard"><TBODY><TR><TD class=titel-kap>Door arresters, door hinges, bonnet arrester, lock cylinders: lubricating</TD></TR></TBODY></TABLE><TABLE class="cc einzug-standard abstand-standard "><TBODY><TR><TD class=einzug-liste>� </TD><TD>Carry out the following steps one after the other.</TD></TR></TBODY></TABLE>Note
<TABLE class="cc abstand-liste-erster einzug-standard hinweis-rumpf"><TBODY><TR><TD class=einzug-liste>t </TD><TD>The vehicle must be at least at room temperature.</TD></TR></TBODY></TABLE><TABLE class="cc abstand-liste einzug-standard hinweis-rumpf"><TBODY><TR><TD class=einzug-liste>t </TD><TD>Operate moving parts several times so that the universal oil or spray-on grease is able to penetrate.</TD></TR></TBODY></TABLE><TABLE class="cc abstand-liste einzug-standard hinweis-rumpf"><TBODY><TR><TD class=einzug-liste>t </TD><TD>Remove surplus lubricant with a lint-free cloth.</TD></TR></TBODY></TABLE>
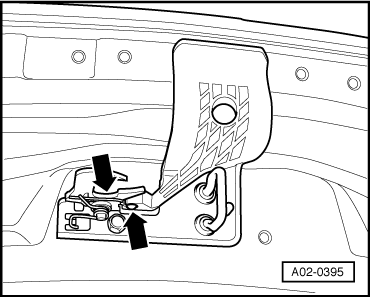
</TD><TD class=spalte-pfeil></TD><TD class=spalte-marg></TD></TR></TBODY></TABLE><TABLE cellSpacing=0 cellPadding=0 width="100%"><TBODY><TR><TD class=spalte-text><TABLE class="cc bild-titel einzug-standard abstand-standard"><TBODY><TR><TD>Door arrester</TD></TR></TBODY></TABLE><TABLE class="cc einzug-standard abstand-standard "><TBODY><TR><TD class=einzug-liste>� </TD><TD>Pull off protective cap -1- in direction of arrow.</TD></TR></TBODY></TABLE><TABLE class="cc einzug-standard abstand-standard "><TBODY><TR><TD class=einzug-liste>� </TD><TD>Lubricate door arrester at points marked with -arrows-.</TD></TR></TBODY></TABLE><TABLE class="cc abstand-standard einzug-standard "><TBODY><TR><TD class=einzug-liste>l </TD><TD>Use universal spray oil G 000 115 A2.</TD></TR></TBODY></TABLE></TD></TR></TBODY></TABLE>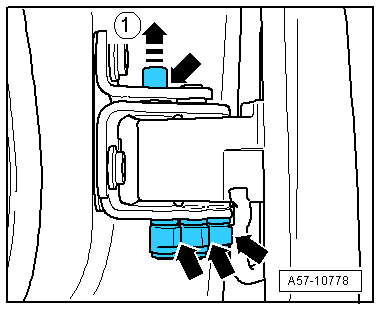
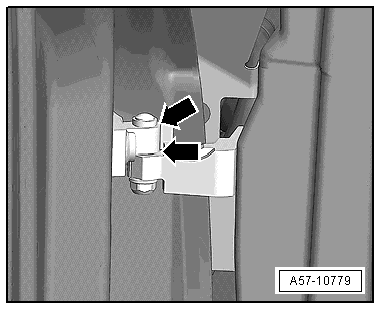
<TABLE class="cc bild-titel einzug-standard abstand-standard"><TBODY><TR><TD>Door hinge</TD></TR></TBODY></TABLE><TABLE class="cc einzug-standard abstand-standard "><TBODY><TR><TD class=einzug-liste>� </TD><TD>Lubricate door hinge at points marked with -arrows-.</TD></TR></TBODY></TABLE><TABLE class="cc abstand-standard einzug-standard "><TBODY><TR><TD class=einzug-liste>l </TD><TD>Use universal spray oil G 000 115 A2.</TD></TR></TBODY></TABLE>
<TABLE cellSpacing=0 cellPadding=0 width="100%"><TBODY><TR><TD class=spalte-text><TABLE class="cc bild-titel einzug-standard abstand-standard"><TBODY><TR><TD>Bonnet arrester</TD></TR></TBODY></TABLE><TABLE class="cc einzug-standard abstand-standard "><TBODY><TR><TD class=einzug-liste>� </TD><TD>Lubricate bonnet arrester at points marked with -arrows-.</TD></TR></TBODY></TABLE><TABLE class="cc abstand-standard einzug-standard "><TBODY><TR><TD class=einzug-liste>l </TD><TD>Use universal spray oil G 000 115 A2.</TD></TR></TBODY></TABLE><TABLE class="cc einzug-standard abstand-standard absatz-hervor"><TBODY><TR><TD>Lock cylinder</TD></TR></TBODY></TABLE><TABLE class="cc einzug-standard abstand-standard "><TBODY><TR><TD class=einzug-liste>� </TD><TD>Lubricate lock cylinder.</TD></TR></TBODY></TABLE><TABLE class="cc abstand-standard einzug-standard "><TBODY><TR><TD class=einzug-liste>l </TD><TD>Use spray-on grease G 052 778 A2.</TD></TR></TBODY></TABLE>
</TD></TR></TBODY></TABLE>
<TABLE class="cc einzug-standard abstand-standard absatz-hervor"><TBODY><TR><TD>Avant</TD></TR></TBODY></TABLE><TABLE class="cc abstand-standard erlaeutrg-explo"><TBODY><TR><TD class=einzug-nummer>1 - </TD><TD>Water drain hose (front)</TD></TR></TBODY></TABLE><TABLE class="cc einzug-explo abstand-explo "><TBODY><TR><TD class=einzug-liste>q </TD><TD>Water drain hoses (front) are located in A-pillars and end behind door at bottom of A-pillar.</TD></TR></TBODY></TABLE><TABLE class="cc einzug-explo abstand-explo "><TBODY><TR><TD class=einzug-liste>q </TD><TD>Cleaning is performed from sunroof frame.</TD></TR></TBODY></TABLE><TABLE class="cc abstand-standard erlaeutrg-explo"><TBODY><TR><TD class=einzug-nummer>2 - </TD><TD>Sunroof frame</TD></TR></TBODY></TABLE><TABLE class="cc abstand-standard erlaeutrg-explo"><TBODY><TR><TD class=einzug-nummer>3 - </TD><TD>Water drain hose (rear)</TD></TR></TBODY></TABLE><TABLE class="cc einzug-explo abstand-explo "><TBODY><TR><TD class=einzug-liste>q </TD><TD>Water drain hoses (rear) are located in C-pillars and end in wheel housing above wheel housing liner.</TD></TR></TBODY></TABLE><TABLE class="cc einzug-explo abstand-explo "><TBODY><TR><TD class=einzug-liste>q </TD><TD>Clean from lower end of hose.</TD></TR></TBODY></TABLE><TABLE class="cc abstand-standard erlaeutrg-explo"><TBODY><TR><TD class=einzug-nummer>4 - </TD><TD>Grommet </TD></TR></TBODY></TABLE>
Cleaning water drain hoses
</TD></TR></TBODY></TABLE>Note
<TABLE class="cc abstand-liste-erster einzug-standard hinweis-rumpf"><TBODY><TR><TD>To clean the water drain hoses we recommend that you use an improvised tool (approx. 2300 mm long), made of the speedometer drive cable core.</TD></TR></TBODY></TABLE>
</TD><TD class=spalte-pfeil></TD><TD class=spalte-marg></TD></TR></TBODY></TABLE><TABLE cellSpacing=0 cellPadding=0 width="100%"><TBODY><TR><TD class=spalte-text><TABLE class="cc einzug-standard abstand-standard absatz-hervor"><TBODY><TR><TD>Water drain hose (front)</TD></TR></TBODY></TABLE><TABLE class="cc einzug-standard abstand-standard "><TBODY><TR><TD class=einzug-liste>� </TD><TD>Water drain hoses (front) -1- are located in A-pillars and end behind door at bottom of A-pillar in grommet -3-.</TD></TR></TBODY></TABLE><TABLE class="cc einzug-standard abstand-standard "><TBODY><TR><TD class=einzug-liste>� </TD><TD>They can be cleaned from the sunroof opening.</TD></TR></TBODY></TABLE>
</TD></TR></TBODY></TABLE><TABLE class="cc einzug-standard abstand-standard absatz-hervor"><TBODY><TR><TD>Water drain hose (rear)</TD></TR></TBODY></TABLE><TABLE class="cc einzug-standard abstand-standard "><TBODY><TR><TD class=einzug-liste>� </TD><TD>Water drain hoses (rear) -2- are located in C-pillars and end in wheel housing above wheel housing liner -3-.</TD></TR></TBODY></TABLE><TABLE class="cc einzug-standard abstand-standard "><TBODY><TR><TD class=einzug-liste>� </TD><TD>Clean from lower end of hose.</TD></TR></TBODY></TABLE><TABLE class="cc einzug-standard abstand-standard "><TBODY><TR><TD class=einzug-liste>� </TD><TD>For this purpose, remove rear wheel housing liner</TD></TR></TBODY></TABLE>
<TABLE cellSpacing=0 cellPadding=0 width="100%"><TBODY><TR><TD class=spalte-text><TABLE class="cc abstand-kap einzug-standard"><TBODY><TR><TD class=titel-kap>Sliding/tilting sunroof: cleaning and lubricating</TD></TR></TBODY></TABLE><TABLE class="cc abstand-standard einzug-standard"><TBODY><TR><TD class=wz-liste-kopf>Special tools and workshop equipment required</TD></TR></TBODY></TABLE><TABLE class="cc abstand-standard einzug-standard "><TBODY><TR><TD class=einzug-liste>t </TD><TD>Lint-free cloth</TD></TR></TBODY></TABLE><TABLE class="cc abstand-liste einzug-standard "><TBODY><TR><TD class=einzug-liste>t </TD><TD>Brush</TD></TR></TBODY></TABLE><TABLE class="cc abstand-liste einzug-standard "><TBODY><TR><TD class=einzug-liste>t </TD><TD>Workshop vacuum cleaner, e.g. wet/dry vacuum cleaner</TD></TR></TBODY></TABLE><TABLE class="cc abstand-liste einzug-standard "><TBODY><TR><TD class=einzug-liste>t </TD><TD>Lubricant G 060 751 A2 for guide rails</TD></TR></TBODY></TABLE><TABLE class="cc abstand-liste einzug-standard "><TBODY><TR><TD class=einzug-liste>t </TD><TD>Krytox paste G 052 141 A2 for seals</TD></TR></TBODY></TABLE><TABLE class="cc abstand-liste einzug-standard "><TBODY><TR><TD class=einzug-liste>t </TD><TD>Isopropanol for cleaning seals</TD></TR></TBODY></TABLE>Note
<TABLE class="cc abstand-liste-erster einzug-standard hinweis-rumpf"><TBODY><TR><TD>Bend brush (commercially available, approx. 15 mm wide) by approx. 40� using workshop equipment.</TD></TR></TBODY></TABLE><TABLE class="cc achtung-rahmen abstand-standard einzug-standard"><TBODY><TR><TD class=achtung-inhalt>Caution
<TABLE class="cc einzug-standard abstand-liste-erster achtung-rumpf"><TBODY><TR><TD>Hold a cloth under the relevant part of the sunroof to protect the interior from dirt.</TD></TR></TBODY></TABLE>
BUY LUBRICANTS - http://www.idparts.com/catalog/index.php?cPath=37
http://www.jimellisvwparts.com/products/Volkswagen-VW/Jetta/Servicing-materials-lock-cylinder-lubricant-spray-LOCK-ZYLINDER-SPRAY-LOCK-LUBRICANT-LOCK-SPRAY-MATERILAL/5346465/G052778A2.html
</TD></TR></TBODY></TABLE><TABLE class="cc einzug-standard abstand-standard absatz-hervor"><TBODY><TR><TD>Cleaning and lubricating glass panel seal</TD></TR></TBODY></TABLE><TABLE class="cc einzug-standard abstand-standard "><TBODY><TR><TD class=einzug-liste>� </TD><TD>Tilt open glass sunroof.</TD></TR></TBODY></TABLE>Note
<TABLE class="cc abstand-liste-erster einzug-standard hinweis-rumpf"><TBODY><TR><TD>With glass sunroof open, first lubricate seal at front, then tilt sunroof at rear.</TD></TR></TBODY></TABLE>
</TD><TD class=spalte-pfeil></TD><TD class=spalte-marg></TD></TR></TBODY></TABLE><TABLE cellSpacing=0 cellPadding=0 width="100%"><TBODY><TR><TD class=spalte-text><TABLE class="cc einzug-standard abstand-standard "><TBODY><TR><TD class=einzug-liste>� </TD><TD>Remove grease and dirt from glass panel seal -arrow- using isopropanol and a lint-free cloth.</TD></TR></TBODY></TABLE><TABLE class="cc einzug-standard abstand-standard "><TBODY><TR><TD class=einzug-liste>� </TD><TD>Using a paintbrush (commercially available), apply a small amount of Krytox paste G 052 141 A2 as far as possible on glass panel seal -arrow-.</TD></TR></TBODY></TABLE><TABLE class="cc abstand-standard einzug-standard "><TBODY><TR><TD class=einzug-liste>l </TD><TD>Make sure that no white grease film remains visible after applying lubricant.</TD></TR></TBODY></TABLE><TABLE class="cc einzug-standard abstand-standard "><TBODY><TR><TD class=einzug-liste>� </TD><TD>Remove surplus Krytox paste from seal with a lint-free cloth.</TD></TR></TBODY></TABLE><TABLE class="cc einzug-standard abstand-standard absatz-hervor"><TBODY><TR><TD>Cleaning and lubricating guide rail</TD></TR></TBODY></TABLE><TABLE class="cc einzug-standard abstand-standard "><TBODY><TR><TD class=einzug-liste>� </TD><TD>Open glass sunroof completely.</TD></TR></TBODY></TABLE><TABLE class="cc einzug-standard abstand-standard "><TBODY><TR><TD class=einzug-liste>� </TD><TD>Remove grease and dirt from guide rail with a lint-free cloth. (If necessary, use a workshop vacuum cleaner to remove sand and fine dust from guide rail.)
</TD></TR></TBODY></TABLE>
Apply lubricant G 060 751 A2 to inside of guide rail -arrow- using a paintbrush (commercially available).
</TD></TR></TBODY></TABLE>
Apply lubricant G 060 751 A2 to outside of guide rail -arrow- using a paintbrush (commercially available).
<TABLE cellSpacing=0 cellPadding=0 width="100%"><TBODY><TR><TD class=spalte-text><TABLE class="cc einzug-standard abstand-standard "><TBODY><TR><TD class=einzug-liste>� </TD><TD>Apply lubricant G 060 751 A2 to side guide rail of sliding headliner -arrow- using a paintbrush (commercially available).</TD></TR></TBODY></TABLE><TABLE class="cc einzug-standard abstand-standard "><TBODY><TR><TD class=einzug-liste>� </TD><TD>Remove surplus lubricant on guide rails with a lint-free cloth.</TD></TR></TBODY></TABLE><TABLE class="cc einzug-standard abstand-standard "><TBODY><TR><TD class=einzug-liste>� </TD><TD>Repeat procedure on opposite side of vehicle.</TD></TR></TBODY></TABLE>
<TABLE width="100%"><TBODY><TR><TD>Technical product information
</TD><TD><NOBR>Transaction No.:</NOBR> 2022771/2
</TD></TR><TR><TD>Greasing sun roof - A6/A8 4F/4E
</TD><TD><NOBR>Release date:</NOBR> 27-Jan-2011
</TD></TR></TBODY></TABLE>
Customer statement / workshop findings
Noises from sun roof. Sun roof stiff.
Technical background
The lubrication of seals and guide rails on the sun roof gets dirty or is reduced over time by water exposure. They must therefore be greased.
Production change
Slightly higher amount of grease used Gradual introduction from 12/09.
Measure
Two types of grease are needed. For the sun roof seals Krytox paste G 060 172 A3 and for the mechanism the sun roof grease G 060 751 A2 must be used.
Before the greasing thoroughly clean the seals and the guide rails with a dry cloth.
No parts have to be removed. Only the sun roof cover must be completely opened.
Before the greasing thoroughly clean the seals and the guide rails with a dry cloth.
No parts have to be removed. Only the sun roof cover must be completely opened.
Grease the seals with G 060 172 A3.
All round seal.
Grease the mechanism and guide rails with G 060 751 A2.
Inner guide rail.
Outer guide rail.
Guide rail for sun roof lining.
At the end, open and close the sun roof 2 to 3 times completely, so that the grease can be distributed.
From 01/10 greasing the sun roof becomes part of the service interval again.
Warranty accounting instructionsFrom 01/10 greasing the sun roof becomes part of the service interval again.
Service number/damage code/manufacturer: 6028/017.
Accounting with APOS:
<TABLE border=1 rules=none cellSpacing=0 cellPadding=0 width=566 frame=box layout="column"><COLGROUP><COL width="25%"><COL width="51%"><COL width="23%"></COLGROUP><TBODY><TR><TD vAlign=bottom>Repair operation:
</TD><TD vAlign=bottom>Designation:
</TD><TD vAlign=bottom>Time units:
</TD></TR><TR><TD vAlign=top>60284999
</TD><TD vAlign=top>Modify frame
</TD><TD vAlign=top>20 TU
</TD></TR><TR><TD vAlign=top colSpan=3>The labour times are correct at the time of publication.
</TD></TR></TBODY></TABLE>
</TD><TD vAlign=bottom>Designation:
</TD><TD vAlign=bottom>Time units:
</TD></TR><TR><TD vAlign=top>60284999
</TD><TD vAlign=top>Modify frame
</TD><TD vAlign=top>20 TU
</TD></TR><TR><TD vAlign=top colSpan=3>The labour times are correct at the time of publication.
</TD></TR></TBODY></TABLE>
Accounting with APOS/2:
A6 Saloon:
A6 Saloon:
<TABLE border=1 rules=cols cellSpacing=0 cellPadding=0 width=667 frame=box layout="column"><COLGROUP><COL width="11%"><COL width="10%"><COL width="17%"><COL width="31%"><COL width="12%"><COL width="16%"></COLGROUP><TBODY><TR><TD vAlign=bottom>Illustration:
</TD><TD vAlign=bottom>Position:
</TD><TD vAlign=bottom>Number:
</TD><TD vAlign=bottom>Designation:
</TD><TD vAlign=bottom>Activity:
</TD><TD vAlign=bottom>Time units:
</TD></TR><TR><TD vAlign=top>877-01
</TD><TD vAlign=top>9
</TD><TD vAlign=top>877049
</TD><TD vAlign=top>Sun roof frame
</TD><TD vAlign=top>50
</TD><TD vAlign=top>20 TU
</TD></TR><TR><TD vAlign=top colSpan=6>The labour times are correct at the time of publication.
</TD></TR></TBODY></TABLE>
A6 Avant:
<TABLE border=1 rules=cols cellSpacing=0 cellPadding=0 width=667 frame=box layout="column"><COLGROUP><COL width="11%"><COL width="10%"><COL width="17%"><COL width="31%"><COL width="12%"><COL width="16%"></COLGROUP><TBODY><TR><TD vAlign=bottom>Illustration:
</TD><TD vAlign=bottom>Position:
</TD><TD vAlign=bottom>Number:
</TD><TD vAlign=bottom>Designation:
</TD><TD vAlign=bottom>Activity:
</TD><TD vAlign=bottom>Time units:
</TD></TR><TR><TD vAlign=top>877-02
</TD><TD vAlign=top>9
</TD><TD vAlign=top>877049
</TD><TD vAlign=top>Sun roof frame
</TD><TD vAlign=top>50
</TD><TD vAlign=top>20 TU
</TD></TR><TR><TD vAlign=top colSpan=6>The labour times are correct at the time of publication.
</TD></TR></TBODY></TABLE>
</TD></TR></TBODY></TABLE>
<TABLE cellSpacing=0 cellPadding=0 width="100%"><TBODY><TR><TD class=spalte-text><TABLE class="cc abstand-kap einzug-standard"><TBODY><TR><TD class=titel-kap>Door arresters, door hinges, bonnet arrester, lock cylinders: lubricating</TD></TR></TBODY></TABLE><TABLE class="cc einzug-standard abstand-standard "><TBODY><TR><TD class=einzug-liste>� </TD><TD>Carry out the following steps one after the other.</TD></TR></TBODY></TABLE>Note
<TABLE class="cc abstand-liste-erster einzug-standard hinweis-rumpf"><TBODY><TR><TD class=einzug-liste>t </TD><TD>The vehicle must be at least at room temperature.</TD></TR></TBODY></TABLE><TABLE class="cc abstand-liste einzug-standard hinweis-rumpf"><TBODY><TR><TD class=einzug-liste>t </TD><TD>Operate moving parts several times so that the universal oil or spray-on grease is able to penetrate.</TD></TR></TBODY></TABLE><TABLE class="cc abstand-liste einzug-standard hinweis-rumpf"><TBODY><TR><TD class=einzug-liste>t </TD><TD>Remove surplus lubricant with a lint-free cloth.</TD></TR></TBODY></TABLE>
</TD><TD class=spalte-pfeil></TD><TD class=spalte-marg></TD></TR></TBODY></TABLE><TABLE cellSpacing=0 cellPadding=0 width="100%"><TBODY><TR><TD class=spalte-text><TABLE class="cc bild-titel einzug-standard abstand-standard"><TBODY><TR><TD>Door arrester</TD></TR></TBODY></TABLE><TABLE class="cc einzug-standard abstand-standard "><TBODY><TR><TD class=einzug-liste>� </TD><TD>Pull off protective cap -1- in direction of arrow.</TD></TR></TBODY></TABLE><TABLE class="cc einzug-standard abstand-standard "><TBODY><TR><TD class=einzug-liste>� </TD><TD>Lubricate door arrester at points marked with -arrows-.</TD></TR></TBODY></TABLE><TABLE class="cc abstand-standard einzug-standard "><TBODY><TR><TD class=einzug-liste>l </TD><TD>Use universal spray oil G 000 115 A2.</TD></TR></TBODY></TABLE></TD></TR></TBODY></TABLE>
<TABLE class="cc bild-titel einzug-standard abstand-standard"><TBODY><TR><TD>Door hinge</TD></TR></TBODY></TABLE><TABLE class="cc einzug-standard abstand-standard "><TBODY><TR><TD class=einzug-liste>� </TD><TD>Lubricate door hinge at points marked with -arrows-.</TD></TR></TBODY></TABLE><TABLE class="cc abstand-standard einzug-standard "><TBODY><TR><TD class=einzug-liste>l </TD><TD>Use universal spray oil G 000 115 A2.</TD></TR></TBODY></TABLE>
<TABLE cellSpacing=0 cellPadding=0 width="100%"><TBODY><TR><TD class=spalte-text><TABLE class="cc bild-titel einzug-standard abstand-standard"><TBODY><TR><TD>Bonnet arrester</TD></TR></TBODY></TABLE><TABLE class="cc einzug-standard abstand-standard "><TBODY><TR><TD class=einzug-liste>� </TD><TD>Lubricate bonnet arrester at points marked with -arrows-.</TD></TR></TBODY></TABLE><TABLE class="cc abstand-standard einzug-standard "><TBODY><TR><TD class=einzug-liste>l </TD><TD>Use universal spray oil G 000 115 A2.</TD></TR></TBODY></TABLE><TABLE class="cc einzug-standard abstand-standard absatz-hervor"><TBODY><TR><TD>Lock cylinder</TD></TR></TBODY></TABLE><TABLE class="cc einzug-standard abstand-standard "><TBODY><TR><TD class=einzug-liste>� </TD><TD>Lubricate lock cylinder.</TD></TR></TBODY></TABLE><TABLE class="cc abstand-standard einzug-standard "><TBODY><TR><TD class=einzug-liste>l </TD><TD>Use spray-on grease G 052 778 A2.</TD></TR></TBODY></TABLE>
</TD></TR></TBODY></TABLE>
Last edited by royclark; 03-12-2013 at 06:44 AM.
The following users liked this post:
willyboy371 (05-18-2023)
04-05-2012, 10:17 AM
#6
AudiWorld Senior Member
04-05-2012, 10:40 AM
#7
AudiWorld Senior Member
No mention of windshield wiper guides
These are the listings under service items for windshield wipers
Wiper blades: checking park position and checking for damage
Wiper blades: renewing
Windscreen wiper/washer system: checking jet settings, adjusting jets if necessary
Windscreen and headlight washer system: topping up with washer fluid
Trending Topics
04-08-2012, 05:33 AM
#8
AudiWorld Senior Member
Thread Starter
04-08-2012, 06:37 AM
#9
Audiworld Junior Member

Join Date: Sep 2009
Location: Leipzig,de
Posts: 36
Likes: 0
Received 0 Likes
on
0 Posts
I found out bad expensive things happen when you don't lubricate using proper lubricants and doing it when the manual suggests, just makes everything better. 
Audi lubes seem best but there's equally non-audi products avail. thx for the post Royclark!
Audi lubes seem best but there's equally non-audi products avail. thx for the post Royclark!
07-25-2012, 06:41 PM
#10
AudiWorld Senior Member
Join Date: Jun 2009
Location: Atlantic City Metro Area
Posts: 792
Likes: 0
Received 2 Likes
on
2 Posts
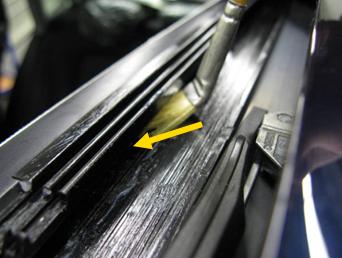
i had my headliner off the other day when i was trying to swap my shark fin antenna.
i spotted these tubes and i knew about the service intervals to keep these clean so i figured i would take some pics for myself
figured ide share them
pics are from rear looking fwd to front
green is driver side and blue is pass side
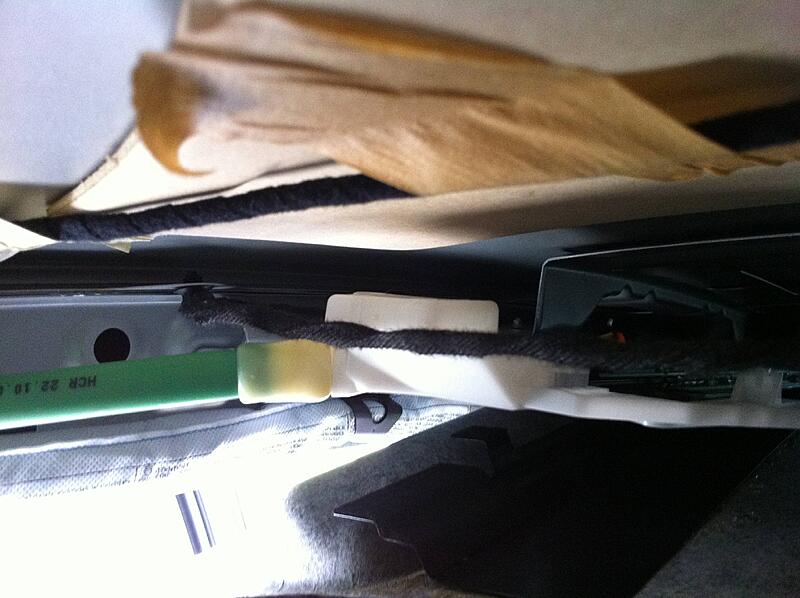
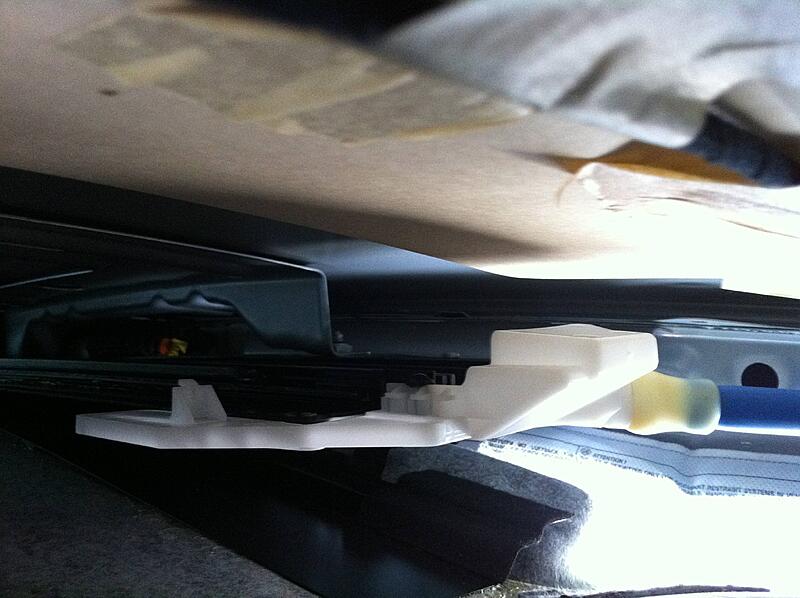
i spotted these tubes and i knew about the service intervals to keep these clean so i figured i would take some pics for myself
figured ide share them
pics are from rear looking fwd to front
green is driver side and blue is pass side

