
 09-06-2016, 11:55 AM
Last edit by: IB Advertising
See related guides and technical advice from our community experts:
- Audi How to Replace Rear Parking Buzzer<br>Step by step instructions for do-it-yourself repairs.

No audible sound from park assist
03-19-2012, 06:45 PM
#1
AudiWorld Member
Thread Starter
Join Date: Mar 2012
Location: Dallas, TX
Posts: 93
Likes: 0
Received 0 Likes
on
0 Posts
Hello audiworld. I'm new to the world of Audi, and new to the forums. I purchased my first Audi two weeks ago. I purchased a 2005 A6q 3.2 with 41k! I'm loving the car! My question is with the park assist. I have the sounds turned all the way up, but I still don't get an audible sound when I get near anything in reverse. Am I doing something wrong, or is there maybe something wrong with the park assist system? I'm hoping someone in this great forum has experienced something similar that can point ime in the right direction. Unfortunately I do not have a Vag system. Maybe someone in the Dallas area can assist me with a Vag system. Thanks in advance for the info!
 03-19-2012, 07:39 PM
#2
AudiWorld Senior Member
Join Date: Jun 2009
Location: Atlantic City Metro Area
Posts: 792
Likes: 0
Received 2 Likes
on
2 Posts
I think i read that the park assist has its own separate small speaker located on the back deck ... i think i remember that they sometime fail
thats what i guess is the prob and the speaker should be easy fix/swap
i doubt its the parking module itself
but if it is... i have one for sale cheap
it is a real easy swap in
thats what i guess is the prob and the speaker should be easy fix/swap
i doubt its the parking module itself
but if it is... i have one for sale cheap
it is a real easy swap in
03-20-2012, 01:44 AM
#3
AudiWorld Member
Thread Starter
Join Date: Mar 2012
Location: Dallas, TX
Posts: 93
Likes: 0
Received 0 Likes
on
0 Posts
I didn't know it had its own separate speaker. I figured it used the stereo speakers. That's good to know. I'll look into it as soon as all this heavy rain lets up in Dallas. Ill keep you in mind if it turns out to be the module. Thanks for the info! If anyone has any more info as to exactly where the speaker is and how to swap it out, that would be great also. Thanks again guys!
03-20-2012, 02:17 AM
#4
AudiWorld Super User
The speaker is called a horn in Audi lingo. I had mine replaced a few years back. If you search the forum you will find a couple of posts by people who did the replacement themselves.
03-25-2012, 09:16 PM
#5
AudiWorld Senior Member
I didn't know it had its own separate speaker. I figured it used the stereo speakers. That's good to know. I'll look into it as soon as all this heavy rain lets up in Dallas. Ill keep you in mind if it turns out to be the module. Thanks for the info! If anyone has any more info as to exactly where the speaker is and how to swap it out, that would be great also. Thanks again guys!
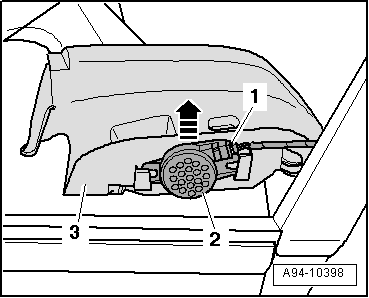
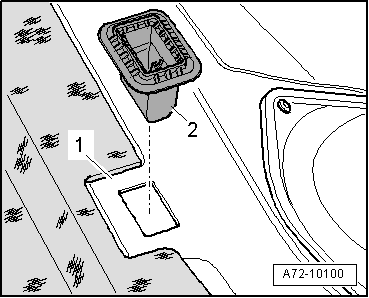
<TABLE cellSpacing=0 cellPadding=0 width="100%"><TBODY><TR><TD class=spalte-text><TABLE class="cc abstand-kap einzug-standard"><TBODY><TR><TD class=titel-kap>Removing and installing rear parking aid warning buzzer -H15- on belt guide (right-side) - Avant from model year 2006 onwards</TD></TR></TBODY></TABLE></TD><TD class=spalte-pfeil> </TD><TD class=spalte-marg> </TD></TR></TBODY></TABLE><TABLE cellSpacing=0 cellPadding=0 width="100%"><TBODY><TR><TD class=spalte-text><TABLE class="cc einzug-standard abstand-standard absatz-hervor"><TBODY><TR><TD>Removing</TD></TR></TBODY></TABLE><TABLE class="cc einzug-standard abstand-standard "><TBODY><TR><TD class=einzug-liste>� </TD><TD>Switch off ignition and take out ignition key.</TD></TR></TBODY></TABLE><TABLE class="cc einzug-standard abstand-standard "><TBODY><TR><TD class=einzug-liste>� </TD><TD>Remove luggage compartment side trim. </TD></TR></TBODY></TABLE><TABLE class="cc einzug-standard abstand-standard "><TBODY><TR><TD class=einzug-liste>� </TD><TD>Take out insulation in area of rear parking aid warning buzzer -H15- (if fitted).</TD></TR></TBODY></TABLE><TABLE class="cc einzug-standard abstand-standard "><TBODY><TR><TD class=einzug-liste>� </TD><TD>Pull out rear parking aid warning buzzer -H15--item 2- at belt guide (right-side) -3- in direction of -arrow-.</TD></TR></TBODY></TABLE><TABLE class="cc einzug-standard abstand-standard "><TBODY><TR><TD class=einzug-liste>� </TD><TD>Unplug electrical connector -1-.</TD></TR></TBODY></TABLE><TABLE class="cc einzug-standard abstand-standard absatz-hervor"><TBODY><TR><TD>Installing</TD></TR></TBODY></TABLE><TABLE class="cc einzug-standard abstand-standard "><TBODY><TR><TD>Installation is carried out in the reverse order; note the following:</TD></TR></TBODY></TABLE><TABLE class="cc einzug-standard abstand-standard "><TBODY><TR><TD class=einzug-liste>� </TD><TD>Install luggage compartment side trim.
</TD></TR></TBODY></TABLE></TD></TR></TBODY></TABLE>
03-27-2012, 05:50 PM
#6
AudiWorld Member
Thread Starter
Join Date: Mar 2012
Location: Dallas, TX
Posts: 93
Likes: 0
Received 0 Likes
on
0 Posts
I will be attempting the install on thursday. Does anyone have any advise on removing the headboard, d-pillar (both pieces), seat bolster, and c-pillar? Any tips/tricks or advice would be very much appreciated. If anyone knows of a how-to out there that would be awsome as well. Wish me luck!
03-27-2012, 07:23 PM
#7
AudiWorld Senior Member
Join Date: Jun 2009
Location: Atlantic City Metro Area
Posts: 792
Likes: 0
Received 2 Likes
on
2 Posts
do u have any experience?
i cant say 100%... it should not be too difficult...
i removed part of those items that u want to remove and i had no experience and i had no issues...i just took my time... interior removal tool are helpful
not sure where the buzzer is but ill start u off
take the rear headrests off may be unnecessary but helps to have mobility
Start by taking the access panel off/back panel (covers part of the rear center mount brake light)
It's held with clips pic a side and pull down gently.
u will need a torx #15 driver for screws from the pillars then pop those off
thats as far as i can take u...never did the back liner
Trending Topics
03-27-2012, 08:42 PM
#8
AudiWorld Senior Member
I will be attempting the install on thursday. Does anyone have any advise on removing the headboard, d-pillar (both pieces), seat bolster, and c-pillar? Any tips/tricks or advice would be very much appreciated. If anyone knows of a how-to out there that would be awsome as well. Wish me luck!
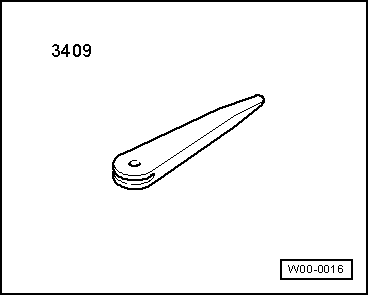
<TABLE cellSpacing=0 cellPadding=0 width="100%"><TBODY><TR><TD class=spalte-text><TABLE class="cc abstand-kap einzug-standard"><TBODY><TR><TD class=titel-kap>Removing and installing D-pillar trim</TD></TR></TBODY></TABLE><TABLE class="cc abstand-standard einzug-standard"><TBODY><TR><TD class=wz-liste-kopf>Special tools and workshop equipment required</TD></TR></TBODY></TABLE></TD><TD class=spalte-pfeil></TD><TD class=spalte-marg></TD></TR></TBODY></TABLE><TABLE cellSpacing=0 cellPadding=0 width="100%"><TBODY><TR><TD class=spalte-text><TABLE class="cc abstand-standard einzug-standard "><TBODY><TR><TD class=einzug-liste>t </TD><TD>Removal wedge -3409-</TD></TR></TBODY></TABLE></TD></TR></TBODY></TABLE>
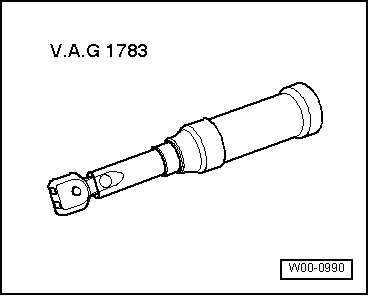
<TABLE cellSpacing=0 cellPadding=0 width="100%"><TBODY><TR><TD class=spalte-text><TABLE class="cc abstand-liste einzug-standard "><TBODY><TR><TD class=einzug-liste>t </TD><TD>Torque wrench -V.A.G 1783-</TD></TR></TBODY></TABLE><TABLE class="cc einzug-standard abstand-standard absatz-hervor"><TBODY><TR><TD>D-pillar trim</TD></TR></TBODY></TABLE>
 </TD></TR></TBODY></TABLE>
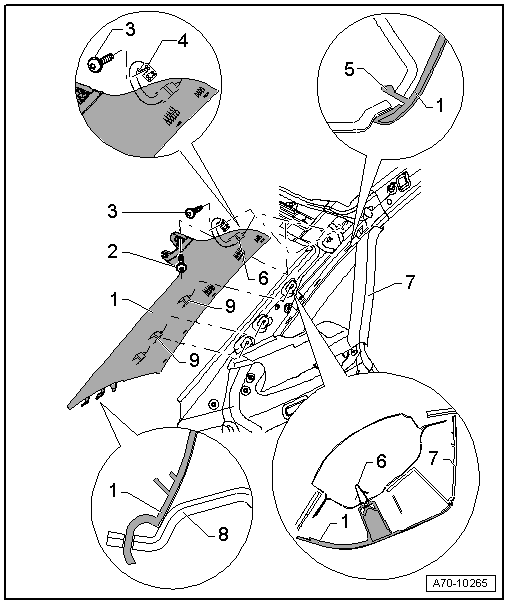
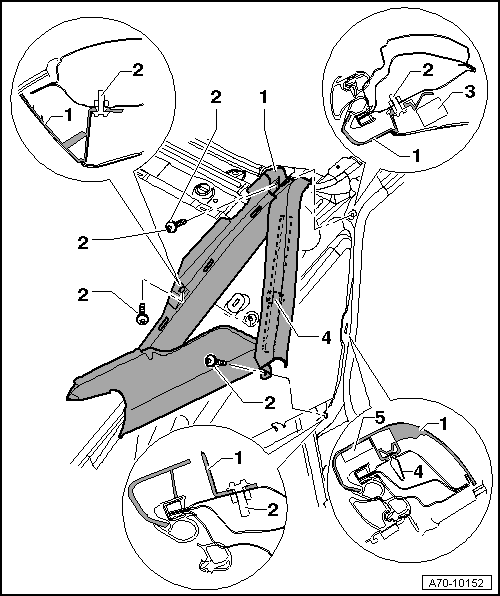
<TABLE class="cc abstand-standard erlaeutrg-explo"><TBODY><TR><TD class=einzug-nummer>1 - </TD><TD>D-pillar trim with bag tether (bolted on)</TD></TR></TBODY></TABLE><TABLE class="cc abstand-standard einzug-explo "><TBODY><TR><TD class=einzug-liste>t </TD><TD>Removing</TD></TR></TBODY></TABLE><TABLE class="cc einzug-explo abstand-explo "><TBODY><TR><TD class=einzug-liste>� </TD><TD>Remove roof end trim</TD></TR></TBODY></TABLE><TABLE class="cc einzug-explo abstand-explo "><TBODY><TR><TD class=einzug-liste>� </TD><TD>Remove bolt -2-.</TD></TR></TBODY></TABLE><TABLE class="cc einzug-explo abstand-explo "><TBODY><TR><TD class=einzug-liste>� </TD><TD>Using removal wedge -3409-, carefully prise out D-pillar trim -1- at clip -6-, clips -9- (2x) and fasteners -5-.</TD></TR></TBODY></TABLE><TABLE class="cc einzug-explo abstand-explo absatz-hervor"><TBODY><TR><TD>Ensure that retaining hooks -5- are not damaged.</TD></TR></TBODY></TABLE>
Note
<TABLE class="cc abstand-liste-erster einzug-explo hinweis-rumpf"><TBODY><TR><TD class=einzug-liste>t </TD><TD>Bag tether -4- is secured to body shell with bolt -3-.</TD></TR></TBODY></TABLE><TABLE class="cc abstand-liste einzug-explo hinweis-rumpf"><TBODY><TR><TD class=einzug-liste>t </TD><TD>Lower clip mounting on D-pillar trim -1- remains vacant.</TD></TR></TBODY></TABLE><TABLE class="cc einzug-explo abstand-explo "><TBODY><TR><TD class=einzug-liste>� </TD><TD>Remove bolt -3- from bag tether -4-.</TD></TR></TBODY></TABLE><TABLE class="cc einzug-explo abstand-explo "><TBODY><TR><TD class=einzug-liste>� </TD><TD>Pull D-pillar trim -1- upwards out of rear shelf -8-.</TD></TR></TBODY></TABLE><TABLE class="cc abstand-standard einzug-explo "><TBODY><TR><TD class=einzug-liste>t </TD><TD>Installing: Install in reverse order, paying attention to the following:</TD></TR></TBODY></TABLE><TABLE class="cc einzug-explo abstand-explo "><TBODY><TR><TD class=einzug-liste>� </TD><TD>Check that clip -6- is not damaged or deformed.</TD></TR></TBODY></TABLE><TABLE class="cc einzug-explo abstand-explo "><TBODY><TR><TD>Renew D-pillar trim if clip -6- is damaged or deformed.</TD></TR></TBODY></TABLE><TABLE class="cc einzug-explo abstand-explo "><TBODY><TR><TD class=einzug-liste>� </TD><TD>Check clips -9- for damage or deformation.</TD></TR></TBODY></TABLE><TABLE class="cc einzug-explo abstand-explo "><TBODY><TR><TD>Any damaged or deformed clips -9- must be renewed. </TD></TR></TBODY></TABLE><TABLE class="cc einzug-explo abstand-explo "><TBODY><TR><TD class=einzug-liste>� </TD><TD>Remove any residual locking compound from the threaded hole for bolt -2- and -3-. To do so, you can use a thread tap.</TD></TR></TBODY></TABLE><TABLE class="cc einzug-explo abstand-explo "><TBODY><TR><TD>If the tapped hole is not cleaned, there is a danger of the new bolt becoming seized on fitting, thus preventing operation of the bag tether.</TD></TR></TBODY></TABLE><TABLE class="cc einzug-explo abstand-explo "><TBODY><TR><TD class=einzug-liste>� </TD><TD>Bolt on bag tether -4- with a new bolt -3- and tighten it to specified torque → Item.</TD></TR></TBODY></TABLE><TABLE class="cc einzug-explo abstand-explo "><TBODY><TR><TD class=einzug-liste>� </TD><TD>Before fitting D-pillar trim -1-, observe correct positioning of clips -6- and -9-.</TD></TR></TBODY></TABLE><TABLE class="cc achtung-rahmen abstand-explo einzug-explo"><TBODY><TR><TD class=achtung-inhalt>WARNING
<TABLE class="cc einzug-standard abstand-liste-erster achtung-rumpf"><TBODY><TR><TD>Make sure you do not trap curtain airbag when installing D-pillar trim -1-.</TD></TR></TBODY></TABLE>
</TD></TR></TBODY></TABLE><TABLE class="cc einzug-explo abstand-explo "><TBODY><TR><TD class=einzug-liste>� </TD><TD>Fit new bolt -2- and tighten it to specified torque</TD></TR></TBODY></TABLE><TABLE class="cc einzug-explo abstand-explo absatz-hervor"><TBODY><TR><TD>Make sure D-pillar trim -1- is securely engaged.</TD></TR></TBODY></TABLE><TABLE class="cc einzug-explo abstand-explo "><TBODY><TR><TD class=einzug-liste>� </TD><TD>Install roof end trim</TD></TR></TBODY></TABLE><TABLE class="cc abstand-standard erlaeutrg-explo"><TBODY><TR><TD class=einzug-nummer>2 - </TD><TD>Bolt, self-locking</TD></TR></TBODY></TABLE><TABLE class="cc einzug-explo abstand-explo "><TBODY><TR><TD class=einzug-liste>q </TD><TD>Tightening torque: 3.5 Nm</TD></TR></TBODY></TABLE><TABLE class="cc einzug-explo abstand-explo "><TBODY><TR><TD class=einzug-liste>q </TD><TD>Always renew after removing</TD></TR></TBODY></TABLE><TABLE class="cc einzug-explo abstand-explo "><TBODY><TR><TD class=einzug-liste>q </TD><TD>Threaded hole for bolt must always be cleaned (e.g. with a thread tap).</TD></TR></TBODY></TABLE><TABLE class="cc abstand-standard erlaeutrg-explo"><TBODY><TR><TD class=einzug-nummer>3 - </TD><TD>Bolt, self-locking</TD></TR></TBODY></TABLE><TABLE class="cc einzug-explo abstand-explo "><TBODY><TR><TD class=einzug-liste>q </TD><TD>Tightening torque: 3.5 Nm</TD></TR></TBODY></TABLE><TABLE class="cc einzug-explo abstand-explo "><TBODY><TR><TD class=einzug-liste>q </TD><TD>Always renew after removing</TD></TR></TBODY></TABLE><TABLE class="cc einzug-explo abstand-explo "><TBODY><TR><TD class=einzug-liste>q </TD><TD>Threaded hole for bolt must always be cleaned (e.g. with a thread tap).</TD></TR></TBODY></TABLE><TABLE class="cc abstand-standard erlaeutrg-explo"><TBODY><TR><TD class=einzug-nummer>4 - </TD><TD>Bag tether</TD></TR></TBODY></TABLE><TABLE class="cc einzug-explo abstand-explo "><TBODY><TR><TD class=einzug-liste>q </TD><TD>→ Item</TD></TR></TBODY></TABLE><TABLE class="cc einzug-explo abstand-explo "><TBODY><TR><TD class=einzug-liste>q </TD><TD>Fixed component of D-pillar trim -1-</TD></TR></TBODY></TABLE><TABLE class="cc einzug-explo abstand-explo "><TBODY><TR><TD class=einzug-liste>q </TD><TD>Check for damage</TD></TR></TBODY></TABLE><TABLE class="cc einzug-explo abstand-explo "><TBODY><TR><TD class=einzug-liste>q </TD><TD>If bag tether is damaged, renew D-pillar trim -1-</TD></TR></TBODY></TABLE><TABLE class="cc einzug-explo abstand-explo "><TBODY><TR><TD class=einzug-liste>q </TD><TD>D-pillar trim must be renewed if curtain airbag has been activated, as bag tether could have been damaged.</TD></TR></TBODY></TABLE><TABLE class="cc abstand-standard erlaeutrg-explo"><TBODY><TR><TD class=einzug-nummer>5 - </TD><TD>Retaining hook</TD></TR></TBODY></TABLE><TABLE class="cc einzug-explo abstand-explo "><TBODY><TR><TD class=einzug-liste>q </TD><TD>→ Item</TD></TR></TBODY></TABLE><TABLE class="cc einzug-explo abstand-explo "><TBODY><TR><TD class=einzug-liste>q </TD><TD>Fixed component of D-pillar trim -1-</TD></TR></TBODY></TABLE><TABLE class="cc abstand-standard erlaeutrg-explo"><TBODY><TR><TD class=einzug-nummer>6 - </TD><TD>Clip</TD></TR></TBODY></TABLE><TABLE class="cc einzug-explo abstand-explo "><TBODY><TR><TD class=einzug-liste>q </TD><TD>If damaged or deformed, renew D-pillar trim</TD></TR></TBODY></TABLE><TABLE class="cc abstand-standard erlaeutrg-explo"><TBODY><TR><TD class=einzug-nummer>7 - </TD><TD>C-pillar trim</TD></TR></TBODY></TABLE><TABLE class="cc abstand-standard erlaeutrg-explo"><TBODY><TR><TD class=einzug-nummer>8 - </TD><TD>Rear shelf</TD></TR></TBODY></TABLE><TABLE class="cc abstand-standard erlaeutrg-explo"><TBODY><TR><TD class=einzug-nummer>9 - </TD><TD>Clip (2x)</TD></TR></TBODY></TABLE><TABLE class="cc einzug-explo abstand-explo "><TBODY><TR><TD class=einzug-liste>q </TD><TD>Renew clip if damaged or deformed</TD></TR></TBODY></TABLE>
<TABLE class="cc abstand-kap einzug-standard"><TBODY><TR><TD class=titel-kap>Removing and installing roof end trim</TD></TR></TBODY></TABLE><TABLE class="cc abstand-standard erlaeutrg-explo"><TBODY><TR><TD class=einzug-nummer>1 - </TD><TD>Roof end trim</TD></TR></TBODY></TABLE><TABLE class="cc abstand-standard einzug-explo "><TBODY><TR><TD class=einzug-liste>t </TD><TD>Removing</TD></TR></TBODY></TABLE><TABLE class="cc einzug-explo abstand-explo "><TBODY><TR><TD class=einzug-liste>� </TD><TD>Disengage roof end trim -1- at clips -4- (4x).</TD></TR></TBODY></TABLE><TABLE class="cc einzug-explo abstand-explo "><TBODY><TR><TD class=einzug-liste>� </TD><TD>To do so, detach roof end trim -1- downwards.</TD></TR></TBODY></TABLE><TABLE class="cc einzug-explo abstand-explo absatz-hervor"><TBODY><TR><TD>Make sure you do not damage retaining hooks -3- on roof end trim -1-.</TD></TR></TBODY></TABLE><TABLE class="cc einzug-explo abstand-explo "><TBODY><TR><TD class=einzug-liste>� </TD><TD>Detach roof end trim -1-.</TD></TR></TBODY></TABLE><TABLE class="cc abstand-standard einzug-explo "><TBODY><TR><TD class=einzug-liste>t </TD><TD>Installing</TD></TR></TBODY></TABLE><TABLE class="cc einzug-explo abstand-explo "><TBODY><TR><TD class=einzug-liste>� </TD><TD>Check that clips -4- (4x) are not damaged or deformed.</TD></TR></TBODY></TABLE><TABLE class="cc einzug-explo abstand-explo "><TBODY><TR><TD>If clips are damaged or deformed they must be renewed.</TD></TR></TBODY></TABLE><TABLE class="cc einzug-explo abstand-explo "><TBODY><TR><TD class=einzug-liste>� </TD><TD>Before fitting roof end trim -1- make sure that clips -4- are correctly positioned.</TD></TR></TBODY></TABLE><TABLE class="cc einzug-explo abstand-explo "><TBODY><TR><TD class=einzug-liste>� </TD><TD>Locate roof end trim -1- in position with pin -2-.</TD></TR></TBODY></TABLE><TABLE class="cc einzug-explo abstand-explo "><TBODY><TR><TD class=einzug-liste>� </TD><TD>Secure roof end trim -1- with clips -4- (4x) and retaining hooks -3-.</TD></TR></TBODY></TABLE><TABLE class="cc einzug-explo abstand-explo absatz-hervor"><TBODY><TR><TD>Make sure roof end trim -1- is securely engaged.</TD></TR></TBODY></TABLE><TABLE class="cc abstand-standard erlaeutrg-explo"><TBODY><TR><TD class=einzug-nummer>2 - </TD><TD>Pin</TD></TR></TBODY></TABLE><TABLE class="cc einzug-explo abstand-explo "><TBODY><TR><TD class=einzug-liste>q </TD><TD>→ Item</TD></TR></TBODY></TABLE><TABLE class="cc einzug-explo abstand-explo "><TBODY><TR><TD class=einzug-liste>q </TD><TD>Fixed component of roof end trim -1-</TD></TR></TBODY></TABLE><TABLE class="cc abstand-standard erlaeutrg-explo"><TBODY><TR><TD class=einzug-nummer>3 - </TD><TD>Retaining hook</TD></TR></TBODY></TABLE><TABLE class="cc einzug-explo abstand-explo "><TBODY><TR><TD class=einzug-liste>q </TD><TD>→ Item</TD></TR></TBODY></TABLE><TABLE class="cc einzug-explo abstand-explo "><TBODY><TR><TD class=einzug-liste>q </TD><TD>Fixed component of roof end trim -1-</TD></TR></TBODY></TABLE><TABLE class="cc abstand-standard erlaeutrg-explo"><TBODY><TR><TD class=einzug-nummer>4 - </TD><TD>Clips (4x)</TD></TR></TBODY></TABLE><TABLE class="cc einzug-explo abstand-explo "><TBODY><TR><TD class=einzug-liste>q </TD><TD>Renew if damaged or deformed</TD></TR></TBODY></TABLE>
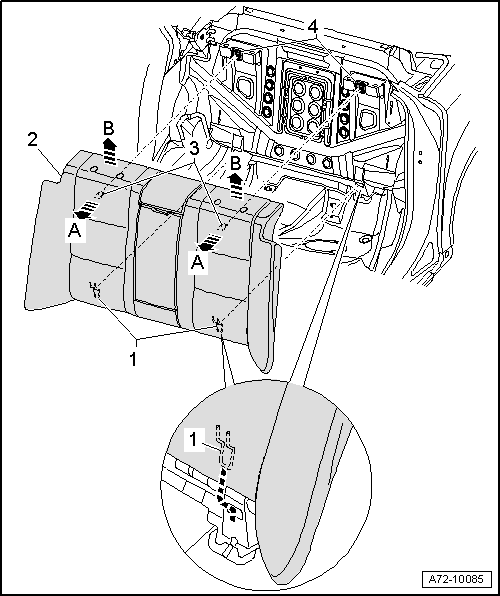
<TABLE class="cc abstand-standard erlaeutrg-explo"><TBODY><TR><TD class=einzug-nummer>1 - </TD><TD>C-pillar trim</TD></TR></TBODY></TABLE><TABLE class="cc abstand-standard einzug-explo "><TBODY><TR><TD class=einzug-liste>t </TD><TD>Removing</TD></TR></TBODY></TABLE><TABLE class="cc einzug-explo abstand-explo "><TBODY><TR><TD class=einzug-liste>� </TD><TD>Remove roof end trim</TD></TR></TBODY></TABLE><TABLE class="cc einzug-explo abstand-explo "><TBODY><TR><TD class=einzug-liste>� </TD><TD>Remove D-pillar trim</TD></TR></TBODY></TABLE><TABLE class="cc einzug-explo abstand-explo absatz-hervor"><TBODY><TR><TD>Vehicles with fixed rear seat backrest</TD></TR></TBODY></TABLE><TABLE class="cc einzug-explo abstand-explo "><TBODY><TR><TD class=einzug-liste>� </TD><TD>Remove rear seat backrest → Chapter.</TD></TR></TBODY></TABLE><TABLE class="cc einzug-explo abstand-explo absatz-hervor"><TBODY><TR><TD>Vehicles with folding rear seat backrest</TD></TR></TBODY></TABLE><TABLE class="cc einzug-explo abstand-explo "><TBODY><TR><TD class=einzug-liste>� </TD><TD>Remove side padding → Chapter.</TD></TR></TBODY></TABLE><TABLE class="cc einzug-explo abstand-explo absatz-hervor"><TBODY><TR><TD>All vehicles (continued)</TD></TR></TBODY></TABLE><TABLE class="cc einzug-explo abstand-explo "><TBODY><TR><TD class=einzug-liste>� </TD><TD>Detach rear shelf on the side in question.</TD></TR></TBODY></TABLE><TABLE class="cc einzug-explo abstand-explo "><TBODY><TR><TD class=einzug-liste></TD><TD>Rear shelf without sun blind → Chapter</TD></TR></TBODY></TABLE><TABLE class="cc einzug-explo abstand-explo "><TBODY><TR><TD class=einzug-liste></TD><TD>Rear shelf with sun blind → Chapter</TD></TR></TBODY></TABLE><TABLE class="cc einzug-explo abstand-explo "><TBODY><TR><TD class=einzug-liste>� </TD><TD>Unscrew bolts -2- (3x).</TD></TR></TBODY></TABLE><TABLE class="cc einzug-explo abstand-explo "><TBODY><TR><TD class=einzug-liste>� </TD><TD>Unclip C-pillar trim -1- at clip -4-.</TD></TR></TBODY></TABLE><TABLE class="cc einzug-explo abstand-explo "><TBODY><TR><TD class=einzug-liste>� </TD><TD>Carefully pull C-pillar trim -1- out from underneath curtain airbag -3-.</TD></TR></TBODY></TABLE><TABLE class="cc einzug-explo abstand-explo "><TBODY><TR><TD class=einzug-liste>� </TD><TD>Release belt guide and slide it towards the rear as far as it will go → Fig..</TD></TR></TBODY></TABLE><TABLE class="cc einzug-explo abstand-explo "><TBODY><TR><TD class=einzug-liste>� </TD><TD>Pull C-pillar trim -1- out over seat belt.</TD></TR></TBODY></TABLE><TABLE class="cc einzug-explo abstand-explo "><TBODY><TR><TD class=einzug-liste>� </TD><TD>Detach C-pillar trim -1-.</TD></TR></TBODY></TABLE><TABLE class="cc einzug-explo abstand-explo "><TBODY><TR><TD class=einzug-liste>� </TD><TD>Remove any residue of locking fluid from threaded holes for bolts -2- (3x). To do so, you can use a thread tap.</TD></TR></TBODY></TABLE><TABLE class="cc einzug-explo abstand-explo "><TBODY><TR><TD>If threaded holes are not cleaned, there would be a danger of the new bolts seizing when screwed in and shearing off if renewed later.</TD></TR></TBODY></TABLE><TABLE class="cc abstand-standard einzug-explo "><TBODY><TR><TD class=einzug-liste>t </TD><TD>Installing</TD></TR></TBODY></TABLE><TABLE class="cc einzug-explo abstand-explo "><TBODY><TR><TD class=einzug-liste>� </TD><TD>Check that clip -4- is not damaged or deformed.</TD></TR></TBODY></TABLE><TABLE class="cc einzug-explo abstand-explo "><TBODY><TR><TD>If clip is damaged or deformed it must be renewed.</TD></TR></TBODY></TABLE><TABLE class="cc einzug-explo abstand-explo "><TBODY><TR><TD class=einzug-liste>� </TD><TD>Before fitting C-pillar trim -1- make sure that clip -4- is correctly positioned.</TD></TR></TBODY></TABLE>
Note
<TABLE class="cc abstand-liste-erster einzug-explo hinweis-rumpf"><TBODY><TR><TD>Make sure that curtain airbag is not trapped or damaged when installing C-pillar trim -1-.</TD></TR></TBODY></TABLE><TABLE class="cc einzug-explo abstand-explo "><TBODY><TR><TD>Adhere to correct sequence for installing C-pillar trim -1-:</TD></TR></TBODY></TABLE><TABLE class="cc einzug-explo abstand-explo "><TBODY><TR><TD class=einzug-liste>� </TD><TD>Carefully push upper section of C-pillar trim -1- under curtain airbag -3-.</TD></TR></TBODY></TABLE><TABLE class="cc einzug-explo abstand-explo "><TBODY><TR><TD class=einzug-liste>� </TD><TD>Secure C-pillar trim -1- with clip -4-.</TD></TR></TBODY></TABLE><TABLE class="cc einzug-explo abstand-explo "><TBODY><TR><TD class=einzug-liste>� </TD><TD>Screw in new bolts -2- and tighten to specified torque.</TD></TR></TBODY></TABLE><TABLE class="cc einzug-explo abstand-explo "><TBODY><TR><TD class=einzug-liste>� </TD><TD>Pull belt guide forwards as far as it will go and make sure it engages → Fig..</TD></TR></TBODY></TABLE><TABLE class="cc einzug-explo abstand-explo "><TBODY><TR><TD>You should hear the retaining tab engage.</TD></TR></TBODY></TABLE><TABLE class="cc einzug-explo abstand-explo absatz-hervor"><TBODY><TR><TD>Make sure C-pillar trim -1- is securely engaged.</TD></TR></TBODY></TABLE><TABLE class="cc einzug-explo abstand-explo "><TBODY><TR><TD class=einzug-liste>� </TD><TD>Install rear shelf:</TD></TR></TBODY></TABLE><TABLE class="cc einzug-explo abstand-explo "><TBODY><TR><TD class=einzug-liste></TD><TD>Rear shelf without sun blind → Chapter</TD></TR></TBODY></TABLE><TABLE class="cc einzug-explo abstand-explo "><TBODY><TR><TD class=einzug-liste></TD><TD>Rear shelf with sun blind → Chapter</TD></TR></TBODY></TABLE><TABLE class="cc einzug-explo abstand-explo absatz-hervor"><TBODY><TR><TD>Vehicles with folding rear seat backrest</TD></TR></TBODY></TABLE><TABLE class="cc einzug-explo abstand-explo "><TBODY><TR><TD class=einzug-liste>� </TD><TD>Install side padding → Chapter.</TD></TR></TBODY></TABLE><TABLE class="cc einzug-explo abstand-explo absatz-hervor"><TBODY><TR><TD>Vehicles with fixed rear seat backrest</TD></TR></TBODY></TABLE><TABLE class="cc einzug-explo abstand-explo "><TBODY><TR><TD class=einzug-liste>� </TD><TD>Install backrest → Chapter.</TD></TR></TBODY></TABLE><TABLE class="cc einzug-explo abstand-explo "><TBODY><TR><TD class=einzug-liste>� </TD><TD>Install D-pillar trim → Chapter.</TD></TR></TBODY></TABLE><TABLE class="cc einzug-explo abstand-explo "><TBODY><TR><TD class=einzug-liste>� </TD><TD>Install roof end trim → Chapter.</TD></TR></TBODY></TABLE><TABLE class="cc einzug-explo abstand-explo "><TBODY><TR><TD class=einzug-liste>� </TD><TD>Fit lip of door seal over C-pillar trim -1-.</TD></TR></TBODY></TABLE><TABLE class="cc abstand-standard erlaeutrg-explo"><TBODY><TR><TD class=einzug-nummer>2 - </TD><TD>Bolts, self-locking (3x)</TD></TR></TBODY></TABLE><TABLE class="cc einzug-explo abstand-explo "><TBODY><TR><TD class=einzug-liste>q </TD><TD>Tightening torque: 3.5 Nm</TD></TR></TBODY></TABLE><TABLE class="cc einzug-explo abstand-explo "><TBODY><TR><TD class=einzug-liste>q </TD><TD>Always renew after removing</TD></TR></TBODY></TABLE><TABLE class="cc einzug-explo abstand-explo "><TBODY><TR><TD class=einzug-liste>q </TD><TD>Threaded holes for bolts must always be cleaned (e.g. with a thread tap).</TD></TR></TBODY></TABLE><TABLE class="cc abstand-standard erlaeutrg-explo"><TBODY><TR><TD class=einzug-nummer>3 - </TD><TD>Curtain airbag</TD></TR></TBODY></TABLE><TABLE class="cc abstand-standard erlaeutrg-explo"><TBODY><TR><TD class=einzug-nummer>4 - </TD><TD>Clip</TD></TR></TBODY></TABLE><TABLE class="cc einzug-explo abstand-explo "><TBODY><TR><TD class=einzug-liste>q </TD><TD>Renew if damaged or deformed</TD></TR></TBODY></TABLE><TABLE class="cc abstand-standard erlaeutrg-explo"><TBODY><TR><TD class=einzug-nummer>5 - </TD><TD>Insulation</TD></TR></TBODY></TABLE>
Removing and installing side padding for rear seat
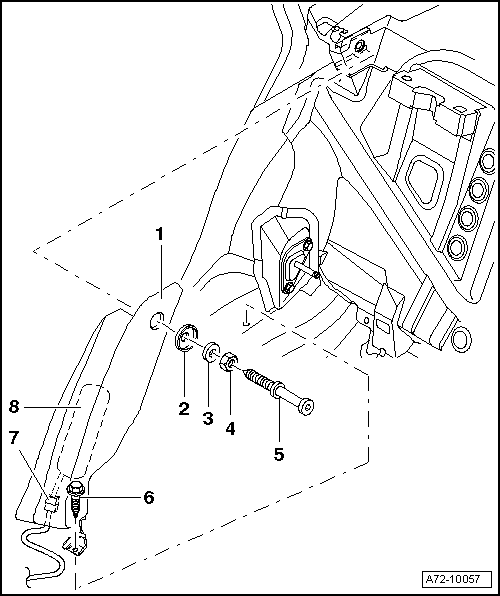
<TABLE class="cc abstand-standard erlaeutrg-explo"><TBODY><TR><TD class=einzug-nummer>1 - </TD><TD>Side padding</TD></TR></TBODY></TABLE><TABLE class="cc abstand-standard einzug-explo "><TBODY><TR><TD class=einzug-liste>t </TD><TD>Removing</TD></TR></TBODY></TABLE><TABLE class="cc einzug-explo abstand-explo "><TBODY><TR><TD class=einzug-liste>� </TD><TD>Remove rear seat bench → Chapter.</TD></TR></TBODY></TABLE><TABLE class="cc einzug-explo abstand-explo "><TBODY><TR><TD class=einzug-liste>� </TD><TD>Unscrew bolt -6-.</TD></TR></TBODY></TABLE><TABLE class="cc einzug-explo abstand-explo "><TBODY><TR><TD class=einzug-liste>� </TD><TD>On vehicles with side airbag -8- unplug electrical connector -7- → Fig..</TD></TR></TBODY></TABLE><TABLE class="cc einzug-explo abstand-explo "><TBODY><TR><TD class=einzug-liste>� </TD><TD>Unfasten nut -4-.</TD></TR></TBODY></TABLE><TABLE class="cc einzug-explo abstand-explo "><TBODY><TR><TD class=einzug-liste>� </TD><TD>Unscrew and remove striker pin -5- together with washer -3- and dished washer -2-.</TD></TR></TBODY></TABLE><TABLE class="cc abstand-standard einzug-explo "><TBODY><TR><TD class=einzug-liste>t </TD><TD>Installing</TD></TR></TBODY></TABLE><TABLE class="cc einzug-explo abstand-explo "><TBODY><TR><TD>Install in reverse order of removal. Note the following:</TD></TR></TBODY></TABLE><TABLE class="cc einzug-explo abstand-explo "><TBODY><TR><TD class=einzug-liste>� </TD><TD>Adjust striker pin -5- and tighten nut -4-.</TD></TR></TBODY></TABLE><TABLE class="cc abstand-standard erlaeutrg-explo"><TBODY><TR><TD class=einzug-nummer>2 - </TD><TD>Dished washer</TD></TR></TBODY></TABLE><TABLE class="cc abstand-standard erlaeutrg-explo"><TBODY><TR><TD class=einzug-nummer>3 - </TD><TD>Washer</TD></TR></TBODY></TABLE><TABLE class="cc abstand-standard erlaeutrg-explo"><TBODY><TR><TD class=einzug-nummer>4 - </TD><TD>Nut</TD></TR></TBODY></TABLE><TABLE class="cc einzug-explo abstand-explo "><TBODY><TR><TD class=einzug-liste>q </TD><TD>Tightening torque: 55 Nm </TD></TR></TBODY></TABLE><TABLE class="cc abstand-standard erlaeutrg-explo"><TBODY><TR><TD class=einzug-nummer>5 - </TD><TD>Striker pin</TD></TR></TBODY></TABLE><TABLE class="cc abstand-standard erlaeutrg-explo"><TBODY><TR><TD class=einzug-nummer>6 - </TD><TD>Bolt</TD></TR></TBODY></TABLE><TABLE class="cc einzug-explo abstand-explo "><TBODY><TR><TD class=einzug-liste>q </TD><TD>Tightening torque: 8 Nm</TD></TR></TBODY></TABLE><TABLE class="cc abstand-standard erlaeutrg-explo"><TBODY><TR><TD class=einzug-nummer>7 - </TD><TD>Connector for side airbag</TD></TR></TBODY></TABLE><TABLE class="cc abstand-standard erlaeutrg-explo"><TBODY><TR><TD class=einzug-nummer>8 - </TD><TD>Side airbag</TD></TR></TBODY></TABLE>
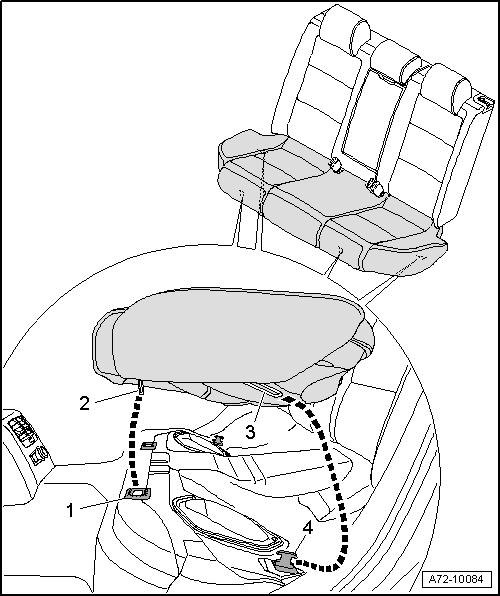
Removing and installing seat bench
<TABLE class="cc einzug-standard abstand-standard absatz-hervor"><TBODY><TR><TD>Removing</TD></TR></TBODY></TABLE><TABLE class="cc einzug-standard abstand-standard "><TBODY><TR><TD class=einzug-liste>� </TD><TD>Pull front edge of seat bench out of retainers -1- (left and right).</TD></TR></TBODY></TABLE><TABLE class="cc einzug-standard abstand-standard "><TBODY><TR><TD class=einzug-liste>� </TD><TD>Disengage seat bench from retainers -4- (left and right) by pushing it firmly towards the rear.</TD></TR></TBODY></TABLE><TABLE class="cc einzug-standard abstand-standard "><TBODY><TR><TD class=einzug-liste>� </TD><TD>On vehicles with seat heating raise the seat bench high enough to be able to unplug the electrical connectors.</TD></TR></TBODY></TABLE><TABLE class="cc einzug-standard abstand-standard "><TBODY><TR><TD class=einzug-liste>� </TD><TD>Take electrical connector for side airbag out of groove → Fig..</TD></TR></TBODY></TABLE><TABLE class="cc einzug-standard abstand-standard "><TBODY><TR><TD class=einzug-liste>� </TD><TD>Take seat bench out of vehicle.</TD></TR></TBODY></TABLE><TABLE class="cc einzug-standard abstand-standard absatz-hervor"><TBODY><TR><TD>Installing</TD></TR></TBODY></TABLE><TABLE class="cc einzug-standard abstand-standard "><TBODY><TR><TD>Installation is carried out in the reverse order, note the following:</TD></TR></TBODY></TABLE><TABLE class="cc achtung-rahmen abstand-standard einzug-standard"><TBODY><TR><TD class=achtung-inhalt>Caution
<TABLE class="cc einzug-standard abstand-liste-erster achtung-rumpf"><TBODY><TR><TD>The retainers must be renewed whenever you have removed the rear seat bench
 </TD></TR></TBODY></TABLE>
</TD></TR></TBODY></TABLE>
<TABLE class="cc bild-titel einzug-standard abstand-standard"><TBODY><TR><TD>Renewing retainers</TD></TR></TBODY></TABLE><TABLE class="cc einzug-standard abstand-standard "><TBODY><TR><TD class=einzug-liste>� </TD><TD>Remove used retainer from body cut-out.</TD></TR></TBODY></TABLE><TABLE class="cc einzug-standard abstand-standard "><TBODY><TR><TD class=einzug-liste>� </TD><TD>Fit new retainer -2- in opening -1- in body and push it in until you hear it engage.
</TD></TR></TBODY></TABLE>
Side airbag connector
Removing and installing fixed rear seat backrest
<TABLE class="cc einzug-standard abstand-standard absatz-hervor"><TBODY><TR><TD>Removing</TD></TR></TBODY></TABLE><TABLE class="cc einzug-standard abstand-standard "><TBODY><TR><TD class=einzug-liste>� </TD><TD>Remove rear seat bench → Chapter.</TD></TR></TBODY></TABLE><TABLE class="cc einzug-standard abstand-standard "><TBODY><TR><TD class=einzug-liste>� </TD><TD>Remove head restraints → Chapter �Removing and installing head restraints with slide-in locking mechanism � or → Chapter �Removing and installing head restraints without slide-in locking mechanism�.</TD></TR></TBODY></TABLE><TABLE class="cc einzug-standard abstand-standard "><TBODY><TR><TD class=einzug-liste>� </TD><TD>On vehicles with load-through hatch/ski bag remove frame for load-through hatch → Chapter.</TD></TR></TBODY></TABLE><TABLE class="cc einzug-standard abstand-standard "><TBODY><TR><TD class=einzug-liste>� </TD><TD>Remove head restraint guides → Chapter �Removing and installing outer head restraint guides without slide-in locking mechanism� or → Chapter �Removing and installing inner head restraint guides without slide-in locking mechanism�.</TD></TR></TBODY></TABLE><TABLE class="cc einzug-standard abstand-standard "><TBODY><TR><TD class=einzug-liste>� </TD><TD>On vehicles with side airbag unplug electrical connector → Fig..</TD></TR></TBODY></TABLE><TABLE class="cc einzug-standard abstand-standard "><TBODY><TR><TD class=einzug-liste>� </TD><TD>On vehicles with backrest heating unplug electrical connectors.</TD></TR></TBODY></TABLE><TABLE class="cc einzug-standard abstand-standard "><TBODY><TR><TD class=einzug-liste>� </TD><TD>Pull backrest -2- out of retainers -4- in direction of -arrow A-.</TD></TR></TBODY></TABLE><TABLE class="cc einzug-standard abstand-standard "><TBODY><TR><TD class=einzug-liste>� </TD><TD>Pull backrest out of body cut-out in direction of -arrow B-.</TD></TR></TBODY></TABLE><TABLE class="cc einzug-standard abstand-standard "><TBODY><TR><TD class=einzug-liste>� </TD><TD>Detach rear seat backrest.</TD></TR></TBODY></TABLE><TABLE class="cc einzug-standard abstand-standard absatz-hervor"><TBODY><TR><TD>Installing</TD></TR></TBODY></TABLE><TABLE class="cc einzug-standard abstand-standard "><TBODY><TR><TD>Installation is carried out in the reverse order, note the following:</TD></TR></TBODY></TABLE>
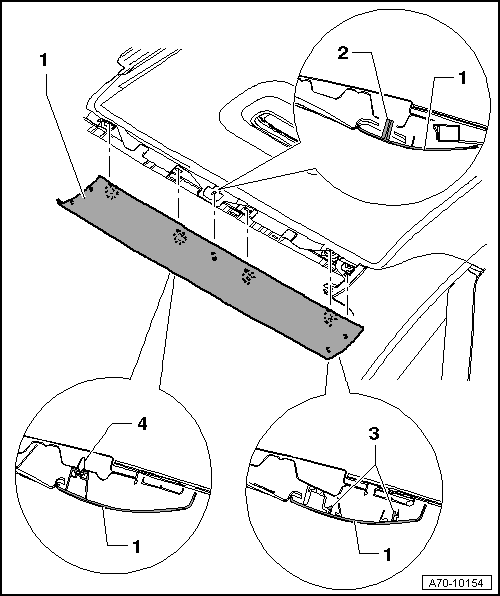
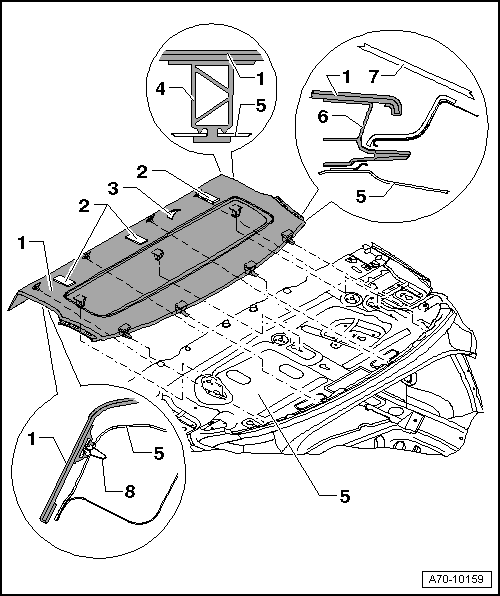
<TABLE class="cc abstand-standard erlaeutrg-explo"><TBODY><TR><TD class=einzug-nummer>1 - </TD></TR></TBODY></TABLE><TABLE class="cc abstand-standard einzug-explo "><TBODY><TR><TD class=einzug-liste>t </TD><TD>Removing</TD></TR></TBODY></TABLE><TABLE class="cc einzug-explo abstand-explo "><TBODY><TR><TD class=einzug-liste>� </TD><TD>Remove roof end trim → Chapter.</TD></TR></TBODY></TABLE><TABLE class="cc einzug-explo abstand-explo "><TBODY><TR><TD class=einzug-liste>� </TD><TD>Remove D-pillar trim (left and right) → Chapter.</TD></TR></TBODY></TABLE><TABLE class="cc einzug-explo abstand-explo absatz-hervor"><TBODY><TR><TD>Vehicles with folding rear seat backrest</TD></TR></TBODY></TABLE><TABLE class="cc einzug-explo abstand-explo "><TBODY><TR><TD class=einzug-liste>� </TD><TD>Fold rear seat backrest forwards.</TD></TR></TBODY></TABLE><TABLE class="cc einzug-explo abstand-explo absatz-hervor"><TBODY><TR><TD>Vehicles with fixed rear seat backrest</TD></TR></TBODY></TABLE><TABLE class="cc einzug-explo abstand-explo "><TBODY><TR><TD class=einzug-liste>� </TD><TD>Remove rear seat bench → Chapter.</TD></TR></TBODY></TABLE><TABLE class="cc einzug-explo abstand-explo "><TBODY><TR><TD class=einzug-liste>� </TD><TD>Remove rear seat backrest → Chapter.</TD></TR></TBODY></TABLE><TABLE class="cc einzug-explo abstand-explo "><TBODY><TR><TD class=einzug-liste>� </TD><TD>Remove belt buckle with buckle bracket (right-side) → Chapter.</TD></TR></TBODY></TABLE><TABLE class="cc einzug-explo abstand-explo absatz-hervor"><TBODY><TR><TD>All vehicles (continued)</TD></TR></TBODY></TABLE><TABLE class="cc einzug-explo abstand-explo "><TBODY><TR><TD class=einzug-liste>� </TD><TD>Pull rear shelf -1- forwards and unclip clips -8- (4x) from cross member for rear shelf -5-.</TD></TR></TBODY></TABLE><TABLE class="cc einzug-explo abstand-explo "><TBODY><TR><TD class=einzug-liste>� </TD><TD>Pull rear shelf -1- further forwards and disengage retainers -4- (3x) from cut-outs (shaped like key-hole) on cross member for rear shelf -5-.</TD></TR></TBODY></TABLE><TABLE class="cc einzug-explo abstand-explo "><TBODY><TR><TD class=einzug-liste>� </TD><TD>Pull rear shelf -1- with retainers and pins -6- (4x) out of cross member below rear window -7-.</TD></TR></TBODY></TABLE><TABLE class="cc einzug-explo abstand-explo absatz-hervor"><TBODY><TR><TD>Vehicles with fixed rear seat backrest</TD></TR></TBODY></TABLE><TABLE class="cc einzug-explo abstand-explo "><TBODY><TR><TD class=einzug-liste>� </TD><TD>Unclip belt guide (rear centre) from rear shelf -1- → Fig..</TD></TR></TBODY></TABLE><TABLE class="cc einzug-explo abstand-explo "><TBODY><TR><TD class=einzug-liste>� </TD><TD>Insert belt with belt guide (rear centre) through cut-out -3- in rear shelf -1-.</TD></TR></TBODY></TABLE><TABLE class="cc einzug-explo abstand-explo absatz-hervor"><TBODY><TR><TD>All vehicles (continued)</TD></TR></TBODY></TABLE><TABLE class="cc einzug-explo abstand-explo "><TBODY><TR><TD class=einzug-liste>� </TD><TD>Remove rear shelf -1-.</TD></TR></TBODY></TABLE><TABLE class="cc abstand-standard einzug-explo "><TBODY><TR><TD class=einzug-liste>t </TD><TD>Installing</TD></TR></TBODY></TABLE><TABLE class="cc einzug-explo abstand-explo "><TBODY><TR><TD class=einzug-liste>� </TD><TD>Check that clips -8- (4x) are not damaged or deformed.</TD></TR></TBODY></TABLE><TABLE class="cc einzug-explo abstand-explo "><TBODY><TR><TD>If clips are damaged or deformed they must be renewed.</TD></TR></TBODY></TABLE><TABLE class="cc einzug-explo abstand-explo "><TBODY><TR><TD class=einzug-liste>� </TD><TD>Before fitting rear shelf -1- make sure that clips -8- (4x) are correctly positioned.</TD></TR></TBODY></TABLE><TABLE class="cc einzug-explo abstand-explo absatz-hervor"><TBODY><TR><TD>Vehicles with fixed rear seat backrest</TD></TR></TBODY></TABLE><TABLE class="cc einzug-explo abstand-explo "><TBODY><TR><TD class=einzug-liste>� </TD><TD>Insert belt with belt guide (rear centre) through cut-out -3- in rear shelf -1-.</TD></TR></TBODY></TABLE><TABLE class="cc einzug-explo abstand-explo "><TBODY><TR><TD class=einzug-liste>� </TD><TD>Clip belt guide (rear centre) into rear shelf -1- → Fig..</TD></TR></TBODY></TABLE><TABLE class="cc einzug-explo abstand-explo absatz-hervor"><TBODY><TR><TD>Make sure that belt is not twisted.</TD></TR></TBODY></TABLE><TABLE class="cc einzug-explo abstand-explo absatz-hervor"><TBODY><TR><TD>All vehicles (continued)</TD></TR></TBODY></TABLE><TABLE class="cc einzug-explo abstand-explo "><TBODY><TR><TD class=einzug-liste>� </TD><TD>Hook retainers -4- (3x) into cut-outs (shaped like key-holes) in cross member for rear shelf -5-.</TD></TR></TBODY></TABLE><TABLE class="cc einzug-explo abstand-explo "><TBODY><TR><TD class=einzug-liste>� </TD><TD>Push rear shelf -1- to rear as far as it will go.</TD></TR></TBODY></TABLE><TABLE class="cc einzug-explo abstand-explo "><TBODY><TR><TD class=einzug-liste>� </TD><TD>Make sure that pins on retainers -6- (4x) are inserted into cut-outs in cross member below rear window -7-.</TD></TR></TBODY></TABLE><TABLE class="cc einzug-explo abstand-explo "><TBODY><TR><TD class=einzug-liste>� </TD><TD>Secure rear shelf -1- to cross member for rear shelf -5- with clips -8- (4x).</TD></TR></TBODY></TABLE><TABLE class="cc einzug-explo abstand-explo absatz-hervor"><TBODY><TR><TD>Vehicles with fixed rear seat backrest</TD></TR></TBODY></TABLE><TABLE class="cc einzug-explo abstand-explo "><TBODY><TR><TD class=einzug-liste>� </TD><TD>Install belt buckle with buckle bracket (right-side) → Chapter.</TD></TR></TBODY></TABLE><TABLE class="cc einzug-explo abstand-explo absatz-hervor"><TBODY><TR><TD>Make sure that belt is not twisted.</TD></TR></TBODY></TABLE><TABLE class="cc einzug-explo abstand-explo "><TBODY><TR><TD class=einzug-liste>� </TD><TD>Install rear seat backrest → Chapter.</TD></TR></TBODY></TABLE><TABLE class="cc einzug-explo abstand-explo "><TBODY><TR><TD class=einzug-liste>� </TD><TD>Install rear seat bench → Chapter.</TD></TR></TBODY></TABLE><TABLE class="cc einzug-explo abstand-explo absatz-hervor"><TBODY><TR><TD>Vehicles with folding rear seat backrest</TD></TR></TBODY></TABLE><TABLE class="cc einzug-explo abstand-explo "><TBODY><TR><TD class=einzug-liste>� </TD><TD>Return backrest to upright position.</TD></TR></TBODY></TABLE><TABLE class="cc einzug-explo abstand-explo absatz-hervor"><TBODY><TR><TD>All vehicles (continued)</TD></TR></TBODY></TABLE><TABLE class="cc einzug-explo abstand-explo "><TBODY><TR><TD class=einzug-liste>� </TD><TD>Install D-pillar trim (left and right) → Chapter.</TD></TR></TBODY></TABLE><TABLE class="cc einzug-explo abstand-explo "><TBODY><TR><TD class=einzug-liste>� </TD><TD>Install roof end trim → Chapter.</TD></TR></TBODY></TABLE><TABLE class="cc abstand-standard erlaeutrg-explo"><TBODY><TR><TD class=einzug-nummer>2 - </TD><TD>Child seat anchorage (3x)</TD></TR></TBODY></TABLE><TABLE class="cc einzug-explo abstand-explo "><TBODY><TR><TD class=einzug-liste>q </TD><TD>Only for USA and Canada</TD></TR></TBODY></TABLE><TABLE class="cc einzug-explo abstand-explo "><TBODY><TR><TD class=einzug-liste>q </TD><TD>Removing and installing → Chapter</TD></TR></TBODY></TABLE><TABLE class="cc einzug-explo abstand-explo "><TBODY><TR><TD class=einzug-liste>q </TD><TD>Cut-outs for child seat anchorage only provided on rear shelf of vehicles for USA and Canada</TD></TR></TBODY></TABLE><TABLE class="cc abstand-standard erlaeutrg-explo"><TBODY><TR><TD class=einzug-nummer>3 - </TD><TD>Cut-out for belt guide</TD></TR></TBODY></TABLE><TABLE class="cc einzug-explo abstand-explo "><TBODY><TR><TD class=einzug-liste>q </TD><TD>Only on vehicles with fixed rear seat backrest</TD></TR></TBODY></TABLE><TABLE class="cc abstand-standard erlaeutrg-explo"><TBODY><TR><TD class=einzug-nummer>4 - </TD><TD>Retainers (3x)</TD></TR></TBODY></TABLE><TABLE class="cc einzug-explo abstand-explo "><TBODY><TR><TD class=einzug-liste>q </TD><TD>→ Item</TD></TR></TBODY></TABLE><TABLE class="cc einzug-explo abstand-explo "><TBODY><TR><TD class=einzug-liste>q </TD><TD>Fixed component of rear shelf -1-</TD></TR></TBODY></TABLE><TABLE class="cc abstand-standard erlaeutrg-explo"><TBODY><TR><TD class=einzug-nummer>5 - </TD><TD>Cross member for rear shelf</TD></TR></TBODY></TABLE><TABLE class="cc abstand-standard erlaeutrg-explo"><TBODY><TR><TD class=einzug-nummer>6 - </TD><TD>Retainers with pins (4x)</TD></TR></TBODY></TABLE><TABLE class="cc einzug-explo abstand-explo "><TBODY><TR><TD class=einzug-liste>q </TD><TD>→ Item</TD></TR></TBODY></TABLE><TABLE class="cc einzug-explo abstand-explo "><TBODY><TR><TD class=einzug-liste>q </TD><TD>Fixed component of rear shelf -1-</TD></TR></TBODY></TABLE><TABLE class="cc abstand-standard erlaeutrg-explo"><TBODY><TR><TD class=einzug-nummer>7 - </TD><TD>Rear window</TD></TR></TBODY></TABLE><TABLE class="cc abstand-standard erlaeutrg-explo"><TBODY><TR><TD class=einzug-nummer>8 - </TD><TD>Clips (4x)</TD></TR></TBODY></TABLE><TABLE class="cc einzug-explo abstand-explo "><TBODY><TR><TD class=einzug-liste>q </TD><TD>Renew if damaged or deformed</TD></TR></TBODY></TABLE>
Last edited by royclark; 03-28-2012 at 07:16 AM.
03-28-2012, 12:46 PM
#9
AudiWorld Member
Thread Starter
Join Date: Mar 2012
Location: Dallas, TX
Posts: 93
Likes: 0
Received 0 Likes
on
0 Posts
royclark.... Thank you very much for the extensive details in which you provide me and the rest of the forum! Do I remove the trim pieces in the order you gave me, or is that just general instructions on how to remove each piece?
03-28-2012, 12:57 PM
#10
AudiWorld Senior Member
just general instructions.
This is the manual that I use http://www.ebay.co.uk/itm/Audi-A6-A7-A8-Workshop-Service-Repair-Manual-ElsaWin-2012-v4-00-/320871658282?pt=UK_CarParts_Vehicles_Manuals_Litte rature_ET&hash=item4ab570f32a
Last edited by royclark; 03-28-2012 at 01:10 PM.
