jbrentd's Project Coupe Quattro
 10-01-2018, 07:04 AM
#31
AudiWorld Senior Member
Thread Starter
So, it looks like I'll have a replacement 7a on the way soon, thanks to a generous member of the vintage Audi community. Hopefully, this will get her back on the road until I can source a proper swap.
My car came with the late 7a and the replacement looks to be an early 7a. I understand that the wiring harness, ECU, and ISV are some of the more important differences between the two. Some questions I have regarding the differences in the early and late 7a's:
1. Are there other differences I should be aware of?
2. Can I simply use my original intake manifold, TPS, and ISV for the swap?
3. What about running the bag o snakes without a heat shield? Seems like there are too many electronics, rubber bits and intake parts that are too close.
Thanks,
Brent
 09-20-2022, 05:24 AM
#32
AudiWorld Senior Member
Thread Starter
I have not done a good job of updating this project thread. I have a few of them going, but it seems AW and this sub-forum is still somewhat active. I hope some of you might enjoy following along.
Right after I got it running with the replacement 7A, I found a 3B to swap in. I drove it with the 7A for about a year while I collected parts and worked on the 3B.
In February 2020, I took it off the road for the 3B swap and a whole bunch of other stuff. Some of it was planned and some was not. Here are some highlights.
Engine ready

All bushings removed/replaced

Subframes/control arms/knuckles cleaned up

DIY coilovers

Some cleaning of the wheel wells

Found an issue hidden under the carpet

POR15 applied

Sound/heat barrier added

Rear subframe/suspension/brakes installed

Merging the 7A and 3B wiring harness

Battery relocation

Respray for the engine compartment

Front subframe/suspension/brakes installed

Back on all 4's and moved over to the new shop

Engine in and working on all the ancillary systems
That get us caught up to where I am with it now. It's been off the road for 2-1/2 years now and I hope to fire it up soon.
Right after I got it running with the replacement 7A, I found a 3B to swap in. I drove it with the 7A for about a year while I collected parts and worked on the 3B.
In February 2020, I took it off the road for the 3B swap and a whole bunch of other stuff. Some of it was planned and some was not. Here are some highlights.
Engine ready
All bushings removed/replaced
Subframes/control arms/knuckles cleaned up
DIY coilovers
Some cleaning of the wheel wells
Found an issue hidden under the carpet
POR15 applied
Sound/heat barrier added
Rear subframe/suspension/brakes installed
Merging the 7A and 3B wiring harness
Battery relocation
Respray for the engine compartment
Front subframe/suspension/brakes installed
Back on all 4's and moved over to the new shop
Engine in and working on all the ancillary systems

That get us caught up to where I am with it now. It's been off the road for 2-1/2 years now and I hope to fire it up soon.
The following users liked this post:
uberwgn (09-20-2022)
09-21-2022, 07:26 AM
#33
AudiWorld Senior Member

I am so impressed with your beautiful work! Very inspiring! I joined this forum a little more than a year ago and after I'd purchased my 1991 Audi 90 quattro 20V, so have missed your earlier progress.
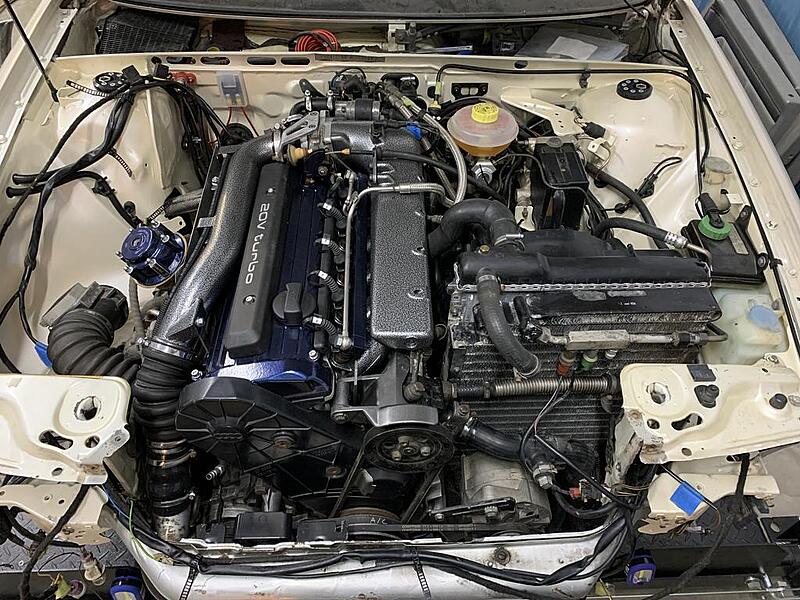
I've been wondering about the best way to shine up the dull appearance of the intake manifold and cam cover on my 7A. The hammered metal effect on your 3B looks fantastic! Are those powder coatings on the IM and cover? Is that an 034 fuel rail that you painted?
A friend has encouraged me to start a build thread for my 20V and catch up on the work that I've done during the past year. It doesn't equal what you've done here but I might get a thread going, anyway.
Keep the updates coming! I'll stay tuned.
09-21-2022, 07:59 AM
#34
AudiWorld Senior Member
Thread Starter
I am so impressed with your beautiful work! Very inspiring! I joined this forum a little more than a year ago and after I'd purchased my 1991 Audi 90 quattro 20V, so have missed your earlier progress.
I've been wondering about the best way to shine up the dull appearance of the intake manifold and cam cover on my 7A. The hammered metal effect on your 3B looks fantastic! Are those powder coatings on the IM and cover? Is that an 034 fuel rail that you painted?
A friend has encouraged me to start a build thread for my 20V and catch up on the work that I've done during the past year. It doesn't equal what you've done here but I might get a thread going, anyway.
Keep the updates coming! I'll stay tuned.
On my 7A, I just used VHT high temp paint that you find at the auto parts store. It worked well. I used their gunmetal grey on a lot of pieces and their black wrinkle on the valve cover (which gets covered up quite a bit by the intake manifold).
 09-21-2022, 08:15 AM
#35
AudiWorld Senior Member
Thank you! That is good info. The shiny gun metal looks good on the IM. Looks like your cruise control was still functional here. And you battery cover is still there! I see that you've now relocated it to the trunk.
Was catching up on your earlier posts... Incredible, how you had sold your CQ and then bought it back years later! Gah, I have so many questions, but I'll just follow along for now.
Was catching up on your earlier posts... Incredible, how you had sold your CQ and then bought it back years later! Gah, I have so many questions, but I'll just follow along for now.
09-21-2022, 11:53 AM
#36

Really nice project! And such a cool story behind getting it back after selling it years earlier. We rarely get that opportunity, and almost never for less than the sell price!
Looks like it's coming along nicely, and that engine is going to be a blast.
Looks like it's coming along nicely, and that engine is going to be a blast.
09-22-2022, 04:24 AM
#37
AudiWorld Senior Member
Thread Starter
Thank you! That is good info. The shiny gun metal looks good on the IM. Looks like your cruise control was still functional here. And you battery cover is still there! I see that you've now relocated it to the trunk.
Was catching up on your earlier posts... Incredible, how you had sold your CQ and then bought it back years later! Gah, I have so many questions, but I'll just follow along for now.
Was catching up on your earlier posts... Incredible, how you had sold your CQ and then bought it back years later! Gah, I have so many questions, but I'll just follow along for now.
Yeah, when I messaged the guy I sold it to, I was a bit surprised that he still had it. Got lucky I suppose, in a sick and twisted kind of way.
09-22-2022, 08:37 AM
#39
AudiWorld Senior Member
Thread Starter
02-14-2023, 08:24 AM
#40
AudiWorld Senior Member
Thread Starter
So, a couple weeks ago I started to prep for firing it up by filling it up with fluids, checking the timing marks, hooking up the instrument cluster, etc. Long story short...it's not a good idea to stop in the middle of the wiring process (over a year), because there were some things that still needed to be finished. Like securing all of the grounds under the dash and putting in the fuses for the ignition system. Once that was done, I found a good sized fuel leak when I tricked the fuel pump to run to purge the air out of the lines.
Fast forward to last weekend, I repaired the fuel line and the thing started so smooth and idled very well!!
So pumped right now. It�s been 3 years since I took it off the road.
Fast forward to last weekend, I repaired the fuel line and the thing started so smooth and idled very well!!
So pumped right now. It�s been 3 years since I took it off the road.