C4 UrS/100/A6 Dash Trim Removal DIY
 02-17-2015, 11:39 AM
#1
AudiWorld Super User

Thread Starter
Removal of Dash Trim (Wrtten for C4s but probably similar for B3s and B4s)
I recently decided that I liked the nut brown walnut on the door panels that I got off a silver on black 94 100 at one of the local wreckers. I like it so much I decided to go back and get the dash trim. I asked the forum for a DIY or hints. I got a few but it turns out they really didn't prepare me for what was involved. As a result, I took some photos along the way and decided to do a DIY to help the next person(s).
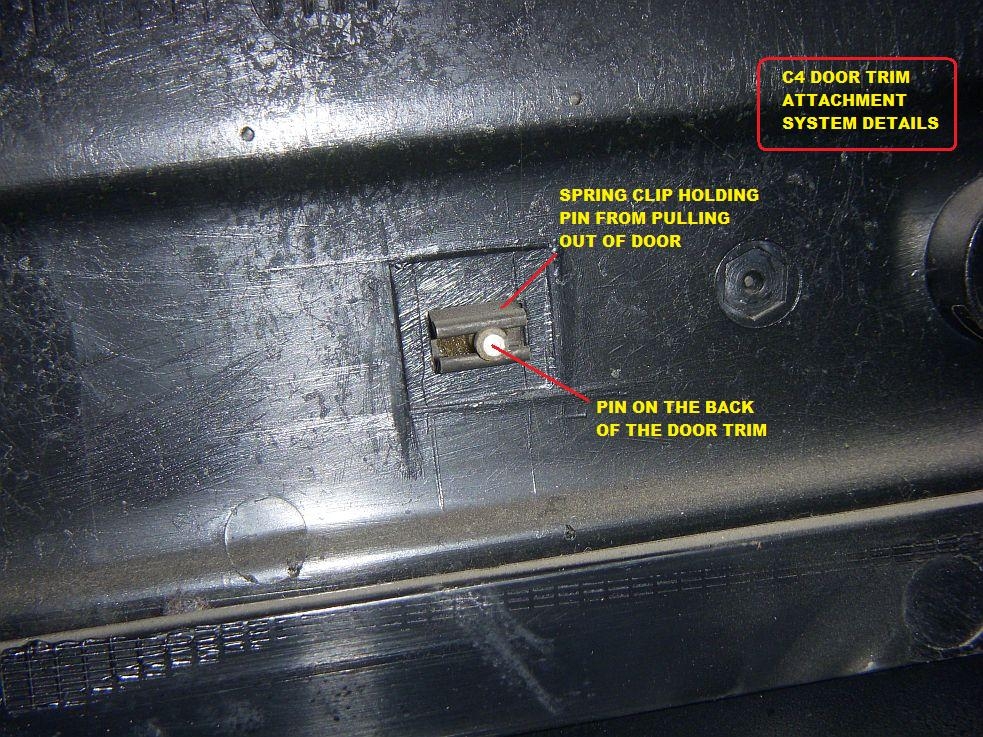
First of all, the dash trim is nothing like door trims in terms of how they are attached. Door trims are based on metal pins on the back of the trims, poking through holes into minor spring clips. While best to remove the door panel to access the door trims for removal, I am thinking (YMMV) that the door trims could potentially be popped off with a wide stiff metal tool (think multipurpose wall and paint scraper) and more than a little patience. Here are some door panel details.

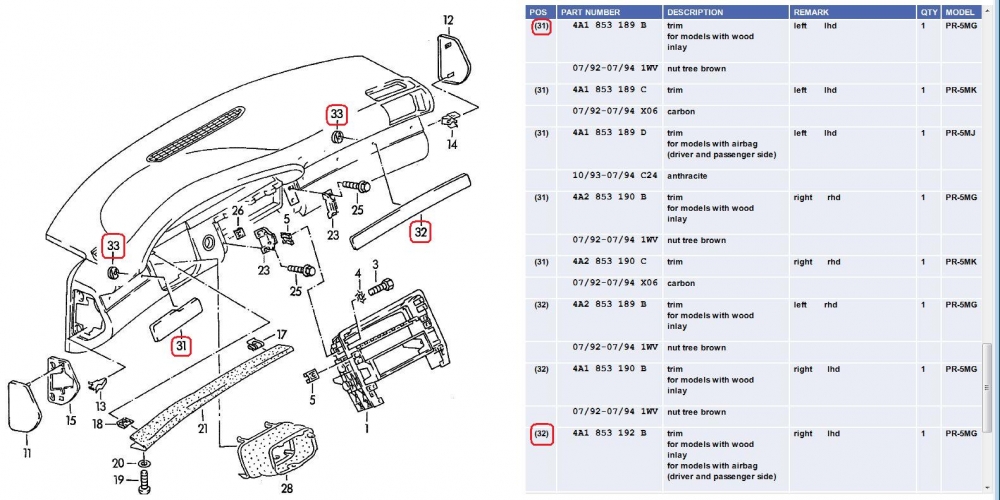
Skipping ahead, this was my goal/focus: To remove the three dash trim pieces, items 31 and the two piece item 32 below:
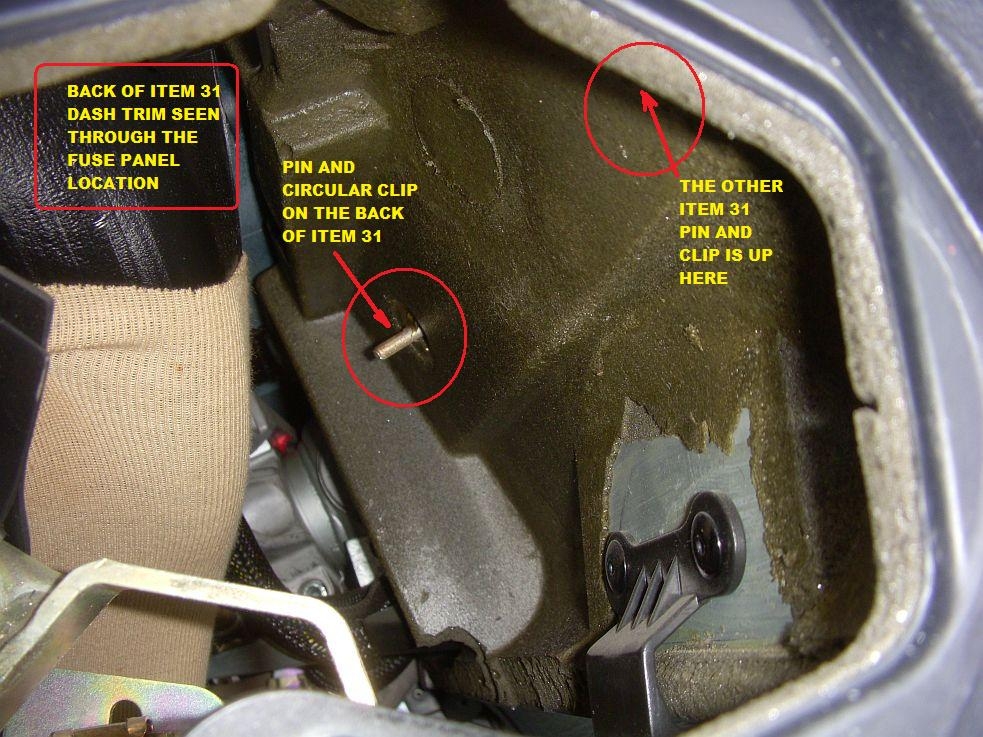
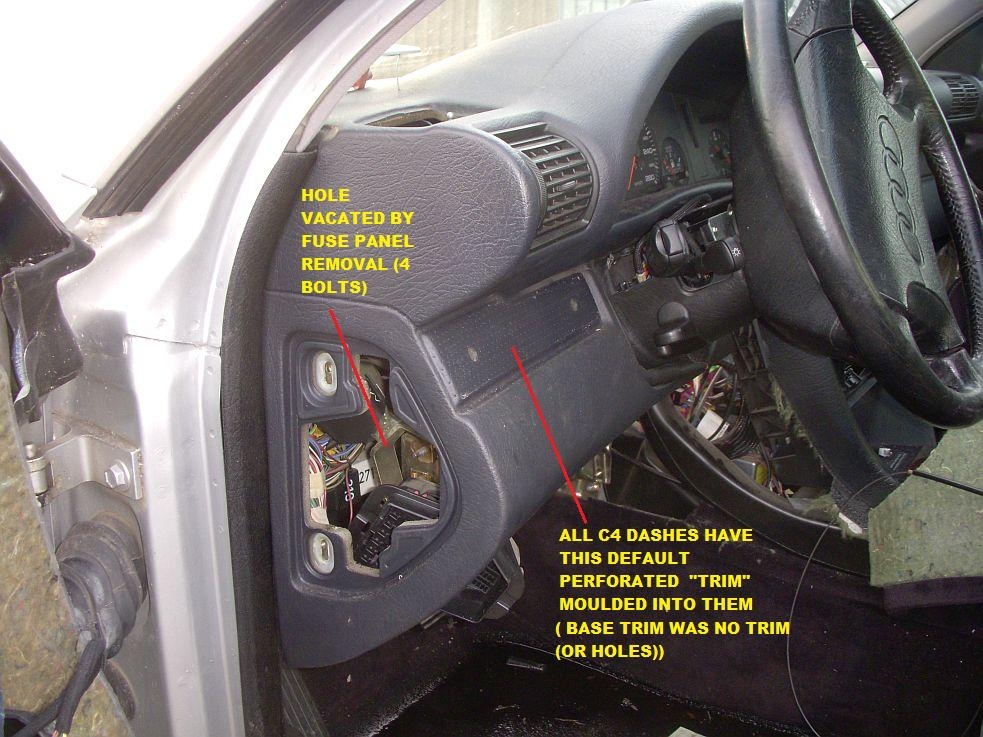
I started on the left side because I knew it would be easier than the right side and I wanted to get a little success under my belt before tackling the right side. The first step would be to remove the knee bolster (two pieces, 6 10mm bolts IIRC). In my junkyard case, the knee bolster was already removed. Even so the access to the back of Trim Piece 31 wasn't great. So I removed cover 11 and fuse holder 15 (just pushed the fuse holder into the interior of the dash). This provided better visual access to the pins and clips on the back of the trim piece.
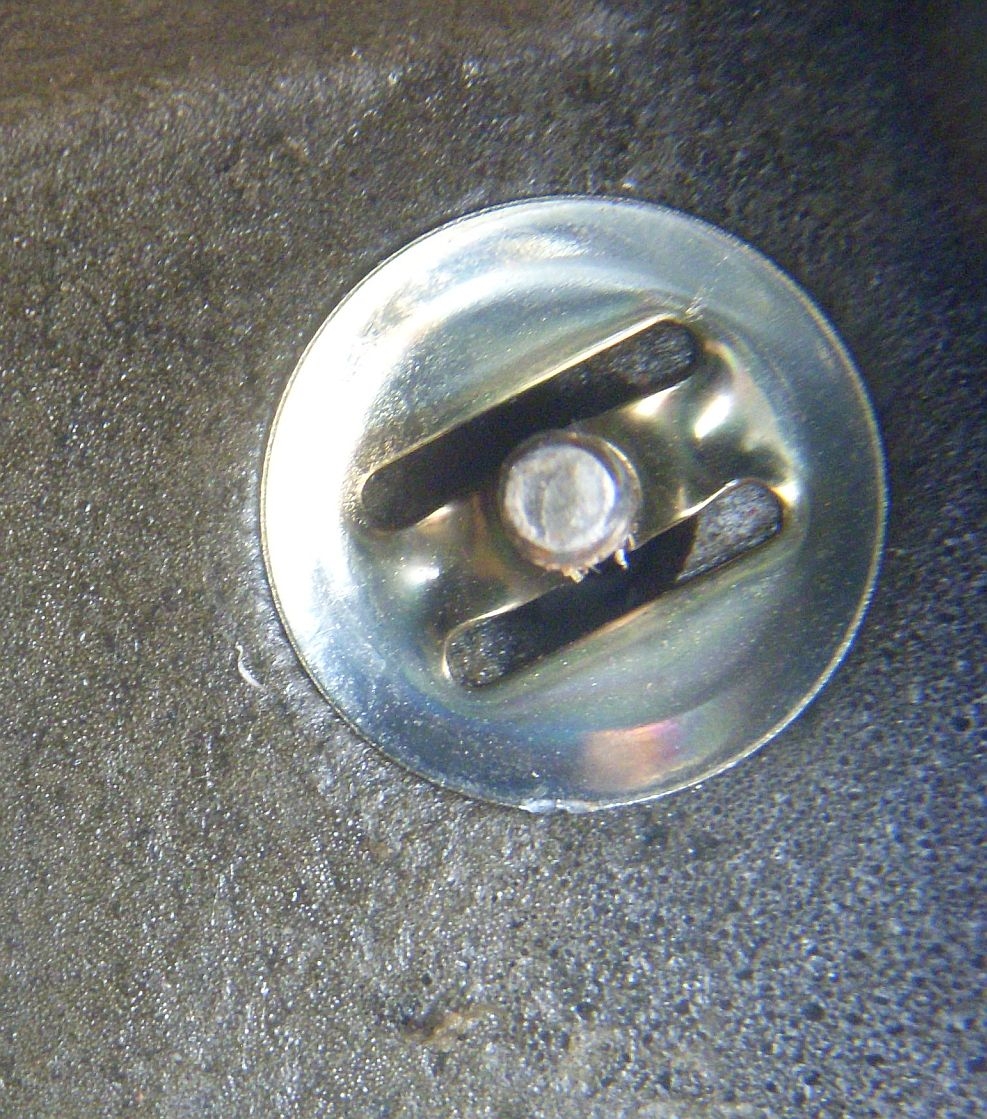
This was the first photo I took, through the hole in the end of the dash were the fuse holder had been:
This is a detail of the way the circular clip has been pushed over the pin on the dash trim:
I was able to remove the circular clips through a combination of prying with a flat blade screw driver and pulling with a long nose pliers. I think I pried through the fuse panel hole and pulled with the pliers coming up from the bottom (door open, knee bolster removed). Here was the final result of that effort: Trim removed undamaged:
Okay with that little bit of success and confidence done, it was time to move to the right side and remove the shorter of the two airbag area trim pieces. To start you would have to remove the glove box (two 10 mm nuts and two 10 mm bolts and two wire connections (with plugs inside grey foam - no need to cut anything). In my case, the glove box was hanging there and all I had to do was remove one final bolt and the two electrical connectors.
Based on the success of working through the fuse panel area on the left end of the dash, I decided to do the same thing on the right side. I removed cover 12 and was a bit surprised to find just dash (nothing to hide behind that cover 12). There was one clip, Item 14, that I removed. That was enough for me to put one eye to the hole and see what I was up against. Basically the same as the left side: Pins and circle clips. Although in the right side the pins were actually threaded rods.

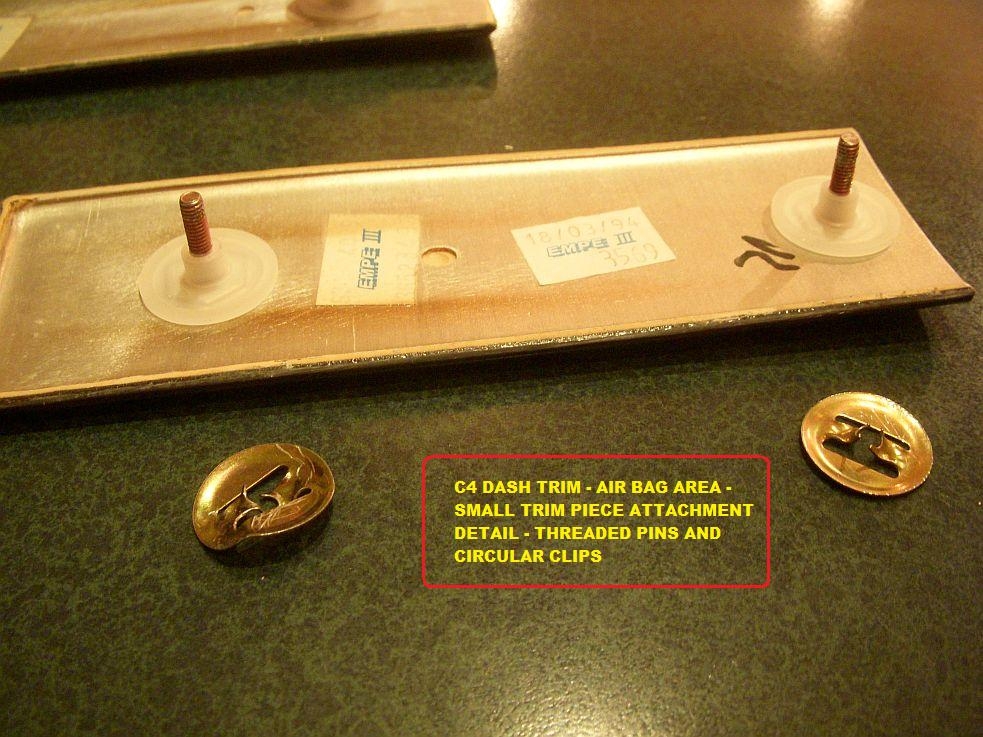
Removal of the shorter right side trim clips was done from below with a flat screw driver and needle nose pliers - while watching through that little access hole with my right eye.
After a bit of playing around and gentle prying and pulling, the small right side trim piece clips and the trim came off in fine shape.
Because I could not see behind the large airbag trim (air bag is in the way), I tried prying and probing for probably 10 minutes before I finally realized that I would have to remove the item 16 airbag. Turns out that it isn't a big deal. There are two 13 mm nuts on studs that hold the Item 15 airbag frame to the metal airbag substructure. These require a 13 mm deep socket because the studs are quite long. Then there are two (four) 10 mm hex head bolts to remove and one very long 8 mm Allen-head bolt (item 17) to be removed.
NOTE: On a "live" car, you would want to disarm the airbag before removing it from its desired location. This could be accomplished by disconnecting the battery for 30 minutes or more (have your radio code handy) or pulling the red "206" relay in the right side (LHD) kick panel and/or disconnecting the airbag at a red plug in a grey foam tube above the ECU.

With the airbag loose an pushed back from the back of the dash, I felt up there and felt three big round nuts of some type. I just loosened them by hand. As you will see in a moment, there is no way you could pry the trim off the dash without damaging the dash and trim with the size of those trim nuts. Anyway, in a few more minutes I had the last trim piece off and was looking at this.

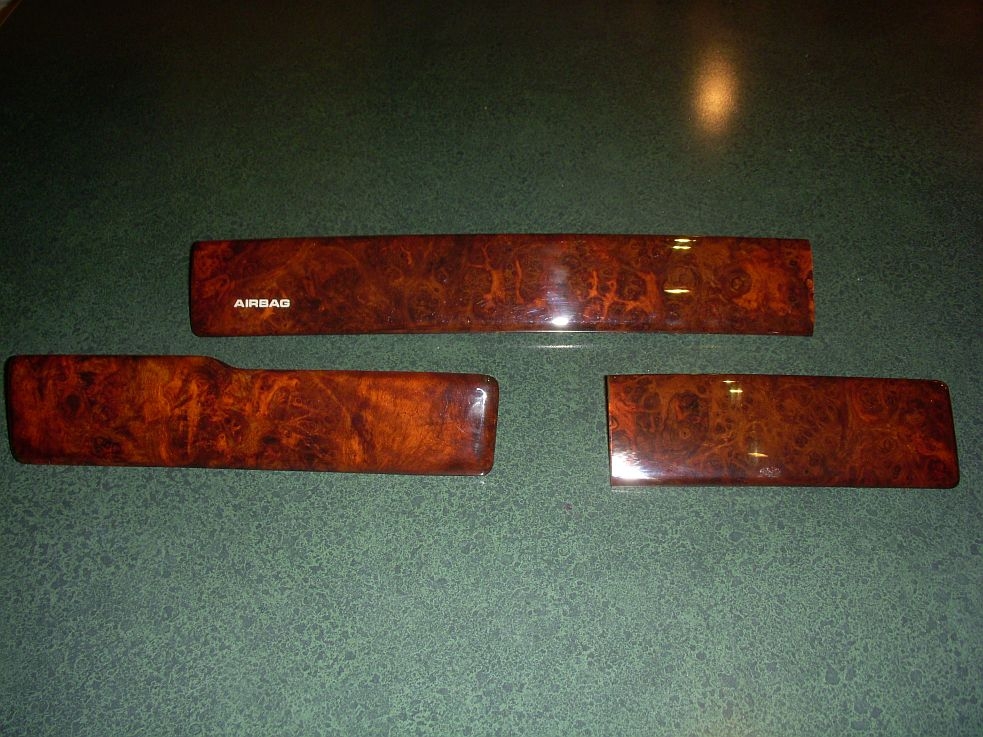
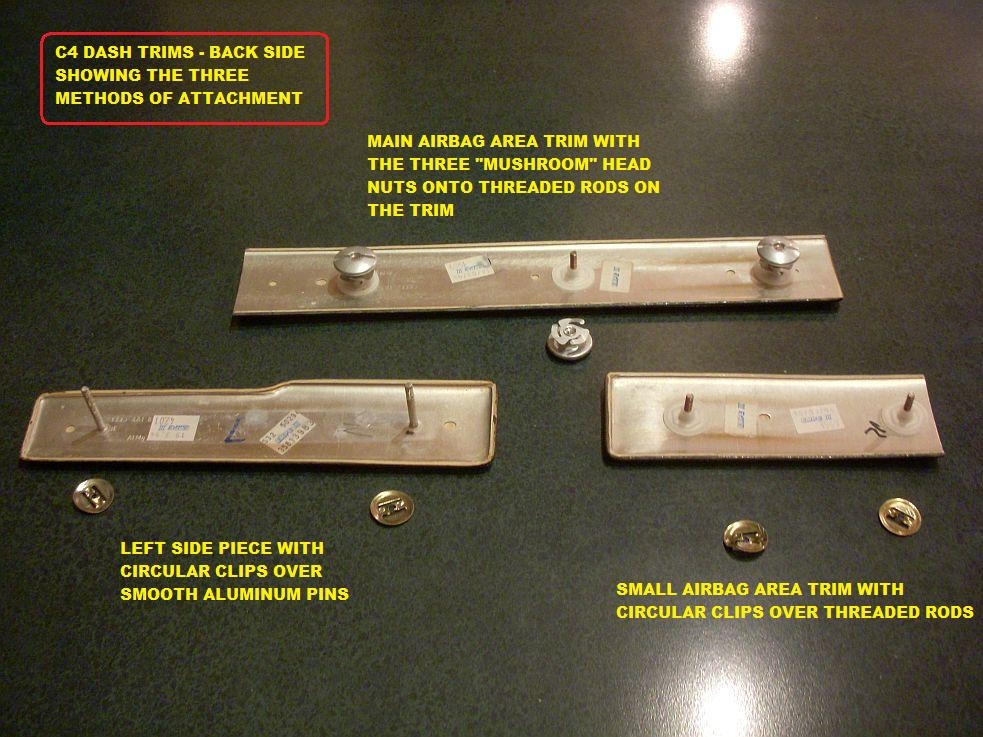
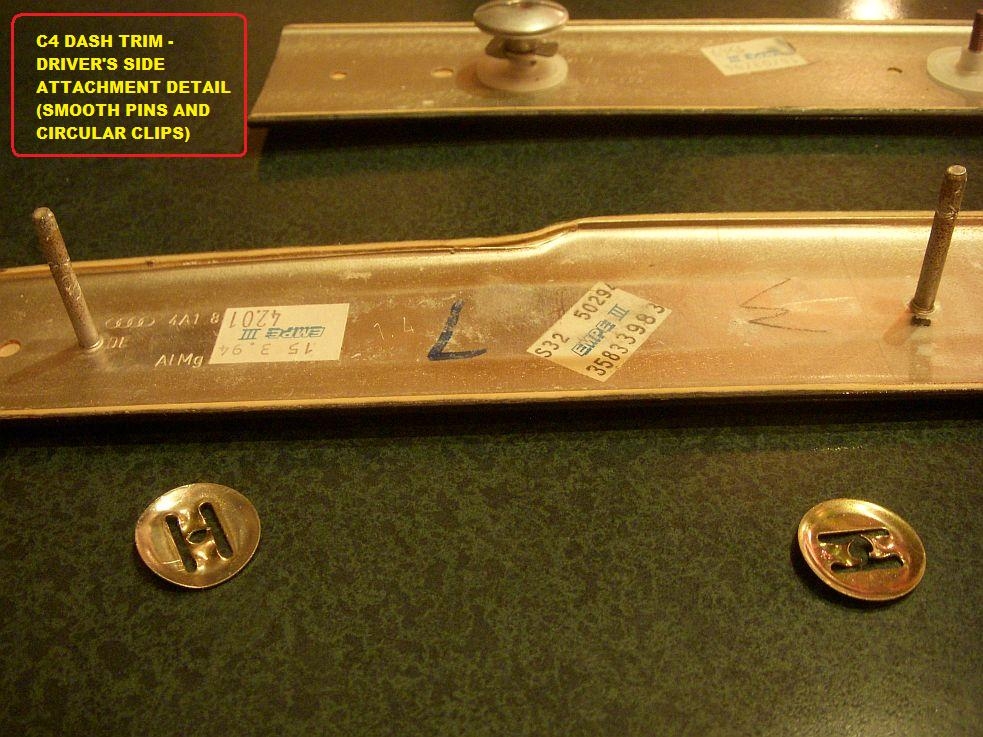
Back home I took these photos of the trim. Note the photos of the backs and the types of rods and pins and clips and nuts that are used.
Front Side:
Back side:
Here is a detail on the "mushroom head" nuts on the main airbag area trim piece:

There, wasn't that fun!?

I recently decided that I liked the nut brown walnut on the door panels that I got off a silver on black 94 100 at one of the local wreckers. I like it so much I decided to go back and get the dash trim. I asked the forum for a DIY or hints. I got a few but it turns out they really didn't prepare me for what was involved. As a result, I took some photos along the way and decided to do a DIY to help the next person(s).
First of all, the dash trim is nothing like door trims in terms of how they are attached. Door trims are based on metal pins on the back of the trims, poking through holes into minor spring clips. While best to remove the door panel to access the door trims for removal, I am thinking (YMMV) that the door trims could potentially be popped off with a wide stiff metal tool (think multipurpose wall and paint scraper) and more than a little patience. Here are some door panel details.
Skipping ahead, this was my goal/focus: To remove the three dash trim pieces, items 31 and the two piece item 32 below:
I started on the left side because I knew it would be easier than the right side and I wanted to get a little success under my belt before tackling the right side. The first step would be to remove the knee bolster (two pieces, 6 10mm bolts IIRC). In my junkyard case, the knee bolster was already removed. Even so the access to the back of Trim Piece 31 wasn't great. So I removed cover 11 and fuse holder 15 (just pushed the fuse holder into the interior of the dash). This provided better visual access to the pins and clips on the back of the trim piece.
This was the first photo I took, through the hole in the end of the dash were the fuse holder had been:
This is a detail of the way the circular clip has been pushed over the pin on the dash trim:
I was able to remove the circular clips through a combination of prying with a flat blade screw driver and pulling with a long nose pliers. I think I pried through the fuse panel hole and pulled with the pliers coming up from the bottom (door open, knee bolster removed). Here was the final result of that effort: Trim removed undamaged:
Okay with that little bit of success and confidence done, it was time to move to the right side and remove the shorter of the two airbag area trim pieces. To start you would have to remove the glove box (two 10 mm nuts and two 10 mm bolts and two wire connections (with plugs inside grey foam - no need to cut anything). In my case, the glove box was hanging there and all I had to do was remove one final bolt and the two electrical connectors.
Based on the success of working through the fuse panel area on the left end of the dash, I decided to do the same thing on the right side. I removed cover 12 and was a bit surprised to find just dash (nothing to hide behind that cover 12). There was one clip, Item 14, that I removed. That was enough for me to put one eye to the hole and see what I was up against. Basically the same as the left side: Pins and circle clips. Although in the right side the pins were actually threaded rods.
Removal of the shorter right side trim clips was done from below with a flat screw driver and needle nose pliers - while watching through that little access hole with my right eye.
After a bit of playing around and gentle prying and pulling, the small right side trim piece clips and the trim came off in fine shape.
Because I could not see behind the large airbag trim (air bag is in the way), I tried prying and probing for probably 10 minutes before I finally realized that I would have to remove the item 16 airbag. Turns out that it isn't a big deal. There are two 13 mm nuts on studs that hold the Item 15 airbag frame to the metal airbag substructure. These require a 13 mm deep socket because the studs are quite long. Then there are two (four) 10 mm hex head bolts to remove and one very long 8 mm Allen-head bolt (item 17) to be removed.
NOTE: On a "live" car, you would want to disarm the airbag before removing it from its desired location. This could be accomplished by disconnecting the battery for 30 minutes or more (have your radio code handy) or pulling the red "206" relay in the right side (LHD) kick panel and/or disconnecting the airbag at a red plug in a grey foam tube above the ECU.
With the airbag loose an pushed back from the back of the dash, I felt up there and felt three big round nuts of some type. I just loosened them by hand. As you will see in a moment, there is no way you could pry the trim off the dash without damaging the dash and trim with the size of those trim nuts. Anyway, in a few more minutes I had the last trim piece off and was looking at this.
Back home I took these photos of the trim. Note the photos of the backs and the types of rods and pins and clips and nuts that are used.
Front Side:
Back side:
Here is a detail on the "mushroom head" nuts on the main airbag area trim piece:
There, wasn't that fun!?


Thread
Thread Starter
Forum
Replies
Last Post
gateway
Audi 90 / 80 / Coupe quattro / Cabriolet
1
11-27-2006 04:01 AM
S4Ca$hwhore
S4 / RS4 (B5 Platform) Discussion
2
08-31-2006 03:31 PM