Replacing Climate Control Head Illumination Bulbs
 11-29-2014, 07:11 PM
#1
AudiWorld Super User

Thread Starter
This almost doesn't need a DIY but because there are a few little issues, I thought that I would do one up anyway. NOTE: CC in this post is going to mean "Climate Control" as in CC head = climate control head and CC surround = climate control head.
*************************
This was my problem. One bulb out: The fan screen. Not critical but annoying.
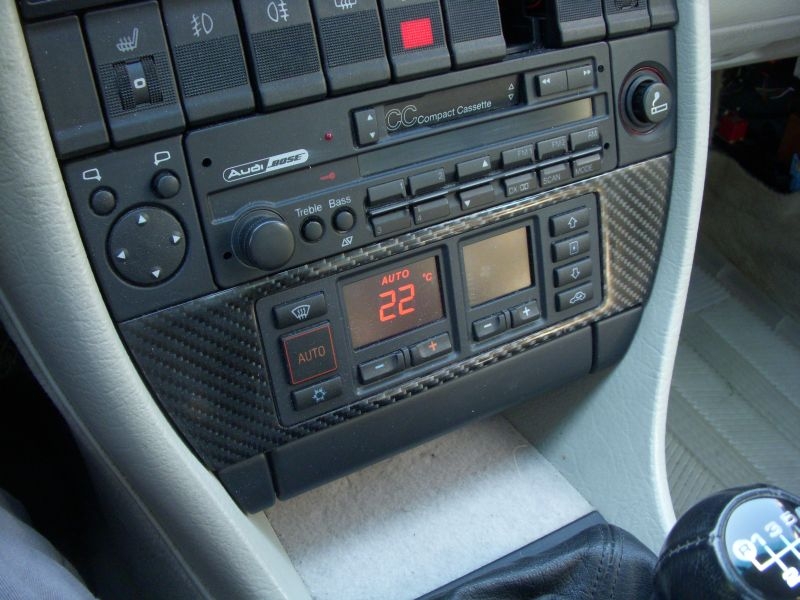
So I needed to get at least one bulb. I decided to do all four while I was there.
Step 1: Remove the face plate.
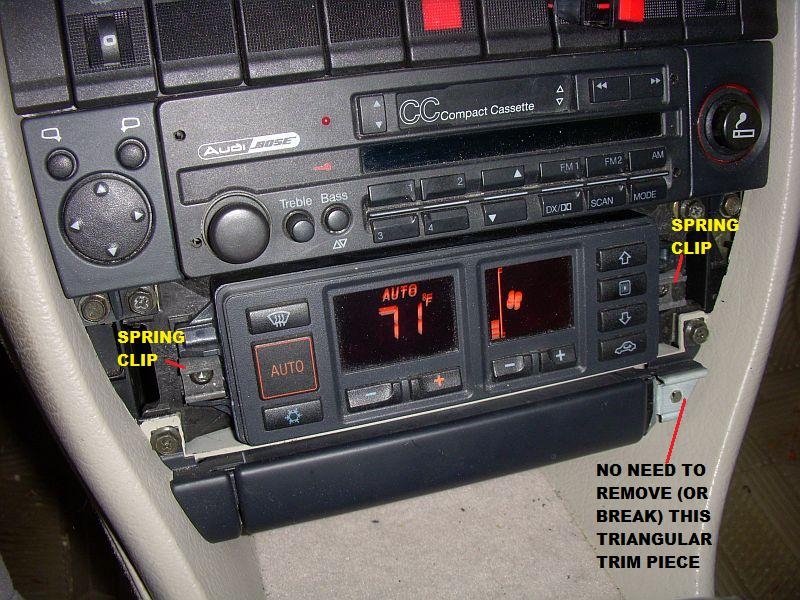
Before we remove it, lets skip ahead and see what is involved with the CC Head Surround and how it is held into the console.
Here we are with the CC head surround removed. Note the two spring clips on either side of the CC head. These grab on to clip lugs on the back of the CC head surround. Note also the broken triangular trim to the right of ashtray. This is what happens when you follow some people's DIY instructions. There is ABSOLUTELY NO NEED to touch anything on or remove anything on the ashtray or its surrounding triangular trim. Lesson learned and now shared.
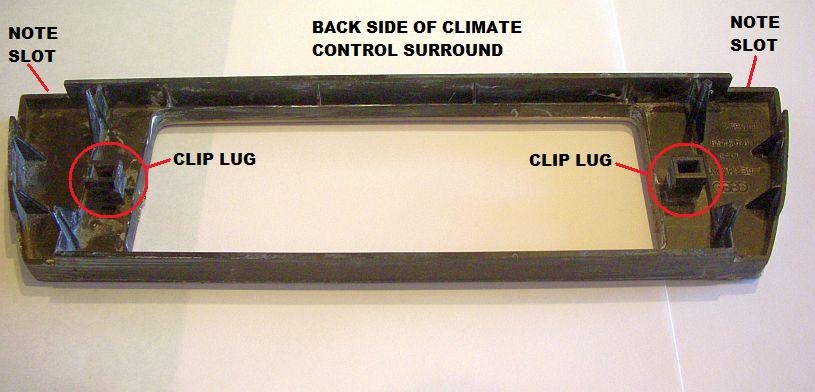
Here is the back side of the CC Head Surround. Note the two clip lugs and the two slots at either end of the surround:
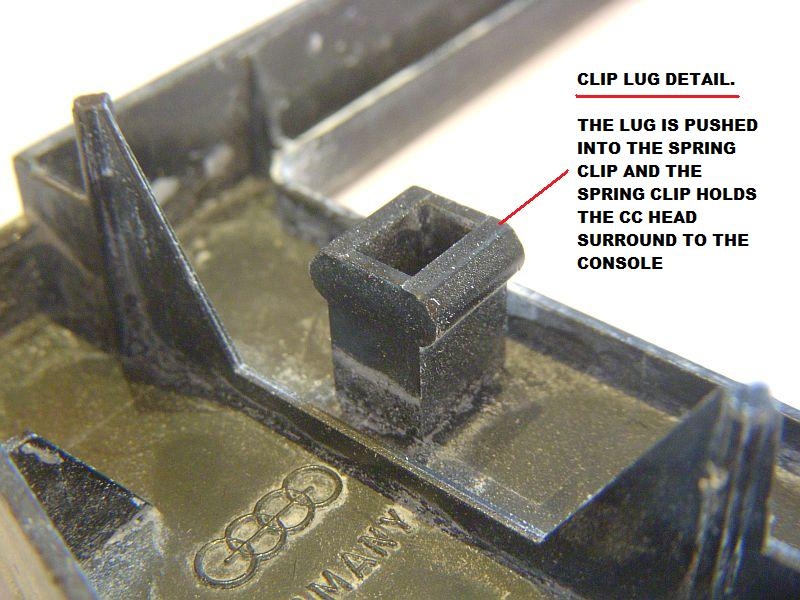
Here is a detail of one of the clip lugs on the back side of the CC head surround:
Okay, with that background, we can now remove the CC head surround without breaking anything.
Remember those slots at the end of the CC head surround? They are there so you can put a small flat tool in there and pry out the ends of the CC head. Here are two examples:
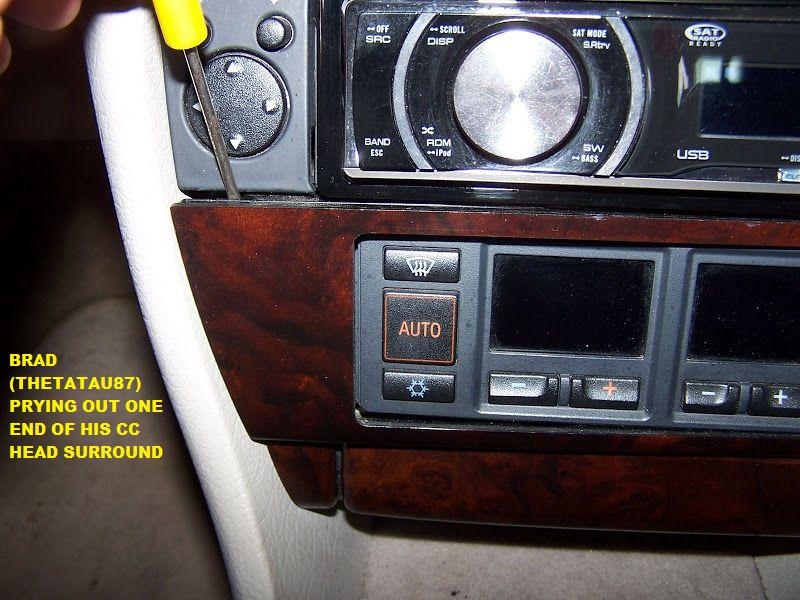

Photos courtesy of Brad (ThetaTau87) and Steve Y. respectively (see Reference list at the end of this post)
Pry both ends of the CC head surround away from the CC head until the clip lugs are released by the two spring clips.
Step 2: Remove the spring clips. The two 4 mm allen head socket bolts that hold the clips also hold the CC head into the front console:

Set the clips and bolts aside in a safe location so you have them for the reinstall
Step 3: Pull the CC head out of the console with the connectors attached. There was some debate as to whether you could pull the CC head out far enough to access the bulbs without disconnecting the four CC head wiring connectors. Based on my experience, I would say "Yes" (it is possible).

I think if you had the right tool (6 mm six point box end wrench) it would be possible to remove and replace the bulbs at this point. However, conventional wisdom says just remove the wiring connectors.
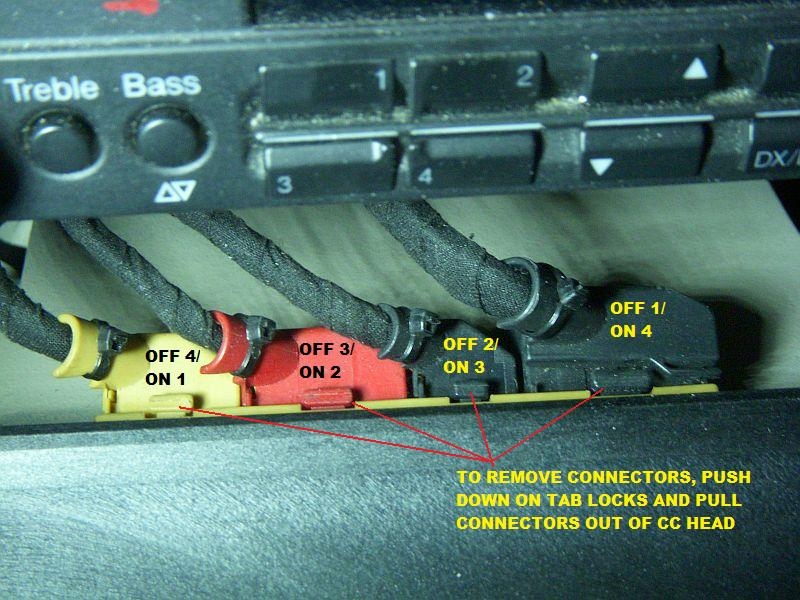
Step 4: Remove the wiring connectors. Start with the big one on the right and move from right to left. Push down on the locking tab and pull the connector out of the CC head (installation will be the reverse order, i.e. starting with the yellow connector and working to the right.
Step 5: Remove and replace the bulbs. Turn them 90 degrees to the left (anti-clockwise)
Here is Brad (ThetaTau87's) CC head showing the bulbs. Mine had 2W outer bulbs and 0.9W inners. Looks like at least one of Brad's inners might have been replaced (or the UrS6s just came with the 1.1W orange bulbs)
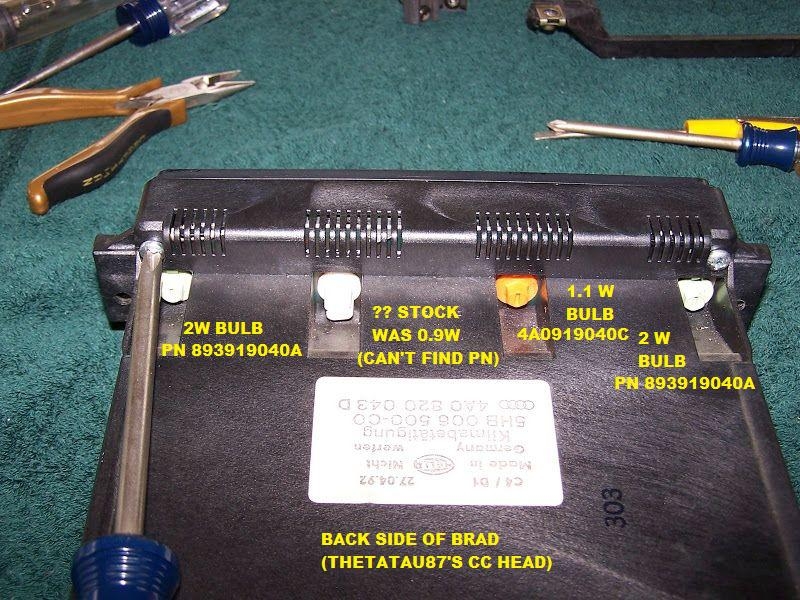
Photo courtesy of Brad (ThetaTau87)
My OE 93UrS4 CC head 2.0W and 0.9W bulbs:
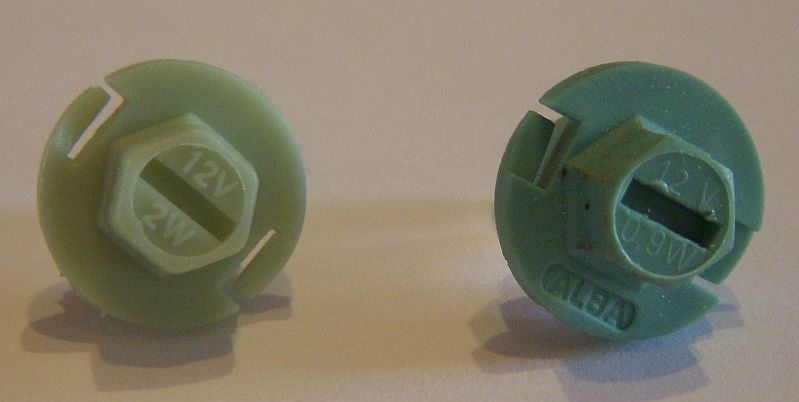
2W = 893919040A
0.9W = ?? Can't find a PN
1.1W = next best thing? = 4A0919040C
A little bulb trivia before we are done:
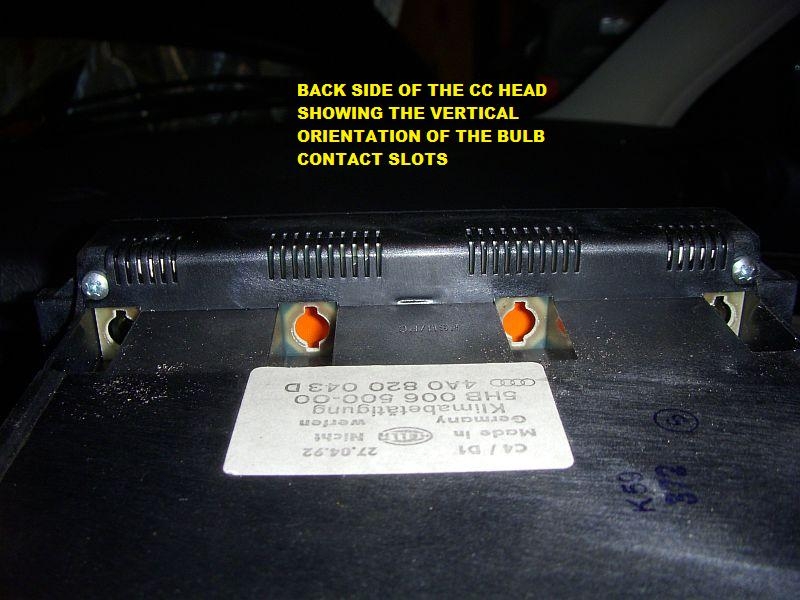
With the bulbs out, you can see the orientation of the openings for the bulbs, i.e. vertical.
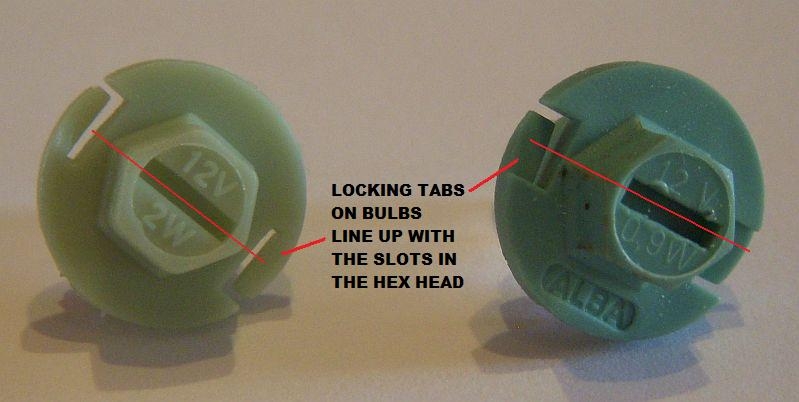
The bulbs have locking tabs that line up with the slots in the hex head of the bulb:
The bulbs have two electrical contacts that are at 90 degrees to the locking tabs (and the slot in the bulb hex head). The electrical contacts go through those vertical slots.
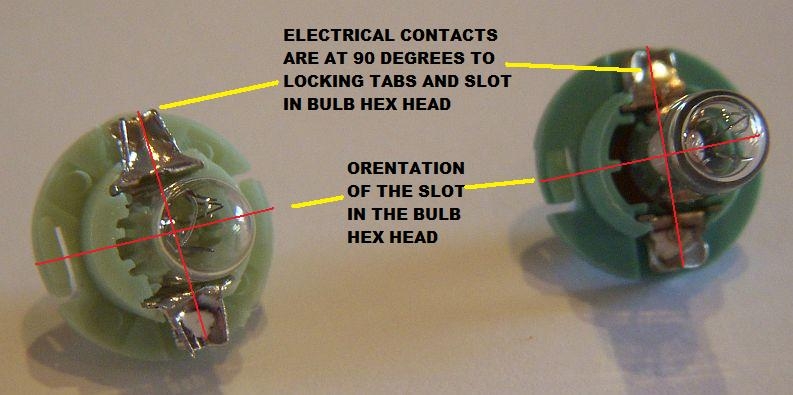
The point of this is, you load the bulb into the CC Head bulb slots with the slot in the bulb hex head in the horizontal (meaning the electrical contacts are vertical) and then you turn the bulbs 90 degrees to the right (clockwise) until the slot is vertical and the locking tabs snap into the slots that the bulb electrical contacts went through. Clever design, I thought.
Installation is the reverse of removal.
REFERENCES:
1. Steve Y's front console removal pdf
2. Brad ThetaTau's climate control button repair post
*************************
This was my problem. One bulb out: The fan screen. Not critical but annoying.
So I needed to get at least one bulb. I decided to do all four while I was there.
Step 1: Remove the face plate.
Before we remove it, lets skip ahead and see what is involved with the CC Head Surround and how it is held into the console.
Here we are with the CC head surround removed. Note the two spring clips on either side of the CC head. These grab on to clip lugs on the back of the CC head surround. Note also the broken triangular trim to the right of ashtray. This is what happens when you follow some people's DIY instructions. There is ABSOLUTELY NO NEED to touch anything on or remove anything on the ashtray or its surrounding triangular trim. Lesson learned and now shared.
Here is the back side of the CC Head Surround. Note the two clip lugs and the two slots at either end of the surround:
Here is a detail of one of the clip lugs on the back side of the CC head surround:
Okay, with that background, we can now remove the CC head surround without breaking anything.
Remember those slots at the end of the CC head surround? They are there so you can put a small flat tool in there and pry out the ends of the CC head. Here are two examples:
Photos courtesy of Brad (ThetaTau87) and Steve Y. respectively (see Reference list at the end of this post)
Pry both ends of the CC head surround away from the CC head until the clip lugs are released by the two spring clips.
Step 2: Remove the spring clips. The two 4 mm allen head socket bolts that hold the clips also hold the CC head into the front console:
Set the clips and bolts aside in a safe location so you have them for the reinstall
Step 3: Pull the CC head out of the console with the connectors attached. There was some debate as to whether you could pull the CC head out far enough to access the bulbs without disconnecting the four CC head wiring connectors. Based on my experience, I would say "Yes" (it is possible).
I think if you had the right tool (6 mm six point box end wrench) it would be possible to remove and replace the bulbs at this point. However, conventional wisdom says just remove the wiring connectors.
Step 4: Remove the wiring connectors. Start with the big one on the right and move from right to left. Push down on the locking tab and pull the connector out of the CC head (installation will be the reverse order, i.e. starting with the yellow connector and working to the right.
Step 5: Remove and replace the bulbs. Turn them 90 degrees to the left (anti-clockwise)
Here is Brad (ThetaTau87's) CC head showing the bulbs. Mine had 2W outer bulbs and 0.9W inners. Looks like at least one of Brad's inners might have been replaced (or the UrS6s just came with the 1.1W orange bulbs)
Photo courtesy of Brad (ThetaTau87)
My OE 93UrS4 CC head 2.0W and 0.9W bulbs:
2W = 893919040A
0.9W = ?? Can't find a PN
1.1W = next best thing? = 4A0919040C
A little bulb trivia before we are done:
With the bulbs out, you can see the orientation of the openings for the bulbs, i.e. vertical.
The bulbs have locking tabs that line up with the slots in the hex head of the bulb:
The bulbs have two electrical contacts that are at 90 degrees to the locking tabs (and the slot in the bulb hex head). The electrical contacts go through those vertical slots.
The point of this is, you load the bulb into the CC Head bulb slots with the slot in the bulb hex head in the horizontal (meaning the electrical contacts are vertical) and then you turn the bulbs 90 degrees to the right (clockwise) until the slot is vertical and the locking tabs snap into the slots that the bulb electrical contacts went through. Clever design, I thought.
Installation is the reverse of removal.
REFERENCES:
1. Steve Y's front console removal pdf
2. Brad ThetaTau's climate control button repair post
Last edited by UrS4boy; 11-29-2014 at 11:04 PM.


Thread
Thread Starter
Forum
Replies
Last Post
Bdawg
Audi 90 / 80 / Coupe quattro / Cabriolet
2
10-23-2014 12:10 PM
watty
A4 (B5 Platform) Discussion
10
02-25-2003 08:59 PM
TGM65
S4 / RS4 (B5 Platform) Discussion
7
12-06-2001 10:43 PM