
How To: B9 *5 Door panel removal, any interest?
 04-15-2019, 01:41 PM
#1
AudiWorld Member
Thread Starter

Howdy,
Recently picked up a 2018 S5 Coupe that I'm going to install aftermarket amps/speakers into. Started out by removing the door panel to see what the factory speakers were all about. Took some pix along the way, so if anyone is needing info on the process, just let me know.
Recently picked up a 2018 S5 Coupe that I'm going to install aftermarket amps/speakers into. Started out by removing the door panel to see what the factory speakers were all about. Took some pix along the way, so if anyone is needing info on the process, just let me know.
 04-21-2019, 07:33 AM
#2
AudiWorld Member
Thread Starter
Here is a quick and dirty description of how to remove the door card from a B9 S5 Coupe... hopefully this applies to the SB as well.
Tools Needed:
T25 Torx bit and driver handle
Trim removal kit or small flat blade screw driver (please tape the tip to protect trim & paint)
Long flat blade screw driver (please tape the tip to protect trim & paint)
Microfiber towel or old T-shirt (used as a wedge to protect trim & paint)
Summary:
The door card is held in place by 3 T25 Torx screws and a series of ball sockets on the card and posts on the door.
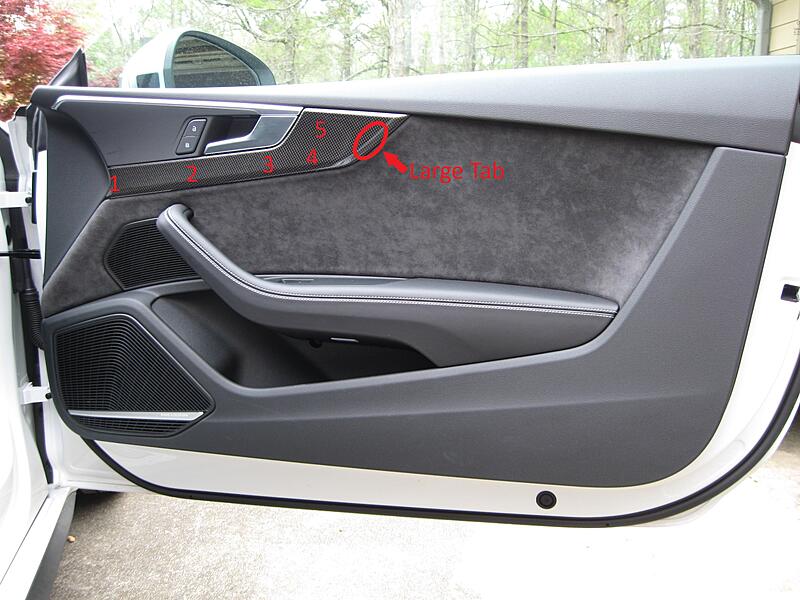
Step 1: Remove Carbon Fiber trim piece
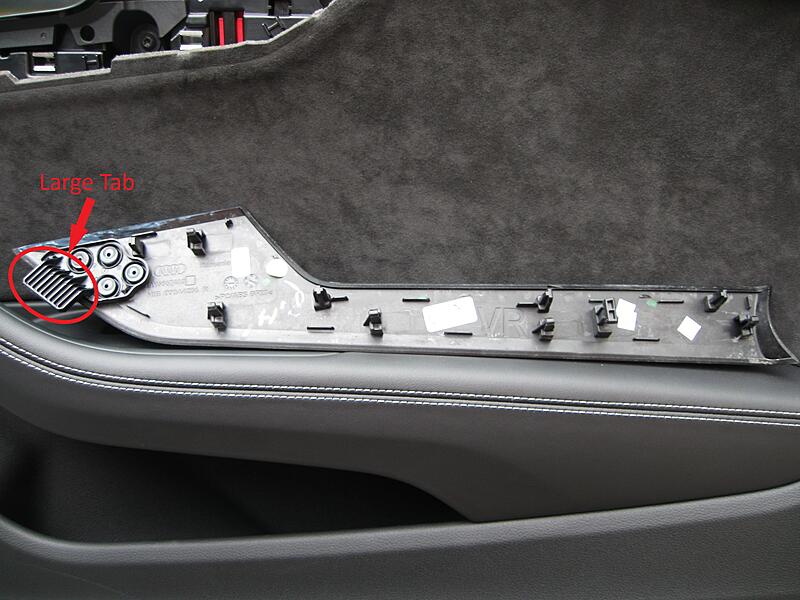
Referring to the next two photos, start at position 1 with a trim removal tool or screwdriver and pry behind the CF trim until it starts to pop loose (place MF towel under tool as a wedge). Move sequentially from position 2 through 5 prying until the trim panel is free. This will leave the Large Tab which can be released by pulling the whole trim panel towards you and then sliding the tab out of the slot.
Attachment 101652
Attachment 101653
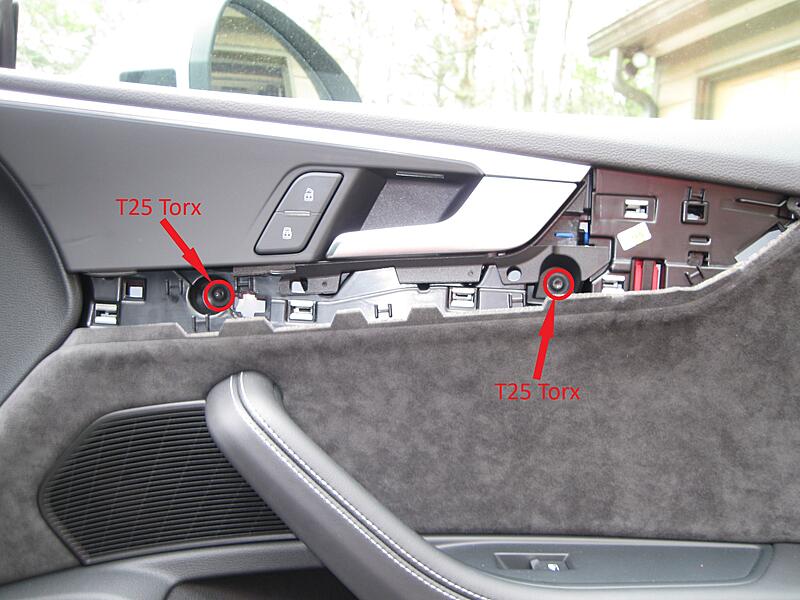
Step 2: Remove 2 T25 Torx screws behind Carbon Fiber trim
Referring to the next photo, remove the 2 T25 Torx screws shown using your bit/driver combo
Attachment 101654
Step 3: Remove T25 Torx screw below the armrest
Referring to the next photo, remove the T25 Torx screw shown using your bit/driver combo
Attachment 101655
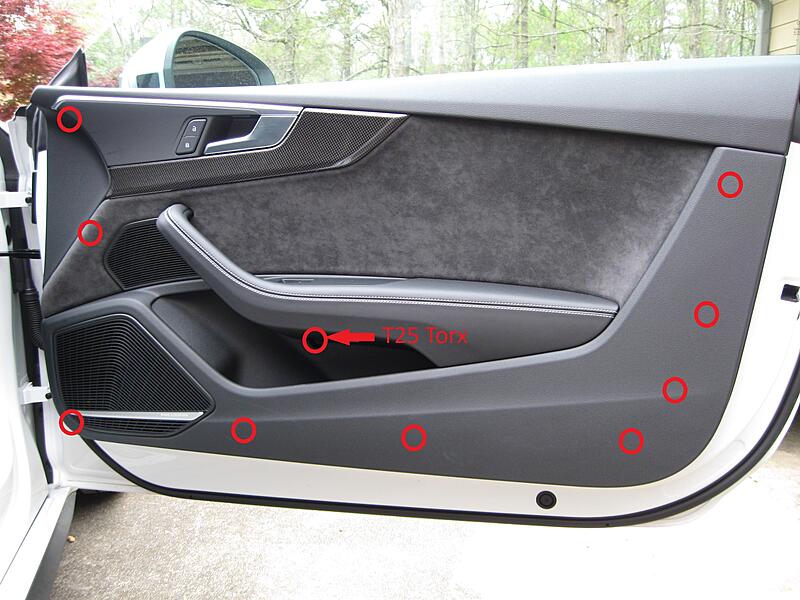
Step 4: Unsnap the door panel ball sockets
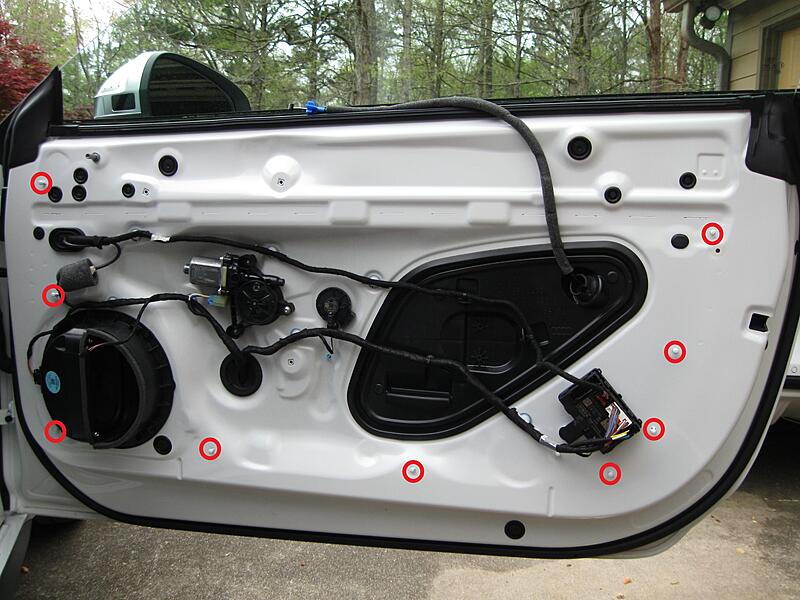
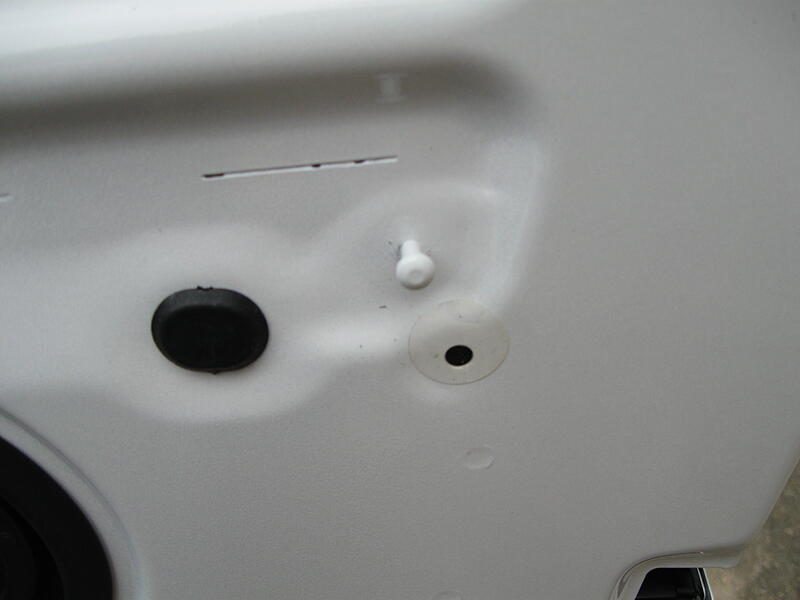
Referring to the previous photo, place the trim tool or long screw driver and MF towel combo at the positions indicated and pry towards you to unsnap the socket from the post. I had the best luck starting nearest the window on the hinge end and working my way towards the latch end. The next 3 photos show the post locations and close-ups of the post and socket.
Attachment 101656
Attachment 101657
Attachment 101658
Step 5: Lift door card off door
No photos necessary for this step. Once all sockets have been freed, lift the door card straight up roughly 3 inches to unseat the lip from the window sill.
Step 6: Disconnect various connectors from door card (a helper would be nice at this step)
Also no photos, mainly because I didn't have enough hands to hold the door card and take pictures. There are 3 connectors that need to be released;
Door Latch Cable: Grasp cable at door card and pull towards the hinge to pop it out. Then slide the round ferrule at the latch out of the circular slot.
Midrange Speaker Cable: This is where a second set of hands would be nice. The connector consists of a square socket on the speaker and a plug on the door cabling. The plug has a small latch... using the small screwdriver, press the latch towards the cable while putting tension on the cable to release it.
Door electronics cable: This cable plugs into a junction box using a folding latch system. Rotate the latch away from the junction box and the plug will pull straight out.
Reassemble in reverse order...
Tools Needed:
T25 Torx bit and driver handle
Trim removal kit or small flat blade screw driver (please tape the tip to protect trim & paint)
Long flat blade screw driver (please tape the tip to protect trim & paint)
Microfiber towel or old T-shirt (used as a wedge to protect trim & paint)
Summary:
The door card is held in place by 3 T25 Torx screws and a series of ball sockets on the card and posts on the door.
Step 1: Remove Carbon Fiber trim piece
Referring to the next two photos, start at position 1 with a trim removal tool or screwdriver and pry behind the CF trim until it starts to pop loose (place MF towel under tool as a wedge). Move sequentially from position 2 through 5 prying until the trim panel is free. This will leave the Large Tab which can be released by pulling the whole trim panel towards you and then sliding the tab out of the slot.
Attachment 101652
Attachment 101653
Step 2: Remove 2 T25 Torx screws behind Carbon Fiber trim
Referring to the next photo, remove the 2 T25 Torx screws shown using your bit/driver combo
Attachment 101654
Step 3: Remove T25 Torx screw below the armrest
Referring to the next photo, remove the T25 Torx screw shown using your bit/driver combo
Attachment 101655
Step 4: Unsnap the door panel ball sockets
Referring to the previous photo, place the trim tool or long screw driver and MF towel combo at the positions indicated and pry towards you to unsnap the socket from the post. I had the best luck starting nearest the window on the hinge end and working my way towards the latch end. The next 3 photos show the post locations and close-ups of the post and socket.
Attachment 101656
Attachment 101657
Attachment 101658
Step 5: Lift door card off door
No photos necessary for this step. Once all sockets have been freed, lift the door card straight up roughly 3 inches to unseat the lip from the window sill.
Step 6: Disconnect various connectors from door card (a helper would be nice at this step)
Also no photos, mainly because I didn't have enough hands to hold the door card and take pictures. There are 3 connectors that need to be released;
Door Latch Cable: Grasp cable at door card and pull towards the hinge to pop it out. Then slide the round ferrule at the latch out of the circular slot.
Midrange Speaker Cable: This is where a second set of hands would be nice. The connector consists of a square socket on the speaker and a plug on the door cabling. The plug has a small latch... using the small screwdriver, press the latch towards the cable while putting tension on the cable to release it.
Door electronics cable: This cable plugs into a junction box using a folding latch system. Rotate the latch away from the junction box and the plug will pull straight out.
Reassemble in reverse order...
09-14-2020, 05:32 PM
#3
AudiWorld Newcomer

Join Date: Sep 2020
Posts: 3
Likes: 0
Received 0 Likes
on
0 Posts
[QUOTE=mumbles;25306062]Here is a quick and dirty description of how to remove the door card from a B9 S5 Coupe... hopefully this applies to the SB as well.
Tools Needed:
T25 Torx bit and driver handle
Trim removal kit or small flat blade screw driver (please tape the tip to protect trim & paint)
Long flat blade screw driver (please tape the tip to protect trim & paint)
Microfiber towel or old T-shirt (used as a wedge to protect trim & paint)
Summary:
The door card is held in place by 3 T25 Torx screws and a series of ball sockets on the card and posts on the door.
Step 1: Remove Carbon Fiber trim piece
Referring to the next two photos, start at position 1 with a trim removal tool or screwdriver and pry behind the CF trim until it starts to pop loose (place MF towel under tool as a wedge). Move sequentially from position 2 through 5 prying until the trim panel is free. This will leave the Large Tab which can be released by pulling the whole trim panel towards you and then sliding the tab out of the slot.
Step 2: Remove 2 T25 Torx screws behind Carbon Fiber trim
Referring to the next photo, remove the 2 T25 Torx screws shown using your bit/driver combo
Step 3: Remove T25 Torx screw below the armrest
Referring to the next photo, remove the T25 Torx screw shown using your bit/driver combo
Step 4: Unsnap the door panel ball sockets
Referring to the previous photo, place the trim tool or long screw driver and MF towel combo at the positions indicated and pry towards you to unsnap the socket from the post. I had the best luck starting nearest the window on the hinge end and working my way towards the latch end. The next 3 photos show the post locations and close-ups of the post and socket.

Step 5: Lift door card off door
No photos necessary for this step. Once all sockets have been freed, lift the door card straight up roughly 3 inches to unseat the lip from the window sill.
Question: Does the very top plastic part of the door card (where you would rest your arm while driving with the window open) separate from the rest of the door card? I�d like to wrap this in real CF.
Thanks
Tools Needed:
T25 Torx bit and driver handle
Trim removal kit or small flat blade screw driver (please tape the tip to protect trim & paint)
Long flat blade screw driver (please tape the tip to protect trim & paint)
Microfiber towel or old T-shirt (used as a wedge to protect trim & paint)
Summary:
The door card is held in place by 3 T25 Torx screws and a series of ball sockets on the card and posts on the door.
Step 1: Remove Carbon Fiber trim piece
Referring to the next two photos, start at position 1 with a trim removal tool or screwdriver and pry behind the CF trim until it starts to pop loose (place MF towel under tool as a wedge). Move sequentially from position 2 through 5 prying until the trim panel is free. This will leave the Large Tab which can be released by pulling the whole trim panel towards you and then sliding the tab out of the slot.


Step 2: Remove 2 T25 Torx screws behind Carbon Fiber trim
Referring to the next photo, remove the 2 T25 Torx screws shown using your bit/driver combo

Step 3: Remove T25 Torx screw below the armrest
Referring to the next photo, remove the T25 Torx screw shown using your bit/driver combo

Step 4: Unsnap the door panel ball sockets
Referring to the previous photo, place the trim tool or long screw driver and MF towel combo at the positions indicated and pry towards you to unsnap the socket from the post. I had the best luck starting nearest the window on the hinge end and working my way towards the latch end. The next 3 photos show the post locations and close-ups of the post and socket.


Step 5: Lift door card off door
No photos necessary for this step. Once all sockets have been freed, lift the door card straight up roughly 3 inches to unseat the lip from the window sill.
Question: Does the very top plastic part of the door card (where you would rest your arm while driving with the window open) separate from the rest of the door card? I�d like to wrap this in real CF.
Thanks

Thread
Thread Starter
Forum
Replies
Last Post
James Cole
A4 (B9 Platform) Discussion
6
06-30-2017 01:52 PM
RidgeS4
S4 / RS4 (B5 Platform) Discussion
1
07-31-2002 06:51 AM