Installed Rearview Camera Retrofit from Carsgadget.com (Pics)
 12-14-2015, 12:17 AM
#11
OK, this is my next project on the car to make the other half happy.
How do you route the wires from the cabin to the hatch? Is that part also PIA? I am assuming right by the hinges?
This is the best kit that I have seen so far.
Thanks for all the write up!
How do you route the wires from the cabin to the hatch? Is that part also PIA? I am assuming right by the hinges?
This is the best kit that I have seen so far.
Thanks for all the write up!
 12-14-2015, 02:11 PM
#12
AudiWorld Super User

I used cable ties on the video cable to follow the OEM wiring harness in the rear hatch lid over to the right side hatch hinge (the black plastic hinge cover just snaps off). I then fed the video cable
down to the cargo floor behind the right side panel to where the rear fuses are located. Pulled the wire out though that fuse access panel, replaced the panel on top of the wire, then with some difficulty
side the cable under that floor seam towards the rear seat, then down around the outside rear seat floor area to the plastic floor sill and all the way up to the front using the sill. It is just very hard to lift the sill edge up around the seats, the front/rear doors pillar, etc.
 12-14-2015, 03:25 PM
#13
AudiWorld Super User
Just some help for others trying this......
First the seller's video and ZThang's photo's above are your greatest help.
You also need a lot of beer, mixed drinks, or other adult beverages to help it go more pleasantly!
1. Do yourself a favor, before you drop the glove box and rear hatch dismantling, start by removing the display panel, and hook up the complete system with power, the CAN connector (by fuse panel) to make sure it all works. You can have a defective unit, cable, etc. Also make sure your guide lines move when the steering wheel is turned.
2. You remove the display by using the nice quality orange pry tools supplied by the seller. For the surround, make sure that you insert the pry tools deep enough or you will remove only the thin chrome edge. Start at the top two corners, it takes some force, trust me it will pop. You can just let it hang by the wire, wrap a rag around it so that the sharp edges don't scratch the dash. Next remove the actual display torx bolts, lift out the panel, remove the panel connector. I stuffed paper towel pieces into all the holes around the panel as not to lose a torx bolt, once you lose them they are gone for good.
3. Remove the AMI unit from the glove box using the proper key removal tools (the seller shows these as free with the purchase but I didn't get any). If you don't know how these tools actually work with the fasteners, Google. You can spend a whole day trying to use wire when you don't know what you are doing.
4. Remove the 10 screws that hold the glove box up, and just let it rotate to the floor.
5. At the rear hatch lid. Remove the cargo light, just pry it out with a screwdriver, disconnect the wire connector. Pry out the two taillight access side panels (then remove one screw each side), and open that narrow panel in the middle (emergency folding triangle storage area), two screws here. Then with a large pry bar, and a lot of force unsnap the lower panel. The top panel just unsnaps the same with a lot of force. You only need to do the right side (two clip points) and then snap the top part by the hinge to have access to the OEM cable and hinge area. Otherwise you can snap off the complete top part if you need more access.
6. Remove you license plate, no need to remove the black plastic plate back panel as indicated in the video. Remove the handle electrical connector, the two nuts, also remove the silver metal bracket (2 bolts) in front of the handle as there are two plastic tabs on each side of the handle that must be squeezed in to remove the handle through the opening. Install the new handle in reverse order.
7. Wire up the handle, route the video cable as you wish. I suggest a route in my above reply post.
8. I tap the fuse using one of those very thin brass taps that sides along with the original fuse. I can't see how the 2 fuse piggy back fuse tap would work as it's too high to replace the dash side cover, at least on my Q5.
9. Power it up to check the system before you reinstall anything.
10. I cut a hole in the back of the AMI tray area sized to fit to cables, and placed the camera interface box there. There is enough cable slack that if the interface box dies for some reason I can just remove the box easily from the tray and replace it without dropping the glove box.
If I did this a second time I could probably do it in 1-2 hours.
I drove on a very rough road and no rattles..........so I guess the job was a complete success story!
Good luck to all attempting this!
Last edited by Bob Petruska; 12-17-2015 at 09:41 AM.
12-15-2015, 11:37 AM
#14

Hi folks,
I'm going to be doing this install over the Christmas holidays and plan on capturing the work via my GoPro and will edit and post. However, I also wanted to share the install pdf that may help others understand how the install is done, specifically for the MMI equipped Q5...and also a simple breakdown of the connections and wiring this up.
Updated as of Dec 19.15
Last edited by raj99; 12-23-2015 at 12:25 AM.
12-15-2015, 01:39 PM
#15
AudiWorld Super User
You should mention that there are 2 different systems with different cables and interface boxes. One for MMI head units and one for non-MMI (AMI) head units.
12-15-2015, 09:56 PM
#16
12-17-2015, 09:36 AM
#17
AudiWorld Super User
Hi Guys,
This is Eugene from CarsGadget.com Thank you all for this great post. Looking at this post, as i personally installed this system only on A4 model, the installation process on Q5 looks very similar to A4 and with this thread the install for Audi enthusiasts will be much easier now. Just wanted to add few things to this thread: all our units are tested before shipping out and all found as 100% working, this way we try to illuminate questions later. If, after installation you found that your unit is not functional, don't make decision it's not working, it means that there was some mistake in installation process. Please check all connections, they are seated properly, until it clicks into right position. For ACC red power wire at fuse box, please use tap fuse connector with 5A fuse, it's safe and cheap and you can find it at any auto parts store or Walmart. If you have any question on our unit's operation and install do not hesitate to contact us at info.carsgadget@gmail.com will try to reply asap.
Also, keep an eye on our website Carsgadget.com Audi rear view camera interface kit , as we're planing to add lots of new Audi gadgets. Probably after New Year we will release new video on how to install front camera for Audi models. Also, you will be able to buy front cameras on our web. Please stay tuned!
On the fuse tap, the Walmart one was too high to replace my Q5 dash side cover back on. It could just be my Q5......
12-17-2015, 02:48 PM
#18
AudiWorld Super User
NEW INSTALL BAY FTATC ATC FUSE TAP SOLID BRASS OVER LEG .250 PACKAGE OF 100
Anyway, I use this type of fuse tap over the OEM fuse leg. I soldered the power wire to it, I didn't use a crimp lug connector on it, this allows me to bend the tab downward for low profile. It also allows for the Audi OEM pink fuse support to be retained. I use fuse position #7 as there is no fuse #6 on my Q5. This is where the fuse tap tab bent down will end up. Fuse #7 is a fuse with little power drain as it's the 12V pin 15 on the OBDII diagnostic connector and only used when a diagnostic cable is connected. Also if anyone uses this type of tap make sure that you place it on the load side of the fuse (left side fuse pin) and not the supply side (right side).
Last edited by Bob Petruska; 12-17-2015 at 06:00 PM.
12-17-2015, 04:24 PM
#19
AudiWorld Member
Thread Starter

Bob's right. If you use a fuse tap like the one I got from walmart, then the pink/purple fuse retainer will no longer fit. The triangular cover for the whole fuse area does still fit just fine in my car however.
Here's a pic of how I set it up:
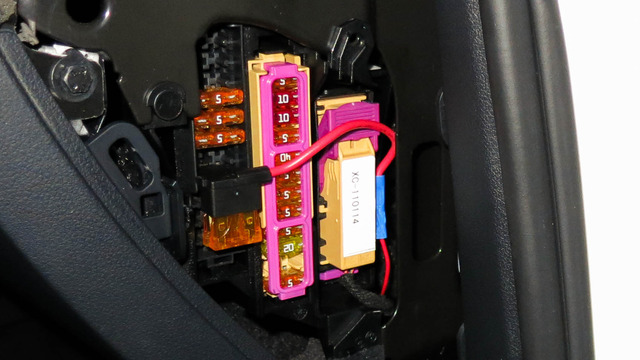
Here's a pic of how I set it up:
 12-19-2015, 12:07 PM
#20
AudiWorld Junior Member

Join Date: Jul 2011
Location: Northern NY
Posts: 17
Likes: 0
Received 0 Likes
on
0 Posts
Thanks Bob and ZThang as your tips made my install much easier today. I could of been done in 4 hours and that includes the pre-check before running the wires which for me was the hardest part as tucking the wire under the trim is a pain. My issue was the power wire for the camera was short by about 4 feet and I saw it was shorter then the video wire, but was hoping the video cable was just extra long. Guess what that's not the case, so I had to add a butt splice which I really didn't want to do but I wasn't going to start over routing the wire again. Anyone else doing this install it's just something else to check.
Overall I am happy with how everything turned out.
Overall I am happy with how everything turned out.

