DIY: Protection screen for intercooling radiator
#1
AudiWorld Super User
Thread Starter
What this is for and why do it?
The B8 S4 has a supercharger, which uses internal intercoolers (radiators) built into the unit, which sits as a single piece on top of the center of the engine, nestled in the "V" of the V6 engine. This system compresses and cools the compressed air in order to make more engine power. To cool the compressed (or charged) air, an air to liquid system is used much like the engine's radiator system. Cool liquid passes through the intercoolers as the charge air is pushed between the blades of these little radiators, taking the heat from the charged air and pulling it into the liquid. Once heated by this air, a pump pushes the liquid in a closed loop through tubing to the intercooling radiator - a small aluminum radiator which sits in the lower half of the area behind the grill on the front of the car. As the car moves, fresh cool air is forced over and through this radiator, and the heat pulled from the charged air now stored in the liquid, is released to the atmosphere, cooling the liquid so it can be recycled back through to the intercoolers and used over and over again.
Two people now on the vairious boards have thought they lost their water pump, but in fact have had holes punched in their intercooling radiators by errant road debris which strikes the radiator at highway speeds and perforates it. Since the engine and supercharger cooling systems share the same overflow container, but are seperate loops, it's only a matter of time before both systems have lost all coolant liquid, due to the one way valve system, the heating and cooling of the coolant and the shared overflow tank. This is not covered by Audi Warranty, and is considered wear and tear. It also removes the car from service until it parts are obtained and it can be repaired, not to mention the cost and frustration.
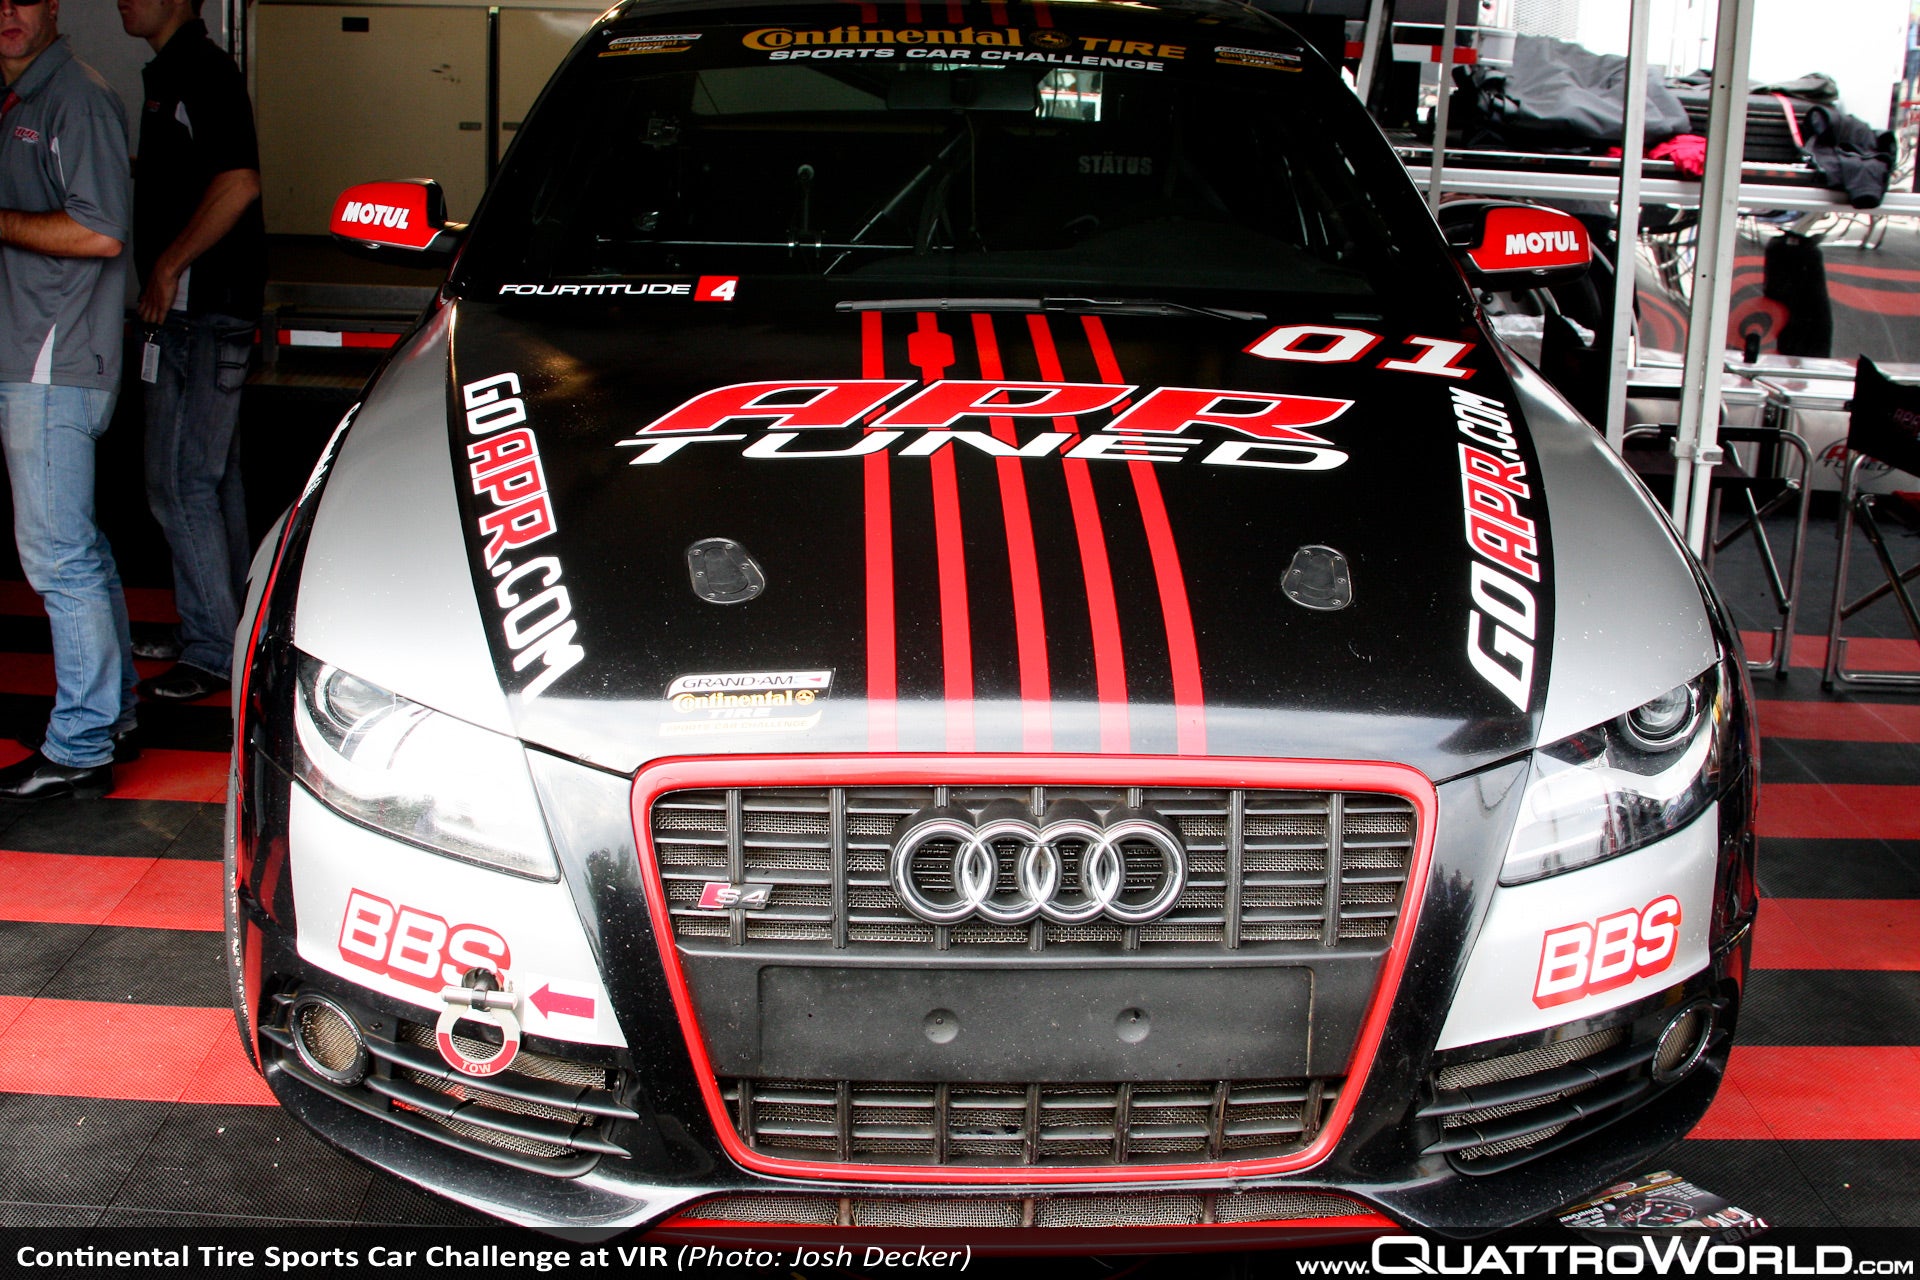
This is not a foolproof fix, but it does offer a much better chance of catching and stopping any debris large enough to damage the radiator from hitting it. APR uses something similar on their B8 S4 race car, since it is tracked and a lot fo debris can and is kicked up when cars cut a corner and hit the dirt during racing. This DIY will allow you to offer more protection for your car without it being very noticable, like the APR setup seen here:
Tools needed:
- Torx T30 bit
- Torx T25 bit
- Screwdriver for insertion of Torx bits
- Small flathead screwdriver
- Wire cutters/Dikes/Tin snips
- Heavy gloves
- 34" x 24" hardware cloth
Removal of parts to access front area
You will need the T30 bit to remove the 4 screws shown below.
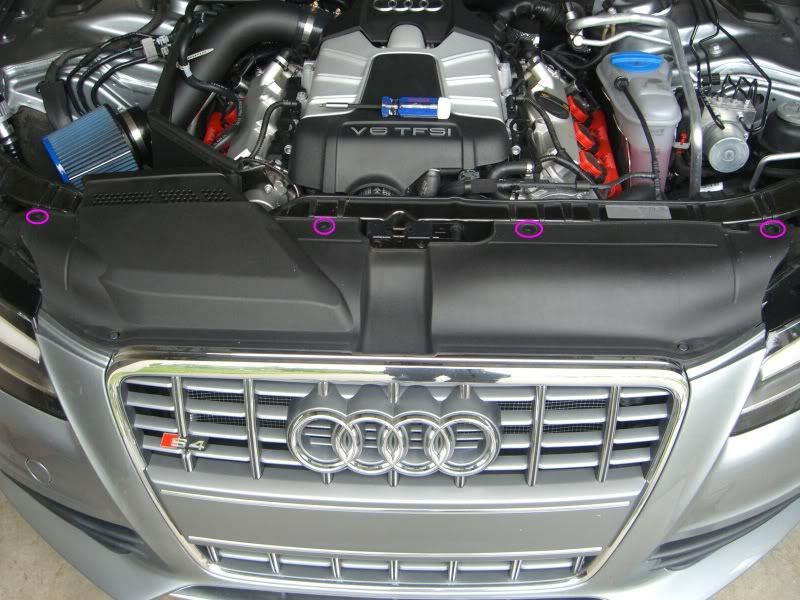
Once these are removed, you can set them aside somewhere safe for reinstall later. To remove the plastic radiator cover, you will lift it from the engine side an inch or so, then gently slide it back towards the engine to pull the tabs that mesh with the car's grill.
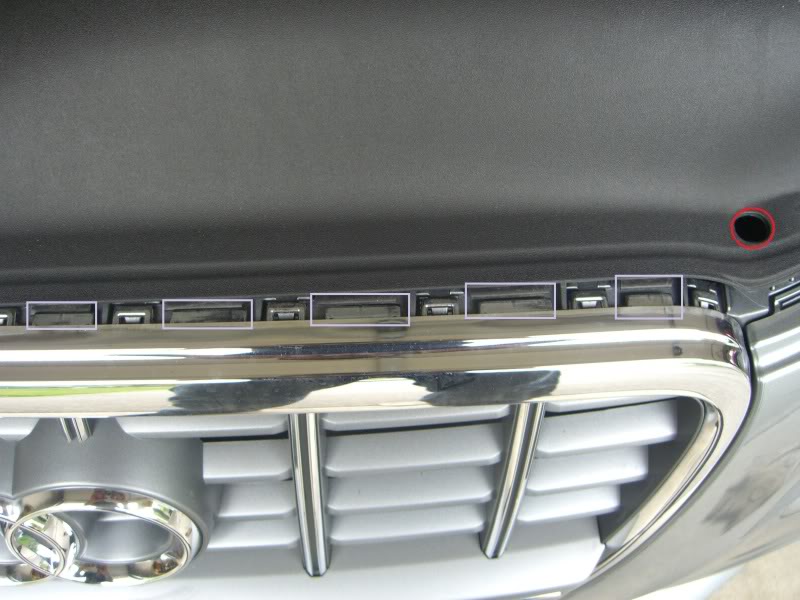
Once free of the tabs that mesh with the grill, you can safely lift this up and out of the engine bay, also setting it aside.
Removal of intake scoop
You now need to swap to the T25 bit to remove the 2 screws holding the intake scoop in place.
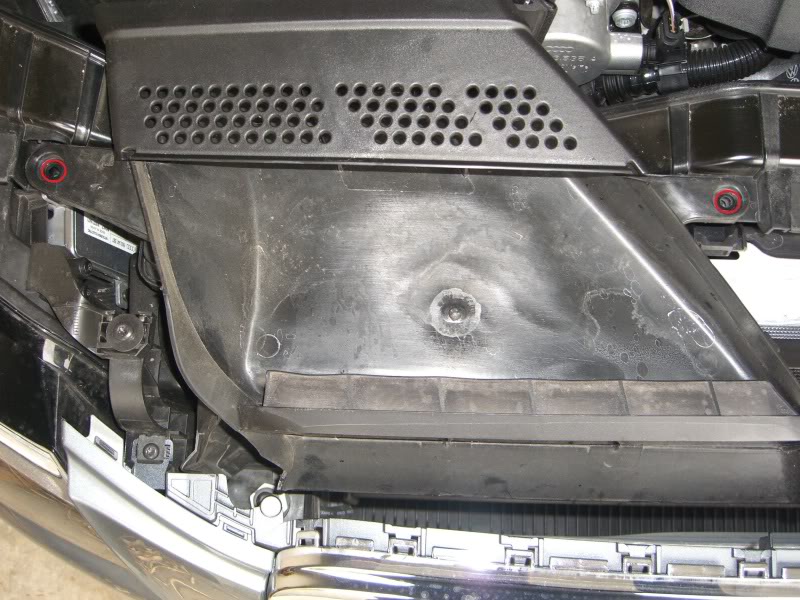
You will notice that the scoop has a very fine mesh over the opening to the air intake area. This is an excellent time to clean it, as it picsk up bugs, pollen, and all assorted particles before the air hits your air cleaner in the stock air filter box. The mesh is pretty soft, so it's best to blow it out and gently use a finger to loosen any debris trapped in it. Here you can see the side cleaned on the left, versus what it looked like when I took it out on the right.
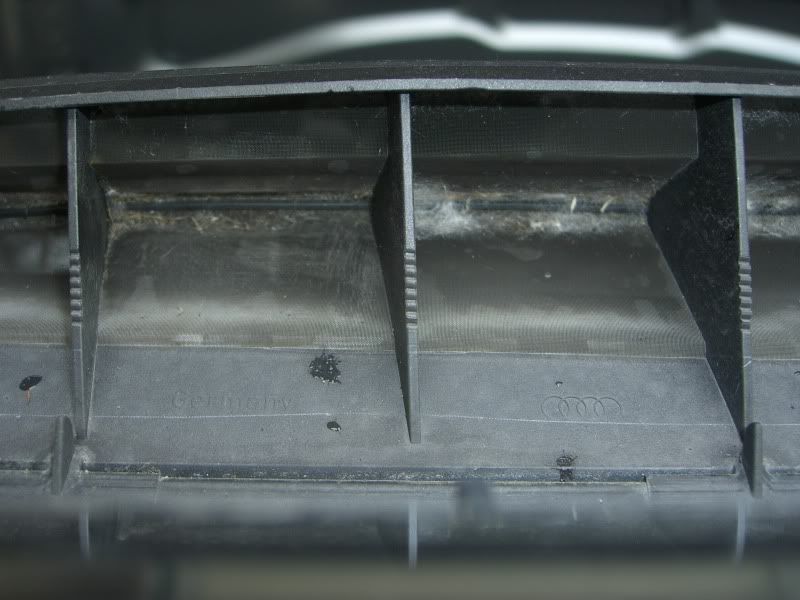
Once removed, set the air scoop and it's screws aside with the other parts already removed.
Familiarity with the setup and system
Looking down on the top of the front area once the cover and scoop are removed, looks like this -
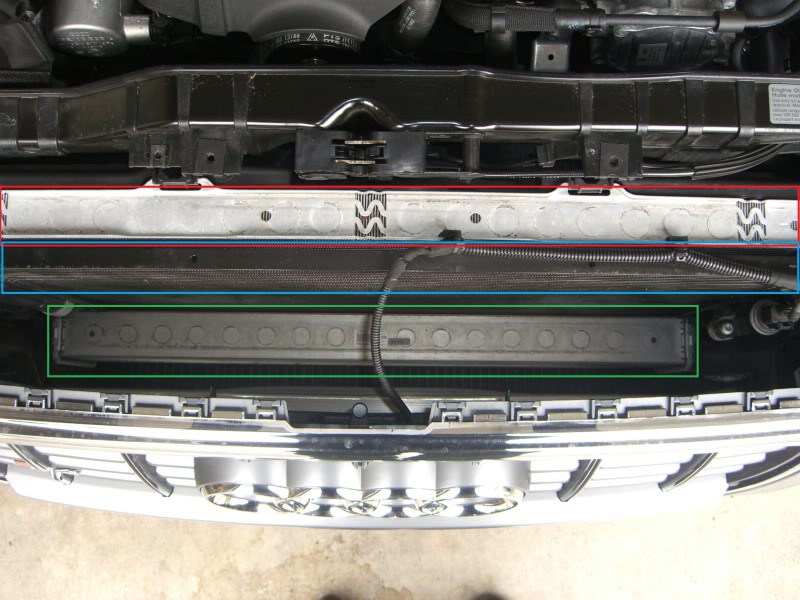
The RED box is the aluminum engine radiator, which cannot be seen through the grill from the front of the car. This is because it is obscured by the black air conditioner condenser, seen outlined in BLUE, which you can see above the filler plate/front license holder through the grill from outside the car. The intercooling radiator is aluminum, like the engine radiator, and it only a little less than half the height of the engine radiator and A/C condenser, in this picture, it's outlined in GREEN. Also notable in this shot, is the electical feed coming from the engine bay, spanning the gap over the coolers to connect to the HomeLink garage door opening system, which is located behind the 4 interlocking rings of the Audi logo on the front grill.
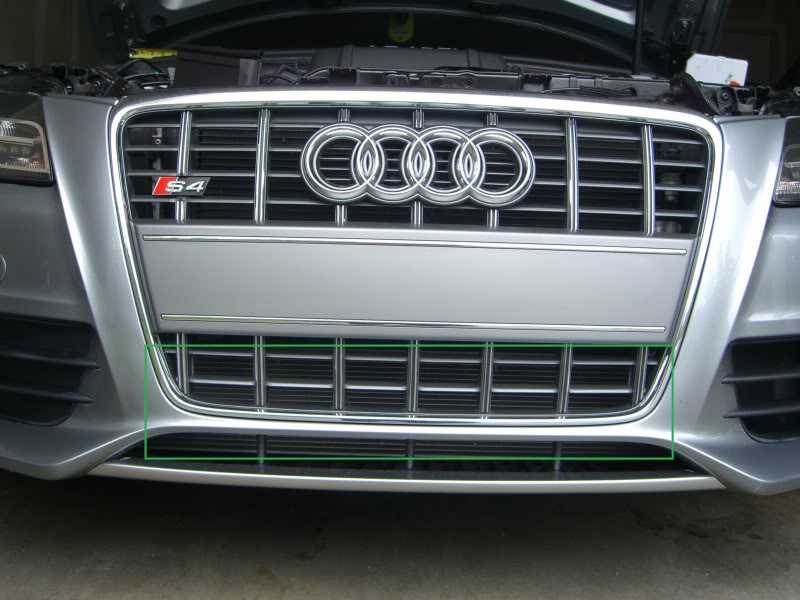
Here is a shot of the front of the car before anything has been installed, so let you see the silver colored aluminum intercooling radiator (again boxed in GREEN) in the lower portion of the grill, and the top is black due to the condenser being open to view, since the intercooling radiator is only a few inches high. You can also see the area below the grill proper and above the front splitter which offers a VERY large area with nothing to stop large debris from entering the front of the car and damaging the radiator.
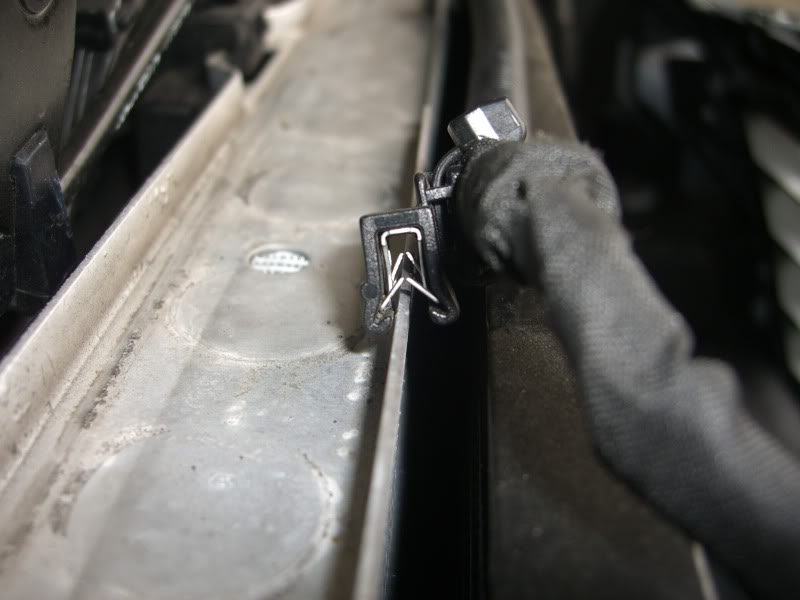
Next, you will need to unlock the 2 clips holding the HomeLink wire to the top of the radiator. These have little teeth which grip the radiator lip when pushed down onto it, so in order to remove these, you need a small flathead screwdriver to work between the teeth and radiator lip, in order to coax them off.
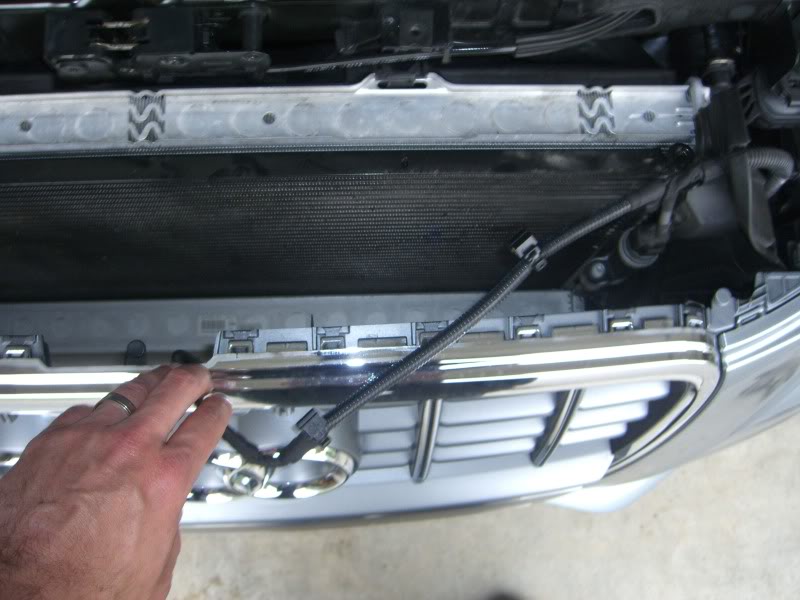
Once off you now have a clear shot straight down to the top side of the front splitter which is just under the intercooling radiator:
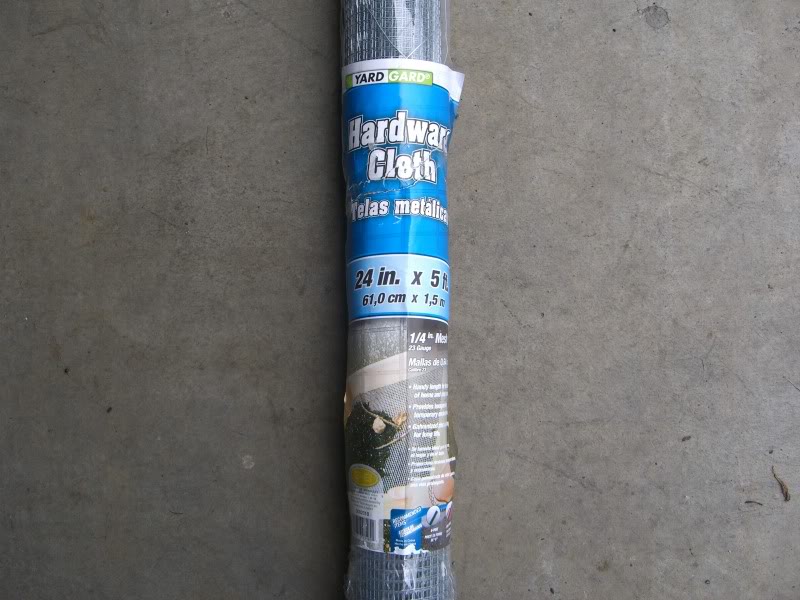
For this project, I went to the local hardware store and bought a roll of 24" wide and 5' long hardware cloth. I wanted something with as small a holes are possible in order to stop as much debris as possible. I chose .25" mesh, which came in 23 guage wire.
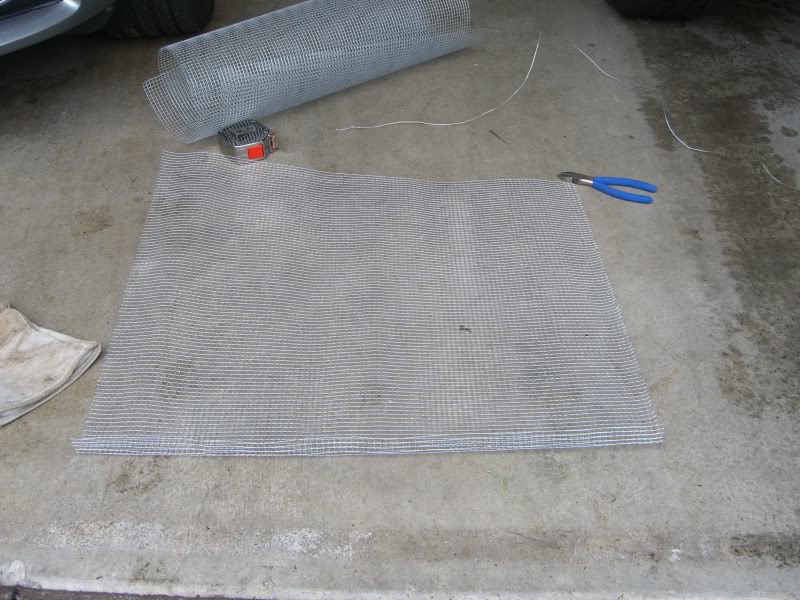
Using dikes to cut this into a 34" long piece, and wearing heavy suede work gloves to handle the wire is highly recommended. The wire is VERY sharp and you WILL cut yourself if you are not very careful. Rolling this new piece opposite the way it is pacakged, will eventually yield a nice flat 24 x 32 piece to work with for this project. Once flattened, you will take one of the short 24" sides and fold it at a 90 degree angle about 1.5 inches from the edge.
This angled piece will slide under the front of the intercooling radiator, and look like so:
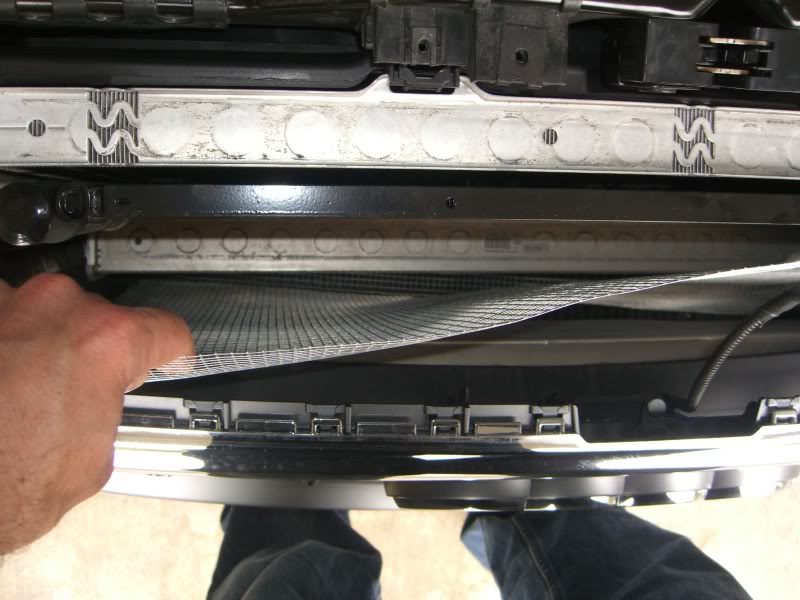
You can see the 90 degree bent piece sliding under the intercooling radiator above. Next take the couple of inches of cloth at the top, and gently bend and fold it into the space between the condenser and engine radiator. Be careful not to catch the delicate radiator fins on the mesh as you feed it between the condenser and radiator. Once you get the slack out of the mesh in front of the condenser and intercooling radiator, you can press harder on the part at the top of the condenser to crimp it in place with a bend in the mesh - take care that the mesh it tucked behind the small cylinder on the front drivers side of the condeser:

Now you can push the clips back onto the radiator lip for the HomeLink wiring which will also help keep this mesh in place:

Since the intercooling radiator sticks out farther to the front of the car than the condenser, the mesh will not lay flat against everything - this is desirable. The purpose is for the mesh not to sit flush against everything, so that it can catch and stop debris before contact is made with the radiators in the first place.
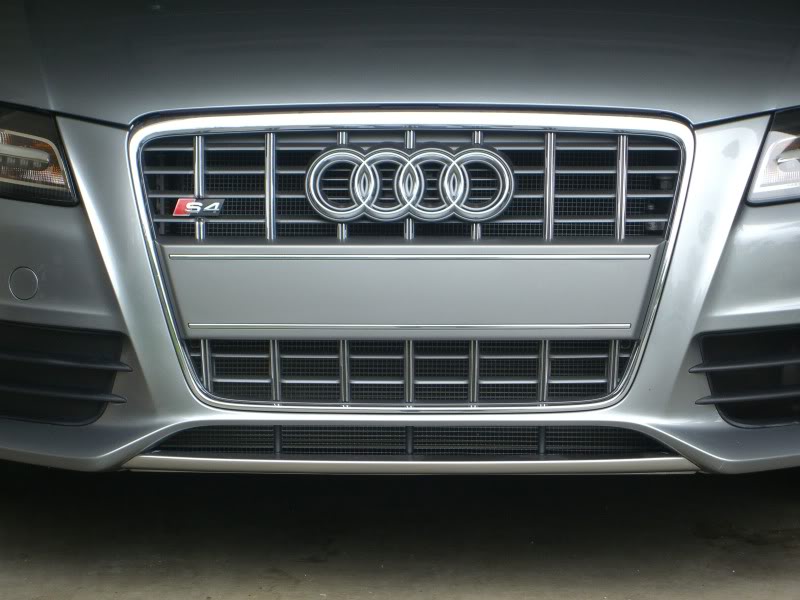
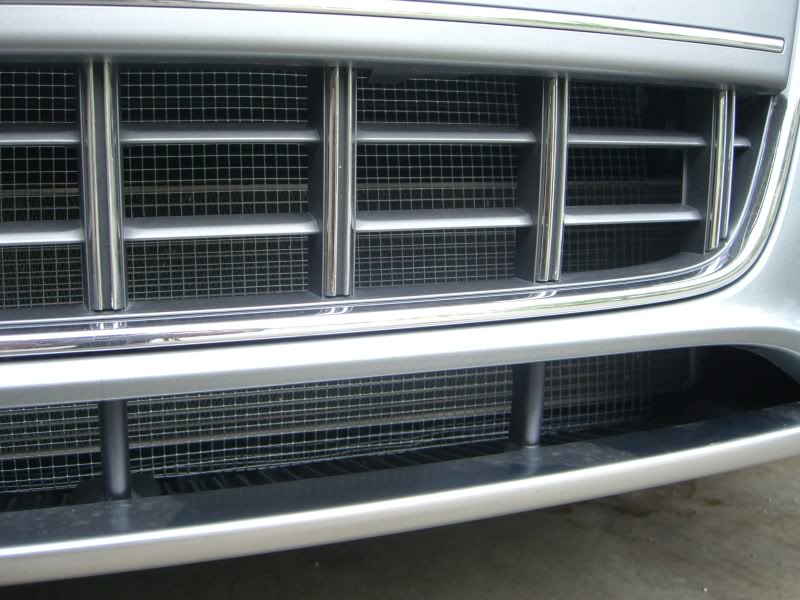
Now replace the parts removed in the reverse order from the first few steps, and you are done. Here are some after shots, one from 5 feet away, the other showing the lower part of the grill up close where the intercooling radiator is now better protected.
The B8 S4 has a supercharger, which uses internal intercoolers (radiators) built into the unit, which sits as a single piece on top of the center of the engine, nestled in the "V" of the V6 engine. This system compresses and cools the compressed air in order to make more engine power. To cool the compressed (or charged) air, an air to liquid system is used much like the engine's radiator system. Cool liquid passes through the intercoolers as the charge air is pushed between the blades of these little radiators, taking the heat from the charged air and pulling it into the liquid. Once heated by this air, a pump pushes the liquid in a closed loop through tubing to the intercooling radiator - a small aluminum radiator which sits in the lower half of the area behind the grill on the front of the car. As the car moves, fresh cool air is forced over and through this radiator, and the heat pulled from the charged air now stored in the liquid, is released to the atmosphere, cooling the liquid so it can be recycled back through to the intercoolers and used over and over again.
Two people now on the vairious boards have thought they lost their water pump, but in fact have had holes punched in their intercooling radiators by errant road debris which strikes the radiator at highway speeds and perforates it. Since the engine and supercharger cooling systems share the same overflow container, but are seperate loops, it's only a matter of time before both systems have lost all coolant liquid, due to the one way valve system, the heating and cooling of the coolant and the shared overflow tank. This is not covered by Audi Warranty, and is considered wear and tear. It also removes the car from service until it parts are obtained and it can be repaired, not to mention the cost and frustration.
This is not a foolproof fix, but it does offer a much better chance of catching and stopping any debris large enough to damage the radiator from hitting it. APR uses something similar on their B8 S4 race car, since it is tracked and a lot fo debris can and is kicked up when cars cut a corner and hit the dirt during racing. This DIY will allow you to offer more protection for your car without it being very noticable, like the APR setup seen here:

Tools needed:
- Torx T30 bit
- Torx T25 bit
- Screwdriver for insertion of Torx bits
- Small flathead screwdriver
- Wire cutters/Dikes/Tin snips
- Heavy gloves
- 34" x 24" hardware cloth
Removal of parts to access front area
You will need the T30 bit to remove the 4 screws shown below.

Once these are removed, you can set them aside somewhere safe for reinstall later. To remove the plastic radiator cover, you will lift it from the engine side an inch or so, then gently slide it back towards the engine to pull the tabs that mesh with the car's grill.

Once free of the tabs that mesh with the grill, you can safely lift this up and out of the engine bay, also setting it aside.
Removal of intake scoop
You now need to swap to the T25 bit to remove the 2 screws holding the intake scoop in place.

You will notice that the scoop has a very fine mesh over the opening to the air intake area. This is an excellent time to clean it, as it picsk up bugs, pollen, and all assorted particles before the air hits your air cleaner in the stock air filter box. The mesh is pretty soft, so it's best to blow it out and gently use a finger to loosen any debris trapped in it. Here you can see the side cleaned on the left, versus what it looked like when I took it out on the right.

Once removed, set the air scoop and it's screws aside with the other parts already removed.
Familiarity with the setup and system
Looking down on the top of the front area once the cover and scoop are removed, looks like this -

The RED box is the aluminum engine radiator, which cannot be seen through the grill from the front of the car. This is because it is obscured by the black air conditioner condenser, seen outlined in BLUE, which you can see above the filler plate/front license holder through the grill from outside the car. The intercooling radiator is aluminum, like the engine radiator, and it only a little less than half the height of the engine radiator and A/C condenser, in this picture, it's outlined in GREEN. Also notable in this shot, is the electical feed coming from the engine bay, spanning the gap over the coolers to connect to the HomeLink garage door opening system, which is located behind the 4 interlocking rings of the Audi logo on the front grill.
Here is a shot of the front of the car before anything has been installed, so let you see the silver colored aluminum intercooling radiator (again boxed in GREEN) in the lower portion of the grill, and the top is black due to the condenser being open to view, since the intercooling radiator is only a few inches high. You can also see the area below the grill proper and above the front splitter which offers a VERY large area with nothing to stop large debris from entering the front of the car and damaging the radiator.

Next, you will need to unlock the 2 clips holding the HomeLink wire to the top of the radiator. These have little teeth which grip the radiator lip when pushed down onto it, so in order to remove these, you need a small flathead screwdriver to work between the teeth and radiator lip, in order to coax them off.

Once off you now have a clear shot straight down to the top side of the front splitter which is just under the intercooling radiator:

For this project, I went to the local hardware store and bought a roll of 24" wide and 5' long hardware cloth. I wanted something with as small a holes are possible in order to stop as much debris as possible. I chose .25" mesh, which came in 23 guage wire.

Using dikes to cut this into a 34" long piece, and wearing heavy suede work gloves to handle the wire is highly recommended. The wire is VERY sharp and you WILL cut yourself if you are not very careful. Rolling this new piece opposite the way it is pacakged, will eventually yield a nice flat 24 x 32 piece to work with for this project. Once flattened, you will take one of the short 24" sides and fold it at a 90 degree angle about 1.5 inches from the edge.

This angled piece will slide under the front of the intercooling radiator, and look like so:

You can see the 90 degree bent piece sliding under the intercooling radiator above. Next take the couple of inches of cloth at the top, and gently bend and fold it into the space between the condenser and engine radiator. Be careful not to catch the delicate radiator fins on the mesh as you feed it between the condenser and radiator. Once you get the slack out of the mesh in front of the condenser and intercooling radiator, you can press harder on the part at the top of the condenser to crimp it in place with a bend in the mesh - take care that the mesh it tucked behind the small cylinder on the front drivers side of the condeser:

Now you can push the clips back onto the radiator lip for the HomeLink wiring which will also help keep this mesh in place:

Since the intercooling radiator sticks out farther to the front of the car than the condenser, the mesh will not lay flat against everything - this is desirable. The purpose is for the mesh not to sit flush against everything, so that it can catch and stop debris before contact is made with the radiators in the first place.
Now replace the parts removed in the reverse order from the first few steps, and you are done. Here are some after shots, one from 5 feet away, the other showing the lower part of the grill up close where the intercooling radiator is now better protected.


Last edited by NWS4Guy; 06-06-2010 at 12:00 PM.
The following users liked this post:
Irvin Fitzgerald (07-15-2021)
#3
AudiWorld Super User
Very nice DIY instructions. This is excellent.
Do you think 0.25" mess is fine enough? How big do the heavy particles (rocks) need to be, to cause damage at 100MPH velocity?
Do you think 0.25" mess is fine enough? How big do the heavy particles (rocks) need to be, to cause damage at 100MPH velocity?
Last edited by m444; 06-06-2010 at 12:22 PM.
#5
AudiWorld Super User
Thread Starter
I got 5' which is 60" and used 34" - so there is 26" left, not enough to do another I don't think (or at least well).
This took about 10 minutes to do all said and done, and the material was less than $8.
This took about 10 minutes to do all said and done, and the material was less than $8.
#6
AudiWorld Super User
Thread Starter
Not sure, those who had damage said it was road debris according to their dealers, but none ever found any. .25" is a good tight mesh, but nothing is foolproof. For $8 and 10 minutes this will provide me with better than nothing, which is what you get from the large opening at the bottom of the grill just above the splitter. The issue is finding a good sweeet spot between mesh density and wire guage so that you don't interfere with much airflow for cooling and it's mostly invisible, yet does the job.
The following users liked this post:
Irvin Fitzgerald (07-15-2021)
#7
AudiWorld Super User
This looks like a good project for Mythbusters. Does 0.25" mesh adequately protect the 2010 S4 radiator and SC L/A heat exchanger?
http://dsc.discovery.com/tv/mythbusters/
http://dsc.discovery.com/tv/mythbusters/
Trending Topics
#8
AudiWorld Senior Member
Join Date: Sep 2006
Location: I-95
Posts: 1,011
Likes: 0
Received 0 Likes
on
0 Posts
Thanks for the clear instructions and excellent photos. Have you gone pretty fast in the car since the project? Did the mesh stay put? I was wondering if you thought that securing the mesh with more than just the two clips for the Homelink system would be a good idea or overkill.
#9
AudiWorld Super User
Thread Starter
I think the answer on the mesh size is use what you think is best and the answer on how big a particle has to be to damage the radiator at 100 mph is: about this big.
Thanks for the clear instructions and excellent photos. Have you gone pretty fast in the car since the project? Did the mesh stay put? I was wondering if you thought that securing the mesh with more than just the two clips for the Homelink system would be a good idea or overkill.
Thanks for the clear instructions and excellent photos. Have you gone pretty fast in the car since the project? Did the mesh stay put? I was wondering if you thought that securing the mesh with more than just the two clips for the Homelink system would be a good idea or overkill.
#10
AudiWorld Senior Member
Join Date: Mar 2010
Location: Queens, NY
Posts: 623
Likes: 0
Received 0 Likes
on
0 Posts
I have had big holes punched on the lower plastic bumper grill of my Mercedes so this would give me a peace of mind when I get my new S4. I am surprised there's no aftermarket piece yet for this.


