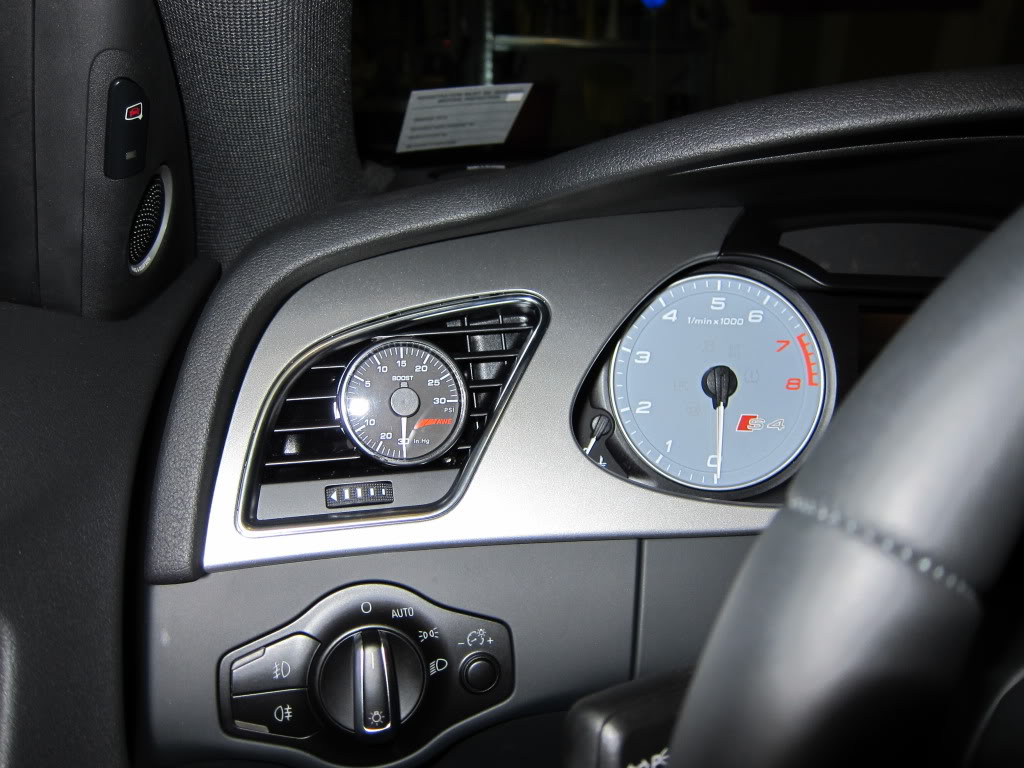
Just installed the AWE vent boost gauge!
 05-14-2010, 08:25 PM
#1
AudiWorld Super User
Thread Starter
Ok, so I drove out to AWE today and picked up the boost gauge. In the packaging along with all the required pieces(sad face), there was a nice window sticker and a lollipop. How thoughtful!
I read over the instructions before I picked up the unit just to acclimate myself to the procedure. I typically do this anytime instructions are available online since it just makes everything easier in the long run. Plus I had already installed one of AWE's vent gauges in my old B6 A4, how hard could it be?
So the instructions suggest it should take 1.5 hours to do this. I felt confident(cocky?) about the install so I put it out there I could do it in less than an hour....3 hours later I finished. Now, mind you I was taking pictures, feeding my cat, getting something to drink, getting frustrated, texting, looking for missing parts, looking for parts that didn't match my car as in the instructions, getting frustrated...
So yeah, it took a bit longer than I anticipated. That being said, now that I know what I need to know, I could probably do it in the suggested time frame. Definitely not as easy as it was on the B6 A4.
Moving on, one of the biggest frustrations I had was there was a missing piece of tubing in the package. Not only is this piece critical to the assembly but if you get to this point and realize something is missing, your car isn't in the position to be drivable to the nearest Pep Boys for this part. Luckily I had a spare piece of vacuum tubing left over from previous experiments and installs. That being said, I was still perturbed and looking for the missing piece and trying to figure out a solution probably took up about a half hour of my 3 hours. Also, a few of the instructions referring to pictures don't necessarily mention everything in good detail, so its a good thing I was taking pics along the way.
Anyway, if you're going to install this, I have a couple pics here that you might want to see;
This first pic is of the washer fluid box. The instructions don't really give you an indication on how far to pull this piece out of the sidewall. Also, i found to remove this piece if you pull the tab(which was held down by a nut) over the firewall foam(1), its easier to slide the tube out of the sidewall(2).
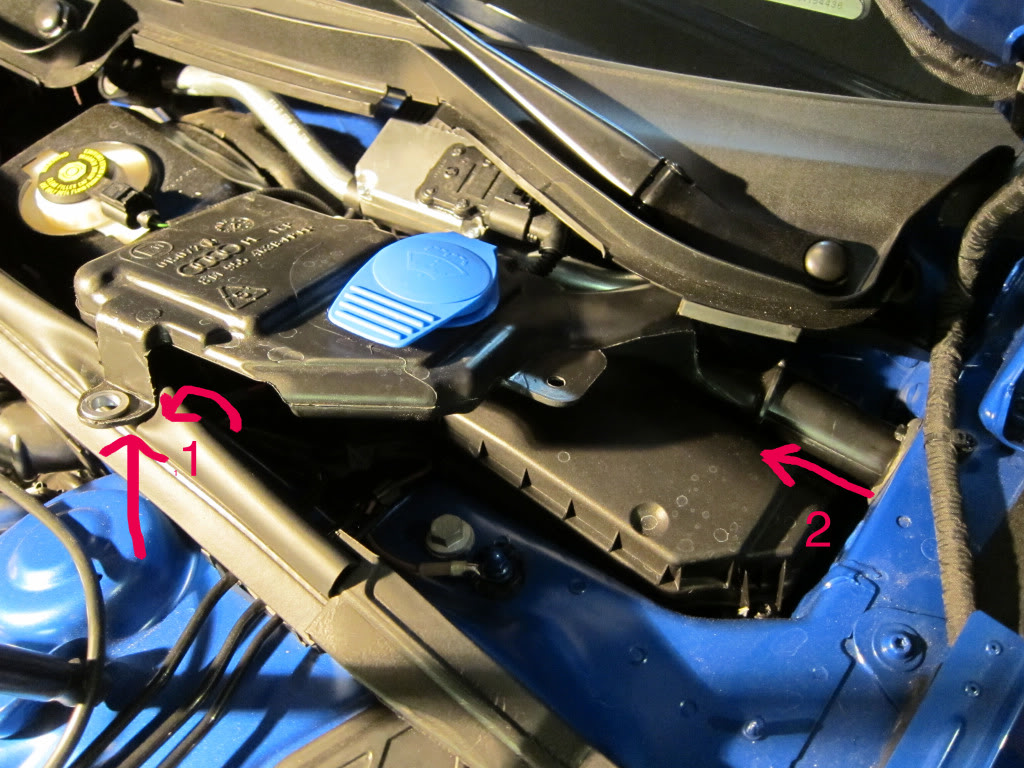
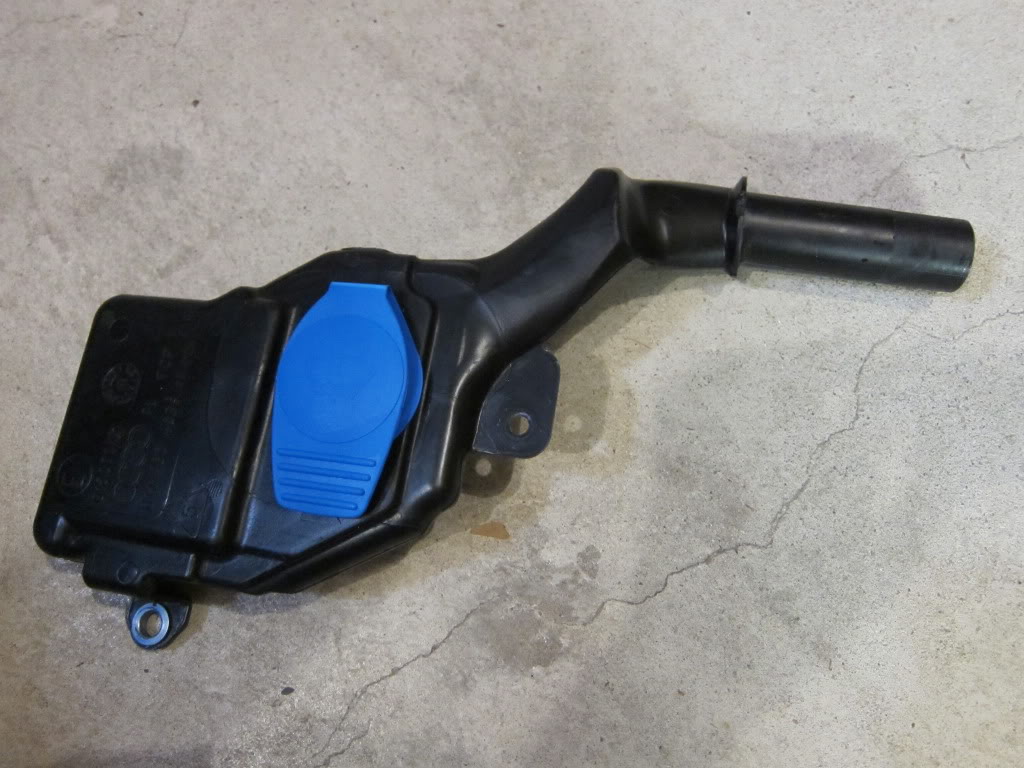
This is a picture of the washer box out of the car
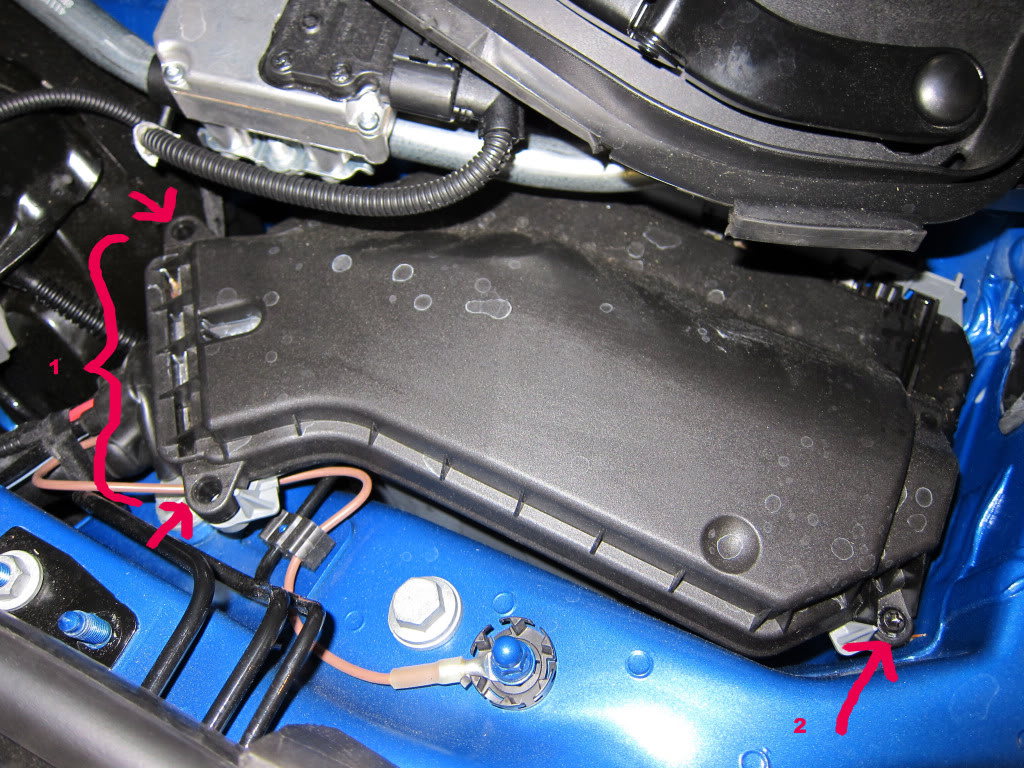
This next pic is of the ECU cover. In the instructions it says to remove the two screws as pictured in their photo(1). However, they dont mention theres another screw in the back of the box(2) which you need to remove also. This seems like common sense but if youre following the instructions to a "T" and only remove the 2 in their photo, you might miss the last one.
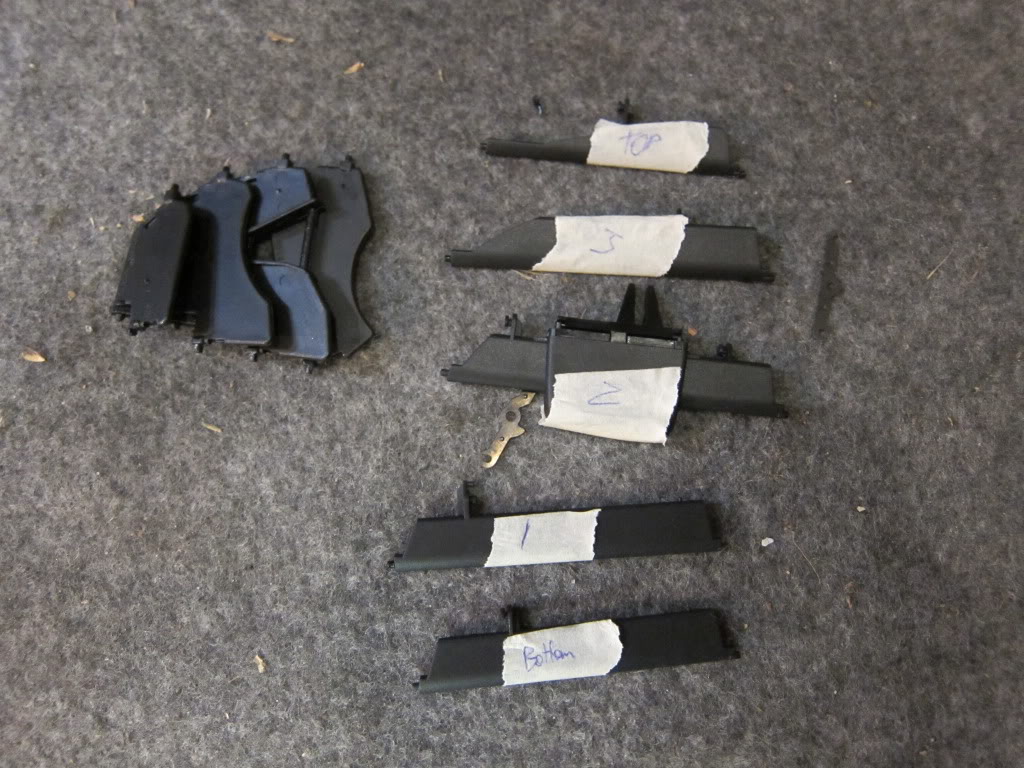
Also, since you'll be keeping most of the parts you remove from the car in some sort of container, marking the pieces if they ever have to go back in makes it easier. The vent slats for instance don't stay together when removed from the vent housing. I labeled them so I could figure out how they go back in later on.
One of the other things to realize is that they used pics of a car with the knee airbags. So there's some things in the pics under the dash that might not coincide with your car(as they didn't in mine and had me worried I was looking in the wrong parts).
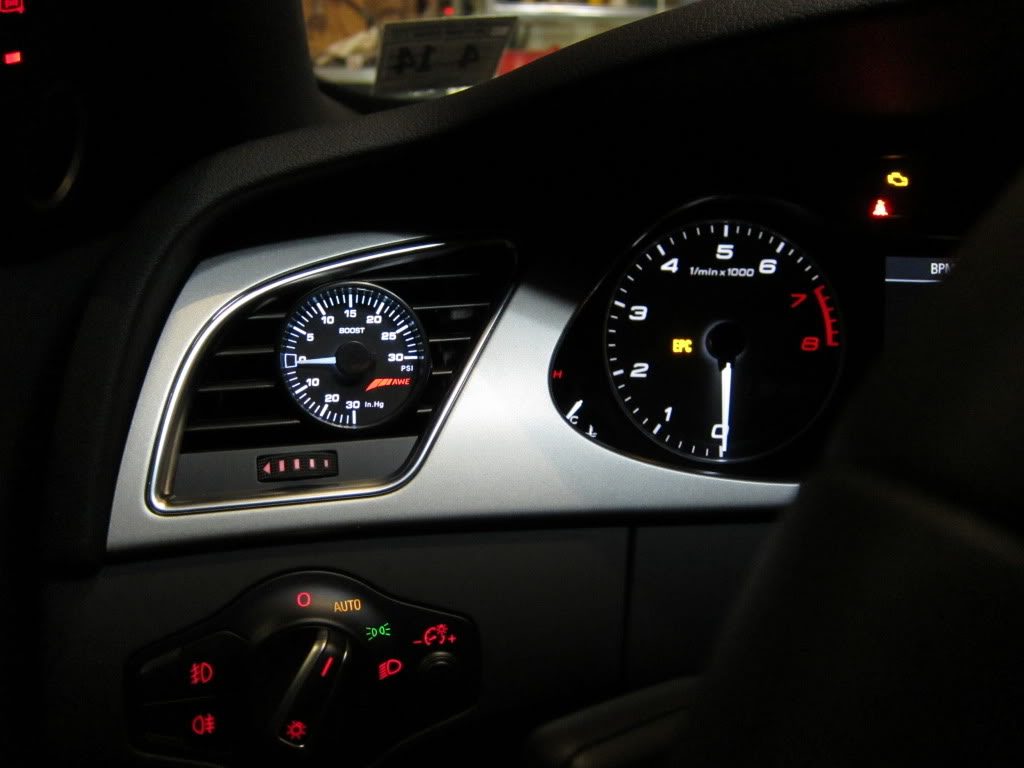
Overall, the construction of the unit is top-notch as to be expected. I've always been a fan of how innovative AWE is and how their products always seem to look as if they came from the factory. Unfortunately I didn't take a drive yet since we are in the middle of some crazy thunderstorm, but Ill have maybe another video of that later on.
In the meantime, I took a couple pics and videos of the gauge while starting the car in two scenarios; accessory and actually starting the car(sorry for the focus). Please enjoy and ask any questions or post any comments you'd like.
<object width="425" height="344"><param name="movie" value="http://www.youtube.com/v/cpZ7xGt6icQ&hl=en&fs=1"></param><param name="allowFullScreen" value="true"></param><param name="allowscriptaccess" value="always"></param><embed src="http://www.youtube.com/v/cpZ7xGt6icQ&hl=en&fs=1" type="application/x-shockwave-flash" allowscriptaccess="always" allowfullscreen="true" width="425" height="344"></embed></object>
<object width="425" height="344"><param name="movie" value="http://www.youtube.com/v/MH2OuEcfbyY&hl=en&fs=1"></param><param name="allowFullScreen" value="true"></param><param name="allowscriptaccess" value="always"></param><embed src="http://www.youtube.com/v/MH2OuEcfbyY&hl=en&fs=1" type="application/x-shockwave-flash" allowscriptaccess="always" allowfullscreen="true" width="425" height="344"></embed></object>
I read over the instructions before I picked up the unit just to acclimate myself to the procedure. I typically do this anytime instructions are available online since it just makes everything easier in the long run. Plus I had already installed one of AWE's vent gauges in my old B6 A4, how hard could it be?
So the instructions suggest it should take 1.5 hours to do this. I felt confident(cocky?) about the install so I put it out there I could do it in less than an hour....3 hours later I finished. Now, mind you I was taking pictures, feeding my cat, getting something to drink, getting frustrated, texting, looking for missing parts, looking for parts that didn't match my car as in the instructions, getting frustrated...
So yeah, it took a bit longer than I anticipated. That being said, now that I know what I need to know, I could probably do it in the suggested time frame. Definitely not as easy as it was on the B6 A4.
Moving on, one of the biggest frustrations I had was there was a missing piece of tubing in the package. Not only is this piece critical to the assembly but if you get to this point and realize something is missing, your car isn't in the position to be drivable to the nearest Pep Boys for this part. Luckily I had a spare piece of vacuum tubing left over from previous experiments and installs. That being said, I was still perturbed and looking for the missing piece and trying to figure out a solution probably took up about a half hour of my 3 hours. Also, a few of the instructions referring to pictures don't necessarily mention everything in good detail, so its a good thing I was taking pics along the way.
Anyway, if you're going to install this, I have a couple pics here that you might want to see;
This first pic is of the washer fluid box. The instructions don't really give you an indication on how far to pull this piece out of the sidewall. Also, i found to remove this piece if you pull the tab(which was held down by a nut) over the firewall foam(1), its easier to slide the tube out of the sidewall(2).
This is a picture of the washer box out of the car
This next pic is of the ECU cover. In the instructions it says to remove the two screws as pictured in their photo(1). However, they dont mention theres another screw in the back of the box(2) which you need to remove also. This seems like common sense but if youre following the instructions to a "T" and only remove the 2 in their photo, you might miss the last one.
Also, since you'll be keeping most of the parts you remove from the car in some sort of container, marking the pieces if they ever have to go back in makes it easier. The vent slats for instance don't stay together when removed from the vent housing. I labeled them so I could figure out how they go back in later on.
One of the other things to realize is that they used pics of a car with the knee airbags. So there's some things in the pics under the dash that might not coincide with your car(as they didn't in mine and had me worried I was looking in the wrong parts).
Overall, the construction of the unit is top-notch as to be expected. I've always been a fan of how innovative AWE is and how their products always seem to look as if they came from the factory. Unfortunately I didn't take a drive yet since we are in the middle of some crazy thunderstorm, but Ill have maybe another video of that later on.
In the meantime, I took a couple pics and videos of the gauge while starting the car in two scenarios; accessory and actually starting the car(sorry for the focus). Please enjoy and ask any questions or post any comments you'd like.
<object width="425" height="344"><param name="movie" value="http://www.youtube.com/v/cpZ7xGt6icQ&hl=en&fs=1"></param><param name="allowFullScreen" value="true"></param><param name="allowscriptaccess" value="always"></param><embed src="http://www.youtube.com/v/cpZ7xGt6icQ&hl=en&fs=1" type="application/x-shockwave-flash" allowscriptaccess="always" allowfullscreen="true" width="425" height="344"></embed></object>
<object width="425" height="344"><param name="movie" value="http://www.youtube.com/v/MH2OuEcfbyY&hl=en&fs=1"></param><param name="allowFullScreen" value="true"></param><param name="allowscriptaccess" value="always"></param><embed src="http://www.youtube.com/v/MH2OuEcfbyY&hl=en&fs=1" type="application/x-shockwave-flash" allowscriptaccess="always" allowfullscreen="true" width="425" height="344"></embed></object>
Last edited by HyperS4; 05-16-2010 at 07:03 PM.


 05-15-2010, 04:46 AM
#4
AudiWorld Senior Member
Join Date: Mar 2009
Location: Houston, TX
Posts: 750
Likes: 0
Received 0 Likes
on
0 Posts
Lookin good! Ya, AWE loves to throw lollipops in w/ their stuff; I think it's kinda funny. I have an A4 so your install notes wouldn't help me as much as the other folks here, but I always appreciate it when someone takes the time to document a DIY. Knowledge-sharing FTW!
05-15-2010, 09:44 AM
#5
AudiWorld Super User
After reading the instructions online myself (as I was and still am considering this mod) I understood that they sent you a length of hose way longer than needed, and you were to cut it in order to make the different size pieces you need. Is the one hose sent long enough to make all the hose you need, or was there no hose sent at all?
05-15-2010, 09:47 AM
#6
AudiWorld Super User
Thread Starter
After reading the instructions online myself (as I was and still am considering this mod) I understood that they sent you a length of hose way longer than needed, and you were to cut it in order to make the different size pieces you need. Is the one hose sent long enough to make all the hose you need, or was there no hose sent at all?
05-15-2010, 12:56 PM
#7
Audiworld Junior Member

Join Date: Feb 2010
Posts: 11
Likes: 0
Received 0 Likes
on
0 Posts
That looks incredibly good. I love gauges and extra information. Your second video sounded great. One techincal question about guage, did you have any concern about any parasitic loss to the boost pressure due to the guage? I would imagine it would be very minor, but there is an extra hose that is used fo this kit.
Now here's an interesting thought, is there anyway to to send engine data to the MMI console? I wonder if anyone has hacked it to display engine control data being processed within the ECU.
Now here's an interesting thought, is there anyway to to send engine data to the MMI console? I wonder if anyone has hacked it to display engine control data being processed within the ECU.
Trending Topics
05-15-2010, 01:29 PM
#8
AudiWorld Super User
Thread Starter
That looks incredibly good. I love gauges and extra information. Your second video sounded great. One techincal question about guage, did you have any concern about any parasitic loss to the boost pressure due to the guage? I would imagine it would be very minor, but there is an extra hose that is used fo this kit.
Now here's an interesting thought, is there anyway to to send engine data to the MMI console? I wonder if anyone has hacked it to display engine control data being processed within the ECU.
Now here's an interesting thought, is there anyway to to send engine data to the MMI console? I wonder if anyone has hacked it to display engine control data being processed within the ECU.
Since its electrical, I dont see how there cant be a way to send the signal to the MMI also. However, the display would need to be completely developed to show the readout.
05-15-2010, 01:46 PM
#10
AudiWorld Super User
Thread Starter