How To: Remove and repair Solar Sunroof Relay 385/Fix interior blower fan
 09-13-2013, 07:39 AM
#1
AudiWorld Newcomer
Thread Starter

My Wife's interior blower quit working on her '99 A6 yesterday. I checked it again this morning and it was working fine after about a 30 degree temperature drop. I started doing some research and on cars equipped with the solar sunroof I found out the relay can stop the blower fan from working. I looked around and found no how to so I dove in and started taking the interior apart. I was planning on running down to the local Pick A Part salvage yard to get a used relay or a blower fan depending on what the culprit was. I pulled the relay out, opened it up and found a cracked solder joint for the NC contact. I took some solder off and then re-soldered the joint. I'm assuming that my problem is fixed, if the motor cuts out again I'm going to get a new one.
Anyway, if you're like me and you do things the blue collar shade tree way with no Bentley manual here's how to fix the 385 relay.
Time Needed: 45-75 minutes depending on your skill level.
Tools needed:
Common Sense
Two Hands
5/16 Or metric equivalent nut driver
Small flat head screwdriver or knife tip
Soldering iron(even if you have to buy one it's still cheaper than a new relay.)
Rosin Core Solder(DO NOT USE PLUMBING SOLDER)
What you're going to do:
Remove the drivers side interior knee panel, remove the relay marked 385, remove the bottom cover on the relay, pull out the circuit board, inspect closely for fractured solder joint(s), repair and fractured joint(s), and reinstall everything.
Step One:
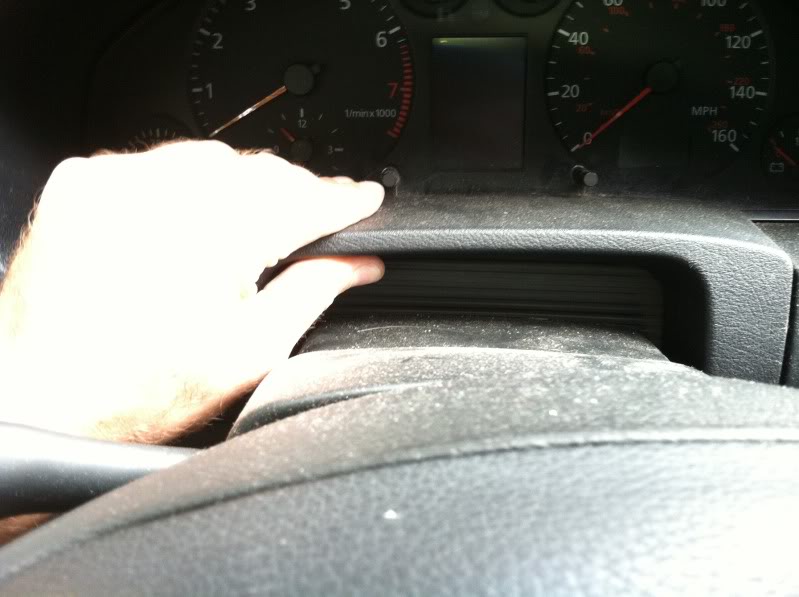
Remove the interior fuse panel cover and the trim above the steering wheel to access 3 bolts. Use the small screwdriver to pop the fuse panel cover off and you will see a bolt on the right side. pull the trim panel straight off and you will see two bolts, one on the right of the wheel, and one on the left.
Sorry, I forgot take a pic of the fuse panel.
Step Two:
Remove the five bolts that hold the knee panel on.
Two are on the lower middle portion of it, I'm pointing to them in the pics.
Now remove the bolt to the right of the fuse panel and these two by the steering wheel.
Step 3:
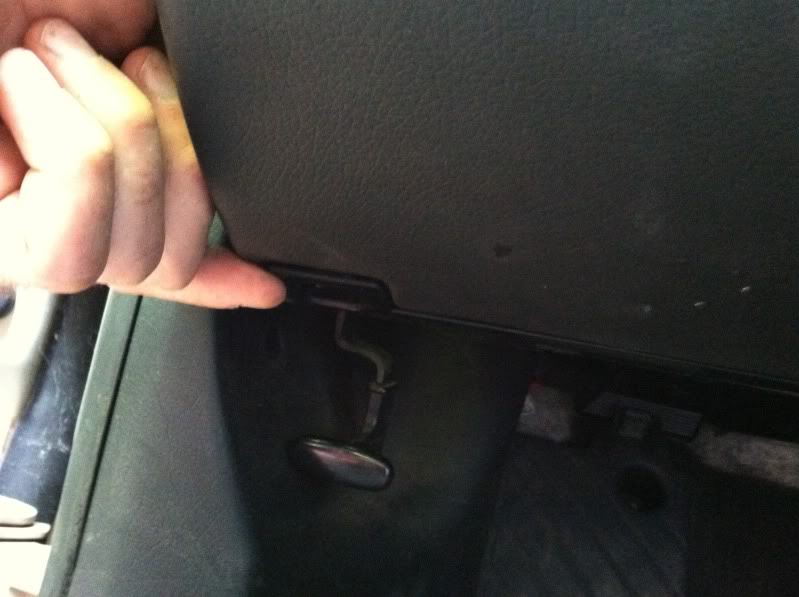
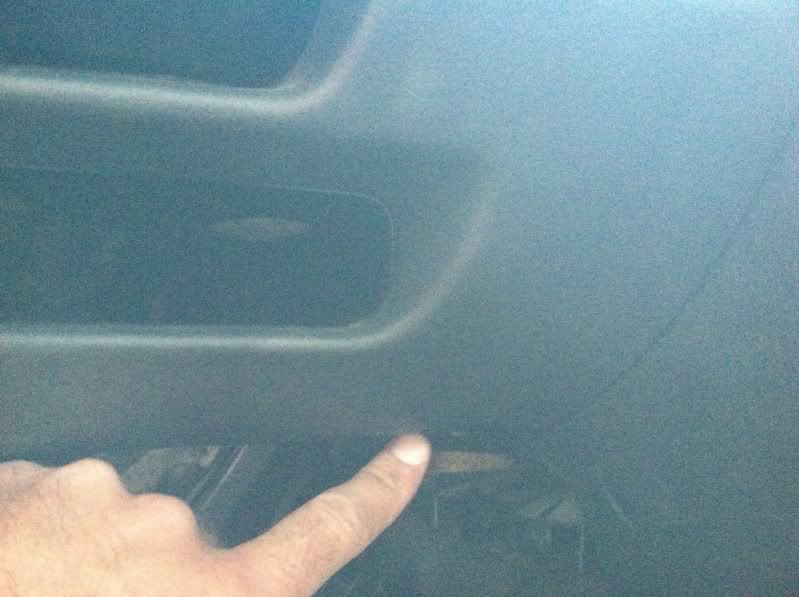
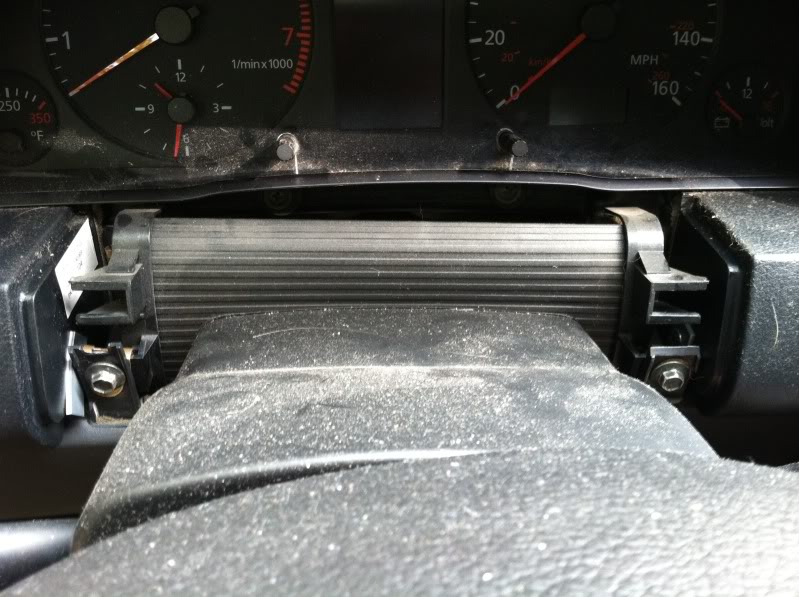
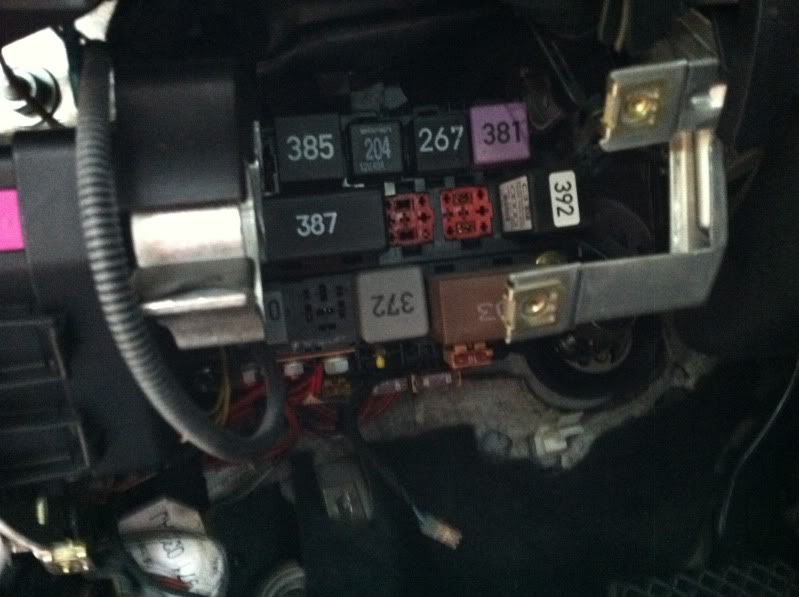
Drop the panel down and locate the relay, in the bank it is on the top left, pull it out.
Step 4:
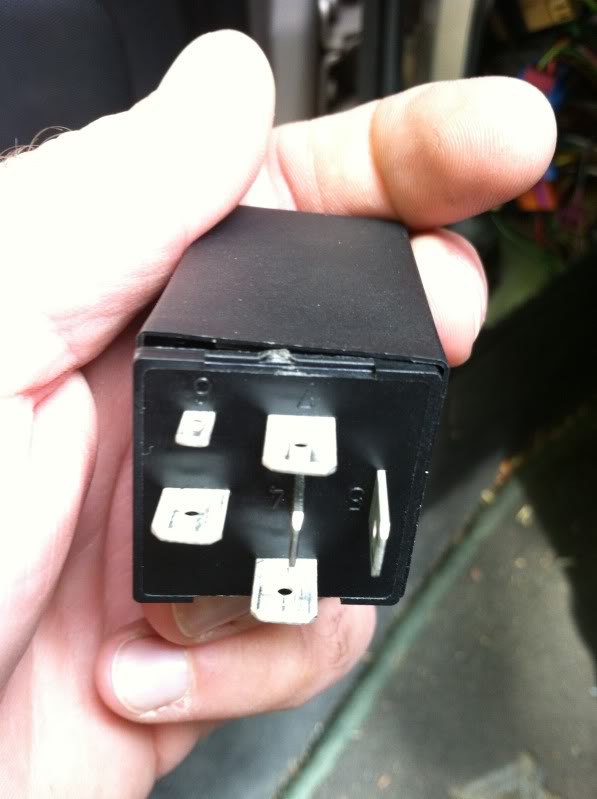
Pry off the bottom cover of the relay with your small flat head screwdriver or knife tip.
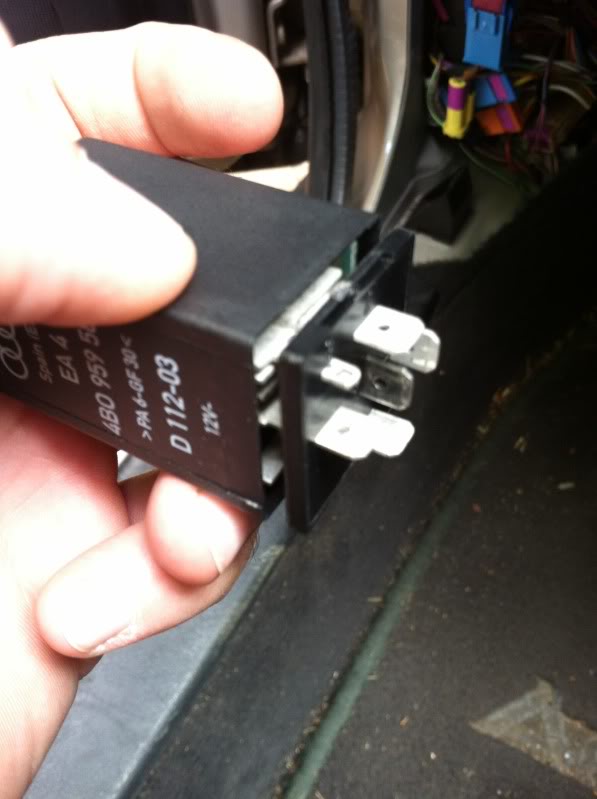
Pull the board out and look for fractures solder joint(s).
Mine is on the top right, sorry my pics are blurry. You can still make out the crack, it looks like a ring around the lead coming through.
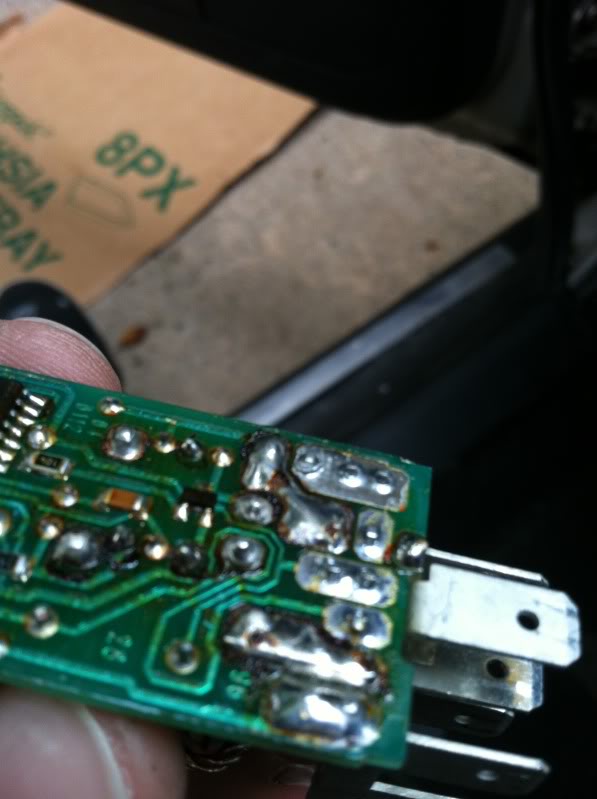
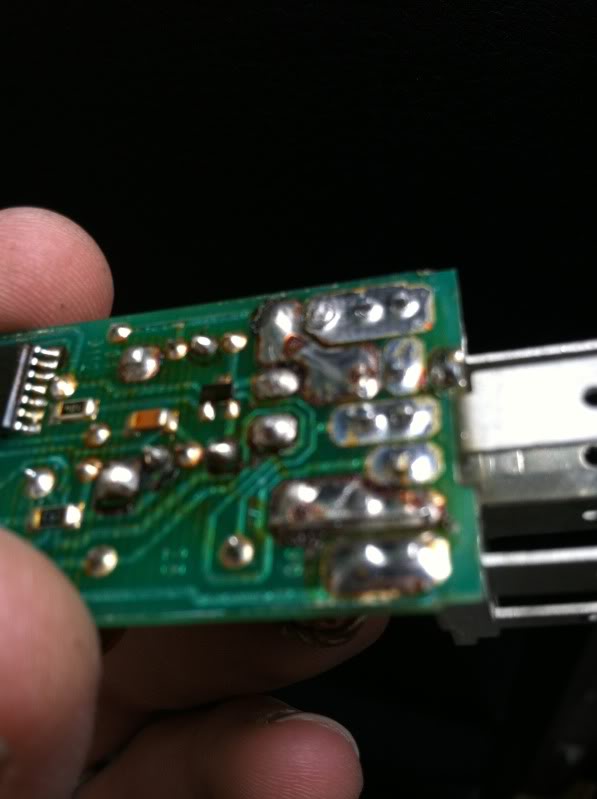
Repair the joint, scratch the older solder a little and then heat it up. Touch and remove heat to keep from burning the board, remove a little solder around the joint. Keep the area hot and flow new solder in. It should not leave the trace and should look like this.
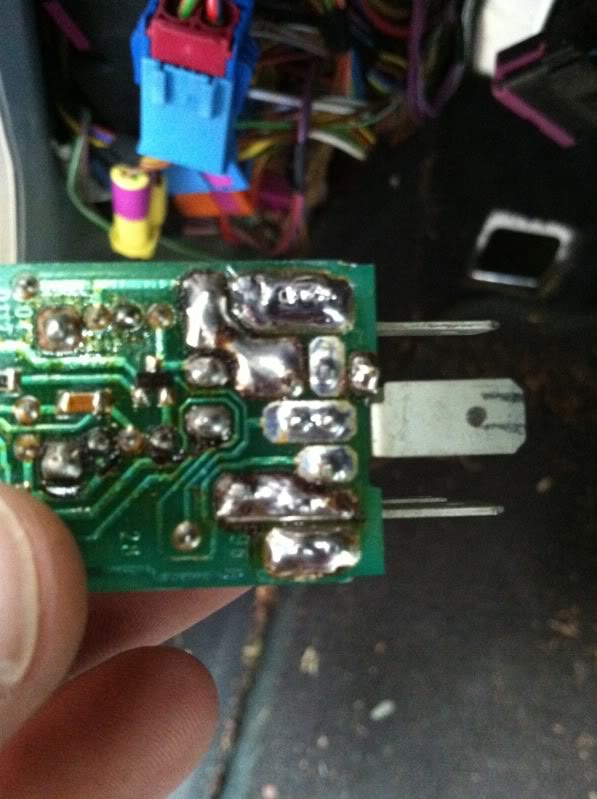
You should still have a tiny gap between the traces.
Step 5:
Reassemble the relay, put it back in the car and and test the operation of the blower fan. If it works, put everything back together, you're done. If it doesn't work, inspect your soldering work and make sure it's not a mess. If it is good, you probably have a bad fan.
Good luck.
Anyway, if you're like me and you do things the blue collar shade tree way with no Bentley manual here's how to fix the 385 relay.
Time Needed: 45-75 minutes depending on your skill level.
Tools needed:
Common Sense
Two Hands
5/16 Or metric equivalent nut driver
Small flat head screwdriver or knife tip
Soldering iron(even if you have to buy one it's still cheaper than a new relay.)
Rosin Core Solder(DO NOT USE PLUMBING SOLDER)
What you're going to do:
Remove the drivers side interior knee panel, remove the relay marked 385, remove the bottom cover on the relay, pull out the circuit board, inspect closely for fractured solder joint(s), repair and fractured joint(s), and reinstall everything.
Step One:
Remove the interior fuse panel cover and the trim above the steering wheel to access 3 bolts. Use the small screwdriver to pop the fuse panel cover off and you will see a bolt on the right side. pull the trim panel straight off and you will see two bolts, one on the right of the wheel, and one on the left.

Sorry, I forgot take a pic of the fuse panel.
Step Two:
Remove the five bolts that hold the knee panel on.
Two are on the lower middle portion of it, I'm pointing to them in the pics.


Now remove the bolt to the right of the fuse panel and these two by the steering wheel.

Step 3:
Drop the panel down and locate the relay, in the bank it is on the top left, pull it out.

Step 4:
Pry off the bottom cover of the relay with your small flat head screwdriver or knife tip.


Pull the board out and look for fractures solder joint(s).
Mine is on the top right, sorry my pics are blurry. You can still make out the crack, it looks like a ring around the lead coming through.


Repair the joint, scratch the older solder a little and then heat it up. Touch and remove heat to keep from burning the board, remove a little solder around the joint. Keep the area hot and flow new solder in. It should not leave the trace and should look like this.

You should still have a tiny gap between the traces.
Step 5:
Reassemble the relay, put it back in the car and and test the operation of the blower fan. If it works, put everything back together, you're done. If it doesn't work, inspect your soldering work and make sure it's not a mess. If it is good, you probably have a bad fan.
Good luck.

The following users liked this post:
KHedges (07-02-2023)
09-13-2013, 03:45 PM
#2
AudiWorld Member
Join Date: May 2009
Posts: 194
Likes: 0
Received 0 Likes
on
0 Posts
I will try to give this a shot this weekend on my wife's 2000 A6. I have never witnessed the solar panel roof do anything at all in the last year or so that we have mostly owned it (parents car initially). Sadly however, the season is almost over and we don't have any warm weather in the future :-( Do you know what the criteria is for the blower fan to turn on? Is there any way for me to test/troubleshoot the solar panel at all? I hate stuff not working!
09-26-2013, 05:26 PM
#3
AudiWorld Newcomer
Thread Starter
You might as well do your cruise control module as well. The CC on my A6 still kind of works, but not 100%.
10-15-2013, 09:38 AM
#4
AudiWorld Newcomer

Join Date: Oct 2013
Posts: 2
Likes: 0
Received 0 Likes
on
0 Posts
My Wife's interior blower quit working on her '99 A6 yesterday. I checked it again this morning and it was working fine after about a 30 degree temperature drop. I started doing some research and on cars equipped with the solar sunroof I found out the relay can stop the blower fan from working. I looked around and found no how to so I dove in and started taking the interior apart. I was planning on running down to the local Pick A Part salvage yard to get a used relay or a blower fan depending on what the culprit was. I pulled the relay out, opened it up and found a cracked solder joint for the NC contact. I took some solder off and then re-soldered the joint. I'm assuming that my problem is fixed, if the motor cuts out again I'm going to get a new one.
Anyway, if you're like me and you do things the blue collar shade tree way with no Bentley manual here's how to fix the 385 relay.
Time Needed: 45-75 minutes depending on your skill level.
Tools needed:
Common Sense
Two Hands
5/16 Or metric equivalent nut driver
Small flat head screwdriver or knife tip
Soldering iron(even if you have to buy one it's still cheaper than a new relay.)
Rosin Core Solder(DO NOT USE PLUMBING SOLDER)
What you're going to do:
Remove the drivers side interior knee panel, remove the relay marked 385, remove the bottom cover on the relay, pull out the circuit board, inspect closely for fractured solder joint(s), repair and fractured joint(s), and reinstall everything.
Step One:
Remove the interior fuse panel cover and the trim above the steering wheel to access 3 bolts. Use the small screwdriver to pop the fuse panel cover off and you will see a bolt on the right side. pull the trim panel straight off and you will see two bolts, one on the right of the wheel, and one on the left.

Sorry, I forgot take a pic of the fuse panel.
Step Two:
Remove the five bolts that hold the knee panel on.
Two are on the lower middle portion of it, I'm pointing to them in the pics.


Now remove the bolt to the right of the fuse panel and these two by the steering wheel.

Step 3:
Drop the panel down and locate the relay, in the bank it is on the top left, pull it out.

Step 4:
Pry off the bottom cover of the relay with your small flat head screwdriver or knife tip.


Pull the board out and look for fractures solder joint(s).
Mine is on the top right, sorry my pics are blurry. You can still make out the crack, it looks like a ring around the lead coming through.


Repair the joint, scratch the older solder a little and then heat it up. Touch and remove heat to keep from burning the board, remove a little solder around the joint. Keep the area hot and flow new solder in. It should not leave the trace and should look like this.

You should still have a tiny gap between the traces.
Step 5:
Reassemble the relay, put it back in the car and and test the operation of the blower fan. If it works, put everything back together, you're done. If it doesn't work, inspect your soldering work and make sure it's not a mess. If it is good, you probably have a bad fan.
Good luck.
Anyway, if you're like me and you do things the blue collar shade tree way with no Bentley manual here's how to fix the 385 relay.
Time Needed: 45-75 minutes depending on your skill level.
Tools needed:
Common Sense
Two Hands
5/16 Or metric equivalent nut driver
Small flat head screwdriver or knife tip
Soldering iron(even if you have to buy one it's still cheaper than a new relay.)
Rosin Core Solder(DO NOT USE PLUMBING SOLDER)
What you're going to do:
Remove the drivers side interior knee panel, remove the relay marked 385, remove the bottom cover on the relay, pull out the circuit board, inspect closely for fractured solder joint(s), repair and fractured joint(s), and reinstall everything.
Step One:
Remove the interior fuse panel cover and the trim above the steering wheel to access 3 bolts. Use the small screwdriver to pop the fuse panel cover off and you will see a bolt on the right side. pull the trim panel straight off and you will see two bolts, one on the right of the wheel, and one on the left.
Sorry, I forgot take a pic of the fuse panel.
Step Two:
Remove the five bolts that hold the knee panel on.
Two are on the lower middle portion of it, I'm pointing to them in the pics.
Now remove the bolt to the right of the fuse panel and these two by the steering wheel.
Step 3:
Drop the panel down and locate the relay, in the bank it is on the top left, pull it out.
Step 4:
Pry off the bottom cover of the relay with your small flat head screwdriver or knife tip.
Pull the board out and look for fractures solder joint(s).
Mine is on the top right, sorry my pics are blurry. You can still make out the crack, it looks like a ring around the lead coming through.
Repair the joint, scratch the older solder a little and then heat it up. Touch and remove heat to keep from burning the board, remove a little solder around the joint. Keep the area hot and flow new solder in. It should not leave the trace and should look like this.
You should still have a tiny gap between the traces.
Step 5:
Reassemble the relay, put it back in the car and and test the operation of the blower fan. If it works, put everything back together, you're done. If it doesn't work, inspect your soldering work and make sure it's not a mess. If it is good, you probably have a bad fan.
Good luck.
10-16-2013, 02:54 AM
#5
AudiWorld Newcomer
Join Date: Oct 2013
Posts: 2
Likes: 0
Received 0 Likes
on
0 Posts
Gald you shared each solar panels step in detail with pics.. I will surely make use of the information and share my own experience.
 07-21-2017, 07:06 PM
#7
AudiWorld Junior Member

Join Date: Jun 2017
Posts: 22
Likes: 0
Received 0 Likes
on
0 Posts
I did this but could not find any fault. I replace the relay with a new one and it did not fix my issue. Does anyone have a troubleshooting procedure for the solar panel powered fan circuit. Mine does not work. 2002 S6 Avant.
Trending Topics
07-22-2017, 10:13 AM
#9
AudiWorld Junior Member
Join Date: Jun 2017
Posts: 22
Likes: 0
Received 0 Likes
on
0 Posts
With all other funtions that use the blower it blows.
Is the solar function controlled by a temperature switch? Is there any other switch in the system besides the 385 relay?
The fuses listed in the manual pertaining to the solar panel also protect other circuits and these work so I am assuming the fuses are not open.
I may break down and order a service manual. I have a feeling it will come in handy.
 07-22-2017, 02:02 PM
#10
AudiWorld Senior Member

I don't have a service manual either. I believe that according to the owners manual, temperature has nothing to do with it. It will blow when there is adequate sunshine, however 1) only when the roof is closed completely. 2) when the rear is tilted up. 3) With key in the off position. If the recirculation mode was set, the system will automatically switch to fresh air intake. This is all the info in my original owner's manual. Whateveryou do don't break the solar glass panel. An after-market sourced replacement will cost you around $2500.